
3-810-253-14(1)
Digital Audio
Tape-corder
©1995 by Sony Corporation
Operating Instructions page 2EN
Mode d'emploi page 2F
TCD-D8
EN
F

Introduction
2
EN
Welcome!
Welcome to the world of the DAT tape-
corder!
Your DAT tape-corder has the following
features, they will be helpful for you to enjoy
it to the full.
· Superb DAT sound quality with excellent
frequency response, low noise, and lack of
distortion.
· Easy DAT operation with high speed fast-
forward/rewind and cue/review.
· Long-time recording in the LP mode using
four LR6 (size AA) alkaline batteries.
· Adjustable (automatic/manual)
recording level to suit every recording
condition.
· Rec mute function that makes a four-
second blank automatically.
· Date function that stamps date and time
during recording.
· LCD display that indicates the current
operating mode and the battery power
status, etc.
· Digital-to-digital recording compatibility
with CD/MD players or BS/CS tuner, etc.
· Three sampling frequencies (48/44.1/32
kHz) that support high quality digital
recording.
Notes on recording
· This tape-corder is not designed for
business or commercial use. Never attempt
to modify or tamper the tape-corder so that
it can be connected to other business or
commercial audio equipment. Do not use
this tape-corder for data storage.
· Check and make sure that the recording
operation is not malfunctioning prior to
recording important materials.
· In no event shall Sony be liable for any
direct, indirect, consequential or incidental
damages arising from the malfunction of
the recording operation of this tape-corder.
· Observe the relevant regulations on
copyright relating to your collection of
recordings. Unauthorized public
performance, broadcasting and duplication
of a recorded material for commercial
purposes are a violation of applicable laws.
IN NO EVENT SHALL SELLER BE
LIABLE FOR ANY DIRECT,
INCIDENTAL OR CONSEQUENTIAL
DAMAGES OF ANY NATURE, OR
LOSSES OR EXPENSES RESULTING
FROM ANY DEFECTIVE PRODUCT OR
THE USE OF ANY PRODUCT.
OWNER'S RECORD
The model and serial numbers are located on
the bottom of the unit.
Record the serial number in the space
provided below. Refer to them whenever you
call upon your Sony dealer regarding this
product.
Model No. TCD-D8
Serial No.
WARNING
To prevent fire or shock
hazard, do not expose the
unit to rain or moisture.
This equipment has been tested and found to
comply with the limits for a Class B digital
device, pursuant to Part 15 of the FCC Rules.
These limits are designed to provide
reasonable protection against harmful
interference in a residential installation. This
equipment generates, uses, and can radiate
radio frequency energy and, if not installed
and used in accordance with the instructions,
may cause harmful interference to radio
communications. However, there is no
guarantee that interference will not occur in a
particular installation. If this equipment does
cause harmful interference to radio or
television reception, which can be determined
by turning the equipment off and on, the user
is encouraged to try to correct the interference
by one or more of the following measures:
-- Reorient or relocate the receiving antenna.
-- Increase the separation between the
equipment and receiver.
-- Connect the equipment into an outlet on a
circuit different from that to which the
receiver is connected.
-- Consult the dealer or an experienced
radio/TV technician for help.
This device complies with Part 15 of the FCC
Rules. Operation is subject to the following
two conditions: (1) This device may not cause
harmful interference, and (2) this device must
accept any interference received, including
interference that may cause undesired
operation.
You are cautioned that any changes or
modifications not expressly approved in this
manual could void your authority to operate
this equipment.

Introduction
3
EN
EN
Table of contents
Inserting the Batteries ................................ 4
Setting the Clock ......................................... 5
Inserting the Cassette ................................. 6
Recording ..................................................... 8
Locating the point at which to
begin recording ................................. 8
Recording from a microphone ....... 9
Playing Back .............................................. 12
Recording
Connecting with Other Equipment
for Recording ............................... 15
Recording from analog audio
equipment ................................ 15
Recording from audio
equipment with digital
output ....................................... 15
Useful Recording Functions ...... 17
Adjusting the recording level
manually--Manual recording
................................................... 17
Recording in the Long Play
mode--LP REC ........................ 17
Recording blank segment--
REC MUTE ............................... 18
Monitoring the recording ...... 18
Writing Start ID ........................... 19
Writing Start ID during
recording .................................. 19
Writing Start ID during
playback ................................... 21
Erasing Start ID ....................... 21
Assigning Program Number ..... 22
Playback
Connecting with Other Equipment
for Playback ................................. 23
Playback with an analog audio
equipment ................................ 23
Playback with an audio
equipment with digital input .. 23
Useful Playback Functions ........ 24
Using AVLS function .............. 24
Power Sources
Replacing the batteries ............... 25
Low-power Consumption
Mode ............................................. 26
Operating with the AC Power
Adaptor or Car Battery .............. 27
Additional Information
Connecting with Other
Equipment .................................... 28
Serial Copy Management
System (SCMS) ............................ 29
Message Display ......................... 30
Troubleshooting .......................... 31
Precautions .................................. 33
Maintenance ................................ 34
Specifications ............................... 35
Location and Function of
Controls ........................................ 37
Display window ...................... 39
Using the display .................... 40
4
EN
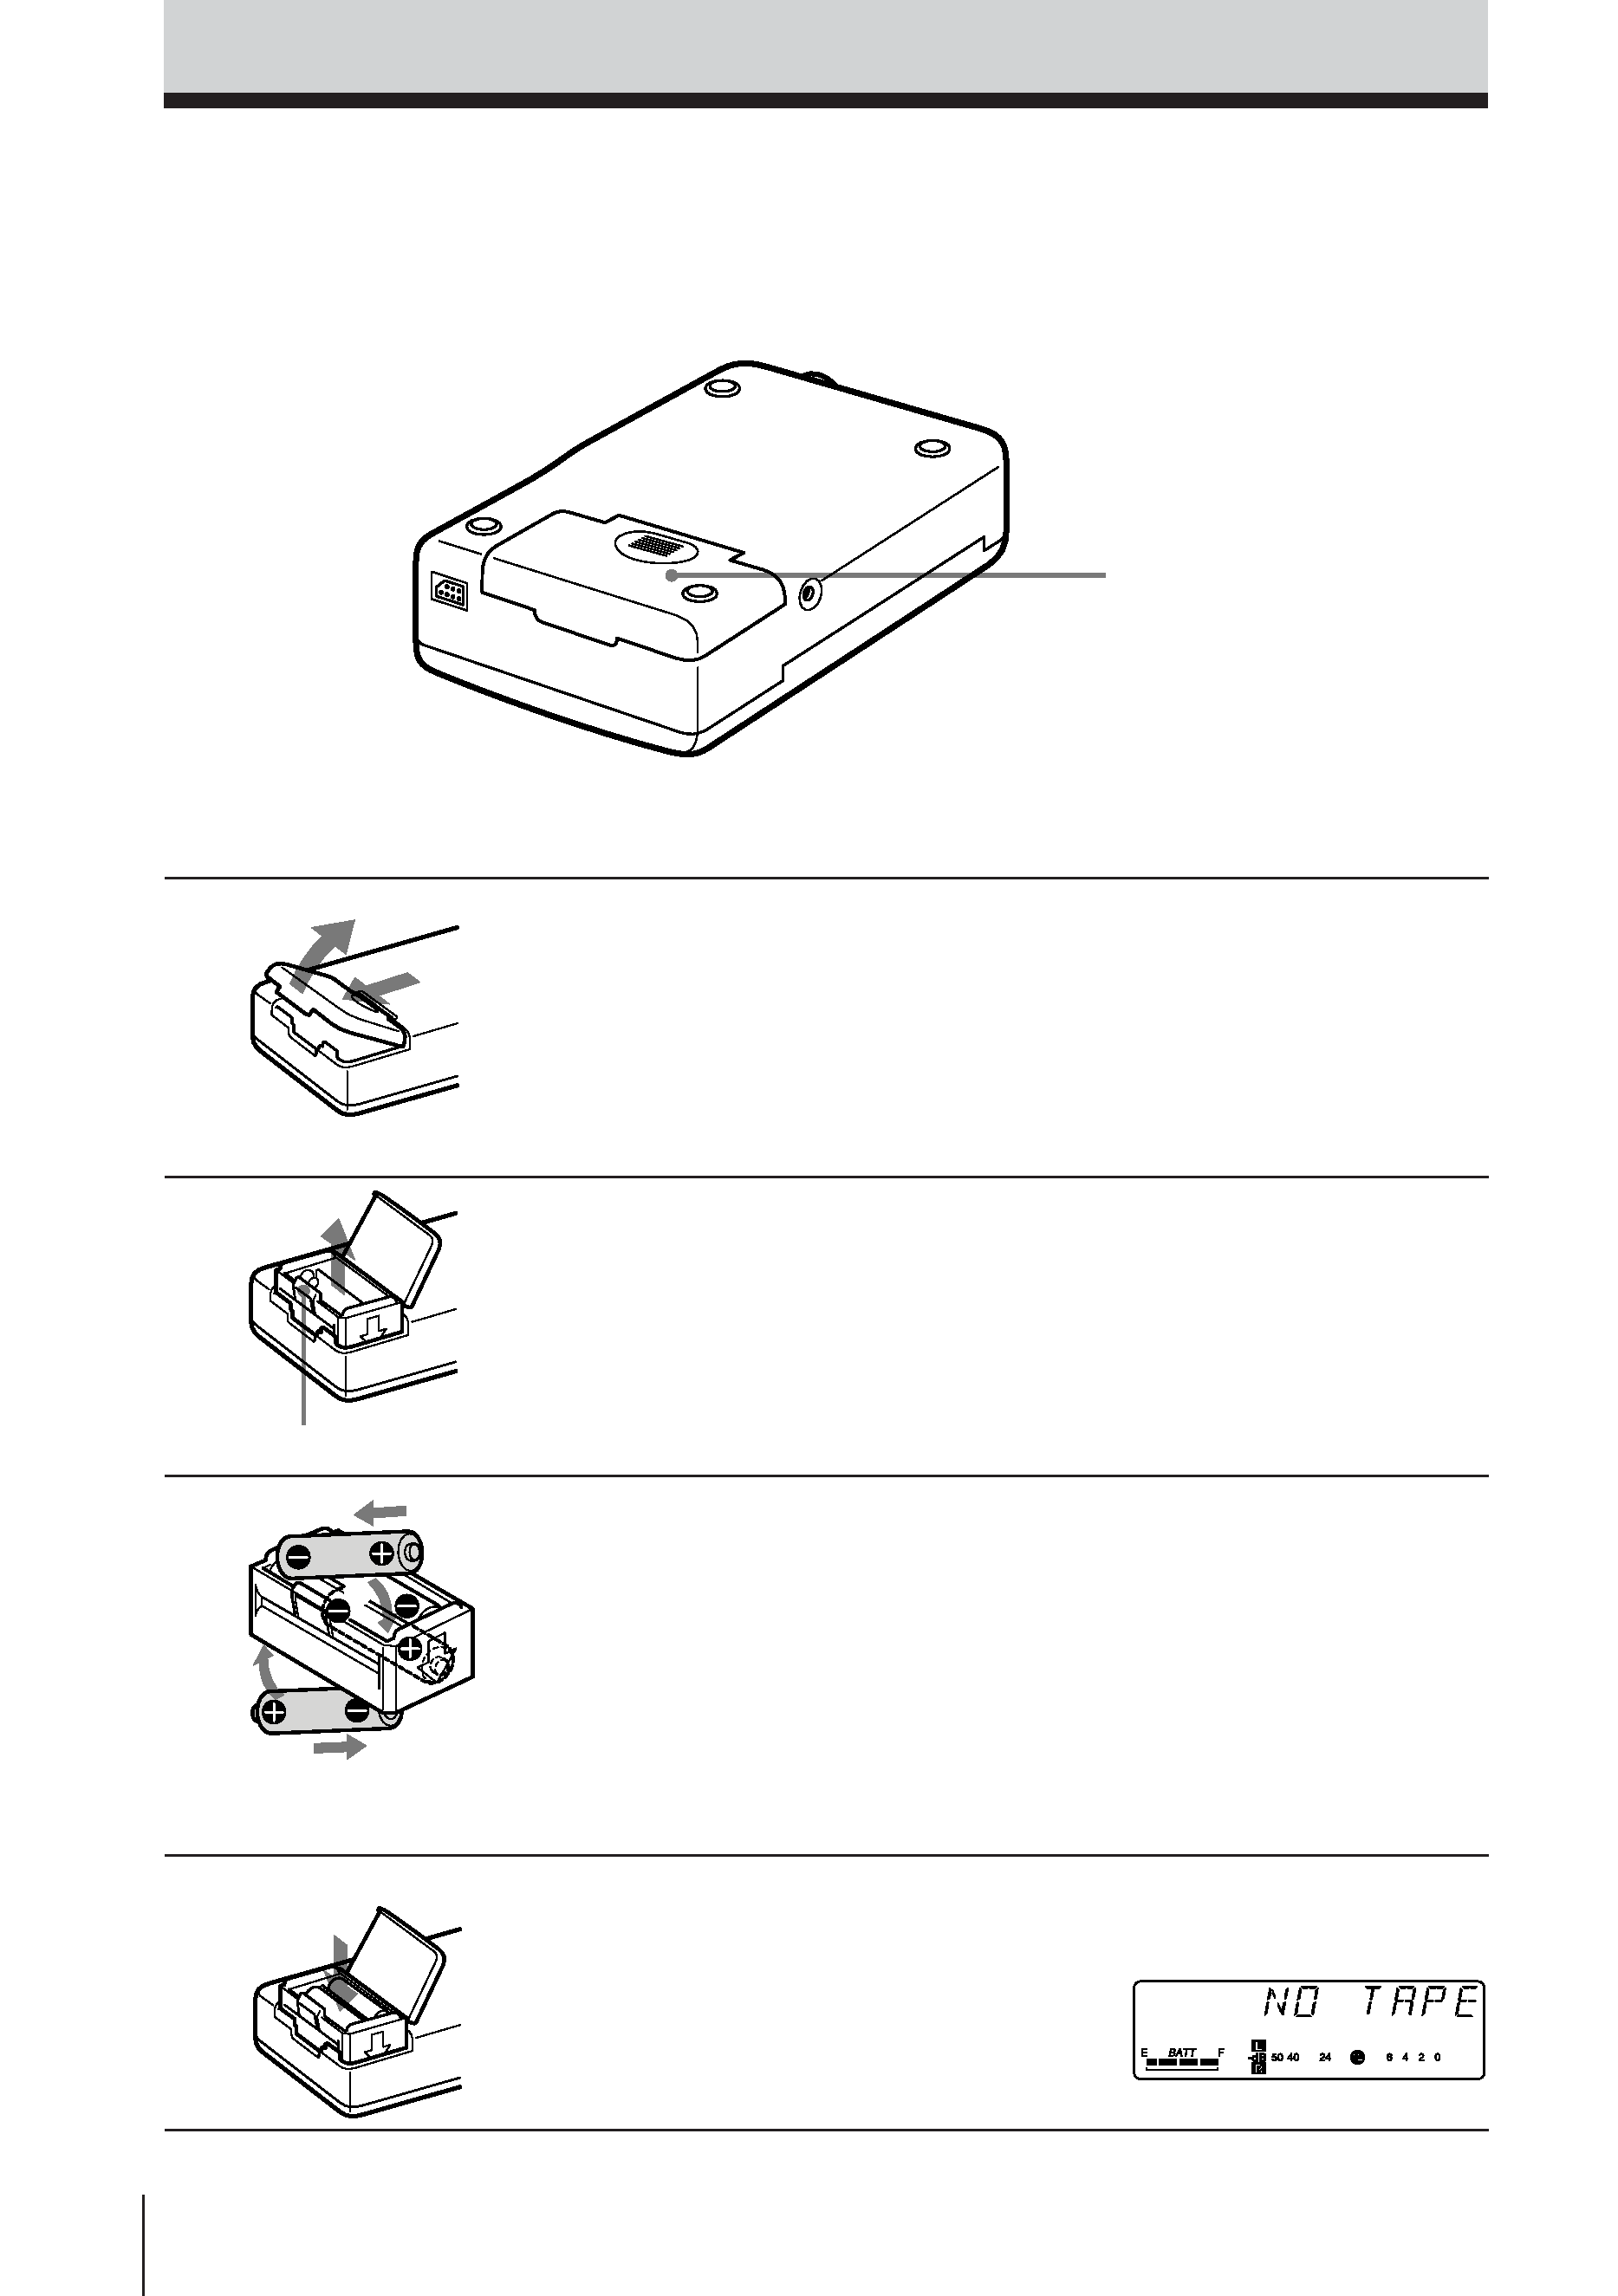
1
Open the battery compartment
lid.
2
Remove the battery holder.
3
Insert 4 new alkaline batteries
into the battery holder.
Make sure that the batteries are
facing the correct directions.
4
Insert the battery holder with the
alkaline batteries and close the
compartment lid.
The LCD display appears when
the batteries are inserted.
Inserting the Batteries
Use four size AA (LR6) alkaline batteries.
Inserting the Batteries
Battery compartment lid
1
2
1
2
1
2
Insert from the ' side
of the battery.
Lift the tab (¢ PULL).
5
EN
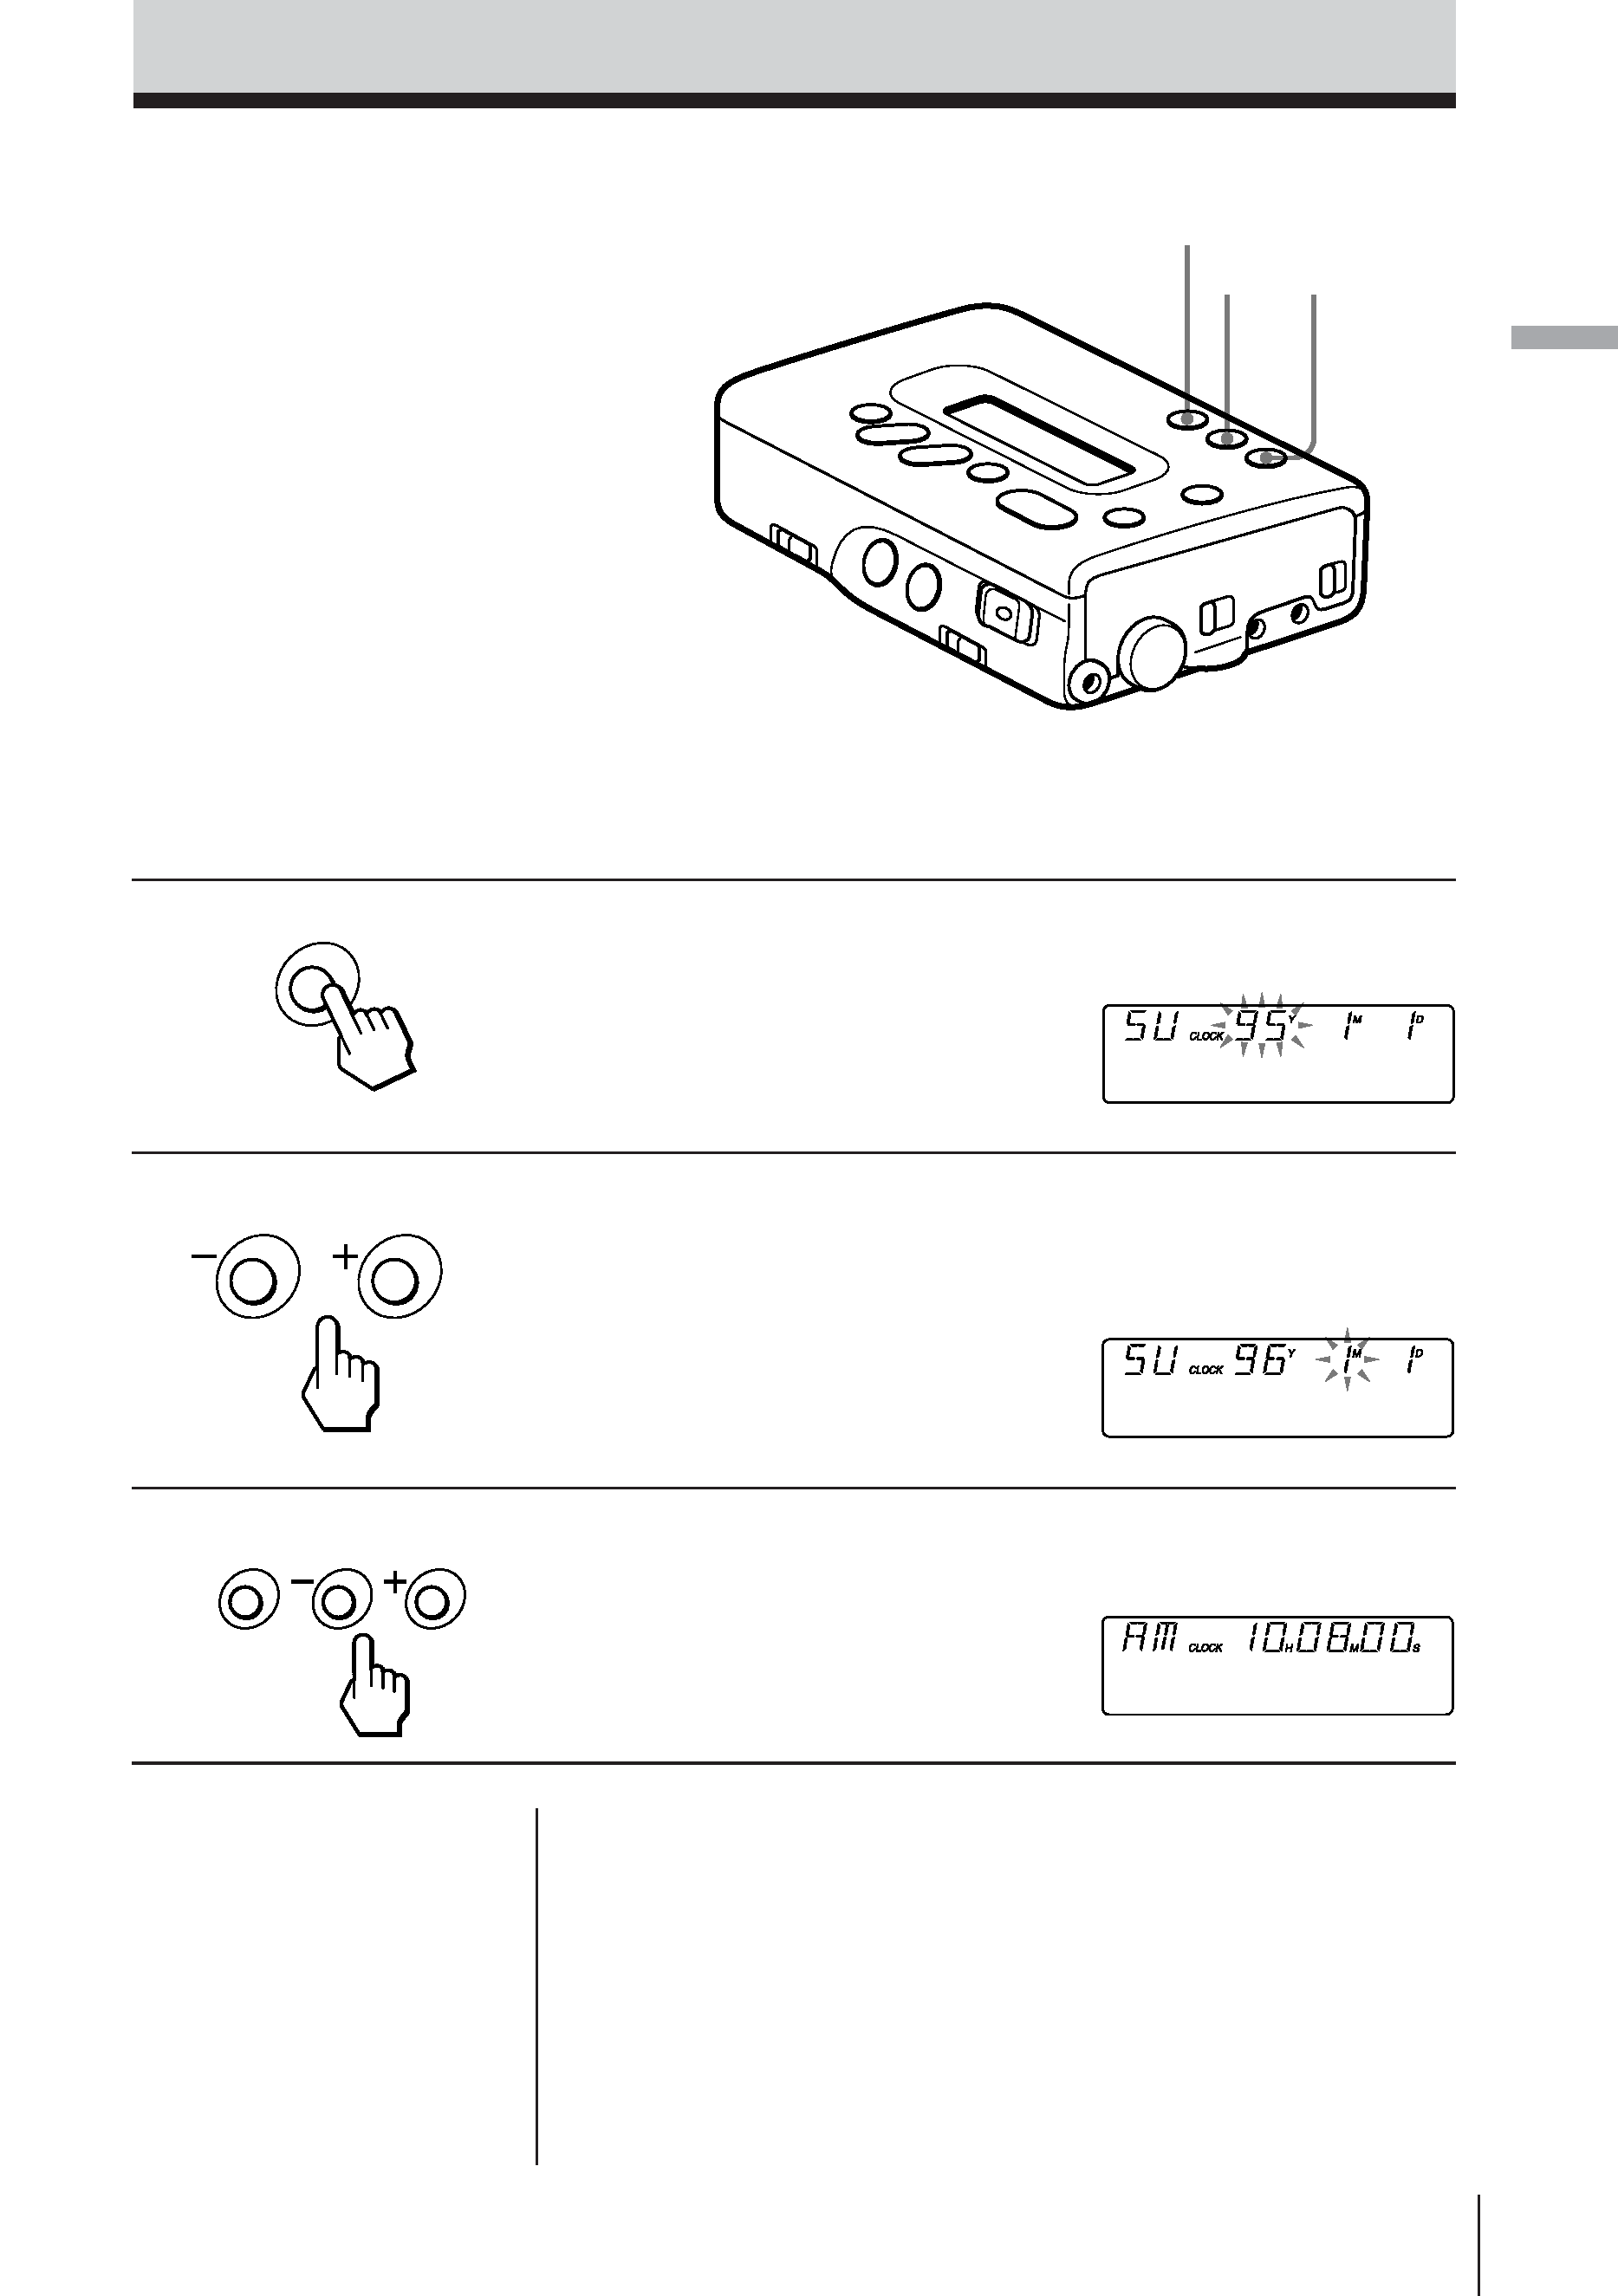
Setting the Clock
Set the clock before starting any
recording operations to stamp
the date and time. Otherwise,
you cannot get the correct date
and time.
The clock will return to its
default setting (SU/95Y1M1D/
AM12H00M00S) if the batteries
are removed from the unit for
one hour or more. In this case,
set the clock again.
Setting the Clock
Make sure that the tape-corder is in the stop mode when the cassette is inserted, and
that the Hold function is disabled.
1
Press the CLOCK/SET button for
more than four seconds.
2
Press + or button to set the
current year, then press the
CLOCK/SET button.
3
Repeat step 2 to set the current
month, date, day, hour, minute,
and second.
The display stops flashing and
the clock operates.
To select either the 12-hour or 24-hour clock
display
Press the + button for 2 seconds or more.
To quit the clock setting
Press the STOP p button. The clock display will
return to the previous clock setting. However, if the
day is set , the year, month, date and day will be set
and will not be applicable for further cancellation.
Tip
To set the clock accurately,
set the second to 00 with
the + or button, and then
press the CLOCK/SET
button at the time of the
tone.
Inserting
the
Batteries/Setting
the
Clock
CLOCK/SET
CLOCK
SET
SET
+
COUNTER
RESET