SERVICE MANUAL
MODEL
COMMANDER
DEST. CHASSIS NO.
MODEL
COMMANDER
DEST. CHASSIS NO.
SU-60DX
US
SU-60DX
Canadian
LCD PROJECTION TV STAND
SU-60DX
2
SU-60DX
SECTION 1
GENERAL
English
Notes on use
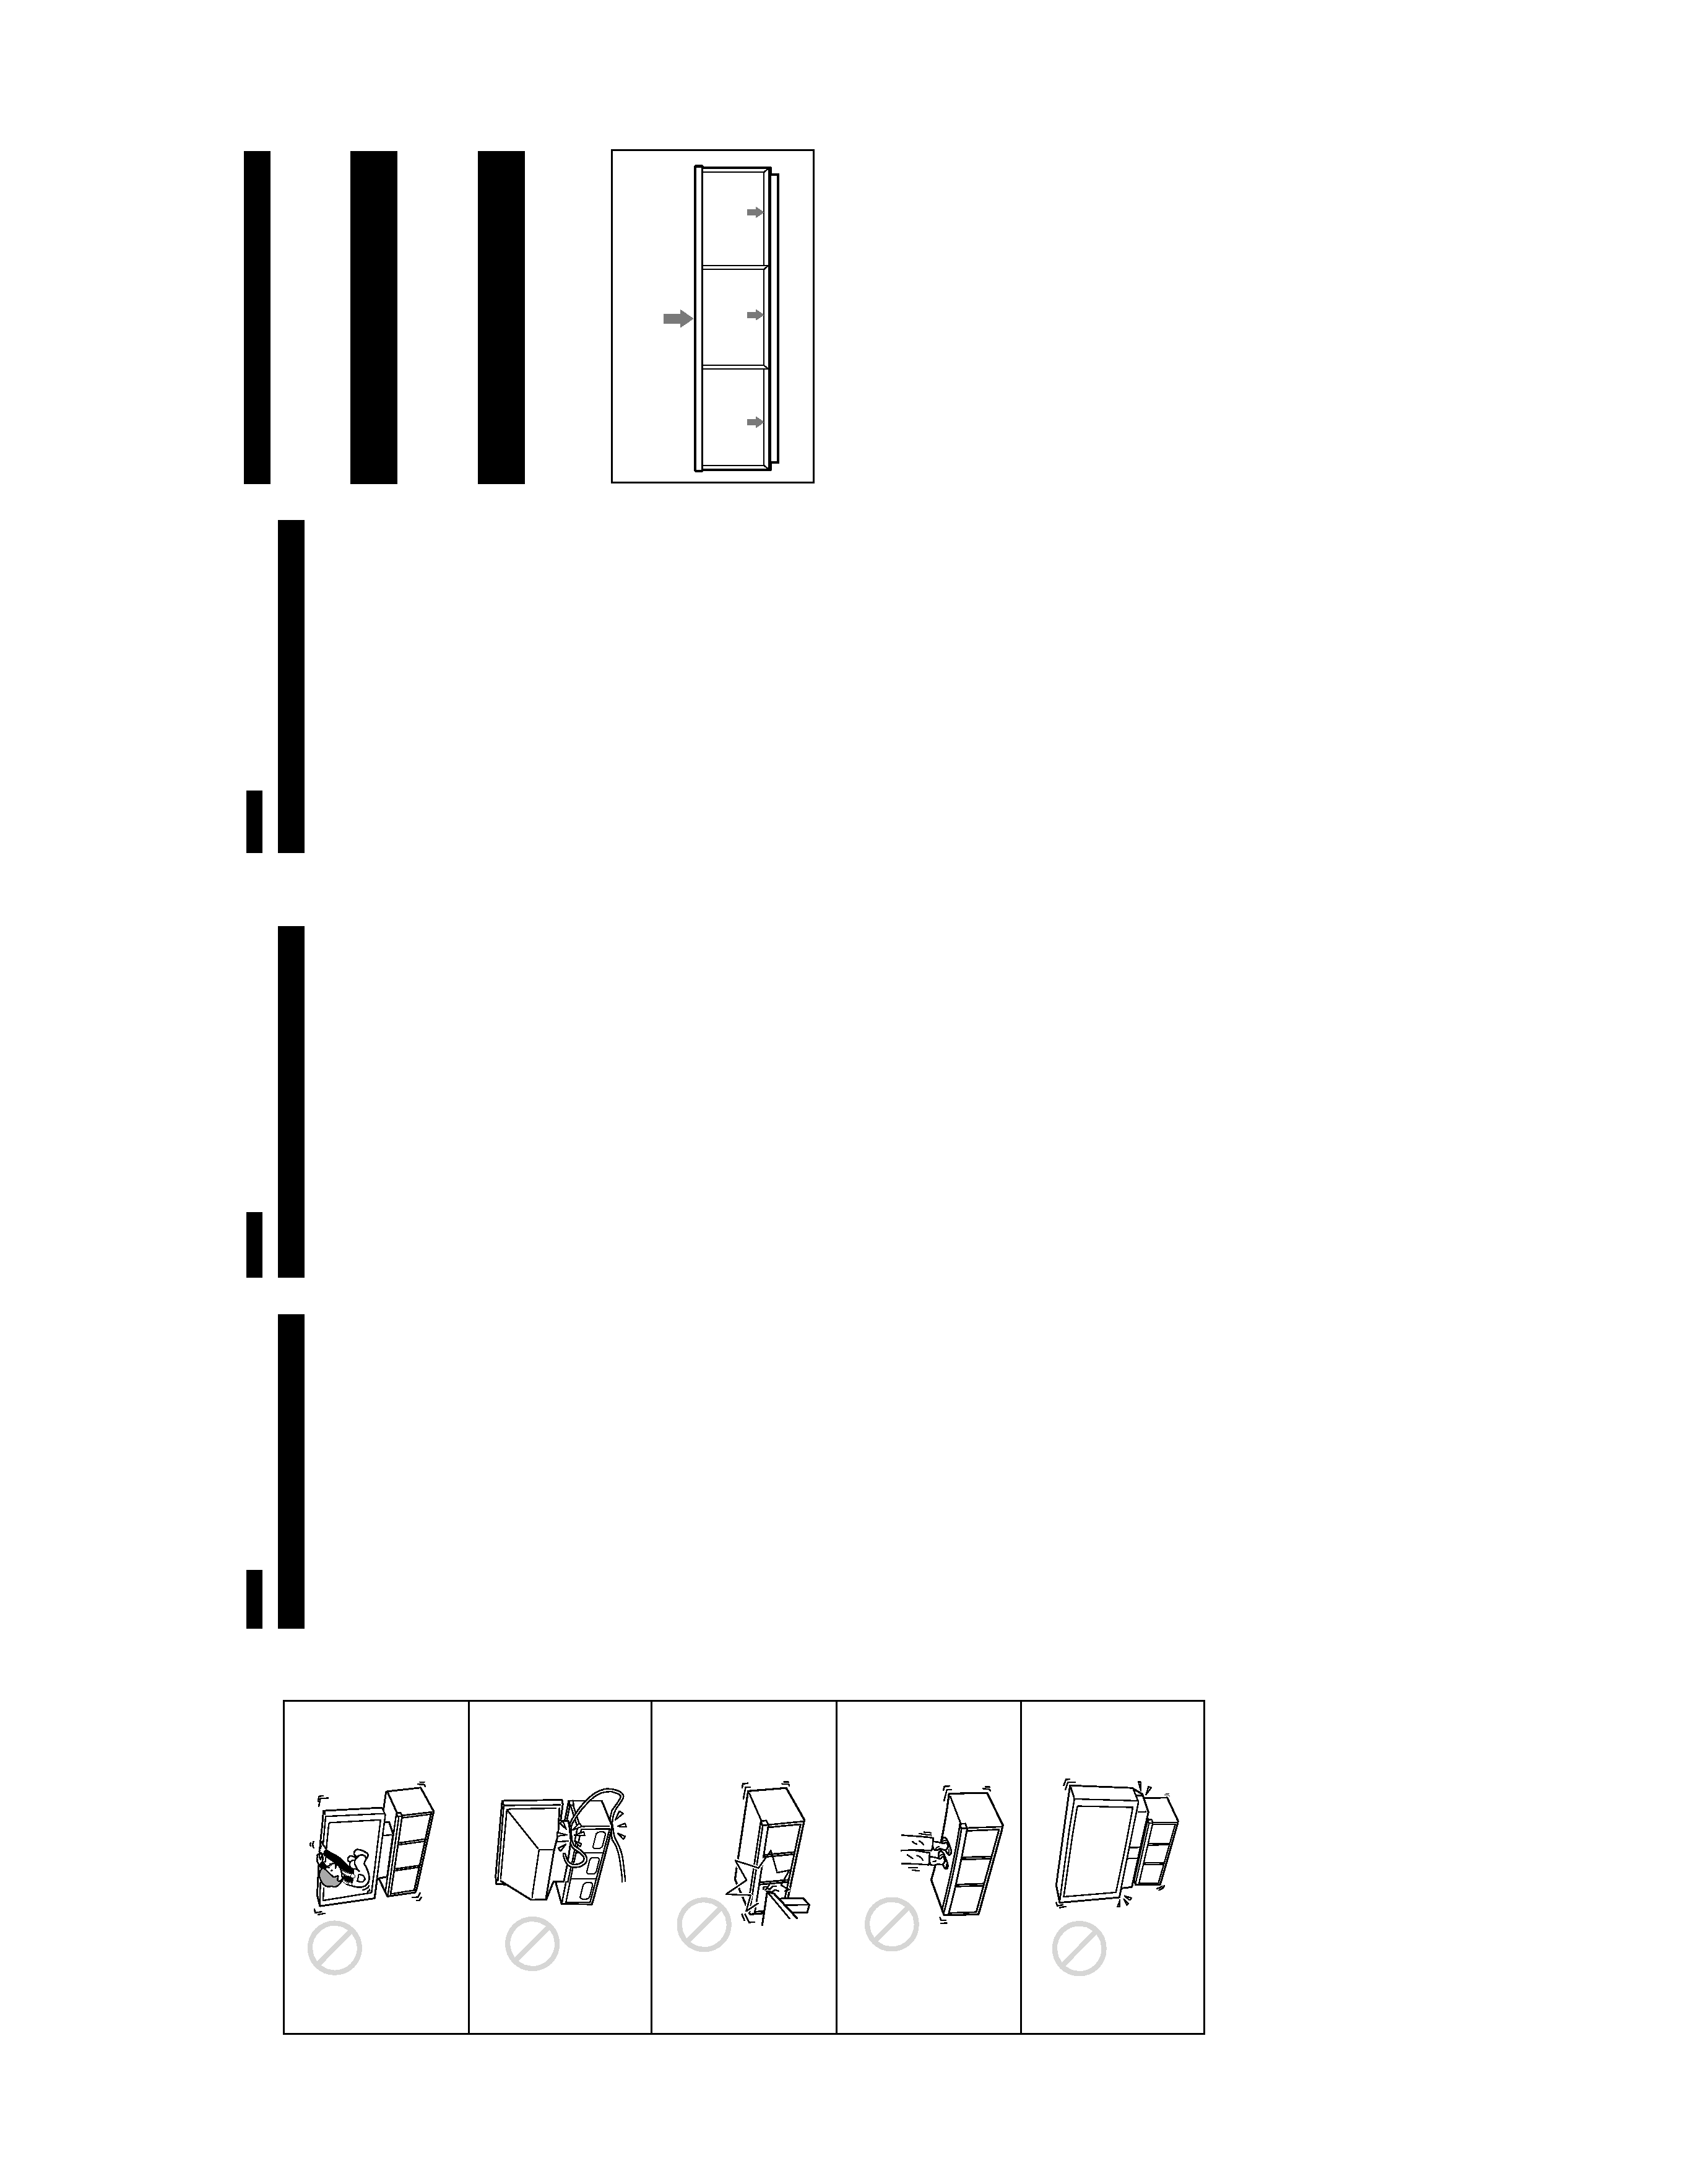
· Do not place things other than the Sony LCD Projection
TV KF-60DX100 on the stand.
· Do not climb on the TV stand. If you do so, the LCD
Projection TV may fall down or break and cause injury.
(Fig. A)
· Do not put the power cord between the top board and the
bottom of the LCD Projection TV. If you do so, the cord
may be damaged and it may cause an electric shock or
fire. (Fig. B)
· Be careful not to hit the glass doors. (Fig. C)
Under normal conditions, this "tempered glass" is more
shock resistant and able to bear more weight than
ordinary glass. However, this glass may break if it
receives a sharp blow or is severely scratched.
· Do not use the TV stand as a stool. (Fig. D)
· Fix the LCD Projection TV to the TV stand to prevent the
LCD Projection TV from tipping or falling off.
· Do not place any equipment which exceeds the maximum
weight on the stand. (Fig. E)
· When opening or closing the door, take care not to pinch
your fingers in the door. When the stand is moved, open
the glass doors and pull out the door stopper so that the
doors do not slide.
· Be careful not to stumble at the edge of the stand.
· Do not place the stand in a location near a heat source,
such as a radiator, or in a place subject to direct sunlight.
· Do not move the stand while the LCD Projection TV is
on top of it.
· Clean the stand periodically with a soft cloth. If finger
prints, food and beverage stains, etc. are difficult to
remove, use a cloth moistened with a mild detergent
solution. Do not use a scouring powder, abrasive pad or
solvent.
Note on carrying capacity
Do not place any equipment which exceeds the maximum
weight. (Fig. F)
Remarque sur la capacité de
charge
Ne pas placer sur le meuble une charge en excès du poids
maximal permis. (Ill. F)
Nota sobre la capacidad de
transporte
No coloque ningún equipo que supere el peso máximo.
(Fig. F)
Français
Remarques sur l'utilisation
· Ne placer aucun autre objet dans le meuble que le téléviseur de
projection LCD KF-60DX100 de Sony.
· Ne pas monter sur le meuble. Cela pourrait faire tomber le
téléviseur de projection LCD ou l'endommager et causer des
blessures. (Ill. A)
· Ne pas placer le câble d'alimentation du téléviseur entre la
tablette supérieure et le dessous du téléviseur de projection LCD.
Cela pourrait endommager le câble et provoquer l'électrocution
ou un incendie. (Ill. B)
· Ne pas faire subir de choc aux portes en verre. (Ill. C)
Dans des conditions normales, le verre trempé des portes résiste
mieux aux chocs et supporte un poids plus grand que le verre
ordinaire. Cependant, le verre des portes peut se briser s'il reçoit
un coup violent ou s'il est rayé profondément.
· Ne pas utiliser le meuble comme un tabouret. (Ill. D)
· Fixer le téléviseur de projection LCD au meuble afin que le
téléviseur de projection LCD ne bascule pas et ne tombe pas du
meuble.
· Ne pas placer sur le meuble une charge en excès du poids
maximal permis. (Ill. E)
· Lors de l'ouverture et de la fermeture des portes, prendre garde
de ne pas se pincer les doigts. Avant de déplacer le meuble,
ouvrir les portes et tirer le butoir pour empêcher les portes de
bouger.
· Prendre garde de ne pas trébucher en s'accrochant au bord du
meuble.
· Ne pas placer le meuble près d'une source de chaleur, par
exemple un radiateur, ou à un endroit soumis aux rayons directs
du soleil.
· Ne pas déplacer le meuble alors que le téléviseur de projection
LCD s'y trouve.
· Nettoyer le meuble régulièrement à l'aide d'un chiffon doux. Si
certaines traces de doigts ou marques de nourriture, de boissons
ou autres sont difficiles à nettoyer, utiliser un linge légèrement
imbibé d'une solution nettoyante douce. Ne pas utiliser de
poudre à récurer, de tampon abrasif ou de solvants.
Español
Notas sobre el uso
· No coloque ningún objeto que no sea el televisor de
proyección LCD Sony KF-60DX100.
· No se suba en el soporte porque el televisor de proyección
LCD podría caerse o romperse y/o causar heridas. (Fig. A)
· No coloque el cable de alimentación del televisor de
proyección LCD entre la placa superior y la inferior. De
hacerlo, puede dañar el cable y causar una descarga eléctrica
o un incendio. (Fig. B)
· Cuide de no golpear las puertas de vidrio. (Fig. C)
En condiciones normales, este "vidrio templado" es más
resistente a los golpes y soporta más peso que el vidrio
común. Sin embargo, puede romperse si recibe un golpe
agudo o se raya en exceso.
· No utilice el soporte para televisor como asiento. (Fig. D)
· Fije el televisor de proyección LCD al soporte, para evitar
que se vuelque o caiga de él.
· No coloque ningún equipo que supere el peso máximo.
(Fig. E)
· Al abrir o cerrar la puerta, cuide de no pellizcarse los dedos.
Cuando vaya a transportar el soporte, abra las puertas de
vidrio y tire del tope para que no se deslicen las puertas.
· Cuide de no tropezar con el borde del soporte.
· No coloque el soporte en un sitio cercano a una fuente de
calor, tal como un radiador, ni bajo la luz solar directa.
· No mueva el soporte mientras el televisor de proyección
LCD esté encima.
· Limpie el soporte de forma periódica con un paño suave. Si
las huellas digitales, las manchas de comida y bebida, etc.
son difíciles de eliminar, utilice un paño mojado en una
solución detergente suave. No utilice polvo limpiador,
almohadillas abrasivas ni disolvente.
A
B
C
D
E
85 kg (187 lb 6 oz)
(187 lb 6 oz)
(187 libras 6 onzas)
25 kg (55 lb 2 oz)
(55 lb 2 oz)
(55 libras 2 onzas)
25 kg (55 lb 2 oz)
(55 lb 2 oz)
(55 libras 2 onzas)
25 kg (55 lb 2 oz)
(55 lb 2 oz)
(55 libras 2 onzas)
F
3
SU-60DX
Installing the projection TV
(Fig. G)
1 Remove the front top panel.
2 Put the LCD projection TV on the stand and move the LCD
projection TV forward.
3 Replace the front top panel.
For wiring
Use the holes on the top panel and side panels. (Fig. H)
The shaded part of the rear panel may be removed for the
wiring.
Note on carrying the TV
· Carrying the LCD projection TV requires at least two people.
Be sure not to grasp the pedestal or the front panel of the
LCD projection TV, otherwise these parts might break off.
When moving the LCD projection TV, support the screen
bottom with one hand while grasping the top part with the
other hand. (Fig. I)
· Take care not to pinch your fingers in the door. When the
stand is carried, open the left glass door and pull out the door
stopper so that the doors do not slide. (Fig. J)
Preventing the projection TV from
tipping (Fig. K)
Use the hold band to prevent the LCD projection TV from
tipping or falling off the TV stand.
1 Insert the hold band into the hole of the rear of the LCD
projection TV until it clicks.
2 Pull down the band to remove the slack.
Specifications (Fig. L)
Dimensions Unit: mm (inches)
Weight: 58 kg (129 lb 15 oz)
Design and specifications are subject to change without notice.
Caractéristiques (Ill. L)
Dimensions du meuble : mm (po)
Poids : 58 kg (129 lb 15 on)
La conception et les spécifications sont sujettes à modification
sans préavis.
Especificaciones (Fig. L)
Dimensiones Unidad: mm (pulgadas)
Peso: 58 kg (129 libras 15 onzas)
El diseño y las especificaciones están sujetas a cambios sin
previo aviso.
Installation du téléviseur à
projection (Ill. G)
1 Retirer le panneau supérieur avant.
2 Placer le téléviseur de projection LCD sur le meuble et le
déplacer vers l'avant.
3 Replacer le panneau supérieur avant.
Raccordement
Faire passer les fils par les trous pratiqués dans le panneau
supérieur et les panneaux latéraux. (Ill. H)
La partie ombrée du panneau arrière peut être retirée pour
permettre de faire les raccordements.
Remarque sur le déplacement du
téléviseur
· Au moins deux personnes sont requises pour transporter le
téléviseur de projection LCD. Ne pas manipuler le téléviseur
de projection LCD par son socle ou par le panneau avant, car
ces pièces pourraient se briser.
Pour déplacer le téléviseur de projection LCD, le tenir par le
bas de l'écran d'une main et de l'autre main par le dessus de
l'appareil. (Ill. I)
· Attention de ne pas se pincer les doigts dans les portes. Avant
de déplacer le meuble, ouvrir la porte de gauche et tirer le
butoir pour empêcher les portes de bouger. (Ill. J)
Directives pour empêcher le
basculement du téléviseur (Ill. K)
Faire usage de la bande de fixation pour empêcher le téléviseur
de projection LCD de basculer et de tomber du meuble.
1 Insérer la bande de fixation dans le trou correspondant à
l'arrière du téléviseur de projection LCD et pousser
jusqu'au déclic.
2 Tirer sur la bande vers le bas pour qu'elle soit bien tendue.
Instalación del televisor de
proyección (Fig. G)
1 Retire el panel frontal superior.
2 Coloque el televisor de proyección LCD en el soporte y
muévalo hacia delante.
3 Reponga el panel frontal superior.
Para el cableado
Utilice los orificios del panel superior y los paneles laterales.
(Fig. H)
Es posible retirar la parte sombreada del panel trasero para el
cableado.
Nota sobre el transporte del televisor
· Se requieren, como mínimo, dos personas para transportar el
televisor de proyección LCD. No tome el televisor de
proyección LCD por el pedestal ni tire del panel frontal del
televisor porque podría romperlos.
Cuando mueva el televisor de proyección LCD, sujete la
parte inferior de la pantalla con una mano mientras agarra la
parte superior con la otra. (Fig. I)
· Cuide de no pellizcarse los dedos con la puerta. Al
transportar el soporte, abra la puerta de vidrio de izquierda y
tire del tope para que no se deslicen las puertas. (Fig. J)
Evite que se vuelque el televisor
de proyección (Fig. K)
Utilice la banda de sujeción para evitar que el televisor de
proyección LCD se vuelque o caiga del soporte.
1 Inserte la banda de sujeción en el orificio de la parte
posterior del televisor de proyección LCD hasta que
enganche.
2 Tire de la banda para que quede tensada.
G
H
I
J
K
510 (20 1/8)
520 (20 1/2)
510 (20 1/8)
585
(23
1 /
8)
599
(23
5 /
8)
1520 (59 7/8)
445.5
(17
5 /
8)
304.5
(12)
1624 (64)
529.8 (20 7/8)
14 (9/16)
L
1
2
3
1
2
1
2
4
SU-60DX
SECTION 2
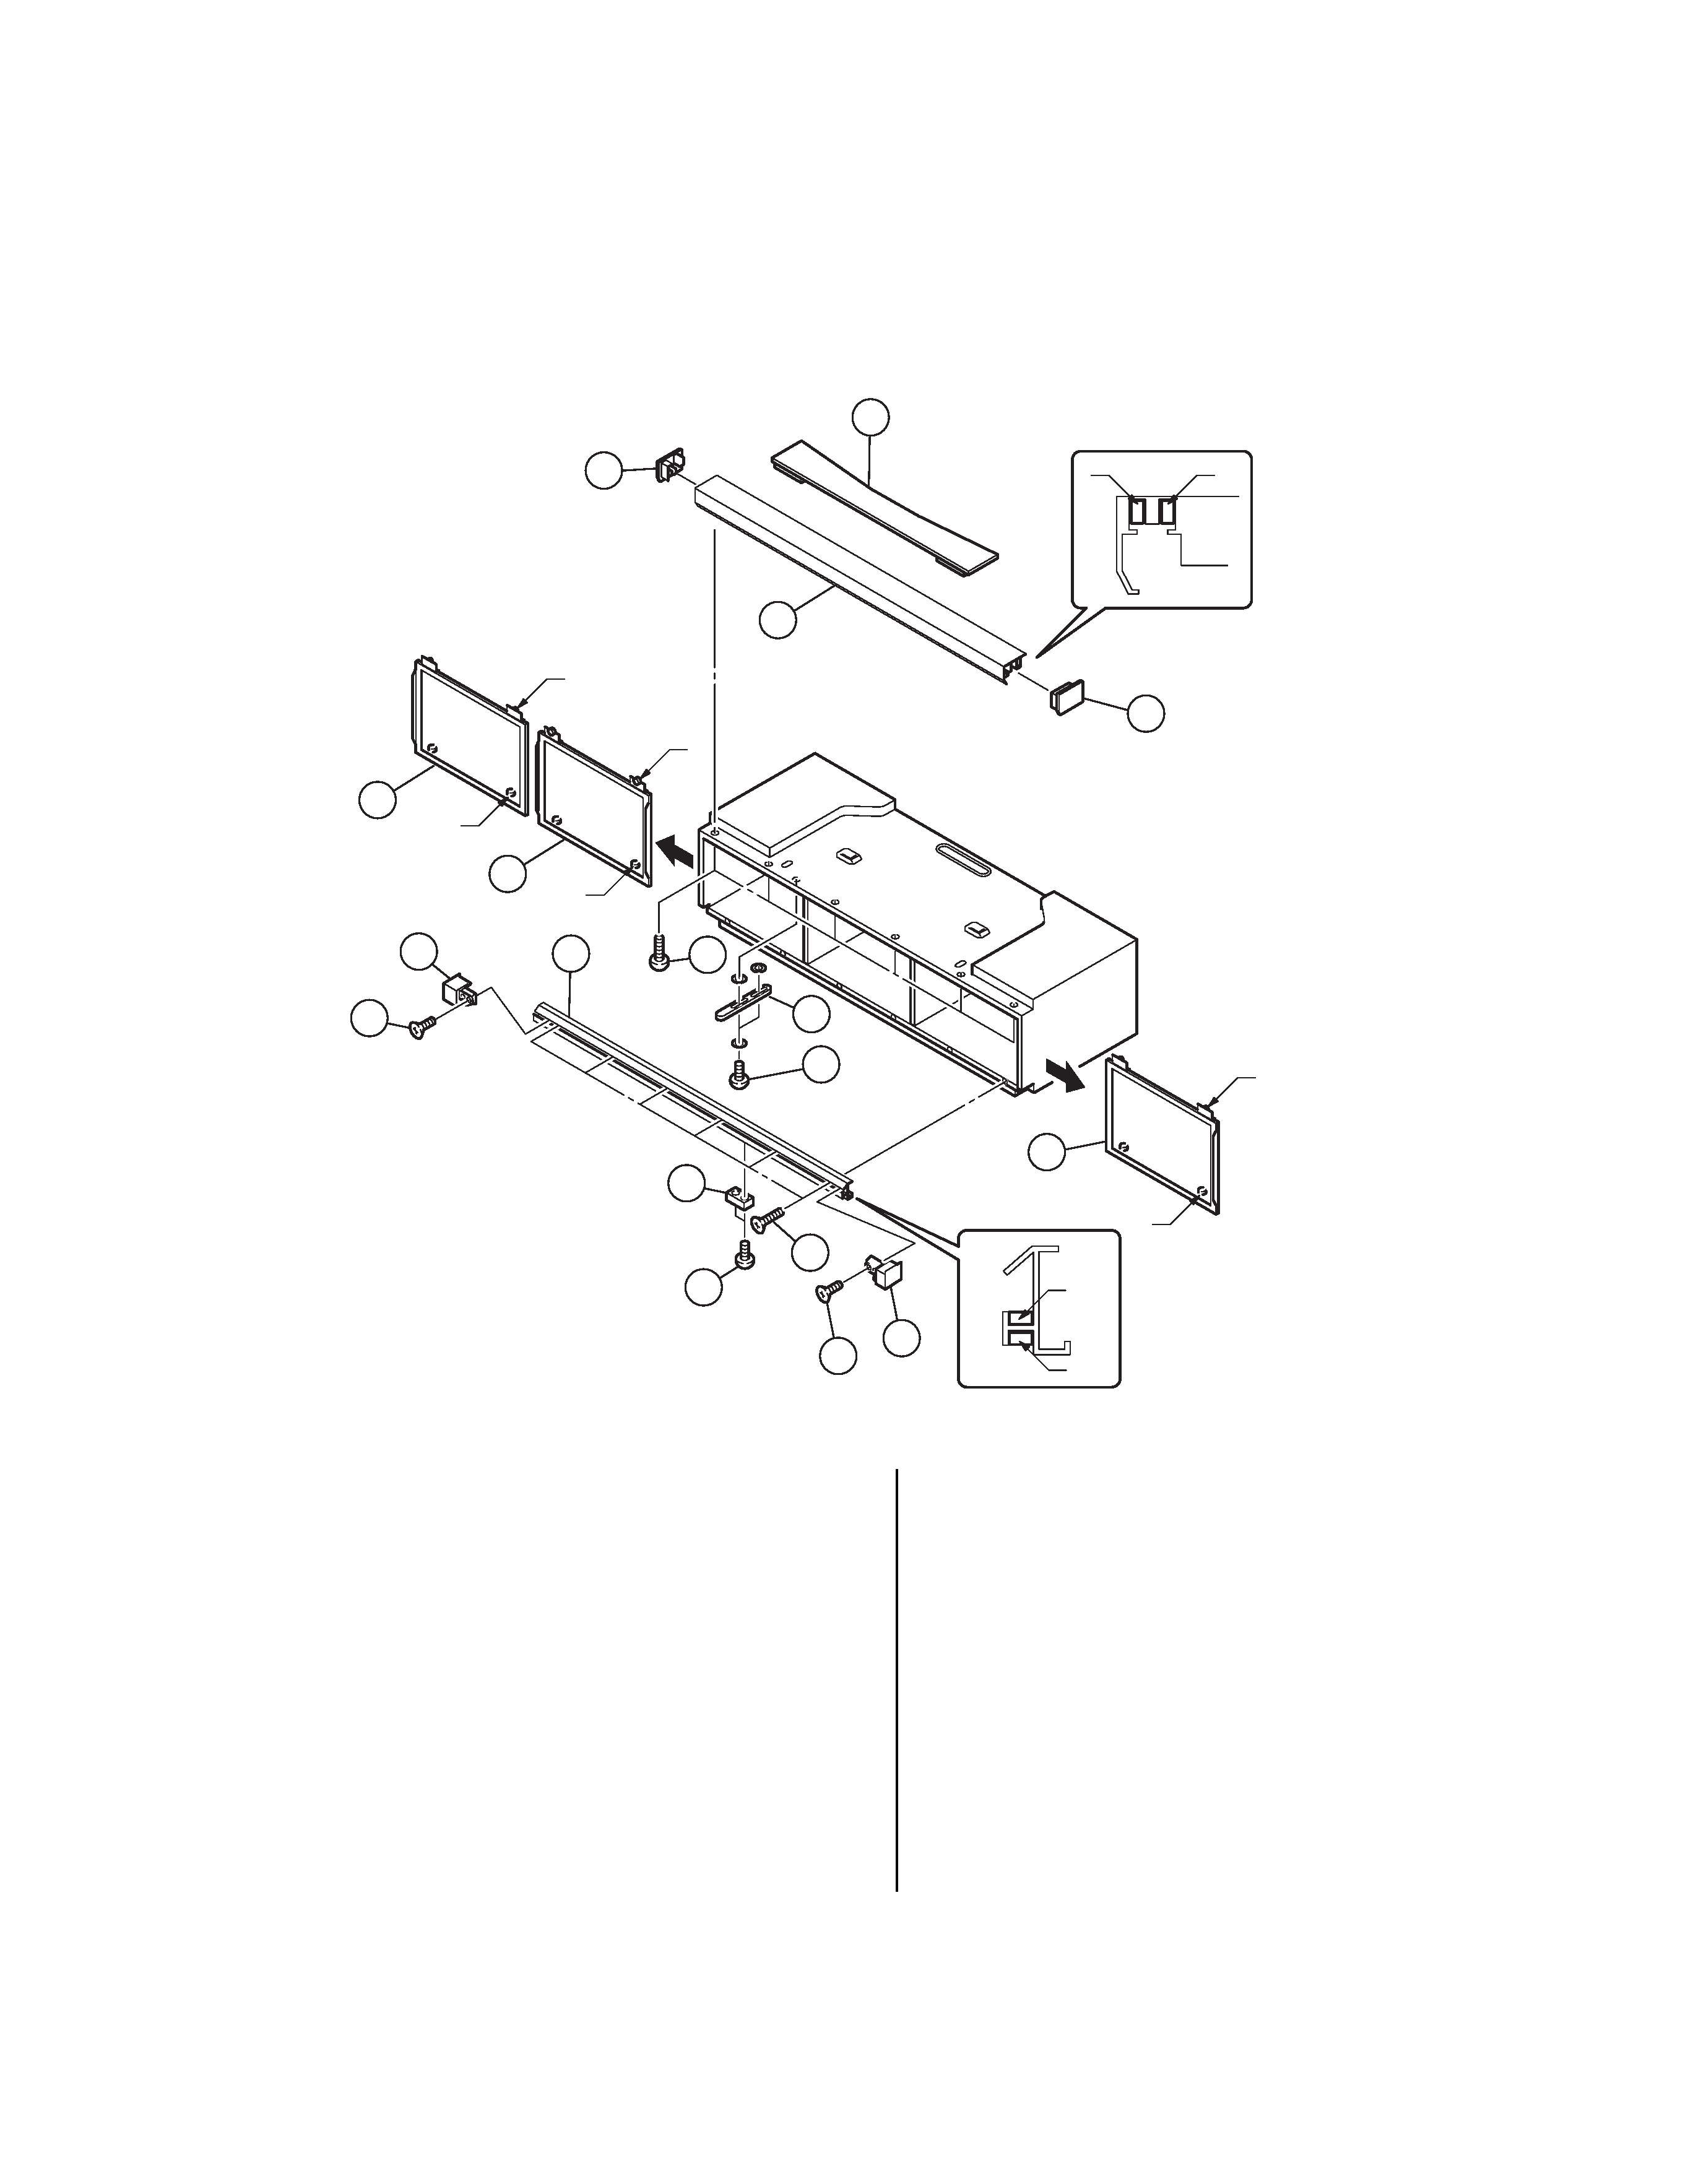
EXPLODE
D VIEW
A'
B'
A
A'
B
B'
A
A'
A
B
13
3
2
17
4
5
18
1
11
14
6
9
8
16
15
12
10
7
The rollers' view in the top rail from the right side.
A: The upper rollers of the right and left door assemblies.
B: The upper rollers of the center door assembly.
The rollers' view in the bottom rail from the right side.
A': The bottom rollers of the right
and left door assemblies.
B': The bottom rollers of the center
door assembly.
Note on removal of the door assemblies:
Follow in the numerical order given.
Note on attaching the door assemblies:
Be careful about the insertion of rollers on the door
assemblies to the grooves of the rails.
· Items with no part number and no
description are not stocked because they
are seldom required for routine service
· The construction parts of an assembled part
are indicated with a collation number in the
remark column.
NOTE:
· Items marked " * " are not stocked since
they are seldom required for routine
service. Some delay should be anticipated
when ordering these items.
REF. NO. PART NO.
DESCRIPTION
REMARK
REF. NO. PART NO.
DESCRIPTION
REMARK
1
4-087-126-01 CAP (L), RAIL TOP
2
4-088-172-01 SCREW +KM4
3
4-087-120-01 CAP (L), RAIL BOTTOM
4
X-4039-868-1 DOOR ASSY (L)
5
X-4039-867-1 DOOR ASSY (C)
6
4-087-127-01 CAP (R), RAIL TOP
7
4-088-172-01 SCREW +KM4
8
4-087-121-01 CAP (R), RAIL BOTTOM
9
X-4039-869-1 DOOR ASSY (R)
10
4-088-129-01 BOLT 6X40
11
* 4-087-124-01 RAIL, TOP
12
4-088-127-01 SCREW 3.5X25 +K
13
* 4-087-125-01 RAIL, BOTTOM
14
4-088-131-01 COVER, FRONT
15
4-088-171-01 SCREW SLIDER 3.5X16 +P
16
4-088-170-01 SLIDER, DOOR
17
4-087-122-01 STOPPER, DOOR
18
4-088-262-01 SCREW 3X12 +P
******************************************************
ACCESSORIES
*************
4-086-710-01 MANUAL INSTRUCTION
9-965-441-01
Sony Corporation
HNC. HVC. Visual Products East Asia Dep
English
2001LA02-1
©2001.12