filename[010cov.fm] model name1[SLV-SE610G] model name2[SLV-SE710G]
model name3[SLV-SE710I] model name4[SLV-SE810G]
[3-065-677-11 (1) GB]
Master Page : Right
3-065-677-11 (1) GB
Video Cassette
Recorder
Operating Instructions
SLV-SE610G
SLV-SE710G
SLV-SE710I
SLV-SE810G
© 2001 Sony Corporation
PAL

2 WARNING
Master Page : Left
filename[010war.fm] model name1[SLV-SE610G] model name2[SLV-SE710G]
model name3[SLV-SE710I] model name4[SLV-SE810G]
[3-065-677-11 (1)]
WARNING
To prevent fire or shock hazard, do not expose the
unit to rain or moisture.
To avoid electrical shock, do not open the cabinet.
Refer servicing to qualified personnel only.
Mains lead must only be changed at a qualified
service shop.
Notice for customers in the United
Kingdom and Republic of Ireland
A moulded plug complying with BS1363 is fitted to
this equipment for your safety and convenience.
If the 13A fitted plug does not match the outlet
socket in your home, please refer to your Appointed
Sony Dealer for advice.
Should the fuse in the plug supplied need to be
replaced, a 5 AMP fuse approved by ASTA or BSI
to BS1362, (i.e., marked with
or
mark)
must be used.
If the plug supplied with this equipment has a
detachable fuse cover, be sure to attach the fuse
cover after you change the fuse. Never use the plug
without the fuse cover. If you should lose the fuse
cover, please contact your nearest Sony service
station.
Precautions
Safety
· This unit operates on 220 240 V AC, 50 Hz.
Check that the unit's operating voltage is
identical with your local power supply.
· If anything falls into the cabinet, unplug the unit
and have it checked by qualified personnel before
operating it any further.
· The unit is not disconnected from the mains as
long as it is connected to the mains, even if the
unit itself has been turned off.
· Unplug the unit from the wall outlet if you do not
intend to use it for an extended period of time. To
disconnect the cord, pull it out by the plug, never
by the cord.
Installing
· Allow adequate air circulation to prevent internal
heat buildup.
· Do not place the unit on surfaces (rugs, blankets,
etc.) or near materials (curtains, draperies) that
may block the ventilation slots.
· Do not install the unit near heat sources such as
radiators or air ducts, or in a place subject to
direct sunlight, excessive dust, mechanical
vibration or shock.
· Do not install the unit in an inclined position. It is
designed to be operated in a horizontal position
only.
· Keep the unit and cassettes away from equipment
with strong magnets, such as microwave ovens or
large loudspeakers.
· Do not place heavy objects on the unit.
· If the unit is brought directly from a cold to a
warm location, moisture may condense inside the
VCR and cause damage to the video head and
tape. When you first install the unit, or when you
move it from a cold to a warm location, wait for
about three hours before operating the unit.
Caution
Television programmes, films, video tapes and other
materials may be copyrighted. Unauthorized
recording of such material may be contrary to the
provisions of the copyright laws. Also, use of this
recorder with cable television transmission may
require authorization from the cable television
transmitter and/or programme owner.
Compatible colour systems
This VCR is designed to record and play back using
the PAL colour system. Recording of video sources
based on other colour systems cannot be guaranteed.
VIDEO Plus+ and PlusCode are registered
trademarks of Gemstar Development Corporation.
The VIDEO Plus+ system is manufactured under
license from Gemstar Development Corporation.

3
Table of contents
Getti
ng
Sta
rted
Master Page : Right
filename[010COVtoc.fm] model name1[SLV-SE610G] model name2[SLV-SE710G]
model name3[SLV-SE710I] model name4[SLV-SX810G]
[3-065-677-11 (1)]
Table of contents
Getting Started
4 Index to parts and controls
10 Step 1 : Unpacking
11 Step 2 : Setting up the remote
commander
15 Step 3 : Connecting the VCR
19 Step 4 : Setting up the VCR with
the Auto Set Up function
21 Step 5 : Tuning your TV to the
VCR
23 Selecting a language
24 Presetting channels
27 Changing/disabling programme
positions
32 Setting the clock
36 Setting your personal code
Basic Operations
38 Playing a tape
40 Recording TV programmes
43 Recording TV programmes using
the Dial Timer (SLV-SE810G only)
48 Recording TV programmes using
the VIDEO Plus+ system
(not available on SLV-SE610G)
52 Recording TV programmes using
the timer
Additional Operations
56 Playing/searching at various speeds
58 Setting the recording duration time
59 Synchronized Recording
(not available on SLV-SE610G)
61 Checking/changing/cancelling
timer settings
63 Recording stereo and bilingual
programmes
65 Searching using the Smart Search
function
67 Storing, searching and deleting
programme information (Smart
Search Plus)
72 Searching using the index function
73 Adjusting the picture
75 Reducing the VCR's power
consumption
76 Changing menu options
Editing
79 Connecting to a VCR or stereo
system
81 Basic editing
82 Audio dubbing (SLV-SE810G only)
Additional Information
83 Troubleshooting
87 Specifications
88 Index
Back Cover
Quick Start Guide
4 Index to parts and controls
filename[010get.fm] model name1[SLV-SE610G] model name2[SLV-SE710G]
model name3[SLV-SE710I] model name4[SLV-SE810G]
[3-065-677-11 (1)]
Getting Started
Index to parts and controls
Refer to the pages indicated in parentheses ( ) for details.
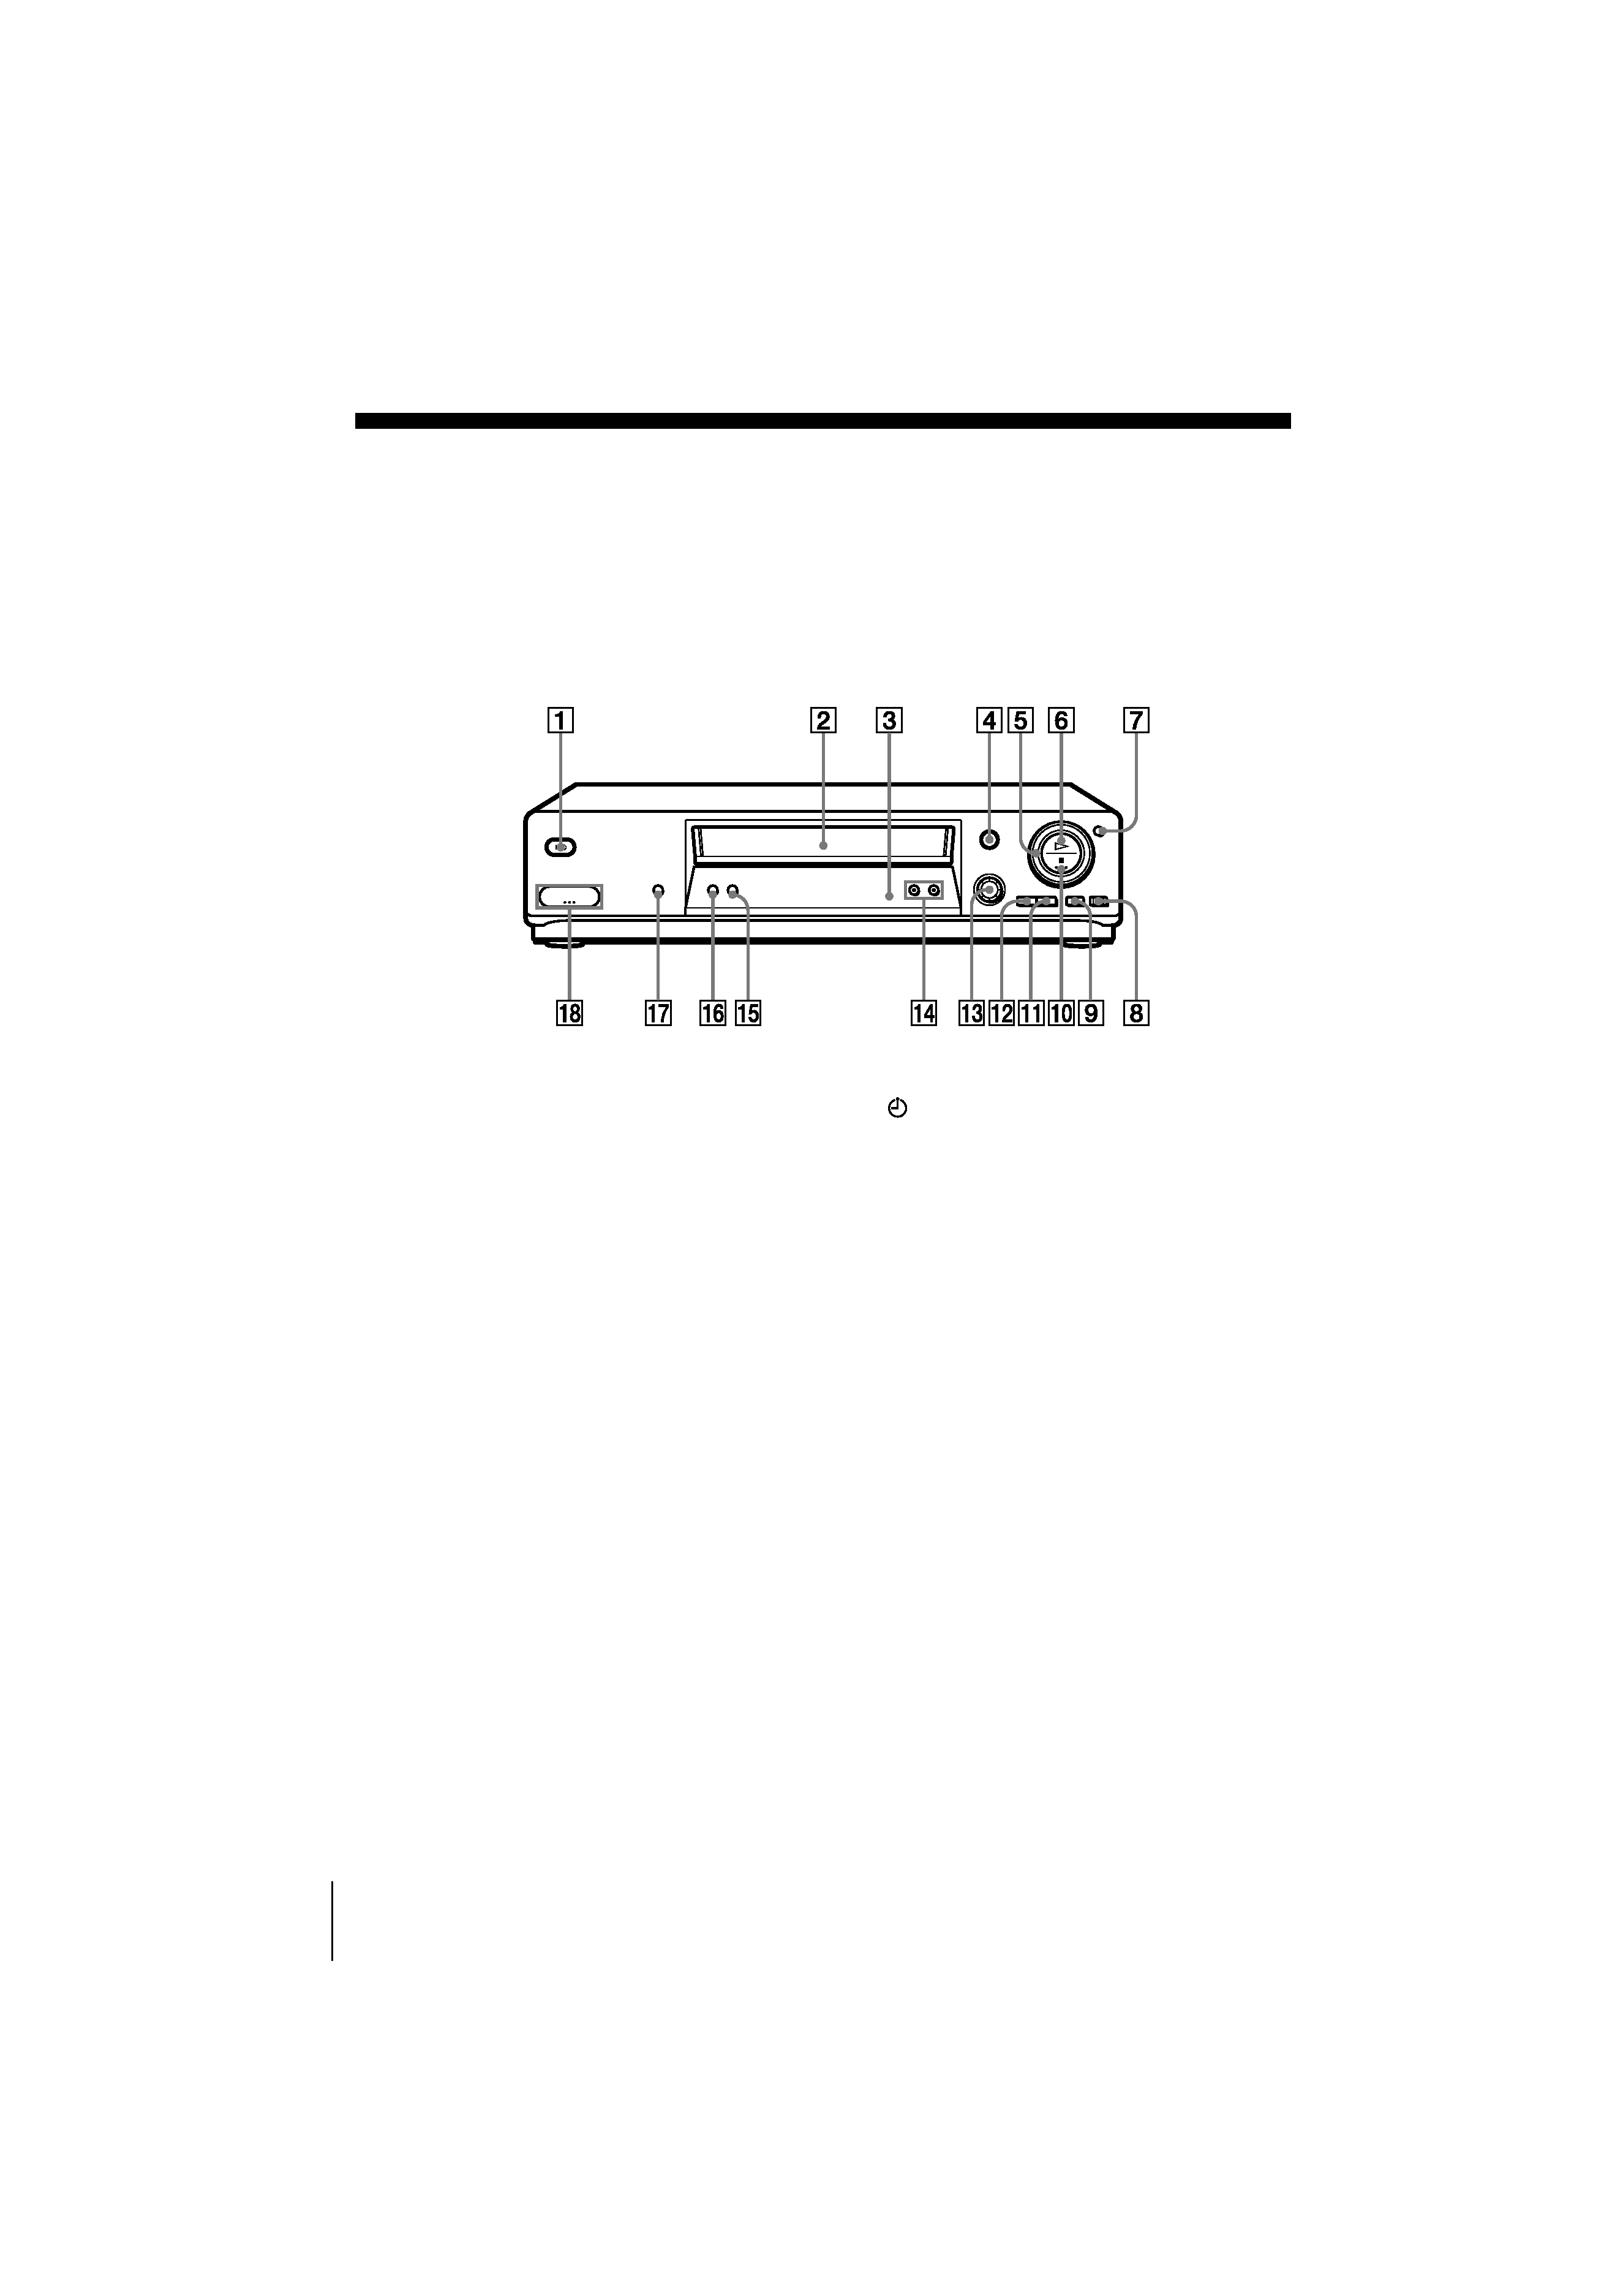
Front panel
SLV-SE810G
A ?/1 (on/standby) switch (36)
B Tape compartment
C Remote sensor (11)
D A (eject) button (38)
E Shuttle ring (56)
F H (play) button (38) (56)
G JOG button (57)
H z REC (record) button (40) (58)
(81)
I X (pause) button (38) (81)
J x (stop) button (38) (81)
K M (fast-forward) button (38) (56)
L m (rewind) button (38) (56)
M
DIAL TIMER (43)
N PROGRAM +/ buttons (22) (57)
(73)
O AUDIO DUB button (82)
P AUTO SET UP/RF (Radio
Frequency) CHANNEL button (19)
(21)
Q SYNCHRO REC (Synchronized
Recording) button (59)
R t LINE-2 L (left) o R (right)
jacks (covered) (79) (80)
How to open the jack cover
1 Press the bottom of the cover.
2 Hook your finger on the top edge of the
cover and pull it open.
5
Index to parts and controls
Master Page : Right
filename[010get.fm] model name1[SLV-SE610G] model name2[SLV-SE710G]
model name3[SLV-SE710I] model name4[SLV-SE810G]
[3-065-677-11 (1)]
Getti
ng
Sta
rted
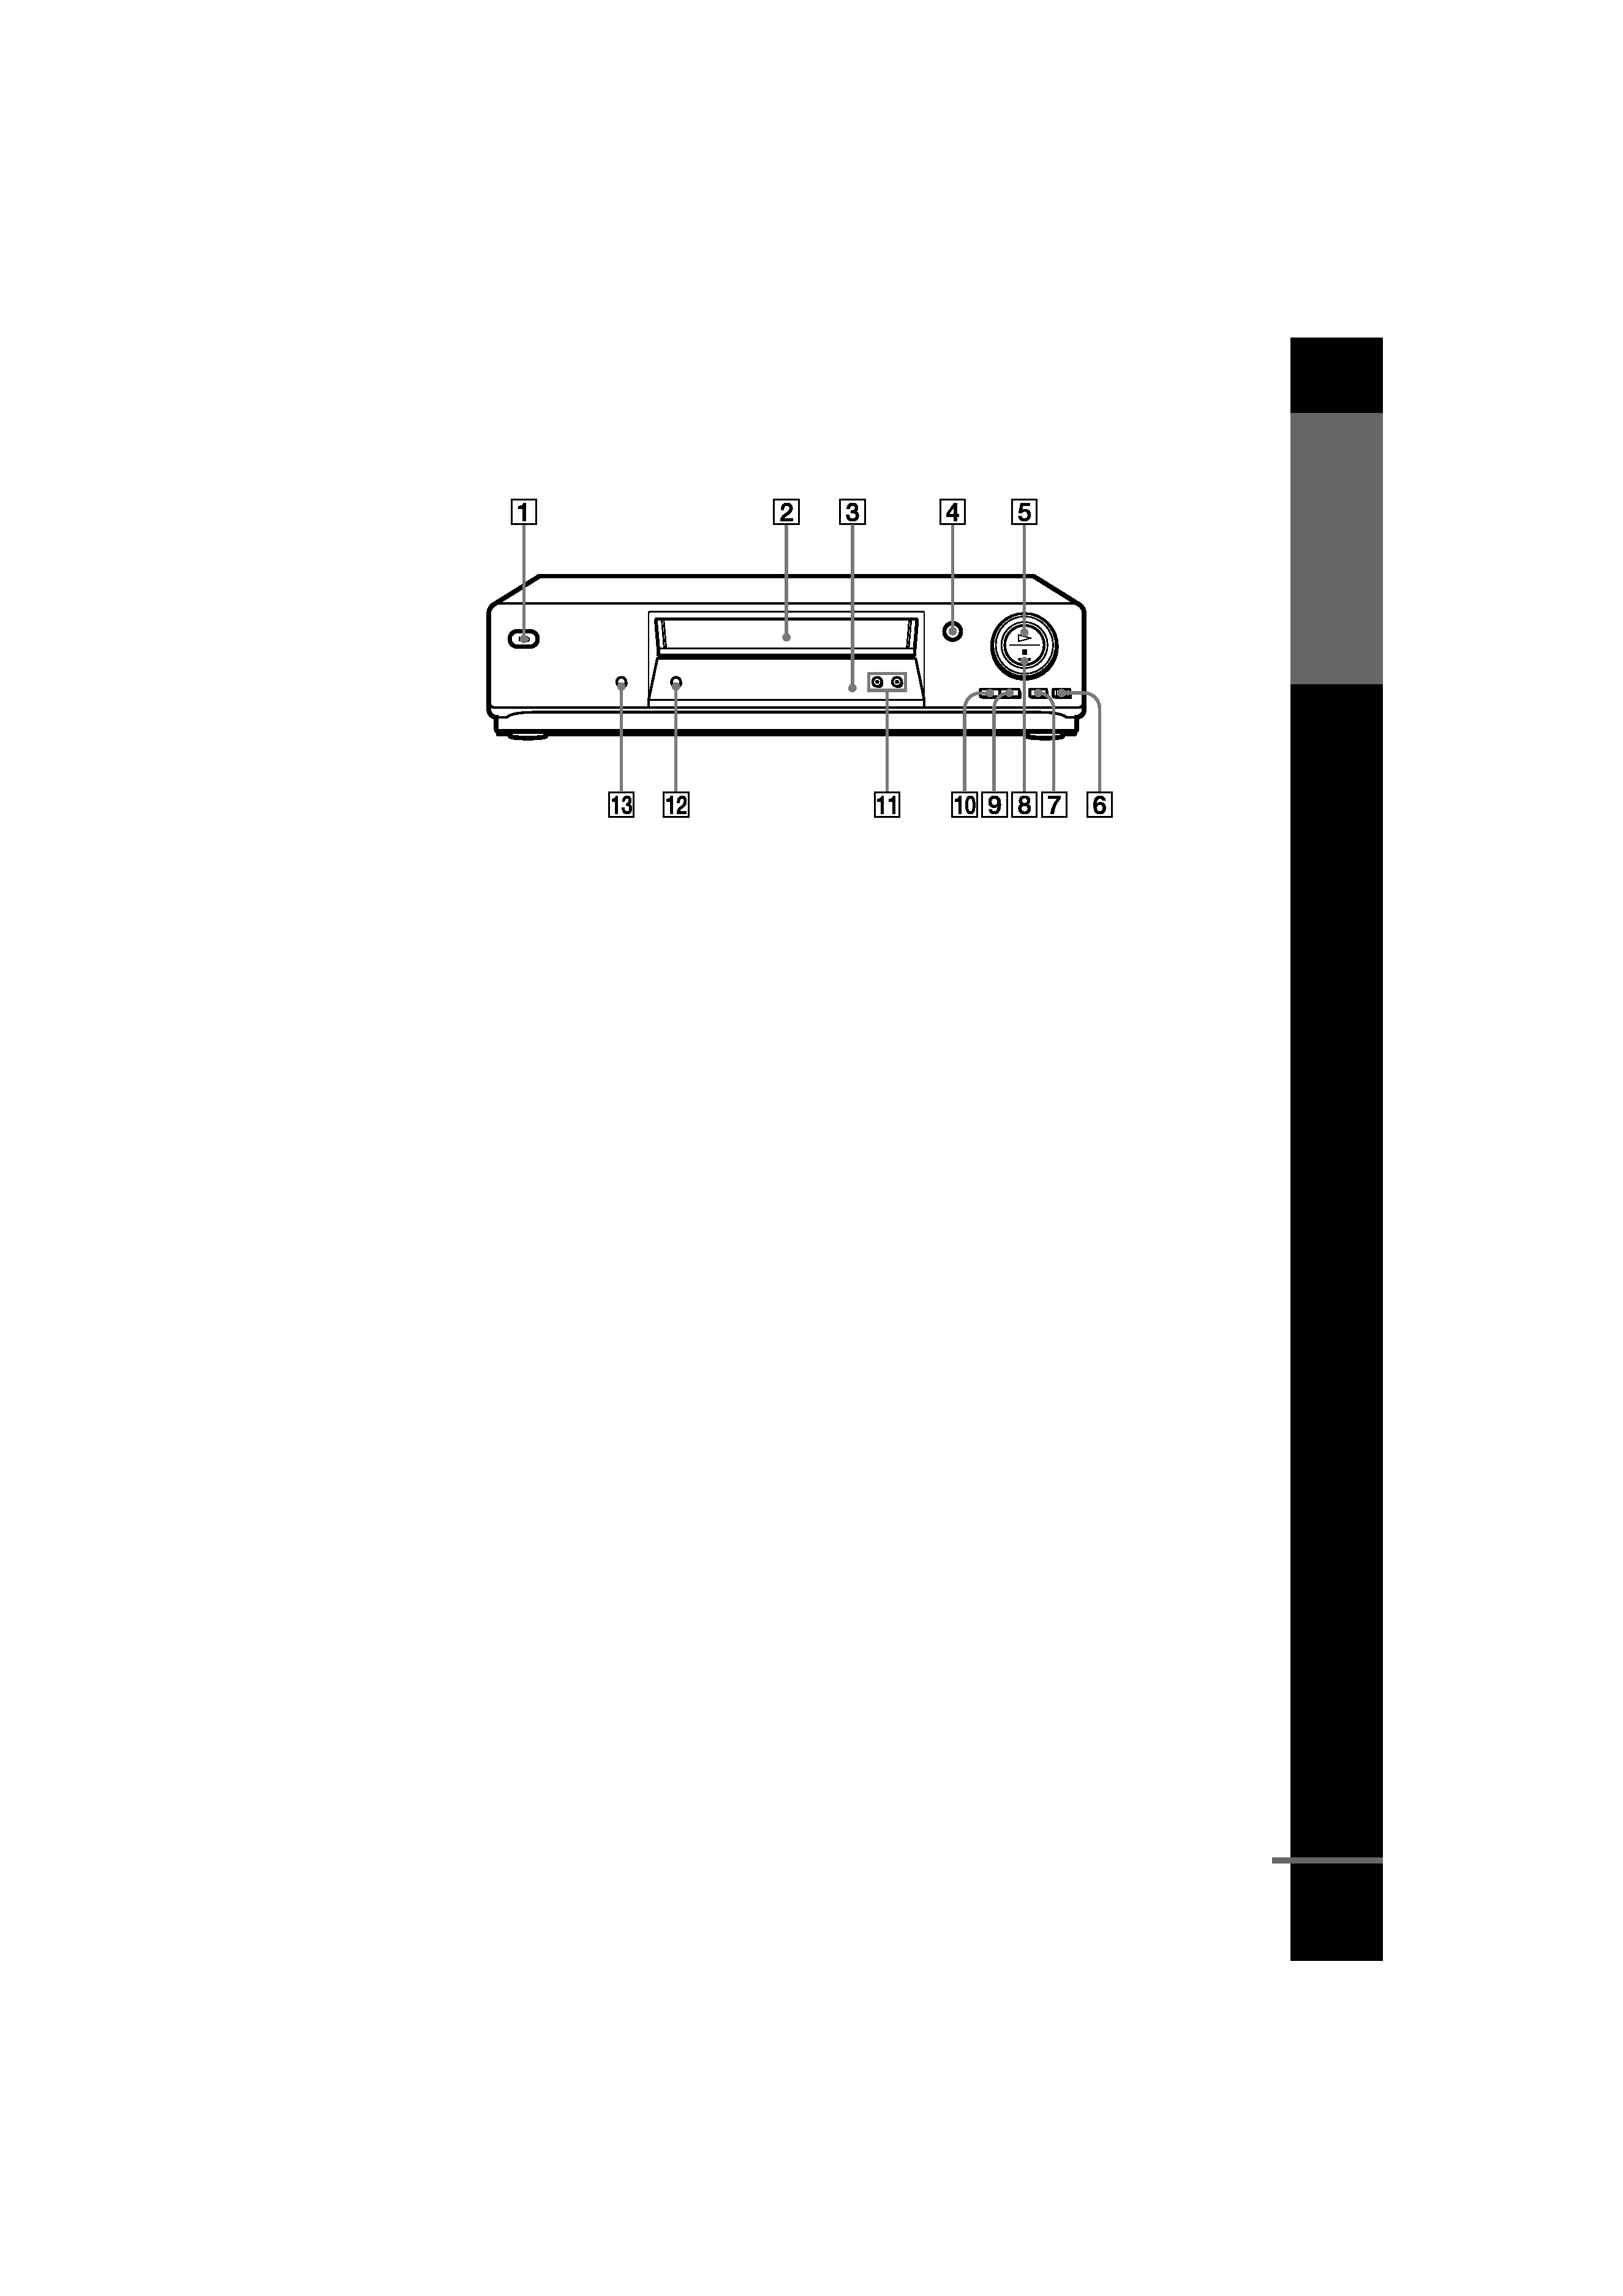
SLV-SE610G, SE710G, SE710I
A ?/1 (on/standby) switch (36)
B Tape compartment
C Remote sensor (11)
D A (eject) button (38)
E H (play) button (38) (56)
F z REC (record) button (40) (58)
(81)
G X (pause) button (38) (81)
H x (stop) button (38) (81)
* not available on SLV-SE610G
I M (fast-forward) button (38) (56)
J m (rewind) button (38) (56)
K PROGRAM +/ buttons (22) (57)
(73)
L AUTO SET UP/RF (Radio
Frequency) CHANNEL button (19)
(21)
M SYNCHRO REC (Synchronized
Recording) button* (59)
continued