3-071-581-41(1)
© 2001 Sony Computer Entertainment Inc. All rights reserved.
SCPH-30004 R
GB
Instruction Manual
Thank you for purchasing the PlayStation®2 computer
entertainment system.
You can play PlayStation®2 format CD-ROM and DVD-
ROM discs, PlayStation® format CD-ROM discs, audio
CDs and DVD video discs with this console.
Before operating this console, please read this manual
carefully and retain it for future reference.
Mode d'emploi
Nous vous remercions d'avoir fait l'acquisition du
système de loisir interactif PlayStation®2.
Avec cette console, vous pouvez lire des disques CD-ROM
et DVD-ROM au format PlayStation®2, des CD-ROM au
format PlayStation®, des CD audio et des disques DVD
vidéo.
Avant d'utiliser votre PlayStation®2, nous vous suggérons
de lire ce manuel et de le conserver pour référence
ultérieure.
Manual de Instrucciones
Gracias por adquirir el sistema de entretenimiento
informático PlayStation®2.
Con esta consola, puede reproducir DVD-ROM y CD-
ROM de formato PlayStation®2, CD-ROM de formato
PlayStation®, así como discos de vídeo DVD y CD audio.
Antes de emplear la consola, lea este manual
detenidamente y consérvelo para consultarlo en el futuro.
Bedienungsanleitung
Vielen Dank, dass Sie sich für das PlayStation®2
Computer-Entertainment-System entschieden haben. Mit
dieser Konsole können Sie CD-ROMs und DVD-ROMs im
PlayStation®2-Format, CD-ROMs im PlayStation®-Format,
Audio-CDs und DVDs abspielen. Lesen Sie diese
Anleitung vor Inbetriebnahme der Konsole bitte genau
durch und bewahren Sie sie zum späteren Nachschlagen
sorgfältig auf.
English
P.2
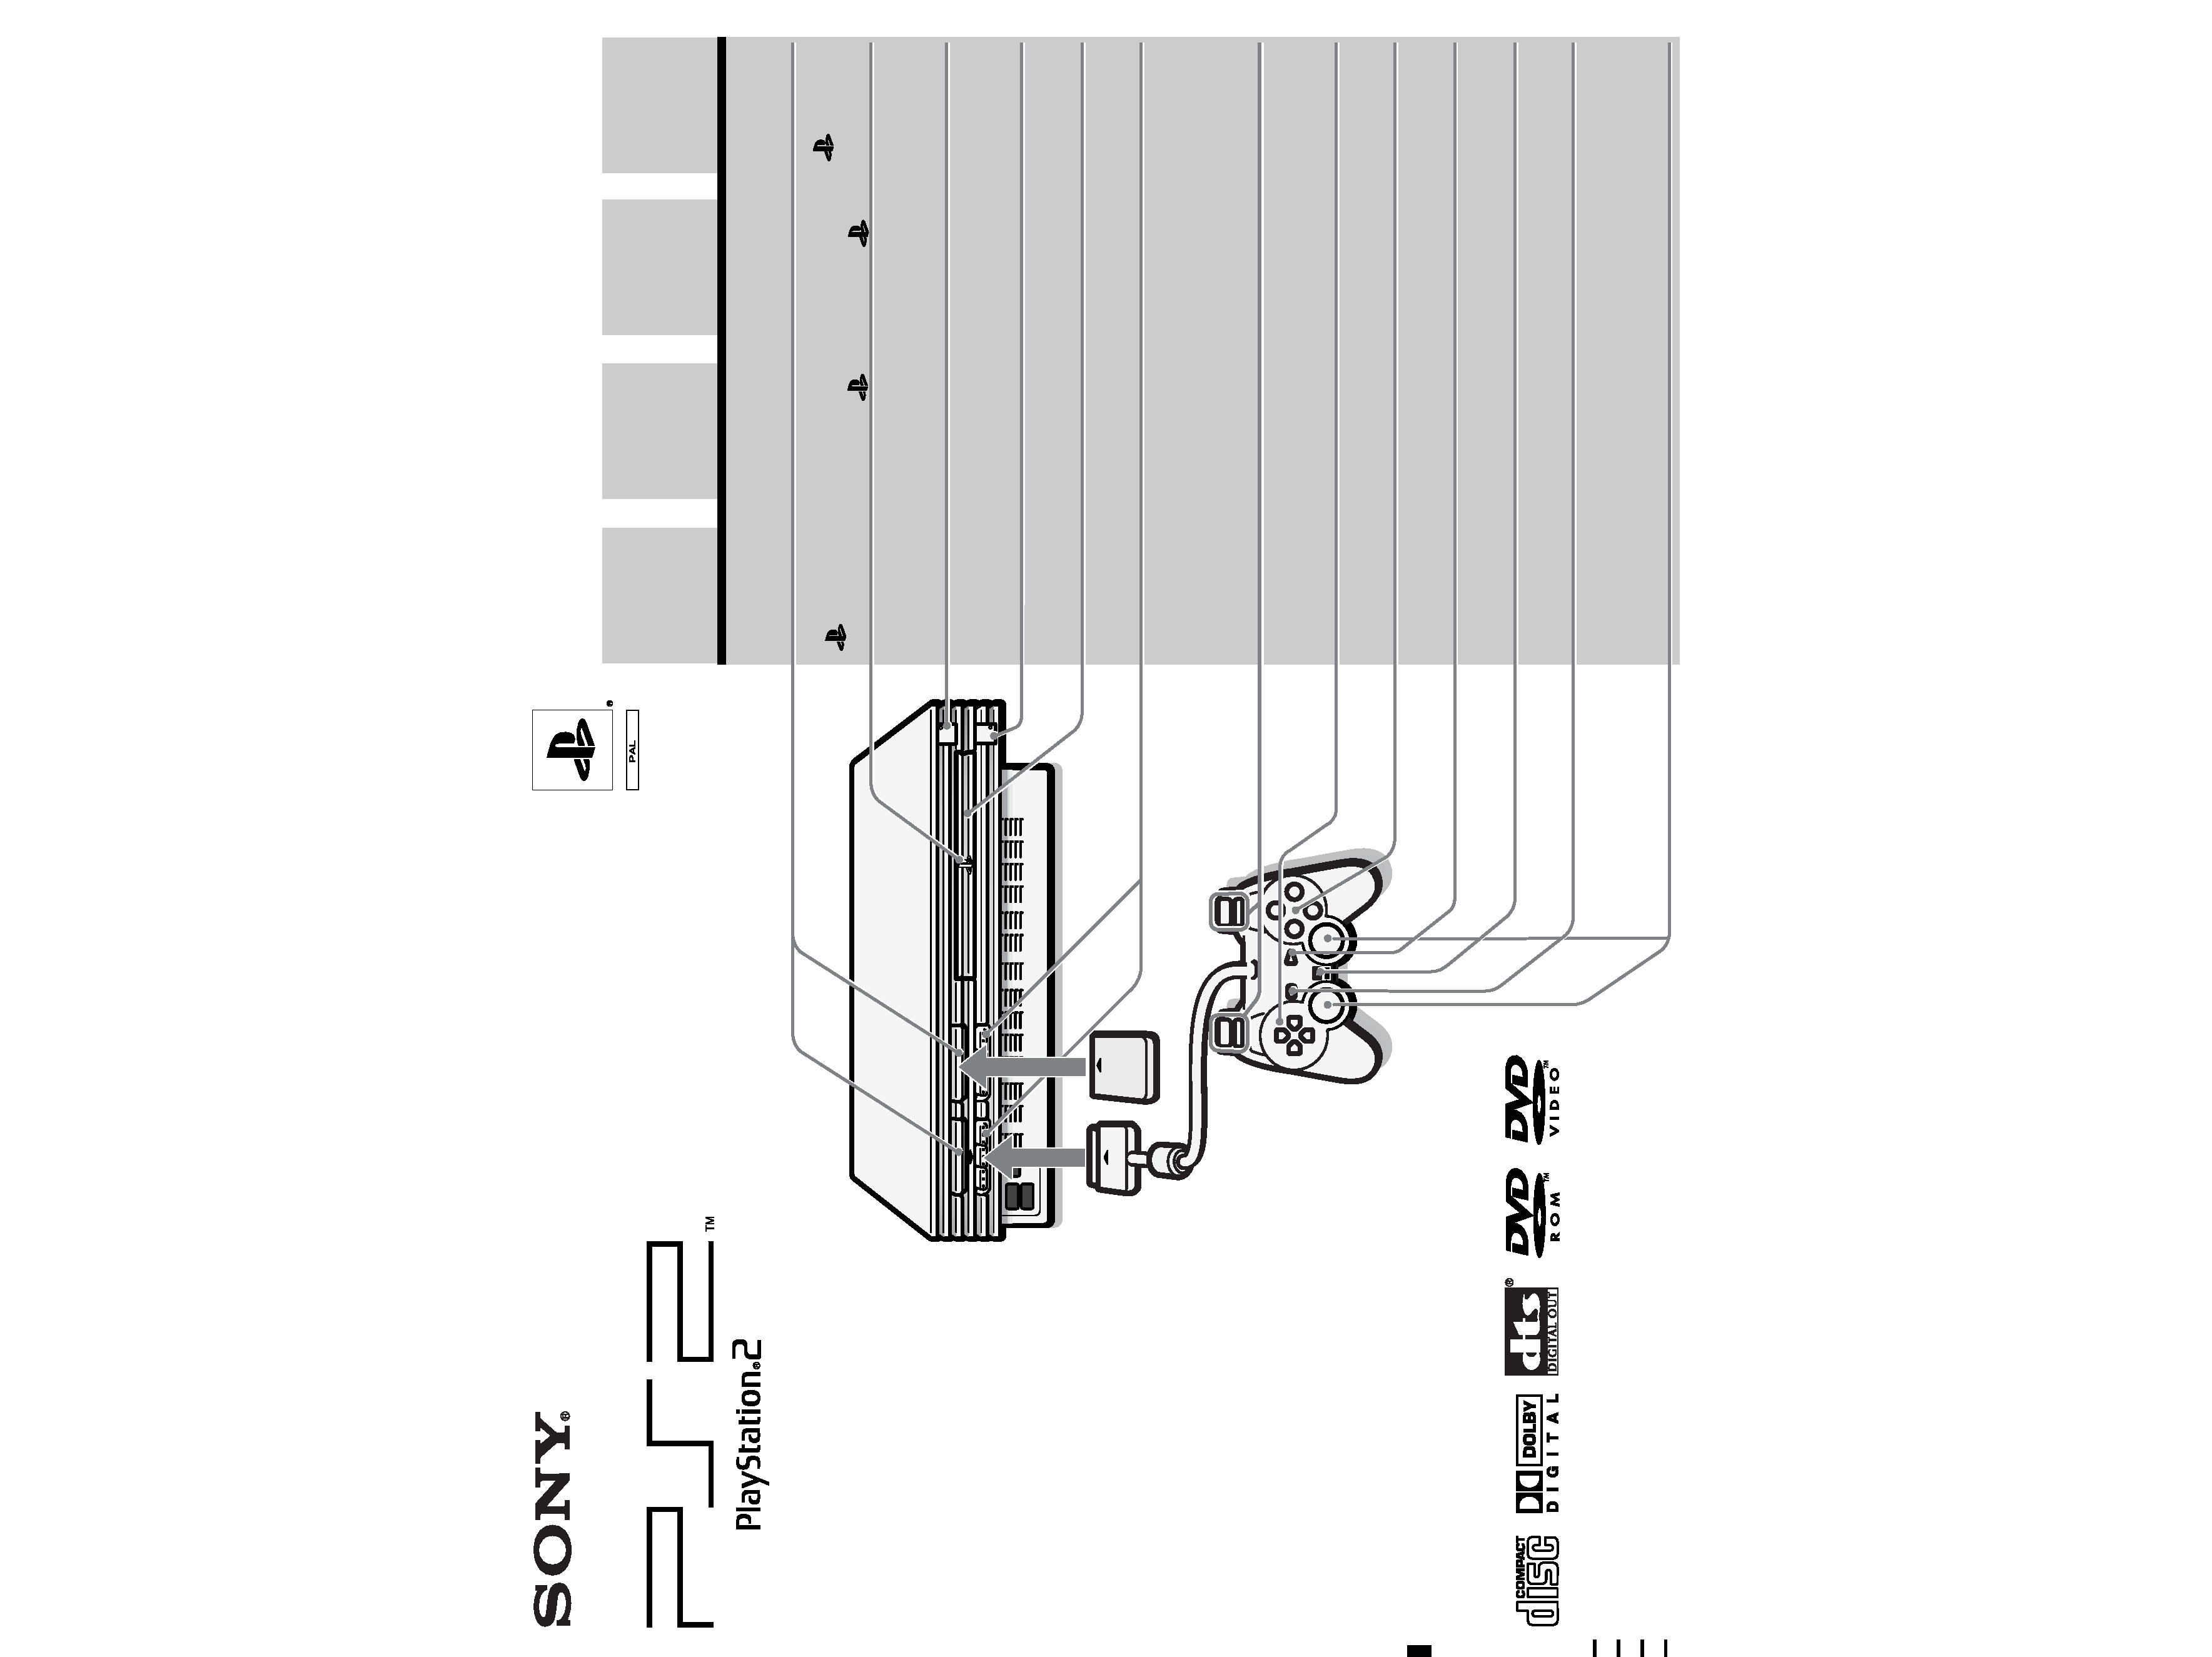
MEMORY CARD
slots
"
"
product
family logo
1
(standby)/RESET
button and
1
indicator
A
(open) button
and A indicator
Disc tray
Controller ports
L2 button,
R2 button,
L1 button,
R1 button
Directional buttons
¢
, a , ! , s
buttons
START button
ANALOG mode
button
SELECT button
Left analog stick,
right analog stick,
L3 button,
R3 button
Fentes pour
MEMORY CARD
(carte mémoire)
Logo de la gamme
de produits "
"
Bouton 1 (veille)/
RESET et
indicateur 1
Bouton A (ouvrir)
et indicateur A
Compartiment à
disque
Ports de manette
Touche L2,
touche R2,
touche L1,
touche R1
Touches
directionnelles
Touches
¢
, a , ! , s
Touche START
(de mise en
marche)
Touche de mode
ANALOG
(analogique)
Touche SELECT
(de sélection)
Joystick analogique
gauche,
joystick analogique
droit,
touche L3,
touche R3
Ranuras para
MEMORY CARD
(tarjeta de memoria)
Logotipo de la
familia de
productos "
"
Botón 1 (espera)/
RESET e indicador 1
Botón A (abrir) e
indicador A
Bandeja del
disco
Puertos de mando
Botón L2,
botón R2,
botón L1,
botón R1
Botones de
dirección
Botones
¢
, a , ! , s
Botón START
(inicio)
Botón modo
ANALOG
(analógico)
Botón SELECT
(selección)
Joystick analógico
izquierdo, joystick
analógico derecho
botón L3,
botón R3
FR
Français
P.22
DE
Deutsch
S.62
ES
Español
P.42
MEMORY CARD-
Steckplätze
,,
"-
Produktfamilien-
logo
1
(standby)/RESET-
Taste und 1 -
Kontroll-Leuchte
A
(Eject)-Taste und
A
-Kontroll-Leuchte
DVD/CD-Lade
Controller-
Anschlüsse
L2-Taste,
R2-Taste,
L1-Taste,
R1-Taste
Richtungstasten
¢
-, a-, !-, s-
Tasten
START-Taste
ANALOG-
Modustaste
SELECT-Taste
Linker Analog-
Stick, Rechter
Analog-Stick,
L3-Taste,
R3-Taste
2
WARNING
Disc handling
· Do not leave discs near a heat source, in direct sunlight,
or in high humidity.
· Store discs in their cases when they are not being used.
Stacking discs or standing them at an angle without
putting them in their cases can cause the discs to warp.
· Do not touch the disc surface when handling a disc;
hold it by the edges.
· Do not stick paper or tape onto the disc.
· Do not write on the disc with a marker, etc.
· Fingerprints or dust on the disc can distort the picture
or reduce sound quality. Make sure discs are always
clean before use.
· Clean discs using a soft cloth, lightly wiping from the
centre outwards.
· Do not use solvents such as benzene, commercially
available cleaners not intended for CD use or anti-static
spray intended for vinyl LPs since these can damage
the disc.
Do not place the console in an unusually hot
location
Do not leave the console in a car with its windows closed
(particularly in summer) as this may warp the exterior of
the console or cause the console to malfunction.
Moisture condensation
If the console or the disc is brought directly from a cold
location to a warm one, moisture may condense on the
lens inside the console or on the disc. Should this occur,
the console may not operate properly. In this case, remove
the disc and do not put the disc back in until the moisture
evaporates. (This could take several hours.) If the console
still does not operate properly, please contact the
appropriate PlayStation® customer service number which
can be found on the customer registration card, within
every PlayStation® and PlayStation®2 format software
manual and on our website www.scee.com
Do not subject the console to violent
physical shock
Do not throw or drop the console or its accessories, and do
not knock the console or its accessories against other
objects. When carrying the console, do not subject it to any
type of violent physical shock. This may damage the disc
or cause the console to malfunction.
Avoid damaging the exterior of the console
Do not apply any solvents, and do not place any rubber or
vinyl materials on the surface of the console for an
extended period of time. Doing so may damage the plastic
surface or cause the paint to peel off.
Precautions
Cleaning the exterior of the console
When cleaning the exterior of the console, be sure to turn
the power off with the MAIN POWER switch on the back
of the console and disconnect the AC power plug from the
electrical socket.
· If the exterior of the console becomes dirty, soak a soft
cloth in a mild detergent solution diluted with water,
tightly squeeze the cloth to remove the excess liquid,
wipe the affected area of the exterior and finish by
wiping with a dry cloth.
· Do not use benzene or paint thinner to clean the
exterior of the console since these may damage the
surface or cause the paint to peel off. When using a
chemically-treated dust cloth, follow the usage
instructions supplied with it.
· Dust can accumulate in both the front and rear vents of
the console. Check the vents from time to time and
remove any accumulated dust with a handheld or low
powered vacuum cleaner.
Never disassemble the console
· Use your PlayStation®2 computer entertainment
system according to the instructions in this manual.
No authorisation for the analysis or modification of the
PlayStation®2 console, nor the analysis and use of its
circuit configurations, is given.
· There are no user-serviceable components inside the
PlayStation®2 console. Disassembling it will void the
guarantee. Additionally, there is a risk of exposure to
(laser) radiation as well as to electrical shock hazards.
Notes on safety when using the Analog
Controller (DUALSHOCK®2) and Analog
Controller (DUALSHOCK®)
· Stop using the console immediately if you begin to feel
tired or if you experience an unpleasant sensation or
pain in your hands and/or arms while operating the
controller. If the condition persists, consult a doctor.
· Do not attempt to operate the controller in any way
except with your hands. Do not bring the controller
into close contact with your head, face or near the
bones of any other part of your body.
· The vibration function of the Analog Controller
(DUALSHOCK®2) or the Analog Controller
(DUALSHOCK®) can aggravate injuries.
Do not use the vibration function of the Analog
Controller (DUALSHOCK®2) and Analog Controller
(DUALSHOCK®) supported by software if you have
any ailment in the bones or joints of your hands or arms.
· Do not use the Analog Controller (DUALSHOCK®2) or
the Analog Controller (DUALSHOCK®) with software
that supports the vibration function if you have injuries
or ailments to the bones or muscles of your fingers ,
hands, wrists or arms. The vibration of the controller
may aggravate such conditions.
· Avoid prolonged use of the Analog Controller
(DUALSHOCK®2) and Analog Controller (DUALSHOCK®).
Take a break at about 30 minute intervals.
To prevent fire or shock hazard, do not
expose the console to rain or moisture.
To avoid electrical shock, do not open the
cabinet. Refer servicing to qualified
personnel only.
Caution
The use of optical instruments with this
product will increase eye hazard. As the
laser beam used in this unit is harmful to
eyes, do not attempt to disassemble the
cabinet.
Refer servicing to qualified personnel only.
Read carefully before
operating your PlayStation®2
A few people may experience epileptic seizures when
viewing flashing lights or patterns in our daily
environment. These persons may experience seizures
while watching TV or playing video games, including
DVD videos or games played on the PlayStation®2
console. Players who have not had any seizures may
nonetheless have an undetected epileptic condition.
Consult your physician before operating the PlayStation®2
console if you have an epileptic condition or experience
any of the following symptoms while watching TV
programs or playing video games: altered vision, muscle
twitching, other involuntary movements, loss of
awareness of your surroundings, mental confusion, and/
or convulsions.
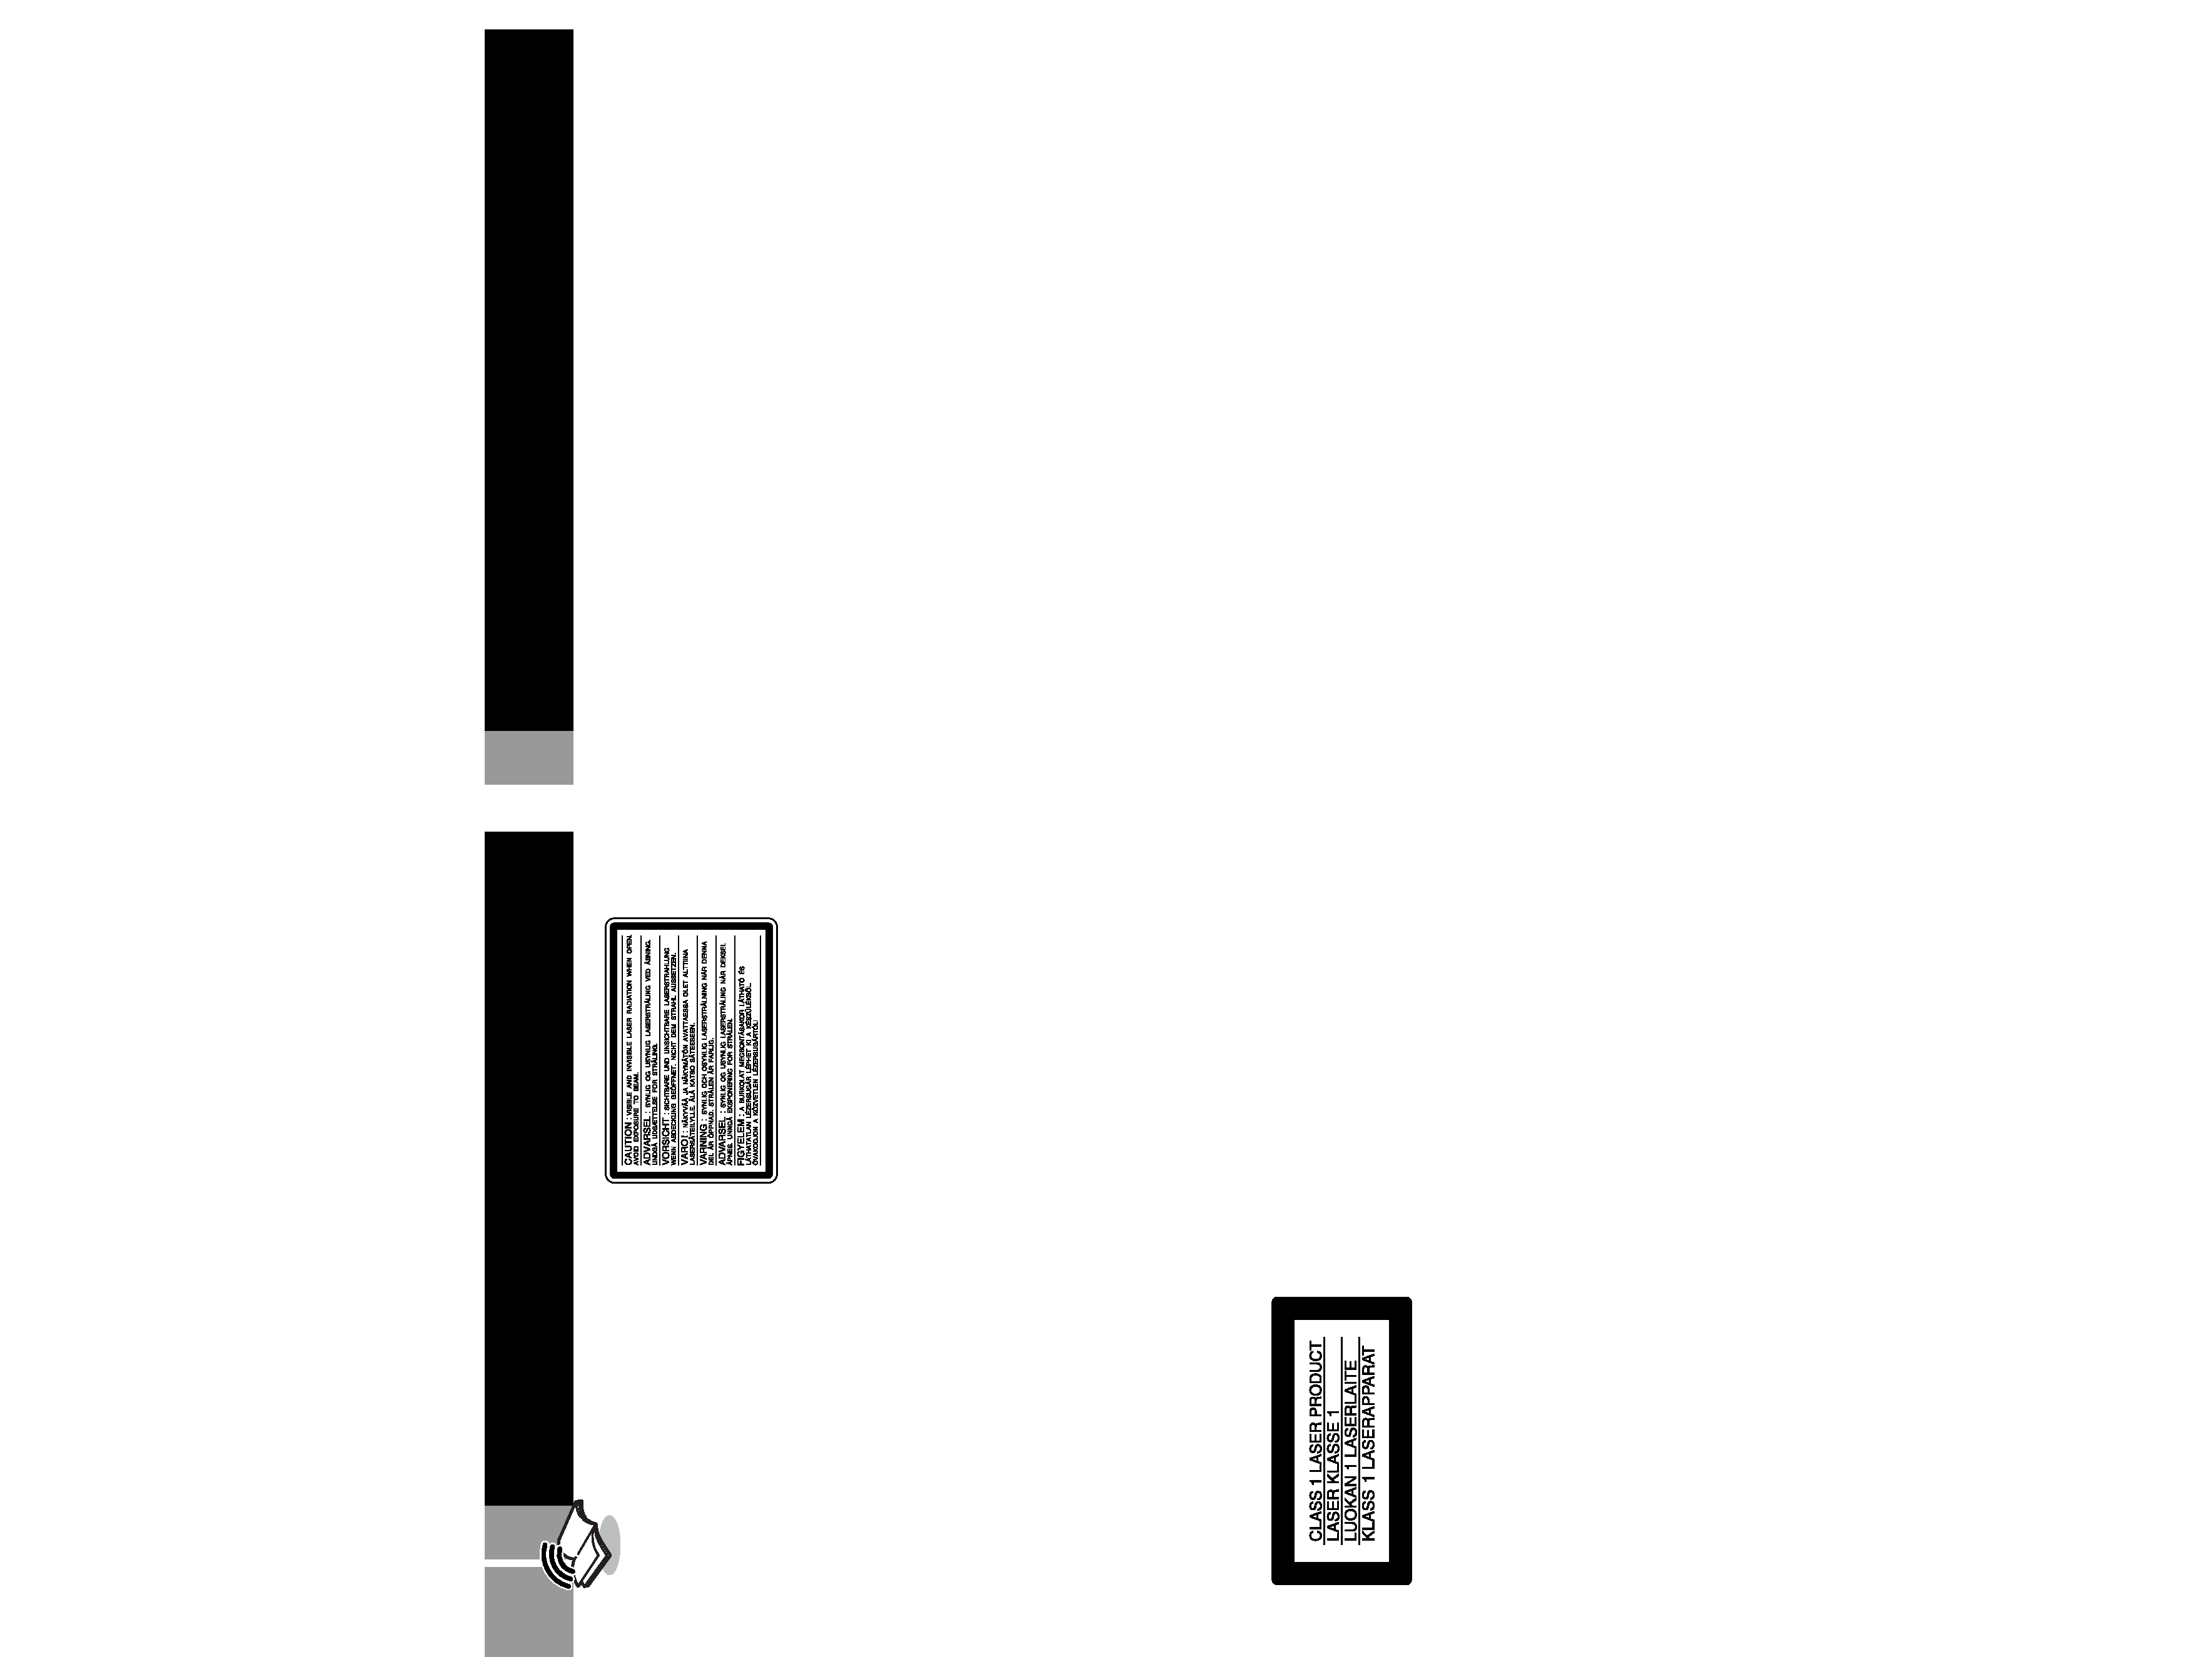
This appliance is classified as a CLASS 1 LASER product.
This label is located on the protective housing of the CD/
DVD unit inside the enclosure.
3
GB
Connection
DVD video systems and regional restrictions
·This console conforms to the PAL broadcast
standard. You cannot play discs recorded for
other broadcast standards (such as NTSC) on
this console (unless the NTSC disc displays
the ALL label and an NTSC compatible TV is
used).
·Some DVD videos are marked with region
numbers such as 2 . The number contained
within the symbol represents the region
number of DVD players on which the disc can
be played. DVD videos that do not bear this
symbol, or that do not display the number 2
cannot be played on your console.
·DVDs with the ALL label can also be played
on this console.
If you attempt to play any other DVDs, a
message stating "This disc cannot be played
due to regional restrictions." will appear on-
screen.
Discs that can be played on PlayStation®2
Table of contents
·Some DVDs that have no region code
markings may still be subject to area
restrictions and may not be playable on the
console.
Note on playback operations of DVDs
This console plays DVD video as originally
designed by the software producers. Some
of the playback features of this console may
not have been incorporated into the DVD
video design. As a result, some playback
features may not be available with certain
DVD videos. Please refer to the instructions
supplied with your DVD video for details.
Specially-shaped discs
Do not use irregularly-shaped CDs (for
example, heart- or star-shaped CDs) as they
may cause the console to malfunction.
Disc logo
Disc colour
Contents
Disc size
PlayStation®2 format
DVD-ROM
"
", PlayStation®2 logo
and
designation
Silver
PlayStation®2 format
CD-ROM
"
", PlayStation®2 logo
and
designation
Blue
Audio and video
12 cm
PlayStation® format
CD-ROM
PlayStation® logo and
designation
Black
Disc logo
Contents
Disc size
Play time
Audio CDs
Audio
DVD videos
Audio and video
12 cm
74 min
8 cm*
(CD single)
20 min
12 cm
About 4 hrs
(single-sided) /
about 8 hrs
(double-sided)
8 cm
About 80 min
(single-sided) /
about 160 min
(double-sided)
* When you position the console vertically and play an 8 cm audio CD, be sure to use an optional adaptor.
The "DVD VIDEO" logo is a trademark.
WARNING
2
Precautions
2
Discs that can be played on PlayStation®2
3
Checking the package contents
4
Positioning the console
4
Connecting your PlayStation®2 to a TV set
4
Connecting digital audio equipment
6
Connecting other digital devices
6
Using the Main menu
7
Playing a game
8
Using the Analog Controller
9
Using Memory Cards
10
Playing an audio CD
10
Playing a DVD video
11
Using various functions with the Control Panel
12
Settings and adjustments for the DVD Player
15
Troubleshooting
19
Specifications
20
Glossary
21
GUARANTEE
21
Getting started
Connection
Game / Audio CD
DVD video
Additional
information
4
Check that you have the following items:
· Console
You can position the console either horizontally
or vertically.
When positioning the console vertically, use
the SCPH-10040 E Vertical Stand (for
PlayStation®2) (sold separately).
When positioning the console horizontally, you
can use the SCPH-10110 E Horizontal Stand (for
PlayStation®2) (sold separately).
Checking the package contents
Positioning the console
Notes
The console may be damaged if it is placed in any position
other than a horizontal or vertical one.
Do not change the position of the console (from horizontal
to vertical or vice versa) while it is in operation. Doing so
may damage the disc or cause the console to malfunction.
The "
" product family logo located on
the disc tray
The "
" product family logo on the disc tray
can be rotated to match the horizontal or
vertical positioning of the console.
Connecting your PlayStation®2 to
Vertical positioning
Horizontal positioning
Note about bouncing effect
Some TVs or monitors may experience a bouncing effect
in their pictures when using the PlayStation®2 console.
There is nothing wrong with the PlayStation®2 console
or the way it is manufactured. The problem technically
lies within the television. If you encounter such a
problem with your television/monitor, please contact
the appropriate PlayStation® customer service number
which can be found on the customer registration card,
within every PlayStation® and PlayStation®2 format
software manual and on our website www.scee.com
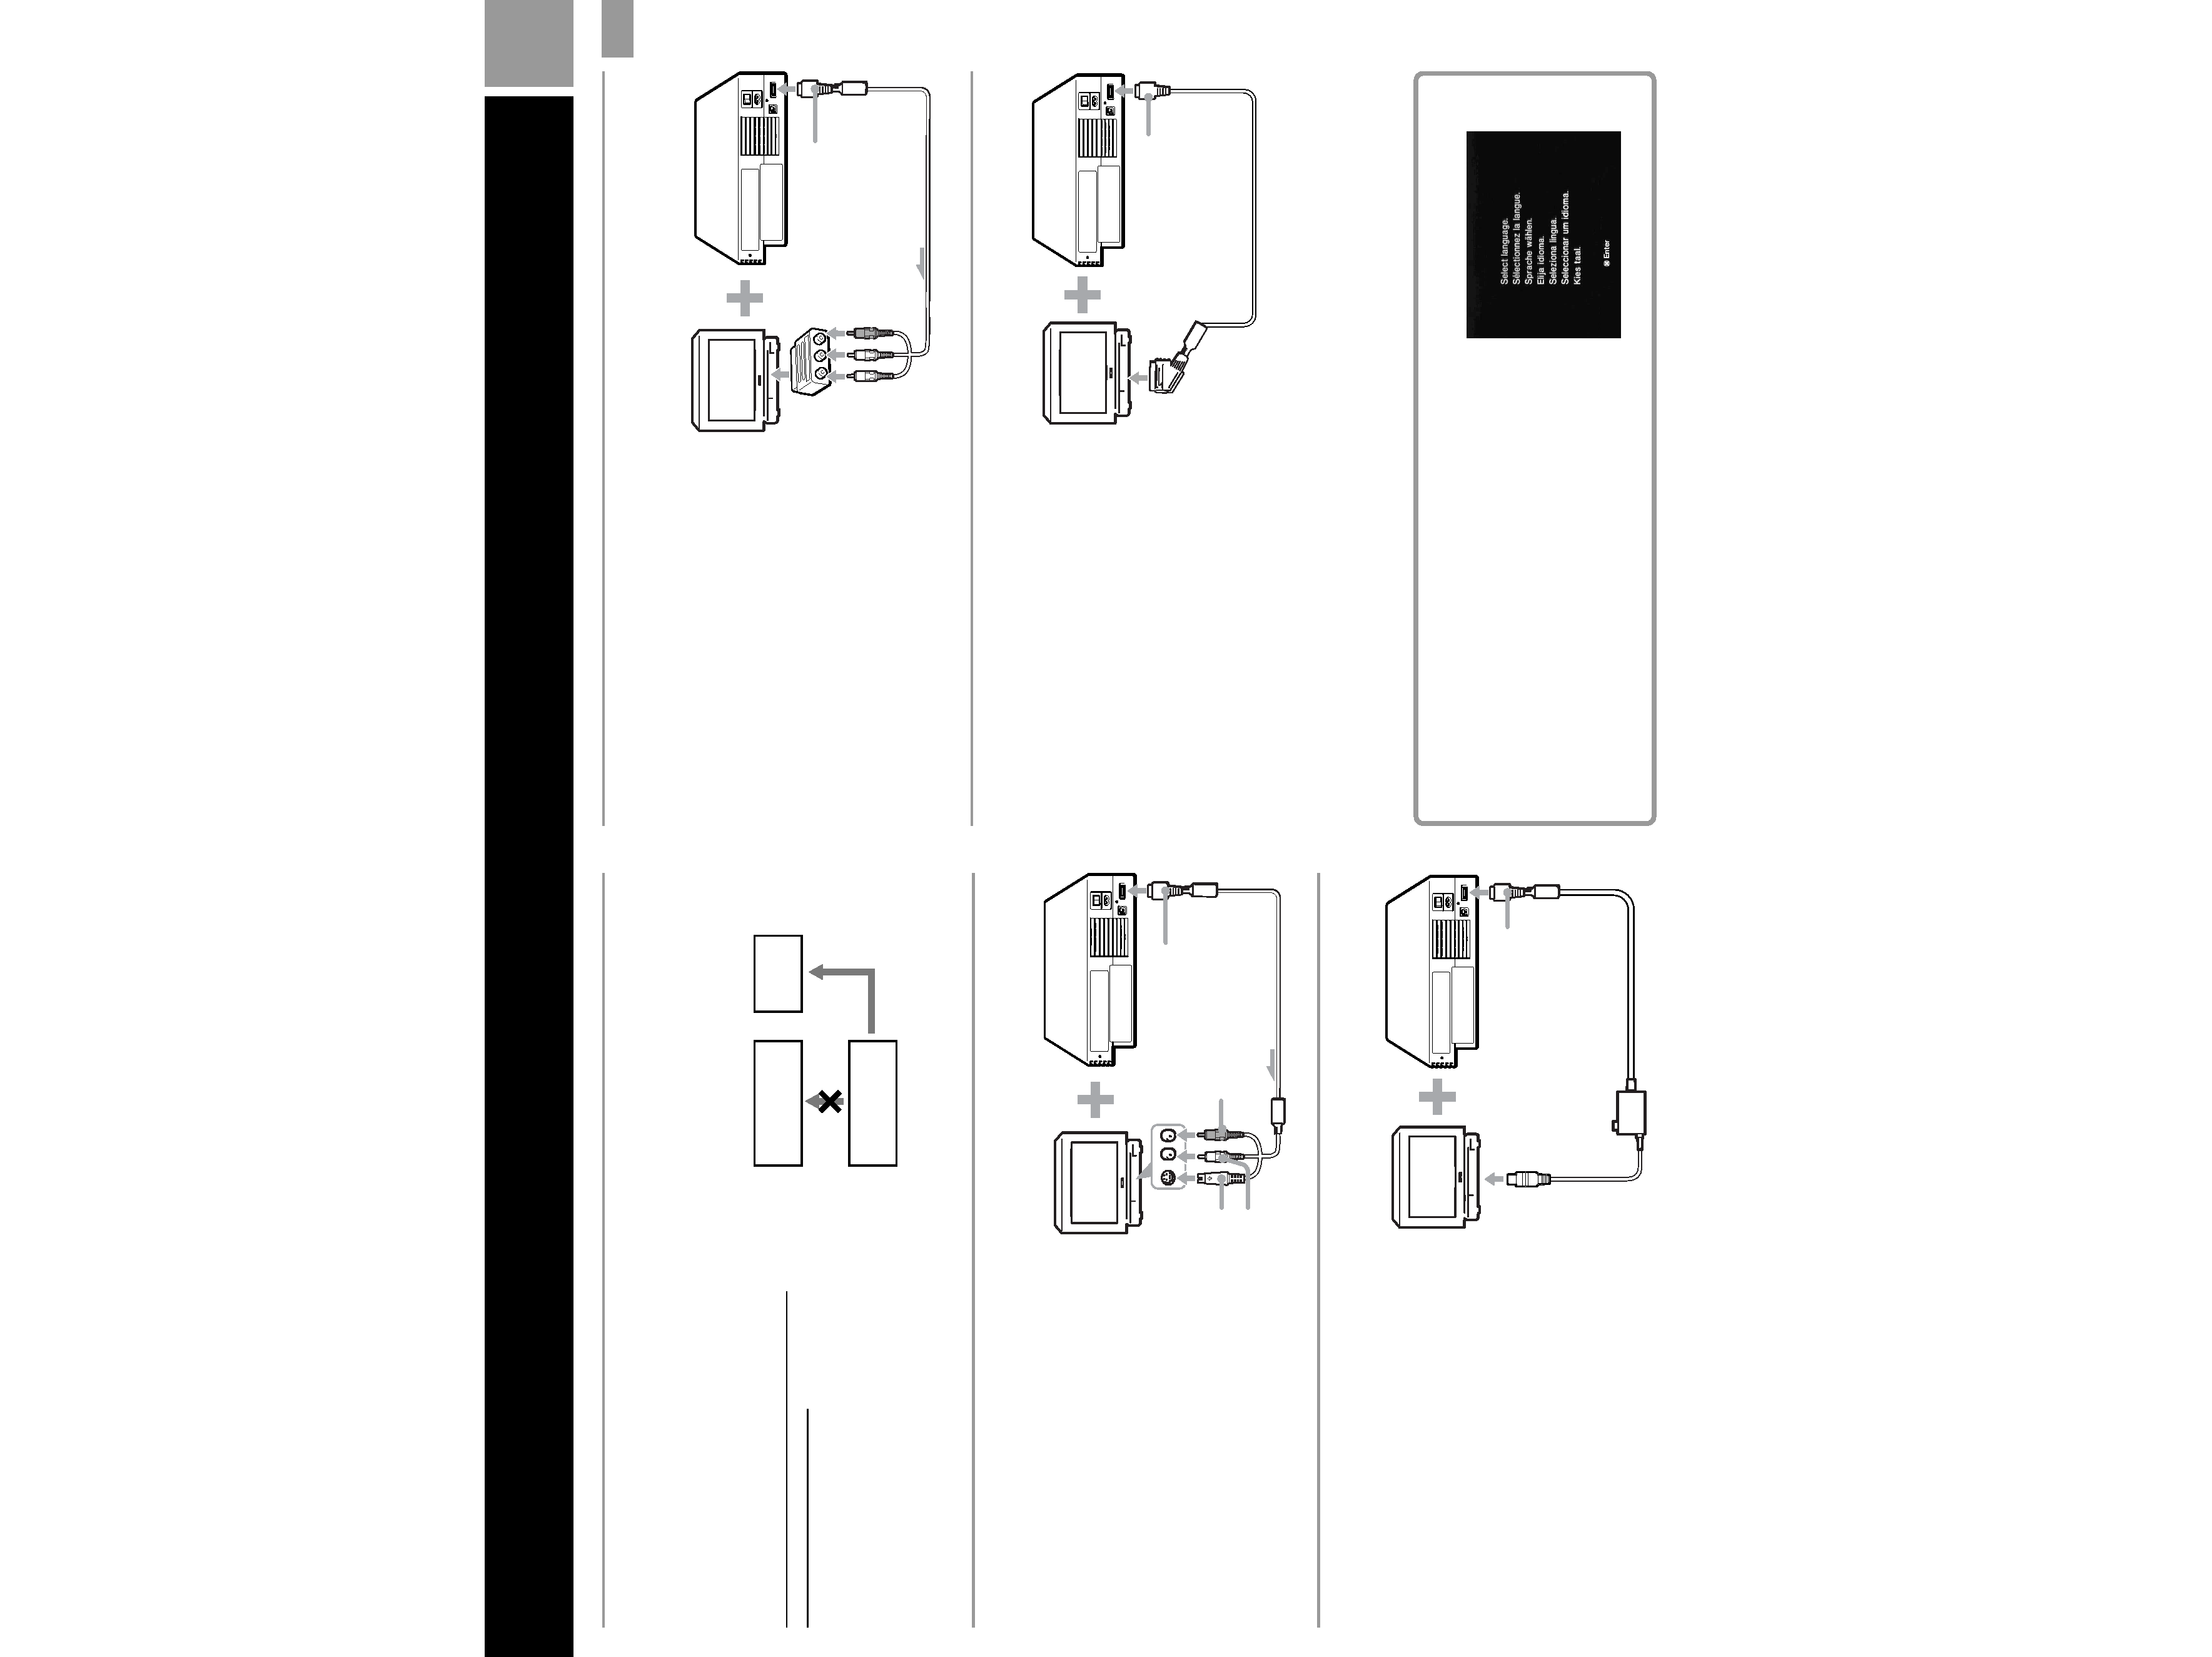
This section explains the connecting method for listening to sound through your TV speakers.
If you wish to connect to audio equipment with digital connectors, see "Connecting digital audio
equipments" on page 6.
Connecting to a TV with audio/video input
Connect your PlayStation®2 computer entertainment system to the TV using the supplied AV Cable
(integrated audio/video).
When connecting the cords, be sure to match the colour-coded cords to the appropriate jacks on the
equipment: yellow (video) to yellow, red (right audio) to red and white (left audio) to white.
After connecting
Set your TV to the appropriate video input mode. Refer to the instruction manual for your TV.
When connecting to a wide-screen TV (16:9 aspect ratio)
Set "Screen Size" in the System Configuration menu to "16:9." For details on the System
Configuration menu, see page 7.
If your TV is monaural
Do not connect the red plug. If you want to hear both left and right sounds from a monaural TV, use a commercially
available dual phono to single phono (stereo to monaural) type audio cable (sold separately).
DIGITAL OUT (OPTICAL)
connector
~AC IN connector
MAIN POWER
switch
To AV MULTI OUT
connector
AV Cable (integrated audio/video)
AC power cord
Static image caution
Static, non-moving images, such as DVD menus,
configuration displays, or images "paused" may leave a
faint image permanently on the TV screen if left on for
extended periods of time.
Projection TVs are more susceptible to this than other
types of displays. Do not operate the console in such a
manner that this could occur.
· Analog Controller (DUALSHOCK®2)
· AV Cable (integrated audio/video)
· AC power cord
· Instruction manual
· Euro-AV connector plug
To the mains
EXPANSION BAY
5
GB
Connection
C
Connecting to a TV with an S VIDEO input connector
a TV set
Connecting to a VCR
Connect your PlayStation®2 console to your
VCR using the supplied AV Cable (integrated
audio/video) matching the plug colours to the
jacks on the VCR.
If your VCR is monaural, do not connect the
red plug.
However, when playing a DVD video, do not
connect the console to a VCR. If you do, the
colour is disturbed. Connect the console
directly to the TV.
After connecting
Set your TV and VCR adjustments
appropriately. Refer to the instruction manuals
for your TV and VCR.
Connect your PlayStation®2 console to the
S VIDEO input connector on the TV using the
SCPH-10060 E S VIDEO Cable (sold separately)
for a higher quality picture.
After connecting
Set your TV to the appropriate video input
mode (such as "S VIDEO").
VCR
Connect directly
PlayStation®2
console
TV
When playing a DVD video
Connecting to a TV with an aerial input
Connect your PlayStation®2 console to the
aerial input on the TV using the SCPH-10072 C
RFU Adaptor (sold separately). In this case, the
sound will be monaural.
After connecting
Tune your TV to channel 36.
C
To AV MULTI OUT
connector
To AV MULTI OUT
connector
To S VIDEO input
To aerial input
Connecting to a TV with a Euro-AV connector using the Euro-AV
connector plug
Connect your PlayStation®2 console to the
Euro-AV connector (SCART) on the TV using
the Euro-AV connector plug and AV Cable
(integrated audio/video), making sure you
match the colour-coded plugs of the AV Cable
to the matching jacks of the connector plug.
After connecting
Set your TV to the appropriate video input
mode. Refer to the instruction manual of your
TV.
Connecting to a TV with a Euro-AV connector using the Euro-AV Cable
You can improve picture quality by using the
Euro-AV Cable SCPH-10142 (sold separately).
Connect your PlayStation®2 console to the
Euro-AV connector on the TV.
After connecting
Set your TV to the appropriate video input
mode. Refer to the instruction manual of your
TV.
Note
Euro-AV Cable supports the video output of
PlayStation®2 and PlayStation® format software only.
Important!
When viewing DVD videos on your PlayStation®2, use
another cable which supports PlayStation®2 format video
output, for example AV Cable (integrated audio/video),
RFU Adaptor or S VIDEO Cable.
To AV MULTI OUT
connector
To Euro-AV
connector
To AV MULTI OUT
connector
When turning on the console for the first time
The initial setup screen appears.
Set "Language," "Time Zone" and "Daylight Savings Time
(Summer Time)" according to the instructions on the
screen.
Settings can be adjusted later in the System Configuration
menu. For details, see "Using the System Configuration
menu" on page 7.
To Euro-AV
connector
To audio input (left)
To audio input (right)