Operating Instructions
Mode d'emploi
PEGA-KB20
Sony Corporation © 2002 Printed in Japan
English
WARNING
To prevent fire or shock hazard, do not expose the unit to rain
or moisture.
To avoid electrical shock, do not open the cabinet. Refer
servicing to qualified personnel only.
Owner's Record
The model and lot numbers are located on the bottom of your mini
keyboard. Record the lot number in the space provided below. Refer to
the model and lot numbers when you call your Sony dealer regarding
this product.
Model No. PEGA-KB20
Lot No.
For the customers in the USA
This device complies with Part 15 of the FCC rules. Operation is subject
to the following two conditions:
(1) This device may not cause harmful interference, and (2) this device
must accept any interference received, including any interference that
may cause undesired operation.
This equipment has been tested and found to comply with the limits
for a Class B digital device, pursuant to Part 15 of the FCC Rules. These
limits are designed to provide reasonable protection against harmful
interference in a residential installation. This equipment generates,
uses, and can radiate radio frequency energy and, if not installed and
used in accordance with the instructions, may cause harmful
interference to radio communications. However, there is no guarantee
that interference will not occur in a particular installation. If this
equipment does cause harmful interference to radio or television
reception, which can be determined by turning the equipment off and
on, the user is encouraged to try to correct the interference by one or
more of the following measures:
· Reorient or relocate the receiving antenna.
· Increase the separation between the equipment and the receiver.
· Connect the equipment into an outlet on a circuit different from that
to which the receiver is connected.
· Consult the dealer or an experienced radio/TV technician for help.
If you have a question about this product, call the Sony Customer
Information Center at keep on next line 1-877-760-7669; or write to the
Sony Customer Information Center at 12451 Gateway Boulevard, Fort
Myers, FL 33913. The number below is for FCC-related matters only.
Declaration of Conformity
Trade Name: SONY
Model No.:
PEGA-KB20
Responsible Party: Sony Electronics Inc.
Address: 680 Kinderkamack Road, Oradell, NJ 07649 USA
Telephone No.: 201-930-6972
This device complies with part 15 of the FCC Rules.
Operation is subject to the following two conditions:
(1) This device may not cause harmful interference, and
(2) This device must accept any interference received, including
interference that may cause undesired operation.
The supplied interface cable must be used with the equipment in order
to comply with the limits for a digital device pursuant to Subpart B of
Part 15 of FCC Rules.
You are cautioned that any changes or modifications not expressly
approved in this manual could void your authority to operate this
equipment.
For the customers in Canada
This Class B digital apparatus complies with Canadian ICES-003.
For the customers in the European Countries
This device complies with the following European Directives:
89/336/EEC, 92/31/EEC (EMC Directives)
93/68/EEC (CE Marking Directive)
4-663-796-13 (1)
Mini Keyboard
This product complies with EN 55022 Class B and EN 55024 for use in
the following areas: residential, commercial and light industrial.
· CLIÉ and Jog Dial are trademarks of Sony Corporation.
· All other trademarks are trademarks of their respective owners.
Before use
This Mini Keyboard is adaptable only for Sony CLIÉ Handheld. It is
easy to carry, and handy when you use it with Sony CLIÉ Handheld
while traveling.
Installing the software
Before using the Keyboard, install a Keyboard driver from the supplied
installation CD-ROM on your CLIÉ Handheld.
For installation, you need a Windows PC on which the Palm Desktop
software that is suitable for your CLIÉ Handheld has been installed.
Connect the PC to your CLIÉ Handheld, and make sure that HotSync
works on both the PC and CLIÉ Handheld.
1 Insert the supplied installation CD-ROM into the CD-
ROM drive of your PC.
The initial installation screen appears.
2 Click [Install software for Mini Keyboard].
The installer submenu appears.
3 Install the software, following the instructions shown
on the screen.
If you have registered more than one user, select a user name from
the user list.
4 Click [Done].
5 Press the HotSync button on the cradle.
HotSync starts and the software is transmitted from your Windows
PC to CLIÉ Handheld.
Note
Re-installing the driver for the Mini Keyboard in your CLIÉ
Please perform re-installation, once you delete the driver already installed
in your CLIÉ.
If the driver is not deleted beforehand, malfunction may occur.
If a fault occurs, please perform a soft reset, according to the operating
instructions for your CLIÉ.
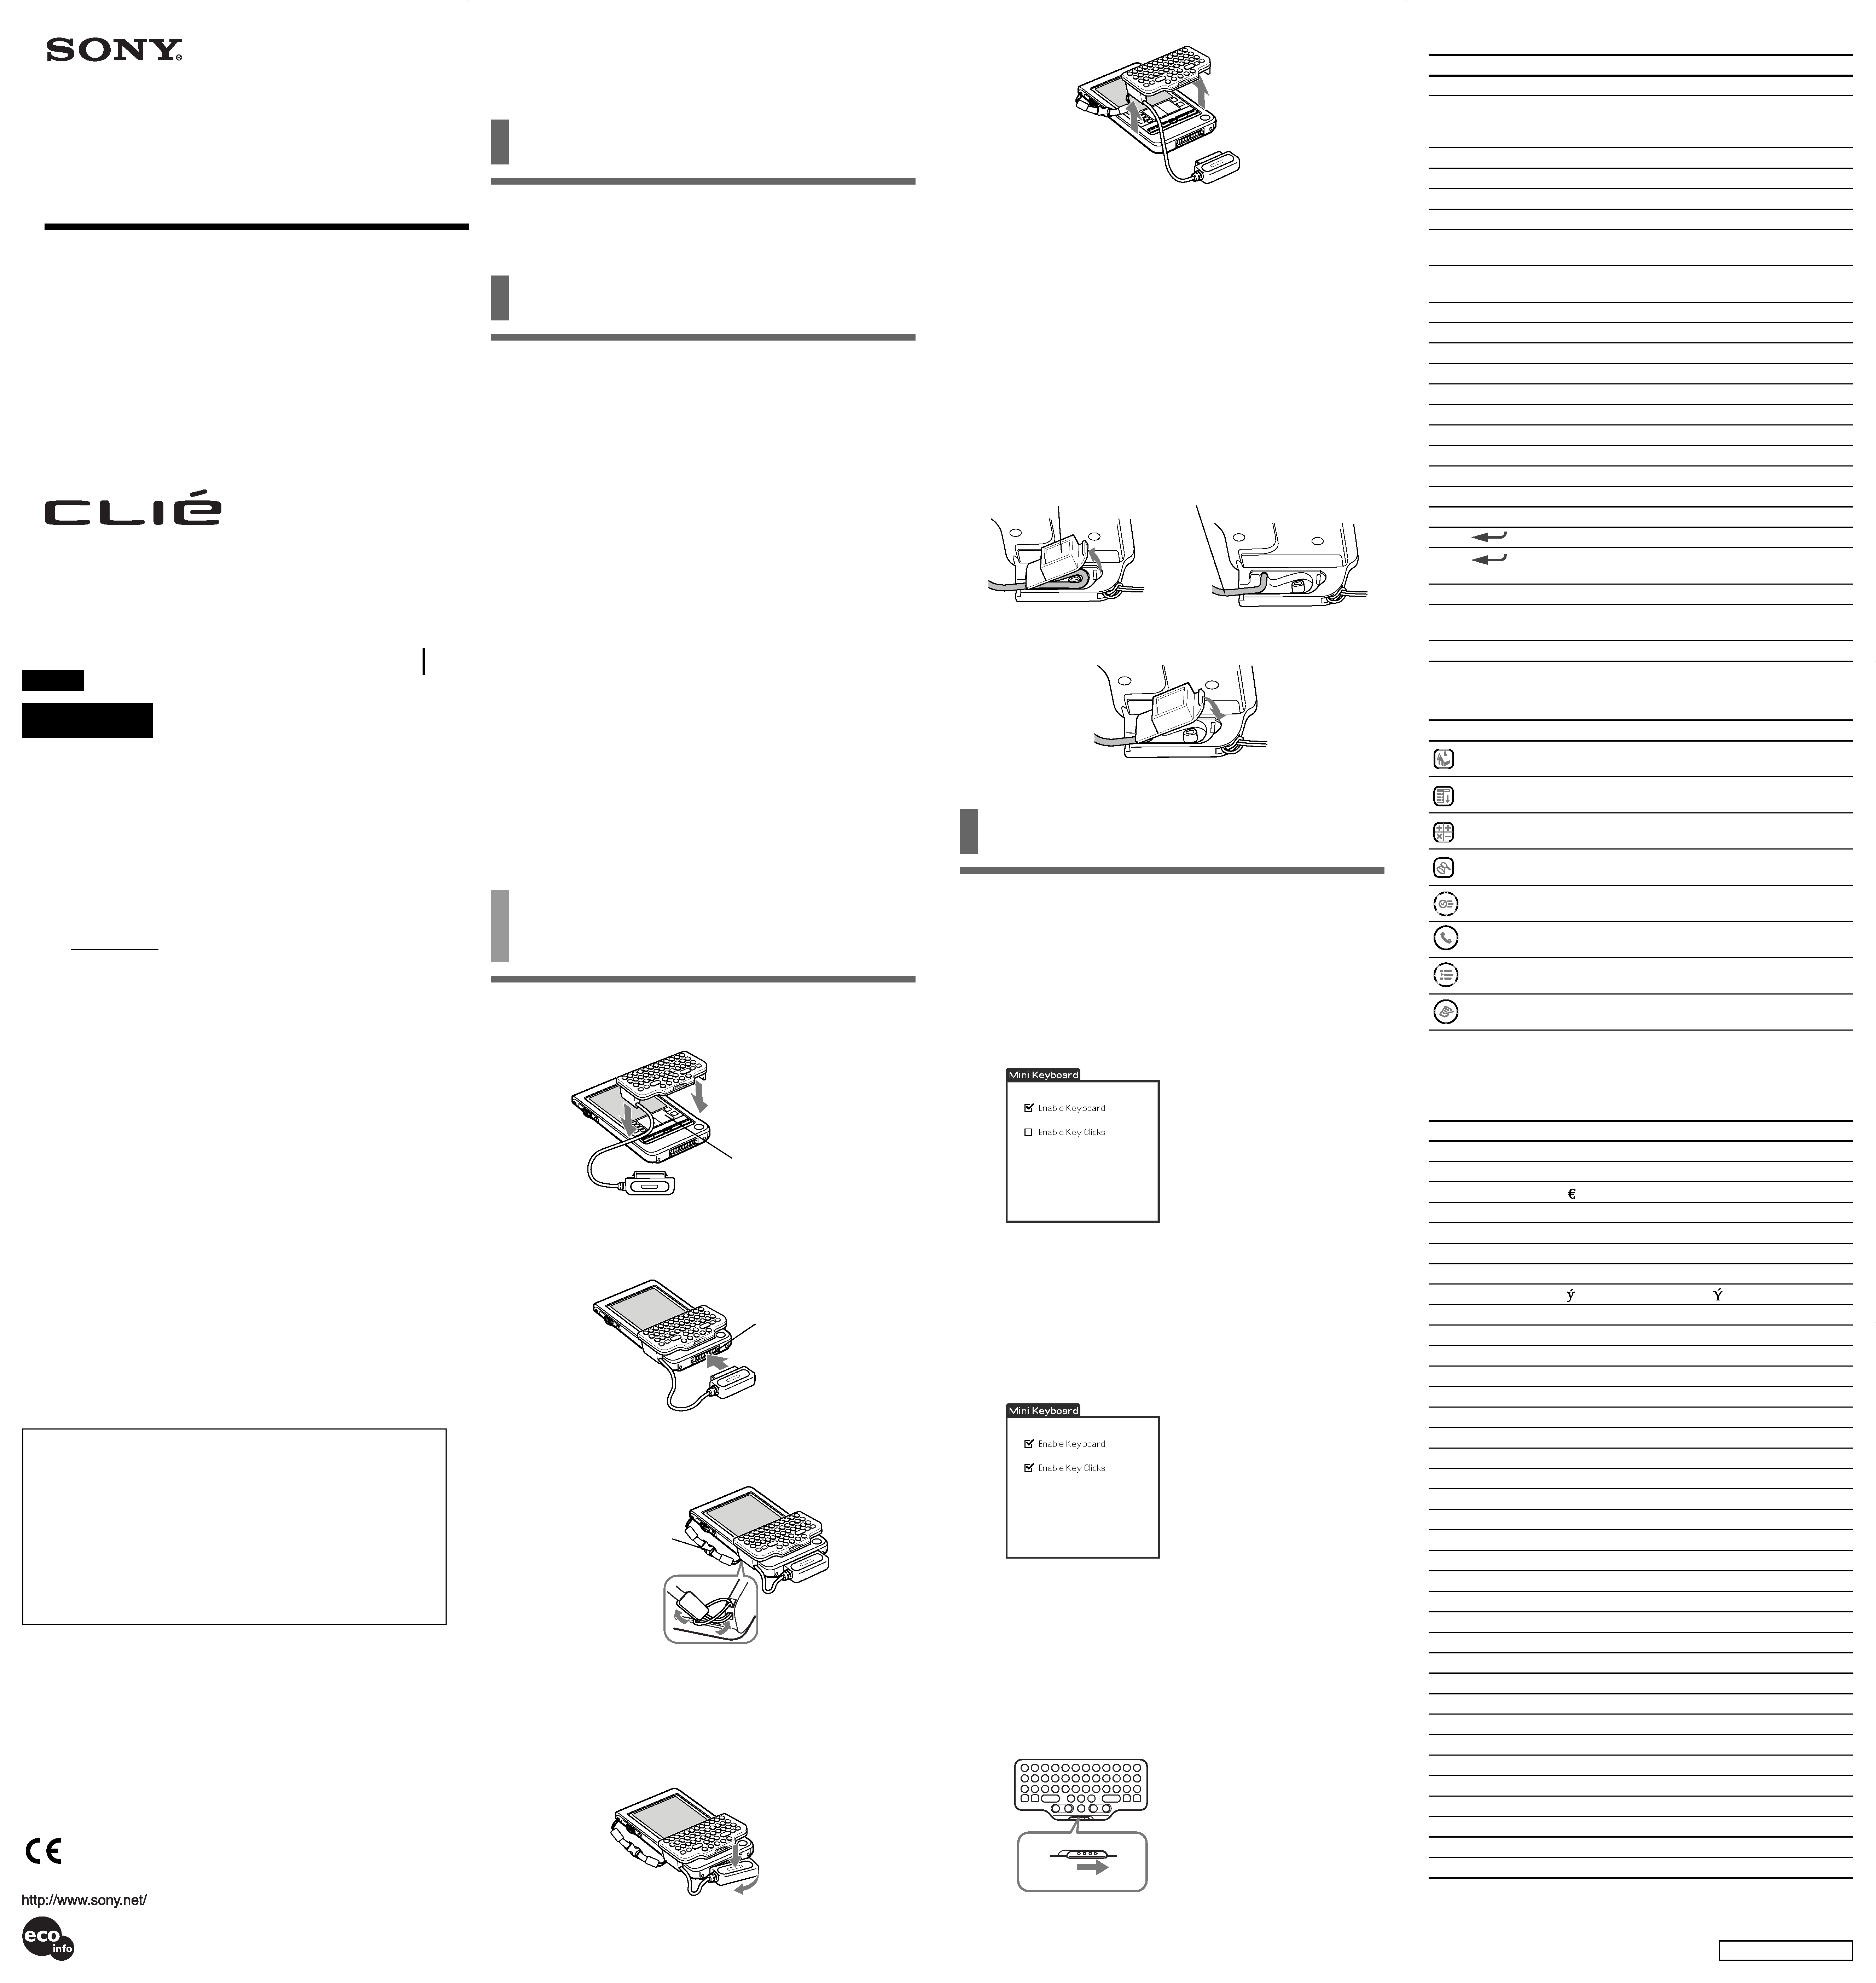
Attaching the Keyboard to
your CLIÉ Handheld
1 Attach the Keyboard to the CLIÉ Handheld, as if to put
it onto the CLIÉ Handheld, as shown.
2 Hook up the connector of the Keyboard to the
interface connector of the CLIÉ Handheld.
3 Attach the drop-prevention strap to the Keyboard and
CLIÉ Handheld.
Removing the Keyboard
1 Remove the Keyboard while pressing the center portion on the
connector of the Keyboard, as shown.
Press down firmly.
The graffiti area should be
covered by the Keyboard.
Interface connector
For detaching,
press the retaining
parts from both sides.
Detach the cover.
Extend the cord.
2 Remove the Keyboard from the CLIÉ Handheld.
3 Remove the drop-prevention strap by pressing the retaining
parts from both sides.
z
Be sure to attach the drop-prevention strap when you
use the Keyboard.
The CLIÉ Handheld and Keyboard are easily detachable. To prevent injury,
or damage to them, be sure to attach the strap.
Extending the cord
Detaching the cover on the back of the Keyboard lengthens the cord by
about 30 mm.
1 Detach the cover on the back of the Keyboard and extend the
cord as shown.
2 Put the cover back in its place.
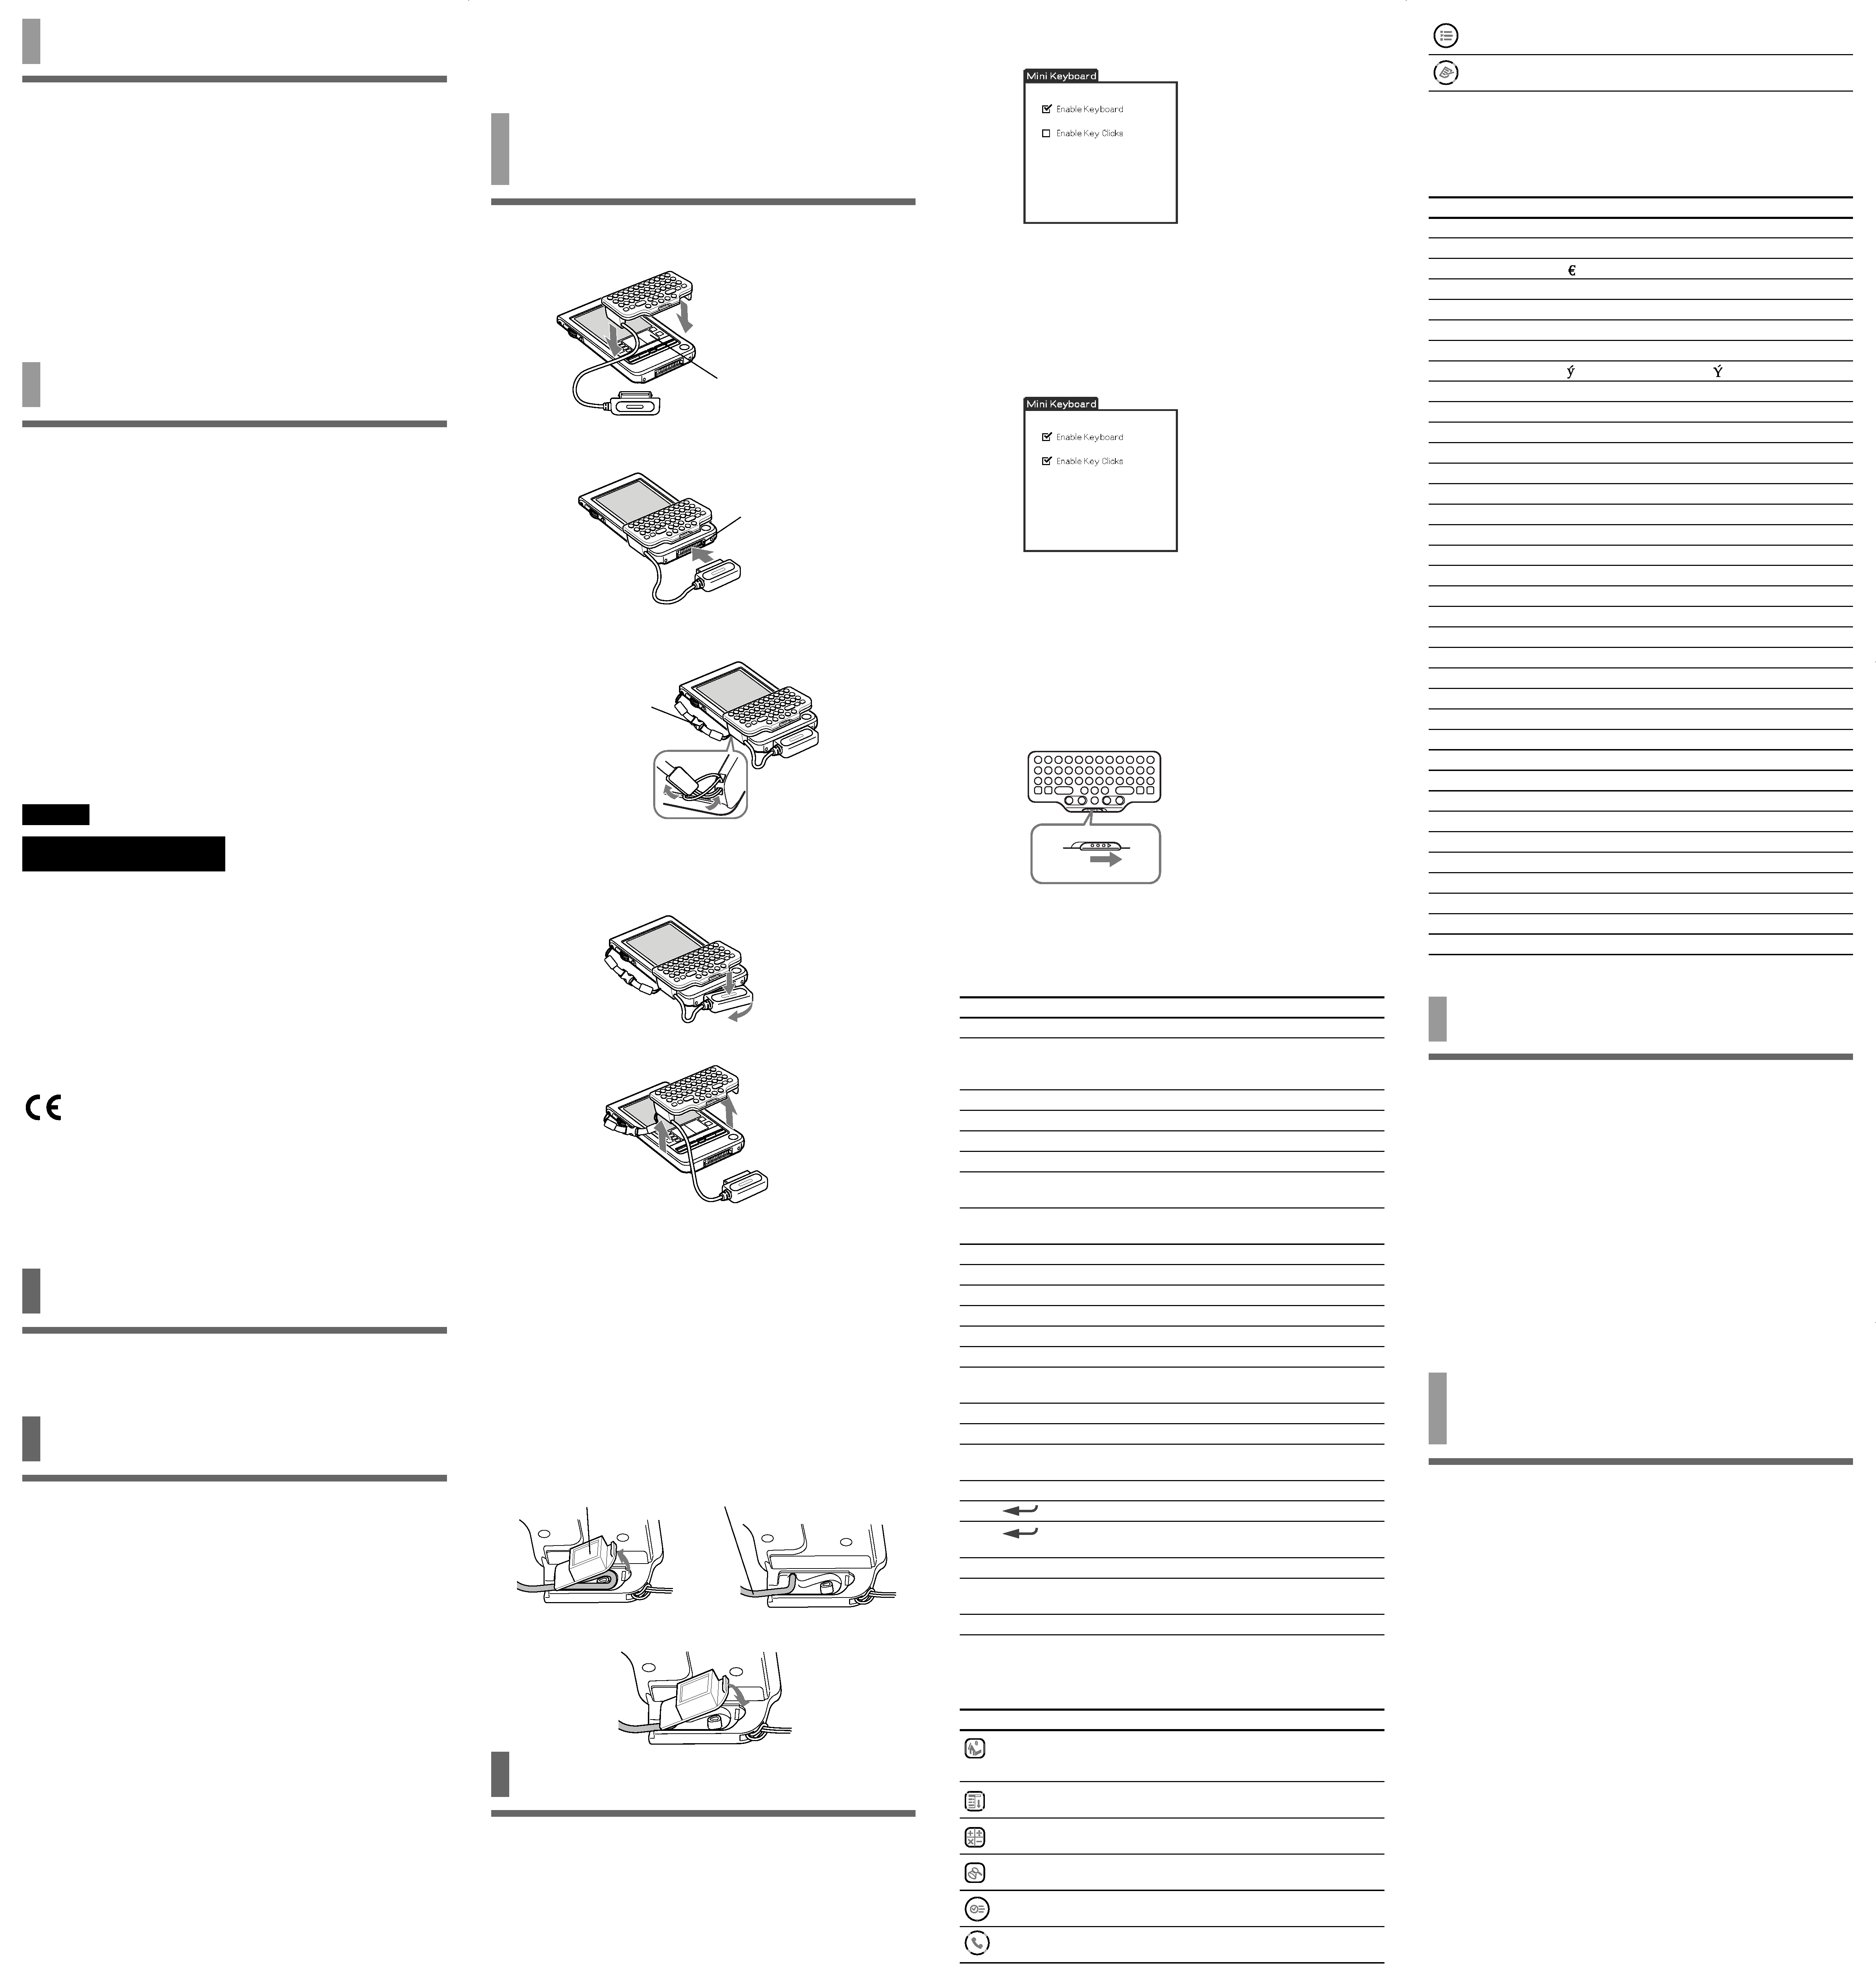
Using the Keyboard
After attaching the Keyboard to your CLIÉ Handheld, you can use the
Keyboard by the following procedure.
1 Press the POWER button on the CLIÉ Handheld to turn
the power on.
2 Tap the [Mini Key] icon on the Home screen.
The Keyboard-setting screen appears.
3 Tap and select the check box for [Enable Keyboard] in
the Keyboard-setting screen.
The Keyboard is ready to use now.
Setting the click sound for the Keyboard
You can set the sound that is heard when you click the keys.
1 Tap [Mini Key].
The Keyboard-setting screen appears.
2 Tap and select the check box for [Enable Key Clicks] in the
Keyboard-setting screen.
The click sound is heard when you press the keys.
To turn off the click sound, deselect the check box for [Click sound] in
the Keyboard-setting screen.
Carrying your CLIÉ Handheld with the
Keyboard attached
Set the HOLD switch on the Keyboard to ON. The Keyboard does not
accept any key operation and prevents the CLIÉ Handheld from
operating without your knowledge.
When you use the Keyboard again, set the HOLD switch to OFF.
Shortcut keys
Keys to press
Function
Fn + Blue letter key
Selects the blue letter code.
Shift + Alphabetic keys;
- with CapsLock off
Enters capital letters.
- with CapsLock on
Enters lower-case letters.
Shift + b
Selects preceding text.
Shift + B
Selects continuing text.
Shift + Ctrl + b
Selects all preceding text.
Shift + Ctrl + B
Selects all continuing text.
Shift + Ctrl + v
Rotates the Jog Dial navigator upward while
holding it down.
Shift + Ctrl + V
Rotates the Jog Dial navigator downward
while holding it down.
Shift + Ctrl + Tab
Jumps back to the previous field.
Ctrl + C
Copies the selected text.
Ctrl + X
Cuts the selected text.
Ctrl + V
Pastes the selected text.
Ctrl + D
Deletes the selected text.
Ctrl + L
Turns on/off the backlight.
Ctrl + H
Goes to the Home (Launcher) screen.
Ctrl + M
Goes to the Menu screen.
Ctrl + F
Does a search.
Ctrl + v
Rotates the Jog Dial navigator upward.
Ctrl + V
Rotates the Jog Dial navigator downward.
Ctrl +
Presses the Jog Dial Navigator.
Ctrl +
(Hold it down.)
Holds down the Jog Dial Navigator.
Ctrl + BS
Presses the Back button.
Ctrl + BS (Hold it down.)
Holds down the Back button.
Ctrl + Tab
Jumps to the next field.
Application key settings
Keys to press
Function
Home
Goes to the Home (Launcher) screen.
Menu
Goes to the Menu screen.
Calc
*Opens the onscreen Calculator.
Search
Goes to the Search screen.
Date Book
*Opens the Date Book.
Address Book
*Opens the Address Book.
To Do List
*Opens the To Do List.
Memo Pad
*Opens the Memo Pad.
* You can open other applications you have assigned to each button by
changing Preferences.
Keys corresponding to Latin characters
Keys Top
+Alt
CapsLock+Alt
BS
BS
BS
Tab
T
«
t
£
»
R
ºß
r
ÿY
SP
SP
SP
;
,
üÜ
.
ûÛ
A
éÉ
B
õÕ
C
öÖ
D
ëË
E
äÄ
F
êÊ
G
íÍ
H
ìÌ
I
çÇ
J
ïÏ
K
îÎ
L
¿¡
M
ùÙ
N
úÚ
O
ñÑ
P
øØ
Q
áÁ
R
âÂ
S
èÈ
T
åÅ
U
æÆ
V
ôÔ
W
àÀ
X
òÒ
Y
ãÃ
Z
óÓ
See reverse side.
Printed on 100% recycled paper using
VOC (Volatile Organic Compound)-
free vegetable oil based ink.
Specifications
Input
DC 3 V
Power consumption
7.5 mW
(when in normal operation)
Operating temperature
41 °F to 95 °F (5 °C to 35 °C)
Dimensions
3 5/8
× 23/32 × 1 11/16 inches
(89
× 17.5 × 42.5 mm) (w/h/d)
(Excluding the largest projecting part)
Mass.
Approx. 0.95 oz (30 g)
Cord length
Approx. 2 3/8 inches (60 mm)
(1 3/16 inches (30 mm) at the factory settings)
Accessories
Operating Manual
Installation CD-ROM
Case
Strap
Design and specifications are subject to change without notice.
Notes on use
· Do not subject the unit to:
Extreme heat or cold
Dust, dirt, or sand
High humidity
Vibration
Strong magnetic fields
Mechanical shock
Direct sunlight (for extended periods of time)
· Do not drop the unit.
· Be sure that nothing metallic comes into contact with the metal parts
of this unit. If this happens, a short circuit may occur and the unit
may be damaged.
· Do not operate the unit if it has a damaged cord or if it has been
dropped or damaged.
· Always keep the metal contacts clean.
· Do not disassemble or convert the unit.
· While the unit is in use, it gets warm. This is normal.
Cleaning
Clean the unit with a soft, dry cloth or a soft cloth lightly moistened
with a mild detergent solution. Do not use any type of solvent, such as
alcohol or benzine, which may damage the finish.
Français
AVERTISSEMENT
Pour éviter tout risque d'incendie ou d'électrocution, préservez
cet appareil de la pluie et de l'humidité.
Pour éviter tout risque de décharge électrique, il est
recommandé de ne pas ouvrir le boîtier. Ne confiez son
entretien qu'à une personne qualifiée.
Pour les utilisateurs au Canada
Cet appareil numérique de la classe B est conforme à la norme NMB-
003 du Canada.
Pour les utilisateurs en Europe
Cet appareil est conforme aux Directives européennes suivantes :
89/336/CEE, 92/31/CEE (compatibilité électromagnétique)
93/68/CEE (marquage CE)
Ce produit est conforme aux normes EN 55022 Classe B et EN 55024
pour une utilisation dans les environnements suivants : résidentiel,
commercial et industriel léger.
· CLIÉ et Jog Dial sont des marques commerciales de Sony
Corporation.
· Toutes les autres marques commerciales appartiennent à leurs
propriétaires respectifs.
Avant l'utilisation
Ce mini clavier peut uniquement être utilisé avec l'ordinateur de poche
CLIÉ Sony. Il peut être transporté facilement et se révèle pratique
lorsque vous utilisez l'ordinateur de poche CLIÉ Sony en voyage.
Installation du logiciel
Avant d'utiliser le clavier, installez un pilote Clavier sur votre
ordinateur de poche CLIÉ à partir du CD-ROM d'installation fourni.
Pour l'installation, vous aurez besoin d'un PC Windows sur lequel le
logiciel Palm Desktop approprié à l'ordinateur de poche CLIÉ a été
installé.
Raccordez le PC à votre ordinateur de poche CLIÉ et vérifiez que
HotSync fonctionne sur le PC et l'ordinateur de poche CLIÉ.
1 Insérez le CD-ROM d'installation fourni dans le lecteur
de CD-ROM du PC.
Le premier écran d'installation apparaît.
2 Cliquez sur [Install software for Mini Keyboard].
Le sous-menu de l'installateur apparaît.
3 Installez le logiciel en suivant les instructions affichées
à l'écran.
Si vous avez enregistré plusieurs utilisateurs, sélectionnez un nom
d'utilisateur dans la liste des utilisateurs.
4 Cliquez sur [Done].
5 Appuyez sur le bouton HotSync situé sur le socle de
synchronisation.
HotSync démarre et le logiciel est transmis du PC Windows à
l'ordinateur de poche CLIÉ.
Remarque
Réinstallation du pilote Clavier sur votre CLIÉ
Une fois que vous avez supprimé le pilote déjà installé sur votre CLIÉ, vous
devez procéder à une réinstallation.
Si le pilote n'est pas supprimé au préalable, un dysfonctionnement peut se
produire.
En cas d'anomalie, procédez à un redémarrage à chaud, conformément au
mode d'emploi de votre CLIÉ.
Raccordement du clavier à
l'ordinateur de poche CLIÉ
1 Placez le clavier sur l'ordinateur de poche CLIÉ comme
si vous vouliez le mettre sur celui-ci, comme illustré.
2 Raccordez le connecteur du clavier sur le connecteur
d'interface de l'ordinateur de poche CLIÉ.
3 Fixez la sangle de prévention des chutes sur le clavier
et l'ordinateur de poche CLIÉ.
Retrait du clavier
1 Retirez le clavier tout en appuyant au milieu du connecteur du
clavier, comme illustré.
2 Retirez le clavier de l'ordinateur de poche CLIÉ.
3 Retirez la sangle de prévention des chutes en appuyant sur les
ergots des deux côtés.
z
Veillez à fixer la sangle de prévention des chutes lorsque
vous utilisez le clavier.
L'ordinateur de poche CLIÉ et le clavier peuvent être désolidarisés
facilement. Afin d'éviter toute blessure ou détérioration du matériel,
veillez à fixer la sangle.
Déploiement du cordon
Lorsque vous retirez le couvercle de l'arrière du clavier, le cordon se
rallonge d'environ 30 mm.
1 Retirez le couvercle de l'arrière du clavier et étirez le cordon
comme illustré.
2 Remettez le couvercle.
Utilisation du clavier
Après avoir raccordé le clavier sur l'ordinateur de poche CLIÉ, vous
pouvez utiliser le clavier grâce à la procédure suivante.
1 Appuyez sur le bouton POWER de l'ordinateur de
poche CLIÉ pour le mettre sous tension.
2 Effleurez l'icône [Mini Key] de l'écran d'accueil.
L'écran de paramétrage du clavier apparaît.
3 Effleurez et sélectionnez la case [Enable Keyboard] sur
l'écran de paramétrage du clavier.
Le clavier est alors prêt à être utilisé.
Réglage du son du clic du clavier
Vous pouvez régler le son émis lorsque vous cliquez sur les touches.
1 Effleurez [Mini Key].
L'écran de paramétrage du clavier apparaît.
2 Effleurez et sélectionnez la case [Enable Key Clicks] sur l'écran
de paramétrage du clavier.
Le son du clic est émis lorsque vous appuyez sur les touches.
Pour désactiver le son du clic, désélectionnez la case [Click sound] sur
l'écran de paramétrage du clavier.
Transport de l'ordinateur de poche CLIÉ lorsque
le clavier est raccordé
Réglez le commutateur HOLD du clavier sur ON. Aucune touche du
clavier ne peut être activée et l'ordinateur de poche CLIÉ ne peut pas
effectuer d'opération à votre insu.
Réglez le commutateur HOLD du clavier sur OFF lorsque vous utilisez
le clavier de nouveau.
Spécifications
Entrée
3 V CC
Consommation électrique
7,5 mW (en fonctionnement normal)
Température de fonctionnement
41 °F à 95 °F (5 °C à 35 °C)
Dimensions
3 5/8
× 23/32 × 1 11/16 pouces
(89
× 17,5 × 42,5 mm) (l/h/p)
(Sauf la plus grosse partie saillante)
Poids environ
environ 0,95 onces (30 g)
Longueur du cordon
environ 2 3/8 pouces (60 mm)
(1 3/16 pouces (30 mm) en réglage par défaut)
Accessoires
Mode d'emploi
CD-ROM d'installation
Boîtier
Sangle
La conception et les spécifications sont sujettes à modifications sans
préavis.
Remarques concernant
l'utilisation
· Ne placez pas l'appareil à des endroits :
Extrêmement chauds ou froids
Sales, poussiéreux, sablonneux
Extrêmement humides
Soumis à des vibrations
Soumis à des champs magnétiques
Soumis à des chocs mécaniques
Exposés au rayonnement direct du soleil (pendant des durées
prolongées)
· Ne laissez pas tomber l'appareil.
· Veillez à ce qu'aucun objet métallique n'entre en contact avec des
pièces métalliques de cet appareil. Si cela se produit, un court-circuit
risque de survenir et d'endommager l'appareil.
· N'utilisez pas l'appareil si son cordon est endommagé ou si
l'appareil est tombé ou a été endommagé.
· Gardez toujours les contacts métalliques bien propres.
· Ne démontez pas et ne transformez pas l'appareil.
· Pendant son fonctionnement, une augmentation de la chaleur de
l'appareil est normale.
Nettoyage
Nettoyez l'appareil avec un chiffon doux et sec ou un chiffon
légèrement humidifié à l'aide d'une solution détergente neutre.
N'utilisez aucun type de solvant comme de l'alcool ou de l'essence, qui
risque d'abîmer la finition du boîtier.
Touches de raccourci
Touches à activer
Fonction
Fn + touche de lettre bleue
Sélectionne le code de lettre bleue.
Shift + touches alphabétiques;
- la touche CapsLock étant désactivée Saisit des lettres majuscules.
- la touche CapsLock étant activée
Saisit des lettres minuscules.
Shift +b
Sélectionne le texte précédent.
Shift +B
Sélectionne le texte suivant.
Shift + Ctrl + b
Sélectionne tout le texte précédent.
Shift + Ctrl + B
Sélectionne tout le texte suivant.
Shift + Ctrl + v
Fait tourner le navigateur Jog Dial vers le
haut tout en le maintenant enfoncé.
Shift + Ctrl + V
Fait tourner le navigateur Jog Dial vers le
bas tout en le maintenant enfoncé.
Shift + Ctrl + Tab
Revient au champ précédent.
Ctrl + C
Copie le texte sélectionné.
Ctrl + X
Coupe le texte sélectionné.
Ctrl + V
Colle le texte sélectionné.
Ctrl + D
Efface le texte sélectionné.
Ctrl + L
Active/désactive le rétroéclairage.
Ctrl + H
Revient à l'écran d'accueil (programme
de démarrage).
Ctrl + M
Revient à l'écran de menu.
Ctrl + F
Lance une recherche.
Ctrl + v
Tourne le navigateur Jog Dial vers le
haut.
Ctrl + V
Tourne le navigateur Jog Dial vers le bas.
Ctrl +
Appuie sur le navigateur Jog Dial.
Ctrl +
(Maintenir enfoncé.)
Maintient le navigateur Jog Dial enfoncé.
Ctrl + BS
Appuie sur la touche Précédent.
Ctrl + BS (Maintenir enfoncé.)
Maintient la touche Précédent enfoncée.
Ctrl + Tab
Passe au champ suivant.
Réglages des touches de l'application
Touches à activer
Fonction
Home
Revient à l'écran d'accueil (programme de
démarrage).
Menu
Revient à l'écran de menu.
Calc
* Ouvre la calculatrice en direct.
Search
Passe à l'écran de recherche.
Date Book
* Ouvre le registre des dates.
Address Book
* Ouvre le registre des adresses.
To Do List
* Ouvre la liste des choses à faire.
Memo Pad
* Ouvre le bloc-notes.
* Vous pouvez ouvrir d'autres applications affectées à chaque bouton
en modifiant Préférences.
Touches correspondant aux caractères latins
Haut des touches
+Alt
CapsLock+Alt
BS
BS
BS
Tab
T
«
t
£
»
R
ºß
r
ÿY
SP
SP
SP
;
,
üÜ
.
ûÛ
A
éÉ
B
õÕ
C
öÖ
D
ëË
E
äÄ
F
êÊ
G
íÍ
H
ìÌ
I
çÇ
J
ïÏ
K
îÎ
L
¿¡
M
ùÙ
N
úÚ
O
ñÑ
P
øØ
Q
áÁ
R
âÂ
S
èÈ
T
åÅ
U
æÆ
V
ôÔ
W
àÀ
X
òÒ
Y
ãÃ
Z
óÓ
Appuyez fermement.
La zone d'écriture doit être
recouverte par le clavier.
Connecteur d'interface
Pour le retirer,
appuyez sur les ergots
des deux côtés.
Retirez le couvercle.
Etirez le cordon.