Installation and setup procedure
Step 1
(Described in the Access Point Quick Start Guide)
For Access Point Network connection mode, set up the Access Point and connect power.
This process is described in the Access Point Quick Start Guide that came with your
Access Point.
Step 2
Insert the Wireless LAN PC Card into the computer, and install the Wireless LAN PC
Card driver.
Step 3
Install the supplied Wireless Panel software.
Step 4
Configure the appropriate computer communications settings.
z Hint
Select either Access Point Network connection mode or Peer to Peer Network connection mode
here. If you select Peer to Peer Network connection mode, no further settings are needed.
Step 5
(Described in the Access Point Quick Start Guide)
Configure the appropriate Access Point communication settings. If connecting to the
Internet via the Access Point, also configure the Access Point Internet connection settings.
Step 6
Configure the computer communications settings to match the settings configured in
Step 5.
Step 7
(Described in the Access Point Quick Start Guide)
Connect the Access Point to the DSL modem, cable modem, or ISDN router.
Step 1
For the Access Point Network connection mode, set up the
Access Point and connect power
Refer to the Access Point Quick Start Guide.
Step 2
Insert the Wireless LAN PC Card in the computer, and install
the Wireless LAN PC Card driver
Before inserting the Wireless LAN PC Card...
Copy the contents of the 5GHzWirelessLAN folder from the supplied CD-ROM to the hard disk. In this
example, the contents are copied to a folder named "temp" created on the D drive.
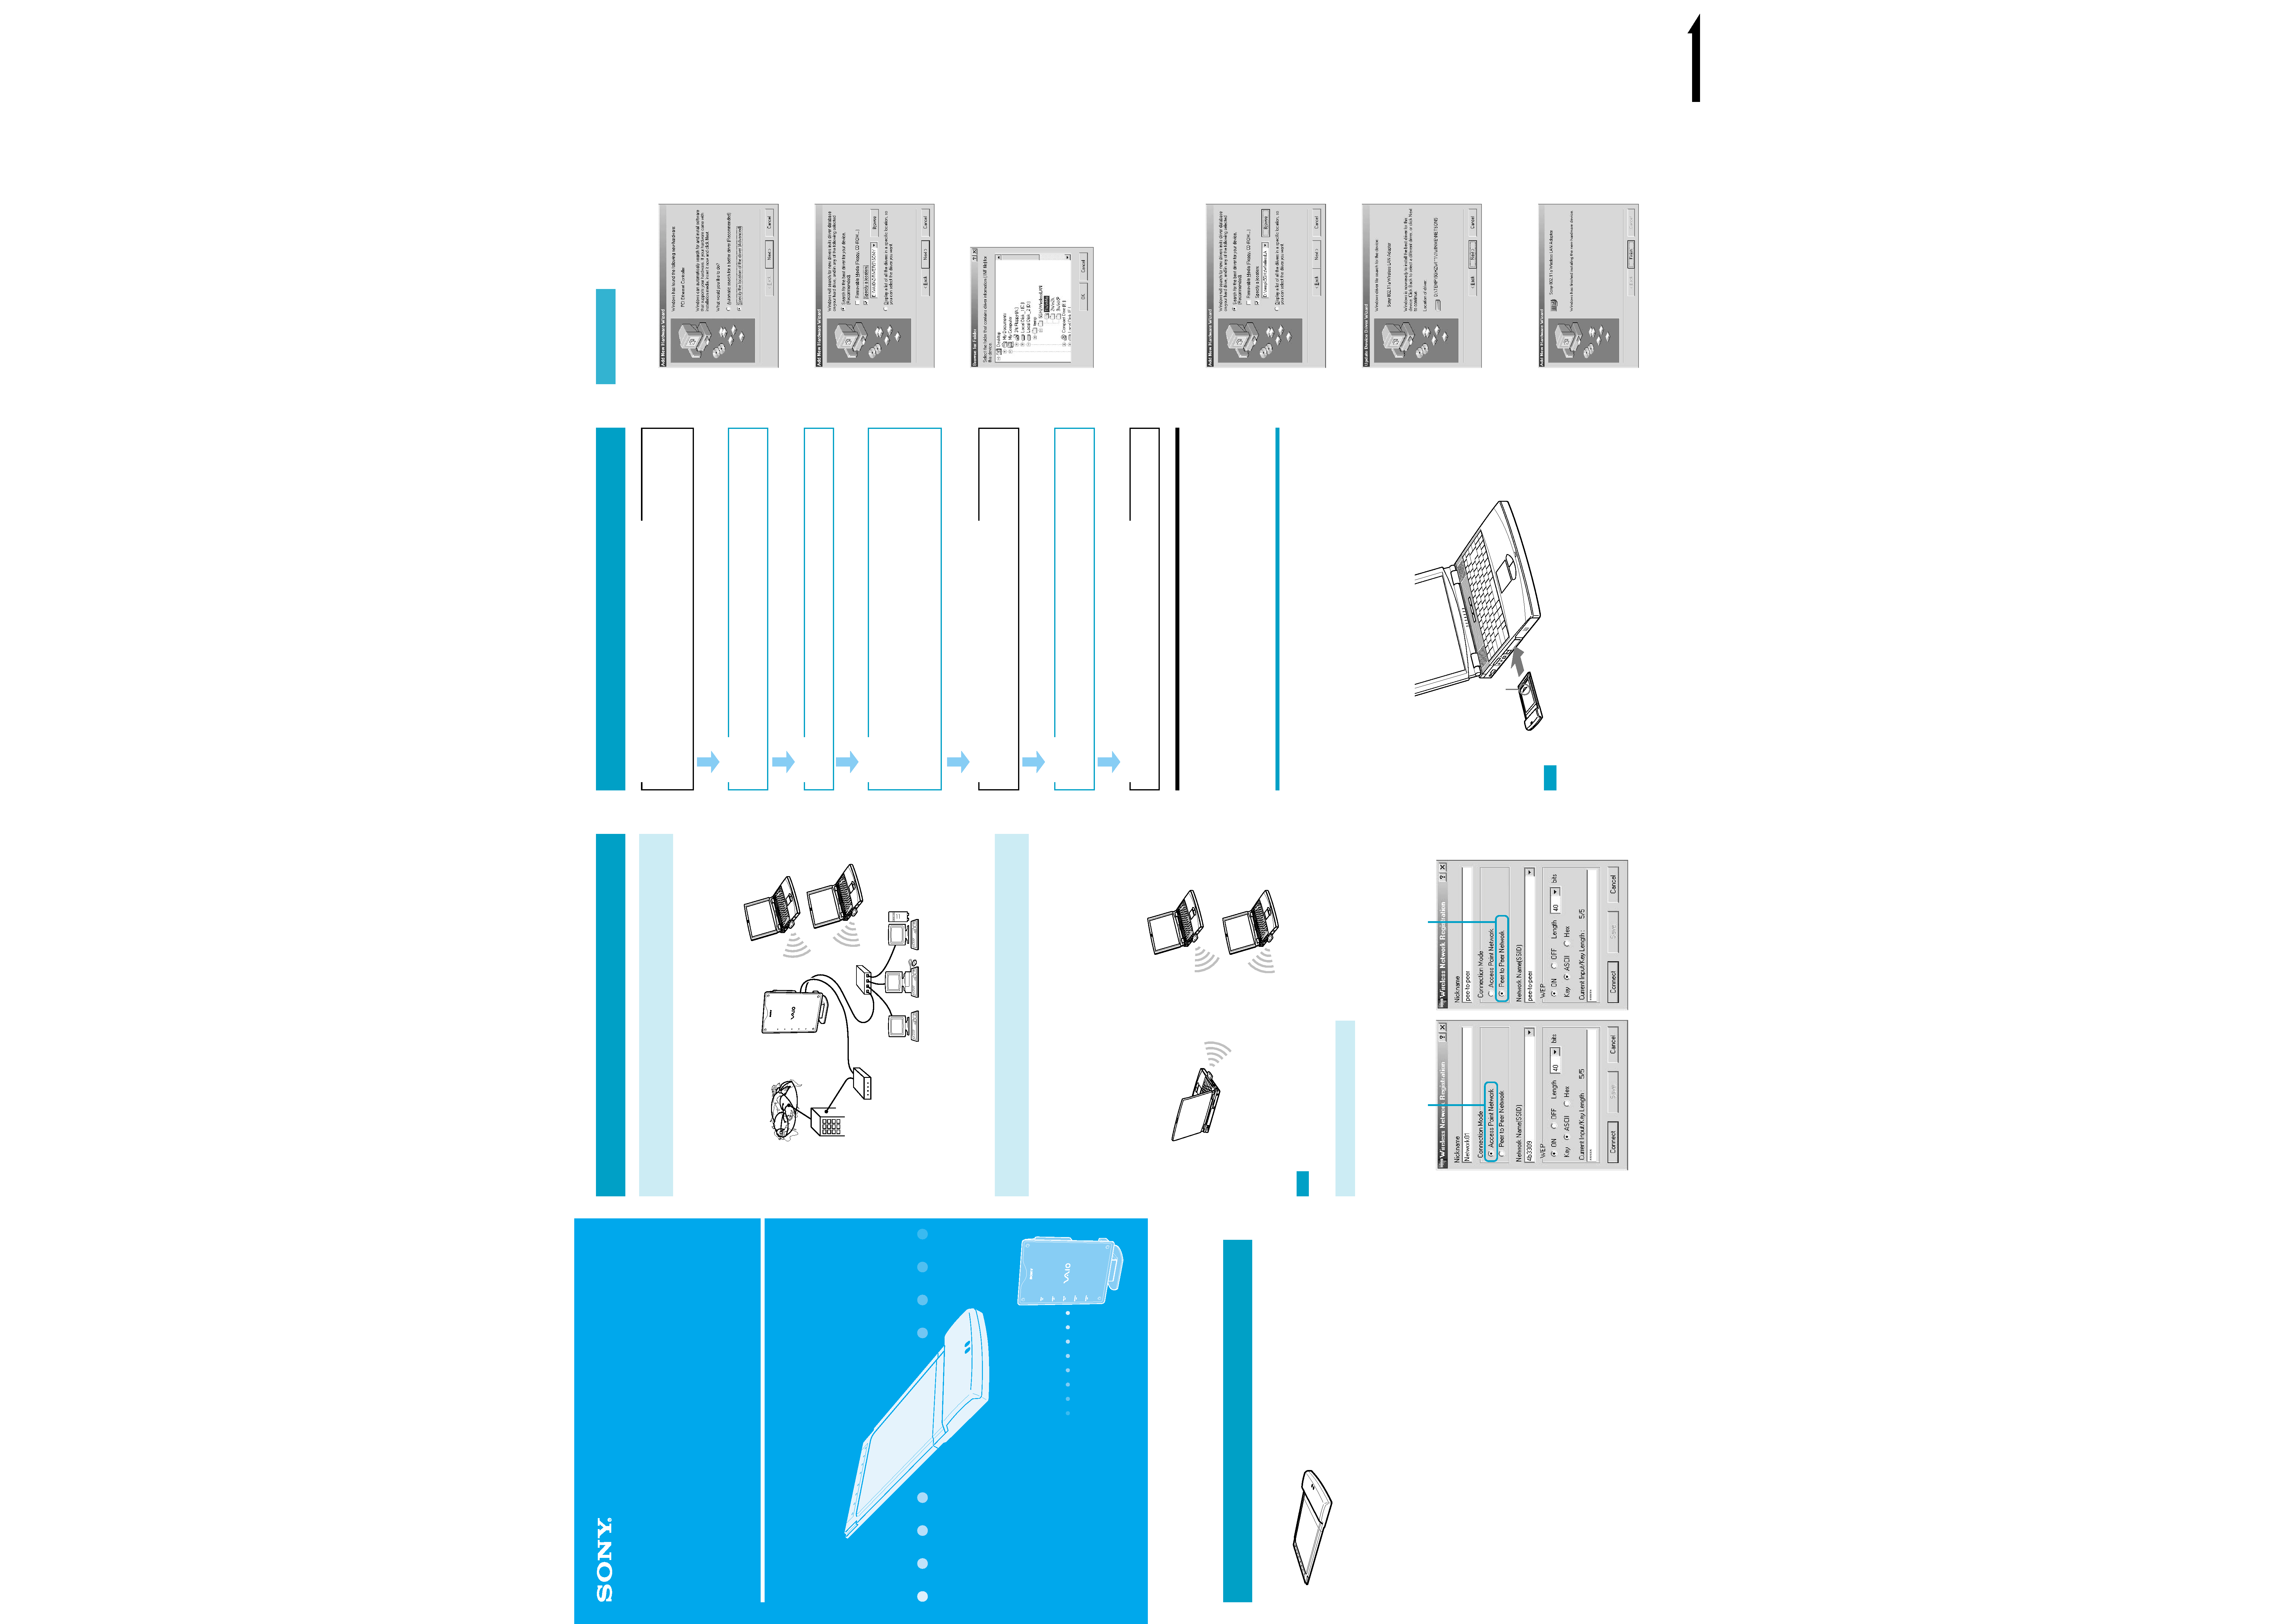
The following illustration shows insertion of the Wireless LAN PC Card in a
computer.
Note
If your computer has an upper and a lower PC card slot, insert the Wireless LAN PC Card into the
upper slot. Inserting it into the lower slot blocks the upper slot with its antenna.
z Hint
Refer to the Wireless LAN PC Card Operating Instructions (separate booklet) for the procedure to remove the
Wireless LAN PC Card.
When the Wireless LAN PC Card is first inserted, the driver installation wizard runs. From this point,
the procedure differs according to the operating system. Refer to the following descriptions for
Windows Me or Windows 2000 according to the operating system being used.
z Hint
Refer to the Wireless LAN PC Card Operating Instructions (separate booklet) for the procedure to uninstall
the driver.
This guide provides an overview of the functions of the 5GHz Wireless LAN PC Card PCWA-C500
and the necessary preparations before use. When using the 5GHz Wireless LAN Access Point
PCWA-A500 (optional) read this together with the manuals provided with the Access Point.
Unpacking
While unpacking the product, confirm that the following items are present.
· Wireless LAN PC Card
· PC Card case
· CD-ROM (Setup Disc)
· Operating Instructions
· Quick Start Guide for Microsoft® Windows® Millennium Edition and Microsoft® Windows® 2000
Professional Users
· Quick Start Guide for Microsoft® Windows® XP Home Edition and Microsoft® Windows® XP
Professional Users
· Warranty card
· Other printed materials
Applications
Accessing the Internet from various places in the house
(Access Point Network connection mode)
Access Point Network connection mode allows you to construct a wireless network based on an Access
Point (optional). By using a computer with a Wireless LAN PC Card, you can communicate with the
Access Point, and share files with other computers via the Access Point. Furthermore, if you connect
the Access Point to a DSL modem, cable modem, or ISDN router, you can access the Internet from
various places in the house.
POWER
MESSAGE
WIRELESS
NETWORK 1
NETWORK 2
z Hint
The above illustration shows the Access Point connected to an Ethernet LAN, providing network access to
two wireless mobile notebook computers.
High bit rate movie streaming playback*
(Peer to Peer Network connection mode)
Peer to Peer Network connection mode allows computers equipped with Wireless LAN PC Cards to
communicate directly, without using a Wireless LAN Access Point. With this connection mode, users
can share files directly from one computer to another.
Higher bit rates are achieved when using the Peer to Peer Network connection mode because
communications are not routed via the Access Point and therefore are subjected to less interference.
This makes the Peer to Peer Network connection mode well-suited for use with high bit rate movie
streaming playback applications.
*
A system for simultaneously playing transmitted files at the receiving computer while file transmission is still in
progress.
Note
Poor radio conditions can cause interruptions of movie playback over wireless connections.
Network switching made simple!
You can quickly and easily switch between multiple networks, including both Access Point Network
connections and Peer to Peer Network connections, after registering the network connections on your
computer. See the Online Help for the included Wireless Panel utility for details.
Insert the card in the
direction of the arrow.
For Windows Me
1 Select "Specify the location of the driver", and click Next.
2 Select "Specify a location".
3 Click Browse, and specify the driver location.
z Hint
If you copied the contents of the 5GHzWirelessLAN folder on the CD-ROM to the temp folder on the D
drive, specify the 1WinMe folder within those contents (D:\temp\5GHzWirelessLAN\1WinMe).
4 Click OK.
5 Click Next.
6 Click Next.
The driver is installed.
7 Click Finish.
Follow the on-screen instruction to restart the computer.
5GHz
Wireless LAN PC Card
PCWA-C500 Quick Start Guide
For Microsoft® Windows® Millennium Edition and
Microsoft® Windows® 2000 Professional Users
This guide provides an overview of the functions of the 5GHz Wireless LAN PC Card
PCWA-C500 and the necessary preparations before use.
Please read first.
Sony Corporation ©2002 Printed in Japan
PCWA-C500
4-657-718-11(1)
Access Point Network
connection mode
Peer to Peer Network
connection mode
Continued on next page
· In this document, Microsoft® Windows® 2000 Professional is referred to as Windows 2000.
· In this document, Microsoft® Windows® Millennium Edition is referred to as Windows Me.
For Windows 2000
Note
Log on to Windows 2000 as one of the Administrators.
1 Click Next.
2 Confirm that "Search for a suitable driver for my device" is selected, and click
Next.
3 Select "Specify a location", and click Next.
4 Click Browse, and specify the location of the driver.
z Hint
If you copied the contents of the 5GHzWirelessLAN folder on the CD-ROM to the temp folder on the D
drive, specify the 2Win2k folder within those contents (D:\temp\5GHzWirelessLAN\2Win2k).
5 Click OK.
6 Click Next.
The driver is installed.
7 Click Finish.
Step 3
Install the supplied Wireless Panel software
Note
Log on to Windows 2000 as one of the Administrators.
Before Installing ...
· Finish installing the Wireless LAN PC Card driver (refer to Step 2).
· Close any running programs.
1 Double-click Setup.exe that was copied from the 5GHzWirelessLAN folder
on the supplied CD-ROM.
Depending on computer settings, Setup.exe may be displayed as just Setup. If several files with the
same name appear in the folder, double click the one with the following icon.
2 Click Next.
3 Confirm the contents of the displayed License Agreement, and click Yes.
Choose Destination Location dialog box appears.
4 Click Next.
Wireless Panel installation begins. When installation finishes, the message "Installation is
completed. Wireless Connection Easy Setup Wizard will be launched" is displayed.
5 Click OK to launch the Wireless Connection Easy Setup Wizard.
Proceed to Step 4.
Step 4
Configure the appropriate computer communications settings
When Wireless Panel installation finishes, the Wireless Connection Easy Setup Wizard launches.
Confirm that "Use Easy Setup Wizard" is checked, and click Next.
The Connection mode panel appears.
z Hint
·
Click Cancel to close the Wizard.
·
After Wireless Panel has been installed and the Wizard has been run, it can be launched again later by clicking
InitSetup.exe in the folder (normally "C:\Program Files\Sony\5GHz Wireless LAN") that was installed with
Wireless Panel.
For Access Point Network connection mode
The example in this description assumes the Access Point has its factory default settings. If the Access
Point settings have been altered, change the new settings to match.
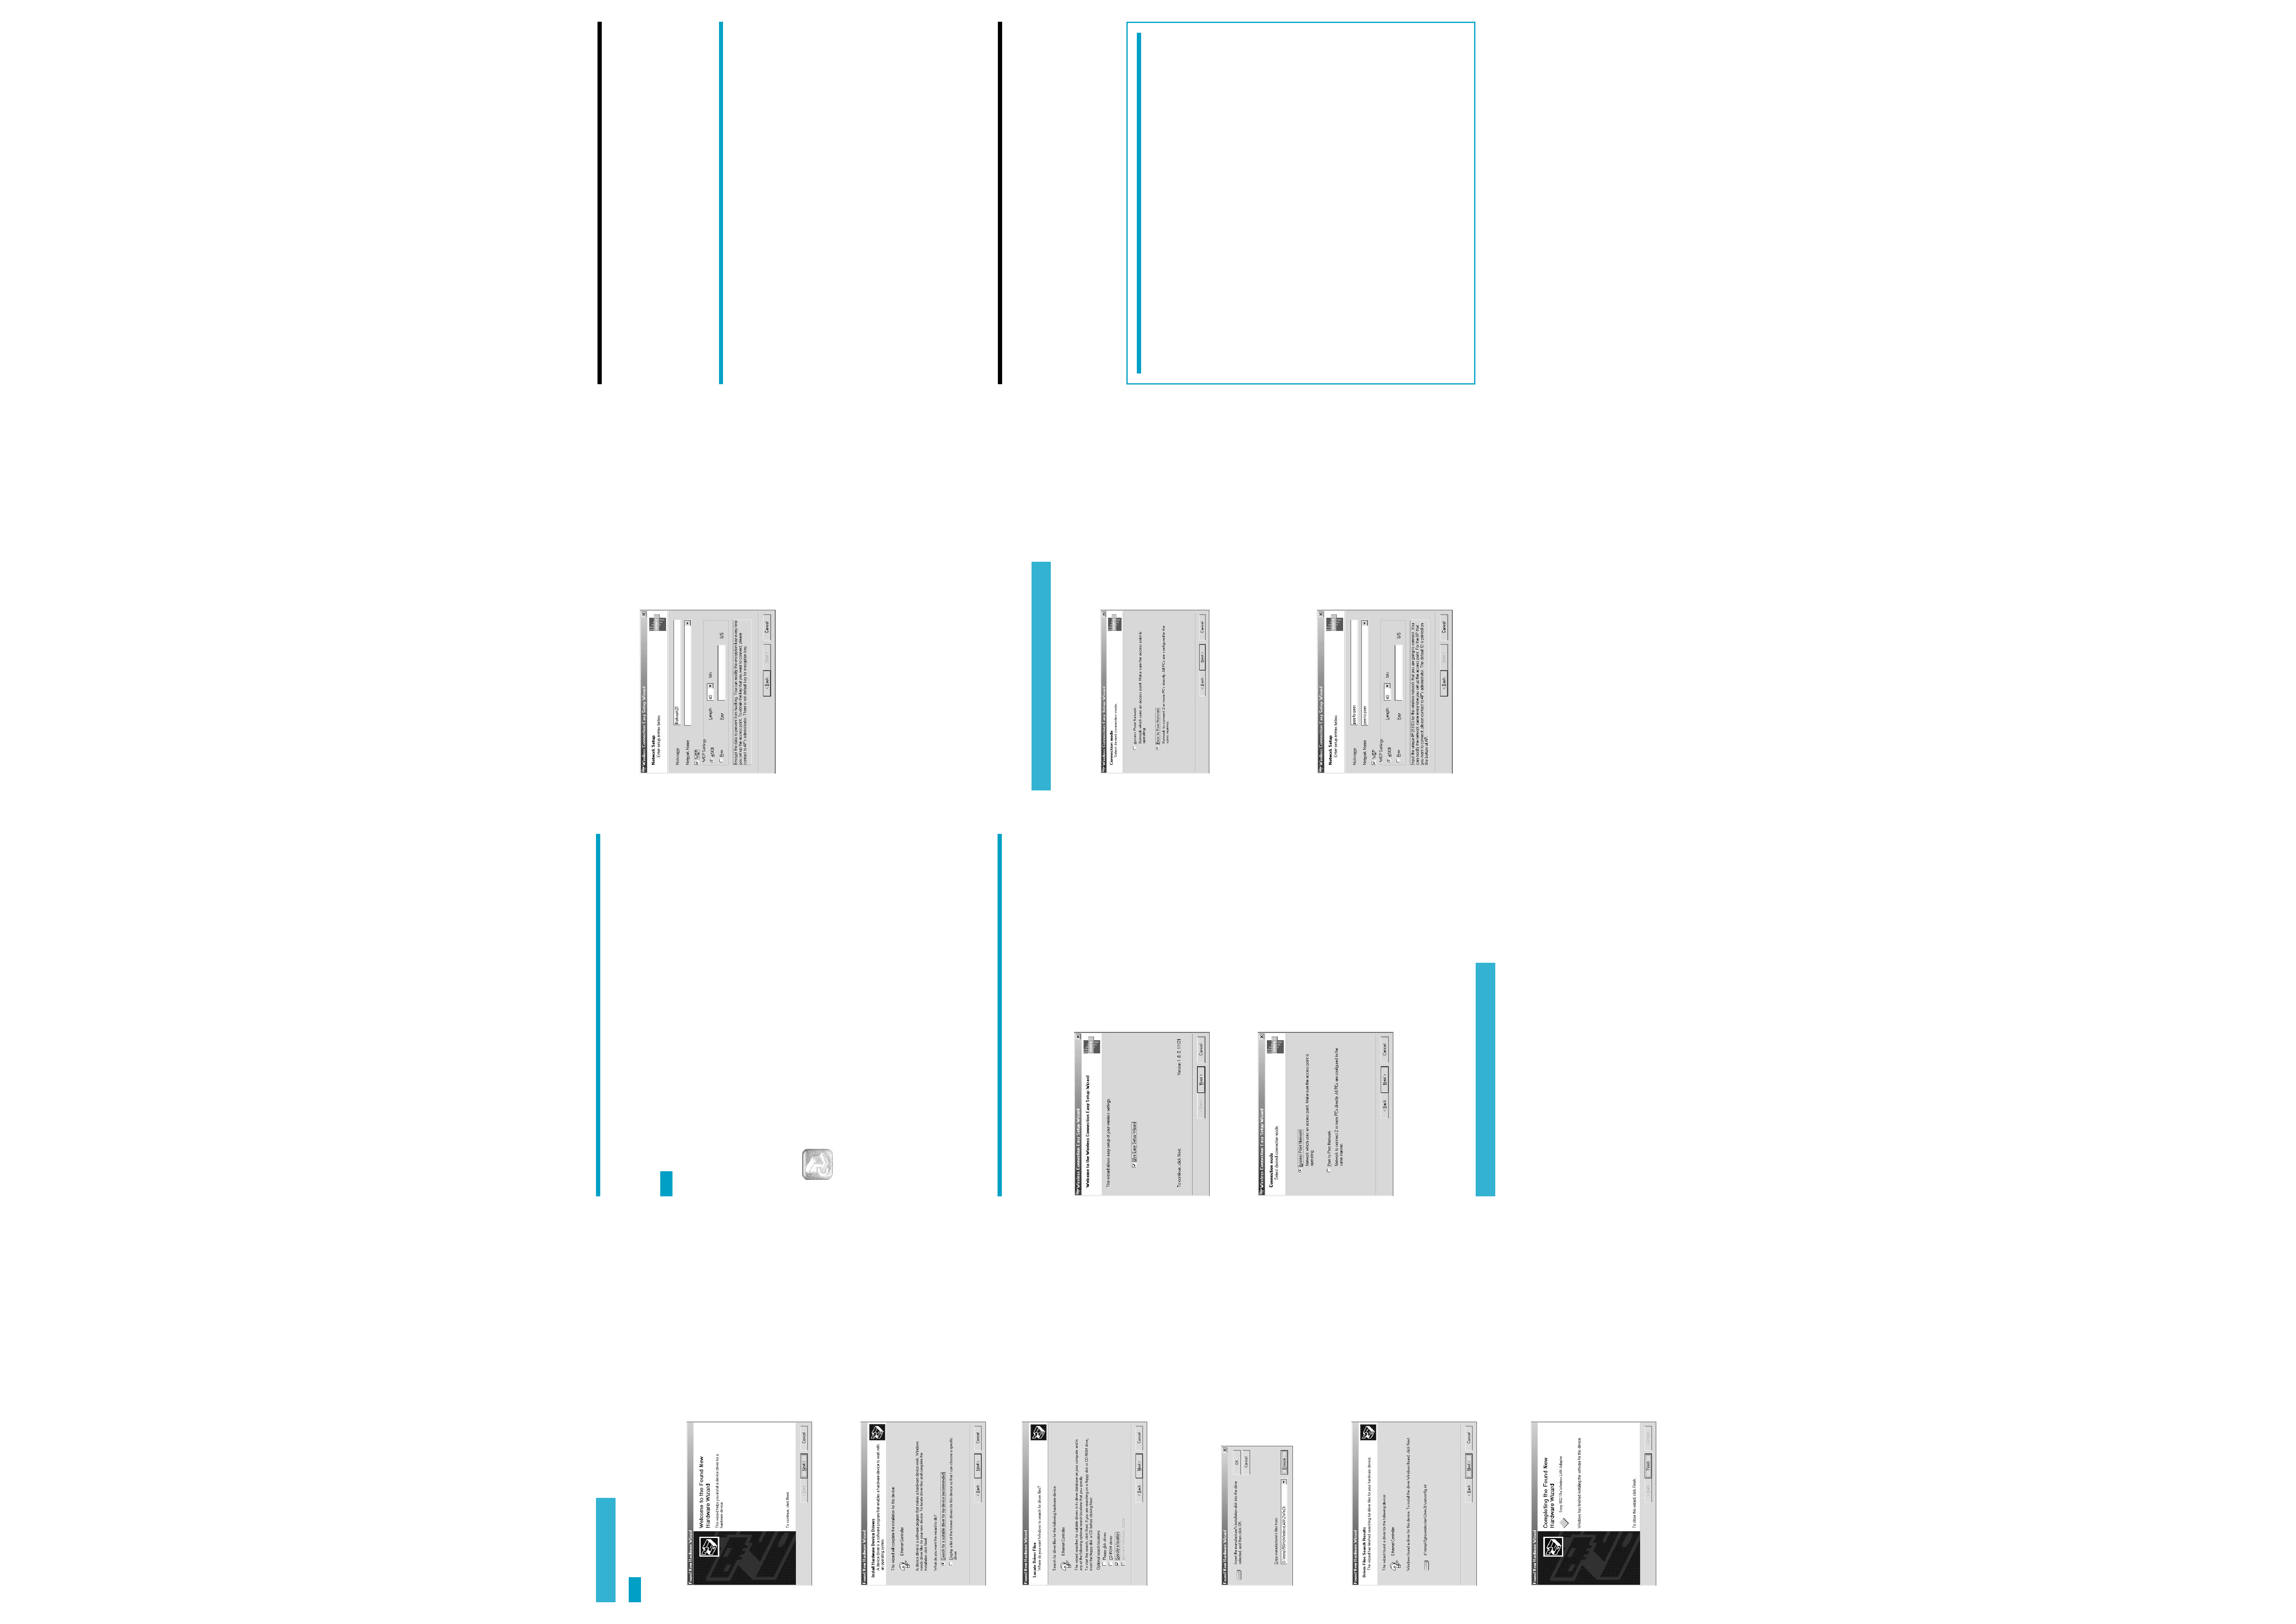
1 Select Access Point Network, and click Next.
2 Enter the Nickname for this network (up to 20 characters, and may include
symbols).
For example, you could enter "Network01".
3 Open the Network Name drop-down list.
Access Points within communications range are shown in the drop-down list.
4 Select the Access Point to connect to from the drop-down list.
5 Because the WEP function of the Access Point is disabled by default at the
factory, confirm that the WEP check box is not checked, and click Next.
The Ready to create new network panel appears.
6 Click Next.
The Connected with access point panel appears when communication with the Access Point is
established.
7 To change the Access Point settings, confirm that Change access point
settings is checked, and click Next.
8 Click Access Point Setup.
Your web browser starts and displays the Access Point setup page. Proceed to Step 5.
For Peer to Peer Network connection mode
This description assumes a pee to peer network of two computers.
1 Select Peer to Peer Network, and click Next.
2 Enter the Nickname for this network (up to 20 characters, may include
symbols).
For example, you could enter "peer-to-peer".
3 In the Network Name field, enter the unique ID of this network (up to 32
characters, may include symbols).
For example, you could enter "peer-to-peer", the same as the Nickname entered above.
4 Check WEP.
5 Select ASCII for the ASCII/Hex item, and select 40 bits for the Length.
6 Enter any five characters (which may include symbols) as the Key.
7 Click Next.
The Ready to create new network panel appears.
8 Click Next.
The network connection is initiated. It may take several minutes for the connection to be
established. Once connection is established, the Completing the Wireless Connection Easy Setup
Wizard panel appears.
9 Click Finish.
10 Perform steps 1 through 9 again on the other computer.
Peer to Peer Network connection mode settings are finished.
Step 5 (Access Point Network connection mode only)
Configure the appropriate Access Point communication
settings. If connecting to the Internet via the Access Point, also
configure the Access Point Internet connection settings.
Refer to the Access Point Quick Start Guide for details.
Step 6 (Access Point Network connection mode only)
Set the computer communications settings to match the
settings configured in Step 5
1 When finished with the Access Point settings, return to the Wireless
Connection Easy Setup Wizard screen, and click Next.
2 Change the computer settings to match the Access Point settings.
3 Click Next.
The settings are displayed.
4 Confirm that the settings are correct, and click Next.
Connection to the Access Point is established.
5 Run the Wireless Connection Easy Setup Wizard on other computers to be
connected to this network, and connect them to the Access Point.
The settings should match those set in Step 5.
Step 7 (Access Point Network connection mode only)
Connect the Access Point to the DSL modem, cable modem,
or ISDN router
Refer to the Access Point Quick Start Guide for details.
Getting help
This section describes how to get help and support from Sony.
About Sony's Support Options
Sony provides several support options for your Wireless LAN PC Card. When you have
questions about your Wireless LAN PC Card and its related software, check these options for
answers:
This guide explains how to install the Wireless LAN PC Card, Wireless LAN PC Card
driver, and the Wireless Panel utility software provided.
Operating Instructions explains how to use your Wireless LAN PC Card.
Wireless Panel Online Help explains how to use the Wireless Panel utility software.
The Sony Wireless LAN PC Card support Web site
http://www.sony.com/wirelesslansupport/ provides the latest information on your
Wireless LAN PC Card.
The Sony e-mail support service answers your questions by electronic mail. Just send
your question in an e-mail message and a customer service representative will reply. To send a
question to Sony e-mail support, fill out the e-mail form at
http://www.sony.com/wirelesslansupport/
The Sony fax-back service provides you with answers to commonly asked questions. You
can use this automated service to request a list of available topics and then select the topics
you want to receive. To contact the Sony fax-back service, call
1-877-760-7669.
The Sony Customer Information Services Center offers information about your
Access Point, Wireless LAN PC Card, and other Sony products that work with your computer.
To contact the Sony Customer Information Services Center, call 1-877-760-7669.
Open 24 hours/day, 7 days/week.