4-229-644-15(1)
Compact Disc
MiniDisc Deck
2000 by Sony Corporation
MXD-D40
MXD-D4
Operating Instructions
2
WARNING
To prevent fire or shock
hazard, do not expose the unit
to rain or moisture.
To avoid electrical shock, do
not open the cabinet. Refer
servicing to qualified
personnel only.
The laser component in this product
is capable of emitting radiation
exceeding the limit for Class 1.
This appliance is classified as a CLASS 1
LASER product. The CLASS 1 LASER
PRODUCT MARKING is located on the
rear exterior.
To prevent fire, do not Cover the
ventilation of the apparatus with news
papers, table-cloths, curtains, etc. And
don't place lighted candles on the
apparatus.
To prevent fire or shock hazard, do not
place vases on the apparatus.
The following caution label is located
inside of the unit.
Don't throw a battery,
dispose it as the injurious
wastes.
IN NO EVENT SHALL SELLER BE
LIABLE FOR ANY DIRECT,
INCIDENTAL OR
CONSEQUENTIAL DAMAGES OF
ANY NATURE, OR LOSSES OR
EXPENSES RESULTING FROM ANY
DEFECTIVE PRODUCT OR THE USE
OF ANY PRODUCT.
CAUTION
The use of optical instruments with this
product will increase eye hazard.
For the customers in the U.S.A.
This symbol is intended to alert
the user to the presence of
uninsulated "dangerous voltage"
within the product's enclosure
that may be of sufficient
magnitude to constitute a risk of
electric shock to persons.
This symbol is intended to alert
the user to the presence of
important operating and
maintenance (servicing)
instructions in the literature
accompanying the appliance.
CAUTION
You are cautioned that any changes or
modification not expressly approved in
this manual could void your authority
to operate this equipment.
INFORMATION
This equipment has been tested and
found to comply with the limits for a
Class B digital device, pursuant to Part
15 of the FCC Rules. These limits are
designed to provide reasonable
protection against harmful interference
in a residential installation. This
equipment generates, uses, and can
radiate radio frequency energy and, if
not installed and used in accordance
with the instructions, may cause
harmful interference to radio
communications. However, there is no
guarantee that interference will not
occur in a particular installation. If this
equipment does cause harmful
interference to radio or television
reception, which can be determined by
turning the equipment off and on, the
user is encouraged to try to correct the
interference by one or more of the
following measures:
· Reorient or relocate the receiving
antenna.
· Increase the separation between the
equipment and receiver.
· Connect the equipment into an outlet
on a circuit different from that to
which the receiver is connected.
· Consult the dealer or an experienced
radio/TV technician for help.
Owner's Record
The model and serial numbers are
located on the rear of the unit. Record
the serial number in the space provided
below. Refer to them whenever you call
upon your Sony dealer regarding this
product.
Model No. MXD-D40/MXD-D4
Serial No. ___________
ENERGY STAR® ia a U.S. registered
mark.
As an
ENERGY STAR® Partner, Sony
Corporation has determined that this
product meets the
ENERGY STAR®
guidelines for energy efficiency.
For the customers in Canada
This Class B digital apparatus complies
With Canadian ICES-003.
CAUTION
TO PREVENT ELECTRIC SHOCK, DO
NOT USE THIS POLARIZED AC PLUG
WITH AN EXTENSION CORD,
RECEPTACLE OR OTHER OUTLET
UNLESS THE BLADES CAN BE FULLY
INSERTED TO PREVENT BLADE
EXPOSURE.
About This Manual
The instructions in this manual are for
models MXD-D40 and MXD-D4.
The MXD-D40 is the model used for
illustration purposes. Any difference in
operation is clearly indicated in the text,
for example, "MXD-D40 only".
Conventions
· Before operating the deck, connect
your deck by referring to "Getting
Started."
· For basic operations, see "Playing a
CD," "Playing an MD," "Recording a
CD to an MD" and "Recording a CD
to an MD at High Speed."
· Controls in the instructions are those
on the deck; these may, however, be
substituted by controls on the remote
that are similarly named or, when
different, appear in the instructions
within brackets.
· The following icons are used in this
manual:
ZIndicatesaprocedurethat
requires use of the remote.
z
Indicates tips for making the
task easier and hints.

3
TABLE OF CONTENTS
Getting Started
Unpacking ........................................................................... 4
Hooking Up the System .................................................... 4
Playing a CD ............................................................ 6
Playing an MD ........................................................ 7
Recording a CD to an MD
(CD-MD Synchro-Recording) ............................. 8
Recording a CD to an MD at High Speed
(High-Speed CD-MD Synchro-Recording) ... 10
Playing CDs and MDs
Using the Display ............................................................ 12
Locating a Specific Track ............................................... 14
Locating a Particular Point in a Track ......................... 15
Playing Tracks Repeatedly (Repeat Play) ................... 15
Playing in Random Order (Shuffle Play) .................... 16
Creating Your Own Program (Program Play) ........... 16
Falling Asleep to Music (Sleep Timer) ........................ 17
Changing the Pitch of the MD
(Pitch Control Function) ............................................. 18
Recording on MDs
Notes on Recording ........................................................ 19
Useful Tips for Recording .............................................. 20
Recording on an MD Manually .................................... 21
Recording for Long Times ............................................. 22
Adjusting the Recording Level ..................................... 23
Marking Track Numbers While Recording ................ 24
Recording the Current CD Track
(REC-IT Function) ....................................................... 25
Synchro-Recording With an External Audio
Equipment (Music Synchro-Recording) .................. 26
Starting Recording With Prestored Audio Data
(Time Machine Recording) ........................................ 26
Fading In and Out (Fader) ............................................. 27
Editing Recorded MDs
Notes on Editing .............................................................. 28
Erasing Recordings ......................................................... 28
Erasing a Part of a Track (A-B Erase Function) ......... 29
Dividing Recorded Tracks (Divide Function) ............ 30
Combining Recorded Tracks (Combine Function) .... 31
Moving Recorded Tracks (Move Function) ................ 32
Labeling Recordings (Name Function) ....................... 33
Undoing the Last Edit (Undo Function) ..................... 37
Changing the Recorded Level After Recording
(S.F Edit Function) ....................................................... 38
Additional Information
Precautions ....................................................................... 40
Display Messages ............................................................ 41
System Limitations ......................................................... 42
Troubleshooting .............................................................. 43
Specifications ................................................................... 44
Guide to the Serial Copy Management System ......... 45
Index .................................................................................. 47
Table of Setup Menus ..................................................... 49
Self-Diagnosis Function ................................................. 50
Notes on CDs ................................................................... 51
Handling MDs ................................................................. 51
Getting Started
4
Unpacking
Check that you received the following items:
· Audio connecting cords (2)
· Remote commander (remote) (1)
· Sony R6 (size-AA) batteries (2)
· Power plug adaptor (1) (Singaporian model only)
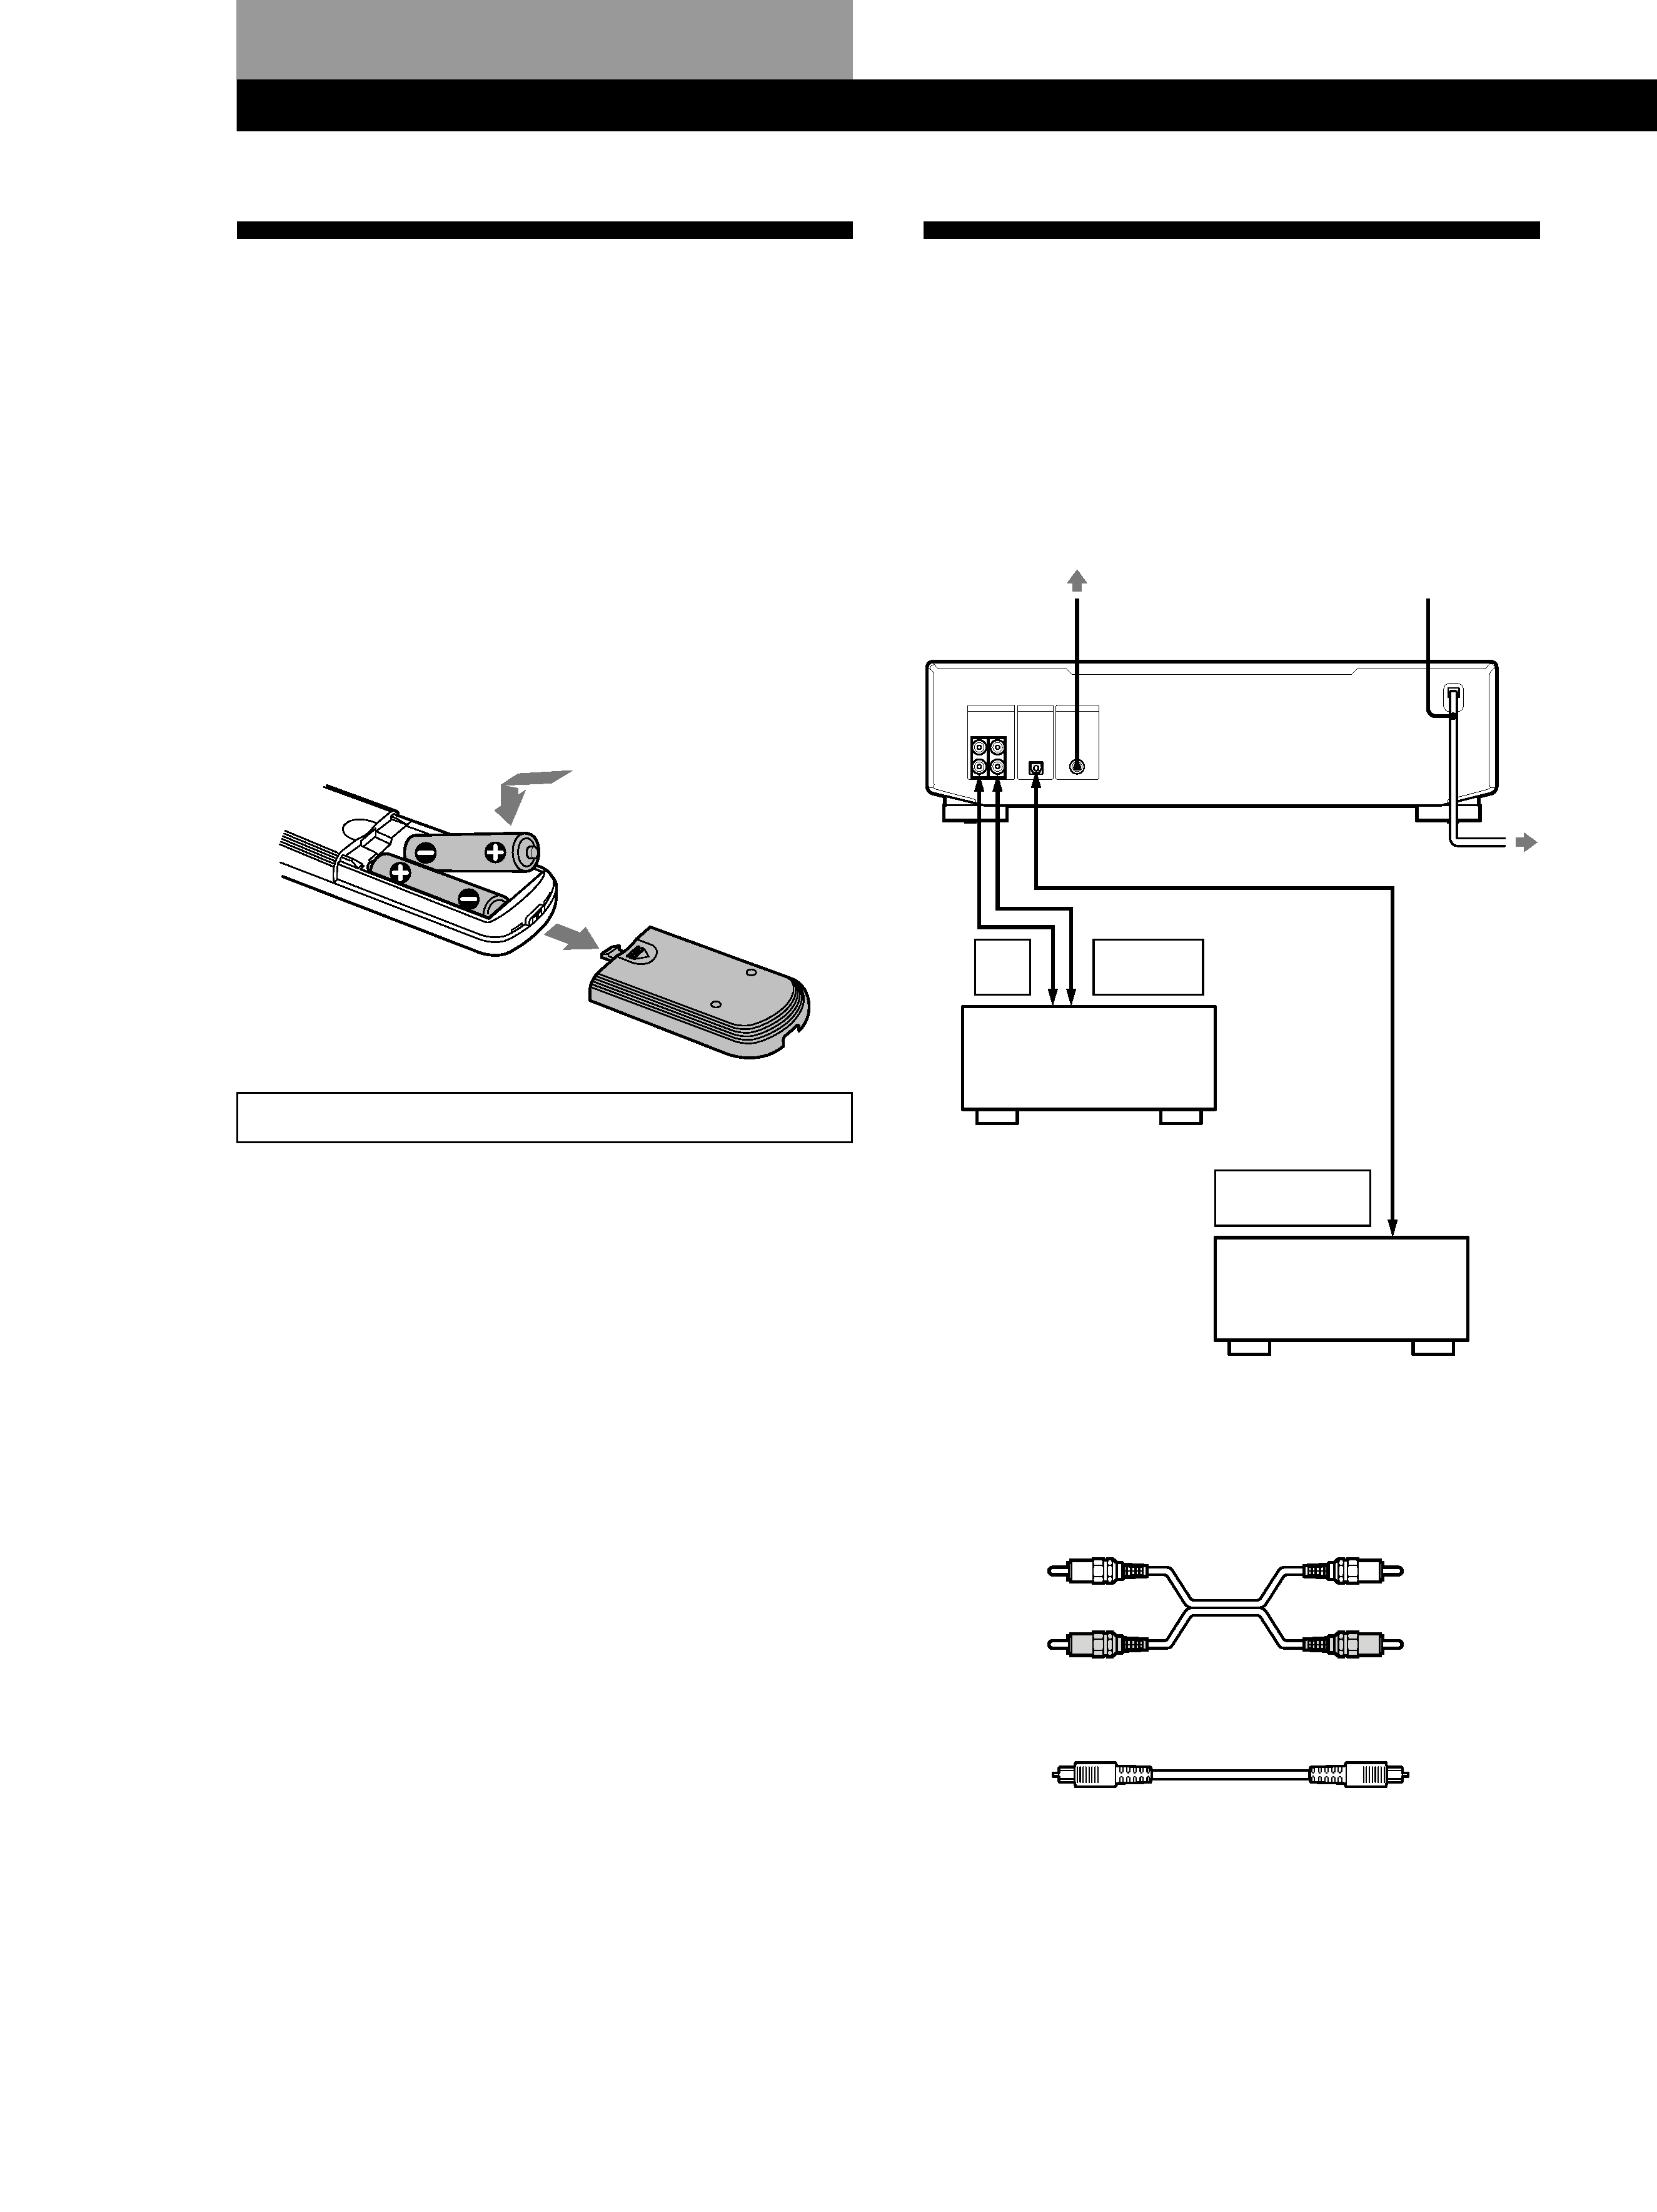
Inserting batteries into the remote
You can control the deck using the supplied remote.
Insert two R6 (size-AA) batteries by matching the +
and on the batteries. When using the remote, point it
at the remote sensor g on the deck.
D.SKIP on the remote cannot be used with this deck.
z When to replace batteries
With normal use, the batteries should last for about six
months. When the remote no longer operates the deck,
replace all the batteries with new ones.
Notes
· Do not leave the remote near an extremely hot or humid
place.
· Do not drop any foreign object into the remote casing,
particularly when replacing the batteries.
· Do not expose the remote sensor to direct sunlight or
lighting apparatuses. Doing so may cause a malfunction.
· If you don't use the remote for an extended period of time,
remove the batteries to avoid possible damage from
battery leakage and corrosion.
Hooking Up the System
Overview
This section describes how to hook up the deck to an
amplifier or other components such as a CD player or
DAT deck. Be sure to turn off the power of each
component before connection.
ç
ç
ç
REC
OUT
TAPE/MD
IN
DIGITAL
OPTICAL OUT
ç
ç
ç
ç
ç: Signal flow
What cords will I need?
· Audio connecting cords (supplied) (2)
· Optical cable (not supplied) (1)
White
(L)
Red
(R)
White
(L)
Red
(R)
Getting Started
to a wall outlet
Amplifier
CD player, DAT deck,
or MD deck, etc.
PC-LINK (MXD-D40 only)
5
Getting Started
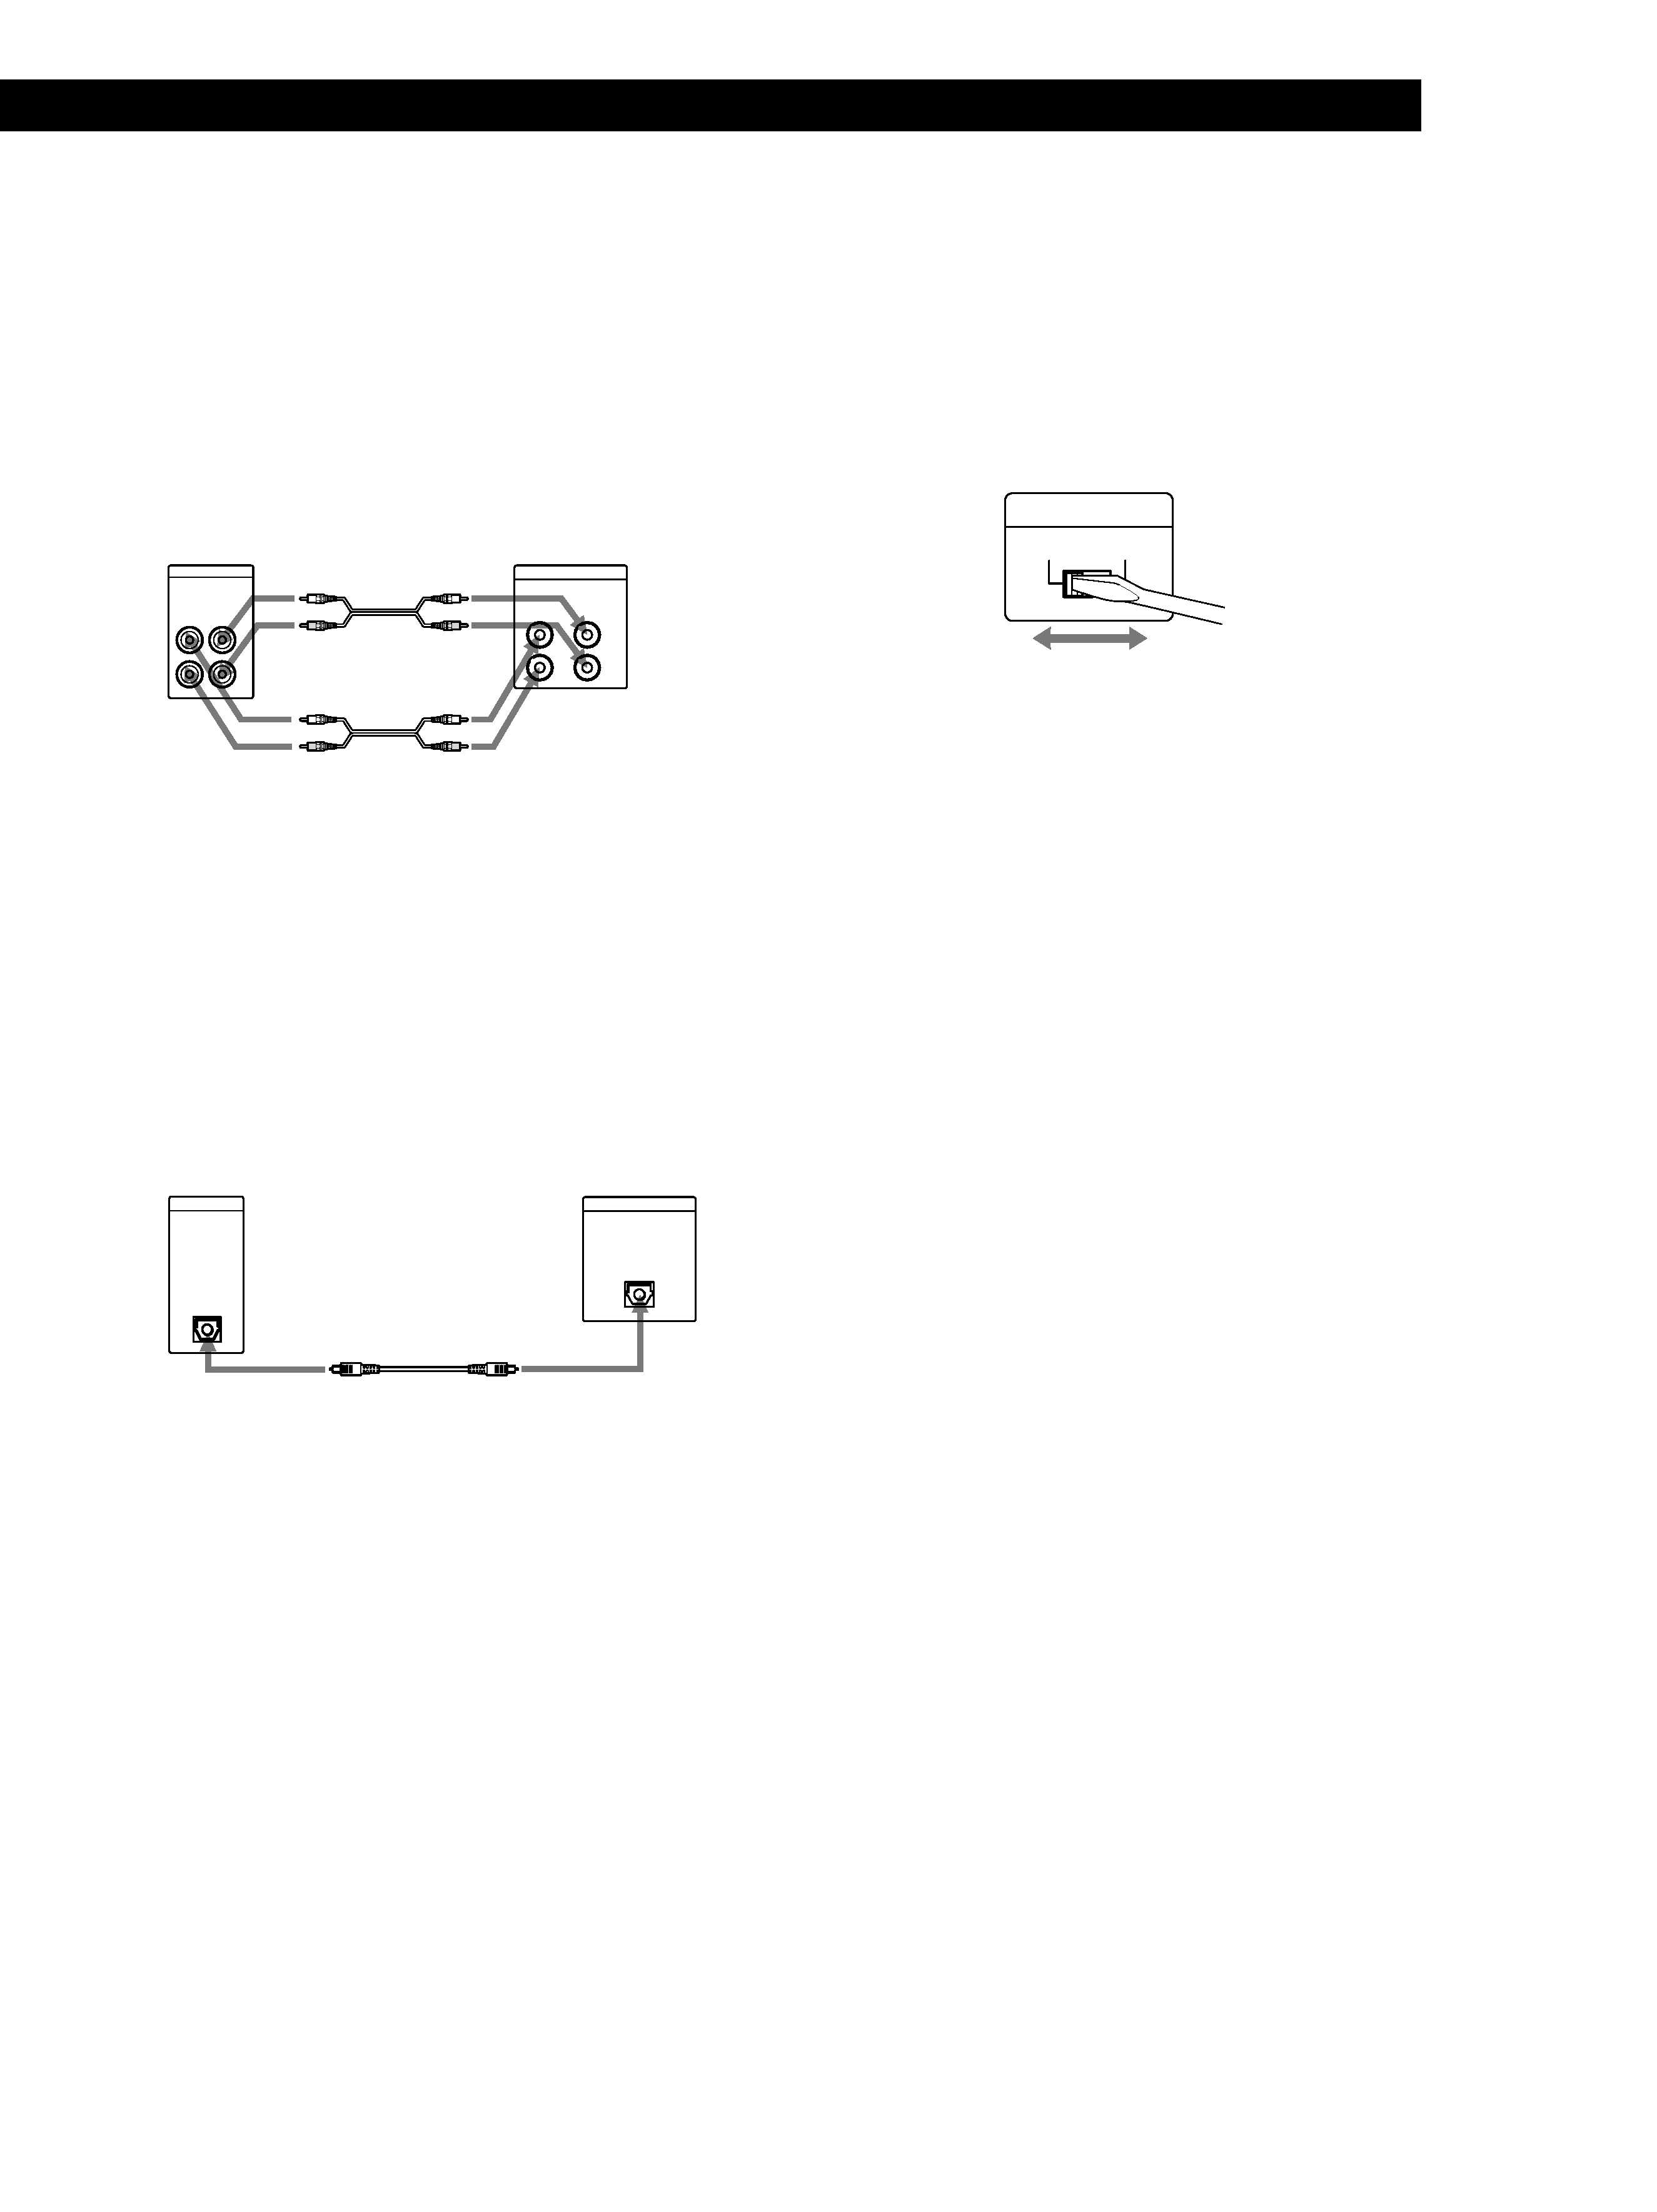
Hookups
Connecting the deck to an amplifier
Connect the amplifier to the ANALOG IN/OUT jacks
using the audio connecting cords (supplied), making
sure to match the color-coded cords to the appropriate
jacks on the components: red (right) to red and white
(left) to white. Be sure to make connections firmly to
prevent hum and noise.
MXD-D40/D4
Amplifier
ç
Ç
TAPE / MD
L
R
IN
OUT
R
L
OUT
IN
ANALOG
ç
ç
ç
ç
ç: Signal flow
Connecting the deck to a digital component such as
a CD player, DAT deck, or an MD deck
Connect the component through the DIGITAL
OPTICAL IN connector with the optical cable (not
supplied).
Take the caps off the connectors and then insert the
plugs parallelly until they click into place.
Be sure not to bend or tie the optical cable.
MXD-D40/D4
Digital component
Ç
DIGITAL
OUT
OPTICAL
DIGITAL
IN
OPTICAL
ç
ç
ç
ç
ç: Signal flow
z If "Din Unlock" and "C71" alternate in the display
The optical cable is not connected properly. Check that
the connections are secure.
z Automatic conversion of digital sampling rates
during recording
A built-in sampling rate converter automatically
converts the sampling frequency of various digital
sources to the 44.1 kHz sampling rate of this deck.
This allows you to record sources such as 32- and 48-
kHz DAT or satellite broadcasts, as well as compact
discs and MDs.
Note
If "Din Unlock" or "Cannot Copy" flashes in the display,
recording through the DIGITAL OPTICAL IN connector is
not possible. In this case, record the program source
through the ANALOG IN jacks with "ANALOG" selected by
INPUT.
Setting the voltage selector (only on
models supplied with a voltage selector)
Check that the voltage selector on the rear panel of the
deck is set to the local power line voltage. If not, set
the selector to the correct position using a screwdriver
before connecting the AC power cord to an AC outlet.
220--240V
110--120V
VOLTAGE
SELECTOR
Connecting the AC power cord
Connect the AC power cord to a wall outlet.
Note
Do not connect the AC power cord to a switched outlet.
Connecting a PC (MXD-D40 only)
Use the PCLK-MN10A PC connecting kit (not
supplied) to connect a PC to the deck. By connecting
the deck to a PC, you will be able to select and play
MD tracks and do various MD editing operations on
the PC. For details, refer to the manual supplied with
the PC connecting kit.
Demonstration mode
When you turn on the deck and there is no CD or MD
in the deck, demonstration mode is activated
automatically after about ten minutes. To deactivate
the demonstration mode, press any button on the deck
or on the remote.
z To turn off the demonstration mode
Press
p on the left of the front panel and CLEAR on the
right of the front panel simultaneously.
Demonstration mode is turned off until you unplug the
power cord of the deck and plug it in again.