3-229-096-33(1)
Operating Instructions
TV/WEATHER/FM/AM
PLL Synthesized Radio
© 2002 Sony Corporation
Printed in China
ICF-M410V
OWNER'S RECORD
The model number is located on the rear and serial number on the rear exterior. Record the serial number
in the space provide below. Refer to these numbers whenever you call upon your Sony dealer regarding
this product.
Model No. ICF-M410V
Serial No.
WARNING
To prevent fire or shock hazard, do not expose the unit to rain or moisture.
To avoid electrical shock, do not open the cabinet. Refer servicing to qualified personnel only.
You are cautioned that any changes or modifications not expressly approved in this manual could void
your authority to operate this equipment.
INFORMATION
This equipment has been tested and found to comply with the limits for a Class B digital device, pursuant
to Part 15 of the FCC Rules. These limits are designed to provide reasonable protection against harmful
interference in a residential installation. This equipment generates, uses, and can radiate radio frequency
energy and, if not installed and used in accordance with the instructions, may cause harmful interference to
radio communications. However, there is no guarantee that interference will not occur in a particular
installation. If this equipment does cause harmful interference to radio or television reception, which can be
determined by turning the equipment off and on, the user is encouraged to try to correct the interference by
one or more of the following measures:
Reorient or relocate the receiving antenna.
Increase the separation between the equipment and receiver.
Connect the equipment into an outlet on a circuit different from that to which the receiver is connected.
Consult the dealer or an experienced radio/TV technician for help.
If you have any questions about this product, you may call:
Sony Customer Information Services Center 1-800-222-7669 or write to:
Sony Customer Information Services Center 12451 Gateway Blvd., Ft Myers, FL 33913
Declaration of Conformity
Trade Name:
SONY
Model:
ICF-M410V
Responsible Party: Sony Electronics Inc.
Address:
16530 Via Esprillo, San Diego, CA 92127 USA
Telephone Number: 858-942-2230
This device complies with Part 15 of the FCC Rules. Operation is subject to the following two condi-
tions: (1) This device may not cause harmful interference, and (2) this device must accept any interfer-
ence received, including interference that may cause undesired operation.
Before You Begin
Thank you for choosing the Sony radio!
It will give you many hours of reliable service and listening pleasure.
Before operating the radio, please read these instructions thoroughly and retain them for future reference.
Features
· PLL synthesized tuning 4 band radio.
·A total of 20 channels can be preset, 5 TV channels, 5 WEATHER channels, 5 FM channels and 5 AM
channels.
· Easy to tune in preset stations with 5 direct access buttons.
· Sleep timer function switches the radio off automatically (can be set to turn off after 15, 30, 45 or 60
minutes).
· Standby timer function switches the radio on automatically at the time you want.
Notes on AM Channel Step
The AM channel step differs depending on areas. See "Changing AM Channel Step".
Precautions
· Operate the unit only on 4.5 V DC. For battery operation, use three size AA (R6) batteries. For AC
operation, use only the recommended AC power adaptor.
· The unit is not disconnected from the AC power source (mains) as long as it is connected to a wall outlet,
even if the unit itself has been turned off.
· The nameplate indicating operating voltage, etc. is located on the bottom exterior.
· Avoid exposure to temperature extremes, direct sunlight, moisture, sand, dust or mechanical shock.
Never leave in a car parked under the sun.
· Should any solid object or liquid fall into the unit, disconnect the AC power adaptor and remove the
batteries, and have the unit checked by qualified personnel before operating it any further. Make sure
that no liquid or foreign material enters the DC IN 4.5 V jack of the unit. This may lead to the malfunc-
tion of the unit.
· In vehicles or buildings, radio reception may be difficult or subject to interference. Try listening near a
window.
· Since a strong magnet is used for the speakers, keep away personal credit cards using magnetic coding or
spring-wound watches from the unit to prevent possible damage from the magnet.
· When the casing becomes soiled, clean it with a soft dry cloth moistened with mild detergent solution.
Never use abrasive cleansers or chemical solvents, as they may deform the casing.
If you have any questions or problems concerning your unit, please consult your nearest Sony dealer.
Troubleshooting Guide
Should any problem persist after you have made the following checks, consult your nearest Sony dealer.
The front panel buttons do not operate at all.
·" - " is displayed. Slide HOLD so that " - " disappears.
Display is dim, or no indication is displayed.
· Weak batteries.
· The unit is being used in extremely high or low temperatures or in a place with excessive moisture.
Very weak or interrupted sound, or unsatisfactory reception.
· Weak batteries.
· When in a vehicle or building, move closer to a window.
A station cannot be received when a preset tuning button is pressed.
· The station has not been preset.
· The memory of the station has been initialized, or another station is preset. Preset the station again.
Sound is not heard and " E " appears in the display.
· Batteries are exhausted.
The preset stations may be initialized, if a maintenance service is performed.
Please note down your settings in case you want to preset them again.
Specifications
Time display:
12-hour system
Frequency range:
Band
Range
Channel step
TV
2 ch - 13 ch
1 channel
WEATHER
1 ch - 7 ch
1 channel
FM
87.5 108 MHz
0.1 MHz
AM
530 1 710 kHz
10 kHz
Speaker: 7.7 cm (3 1/
8 inches) 8
Power output: 200 mW (at 10% harmonic distortion)
Output: v (earphone) jack (ø 3.5 mm minijack)
Power requirements: 4.5 V DC, three size AA (R6) batteries
External power source: DC IN 4.5 V
Dimensions:
Approx. 205
× 104 × 40.5 mm (w/h/d)
(Approx. 8 1/
3 × 4
1/
8 × 1
5/
8 inches) not incl. projecting parts and controls
Approx. 212
× 104 × 42.5 mm (w/h/d)
(Approx. 8 3/
8 × 4
1/
8 × 1
11/
16 inches) incl. projecting parts and controls
Mass: Approx. 504 g (17.8 oz ) incl. batteries
Optional accessory
AC power adaptor AC-E45HG*
* Specifications for AC-E45HG vary for each area. Check your local voltage and the polarity of the plug
before purchasing.
Design and specifications are subject to change without notice.
Your Sony dealer may not handle all of the above listed optional accessory. Please ask your dealer for
detailed information on the optional accessory available in your country.
For customers who purchased this product in the USA
Please register this product on line at http://www.sony.com/productregistration.
Proper registration will enable us to send you periodic mailings about new products, services, and
other important announcements. Registering your product will also allow us to contact you in the
unlikely event that the product needs adjustment or modification. Thank you.
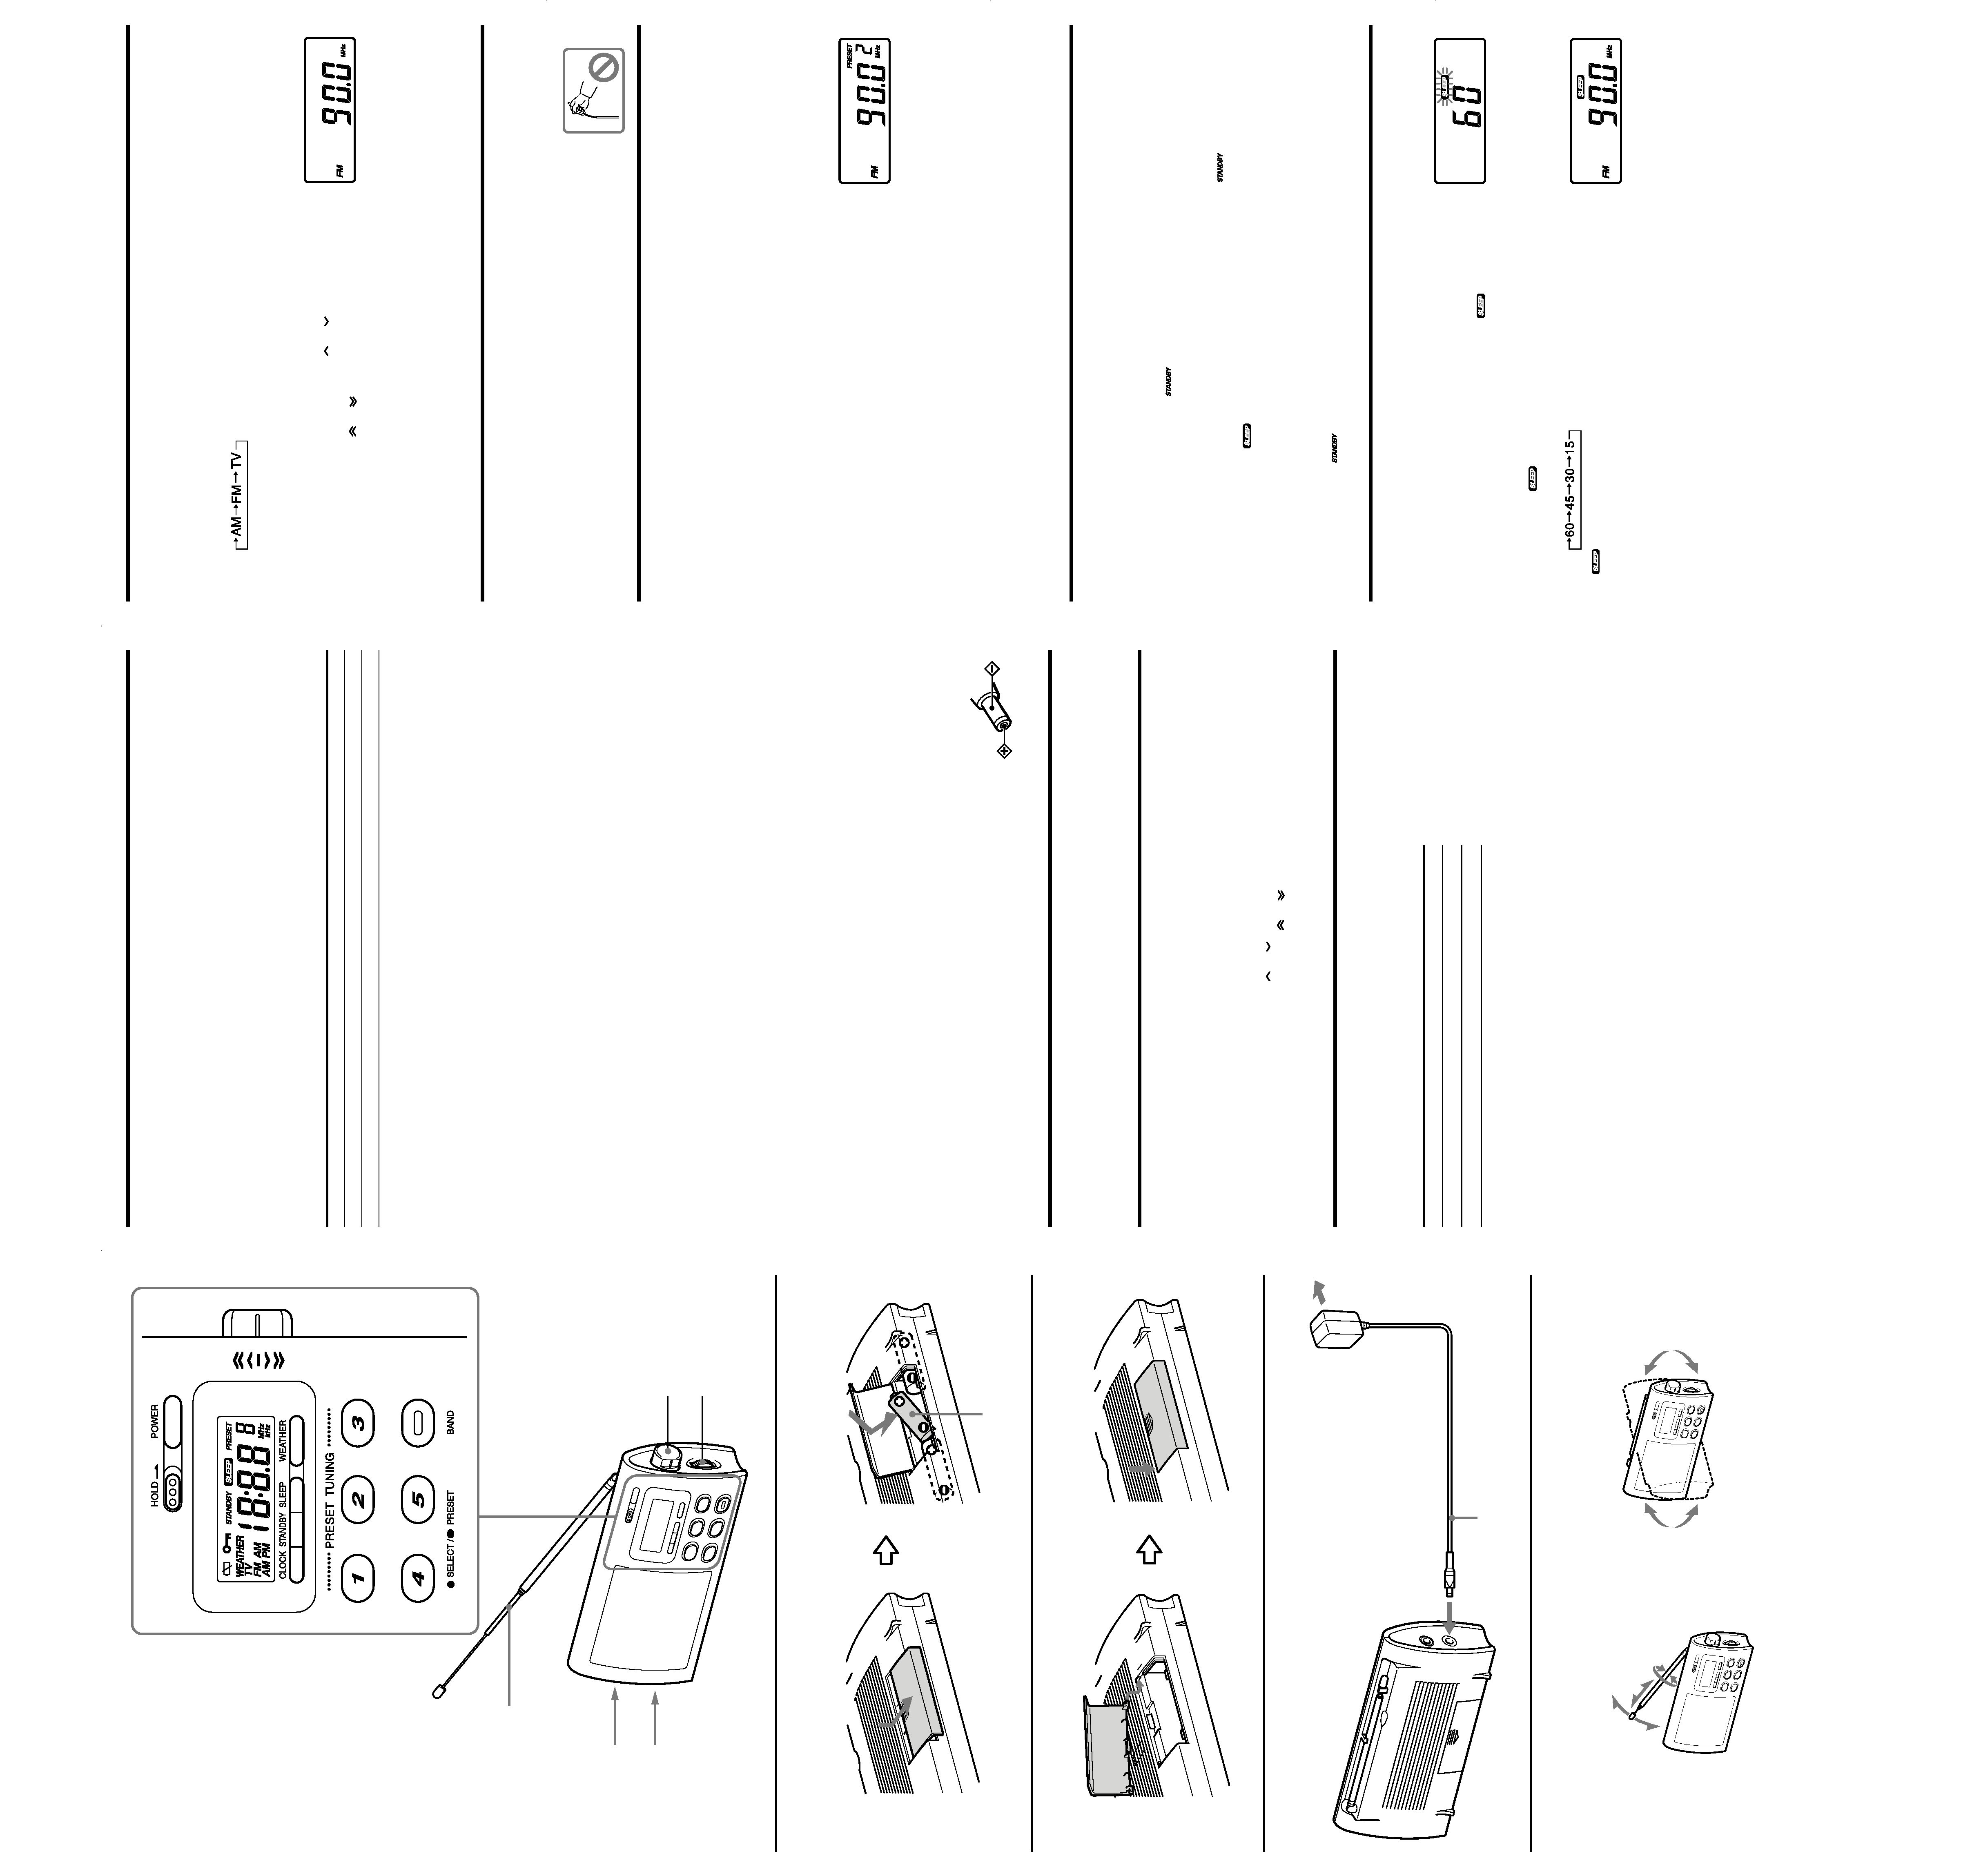
Telescopic
Antenna
TUNE/TIME SET
VOL
DC IN 4.5V
v
(earphone)
jack
Insert the # side of the battery first.
Rear
Size AA (R6)
× 3
TV/WEATHER/FM
AM
to a wall outlet
to DC IN 4.5V
AC power adaptor (not supplied)
Choosing Power Source
Installing Batteries (See fig. A)
1 Open the lid of the battery compartment at the rear of the unit.
2 Install three size AA (R6) batteries (not supplied) with correct polarity and then close the
lid.
"AM 12:00" flashes on the display when you first install the batteries. To stop the flashing, set the clock.
(See "Setting the Clock")
Battery Life (Approx. hours)
(JEITA*)
TV
WEATHER
FM
AM
Sony alkaline size AA (LR6) batteries
28
28
29
41
Sony size AA (R6) batteries
16
16
17
24
* Measured by JEITA (Japan Electronics and Information Technology Industries Association) standards.
The actual battery life may vary depending on the circumstance of the unit.
When to replace the batteries
When the batteries become weak, the sound may become weak or distorted, and "E" will flash in the
display. After that, when the batteries are used up, "E" will light and the power of the unit will be turned
off. If this happens, replace the batteries with new ones.
After the batteries are replaced, press POWER to turn the indication off.
Note on replacing the batteries
Do not take more than 40 seconds to replace the batteries, otherwise the clock, standby settings and preset
stations will be initialized. Should that happen, reset the functions.
Notes on batteries
·
Do not charge the dry batteries.
· Do not carry the dry batteries together with coins or other metallic objects. It can generate heat if the
positive and negative terminals of the batteries accidentally come into contact with metallic objects.
· When you are not going to use the unit for a long time, remove the batteries to avoid damage from
battery leakage and corrosion.
· Do not use different types of batteries at the same time.
· When you replace the batteries, replace all with new ones.
To attach the battery compartment lid if it is accidentally detached (See Fig.B)
1 Insert one side of the lid as illustrated.
2 Push the other side to attach.
Using House Current (See fig. C)
Connect the Sony AC power adaptor (not supplied) to the DC IN 4.5 V jack firmly, and plug it into a wall
outlet.
Notes on the AC power adaptor
· When operating the unit with an external power source, do not remove the batteries.
These batteries serve to backup settings stored to memory. Since batteries discharge in this case as well,
we recommend changing them about once a year.
· Before connecting and disconnecting the external power source plug, be sure to turn off the radio.
Otherwise, "E" may be displayed.
When this occurs, turn on the radio so that "E" disappears.
· When operating the unit with the internal batteries, remove the AC power adaptor from the wall outlet
and the DC IN 4.5 V jack. Make sure that the plug of the external power source is disconnected before
operating the unit.
· Use the recommended Sony AC power adaptor* only. The polarity of the plugs
of other manufacturers may be different. Failure to use the recommended AC
power adaptor may cause the unit to malfunction.
* For details on the optional AC power adaptor, see "Specifications".
Preventing Accidental Change HOLD function
Slide HOLD. " - " is displayed, indicating that all the functions of the buttons are locked.
To release the key protection, slide HOLD again so that " - " disappears.
Setting the Clock
The display will flash "AM 12:00" when the batteries are installed or the AC power adaptor is plugged in
for the first time.
1 To stop the display from flashing, press CLOCK when the radio is off.
2 While holding down CLOCK, turn TUNE/TIME SET to set the clock to the current time.
When you turn TUNE/TIME SET a little to
or
, the clock digits move forward or backward one by
one, and when you turn TUNE/TIME SET further to
or
, the clock digits move rapidly.
When you release CLOCK, the clock starts operating, and ":" starts flashing.
Changing AM Channel Step
The AM channel step differs depending on areas. The channel step of this unit is factory-set to 10 kHz.
Change the settings as shown below to be able to listen to the radio.
Area
Channel step
North and South American countries
10 kHz
Other countries/regions
9 kHz
Note
When the AM channel step is changed, the preset stations for AM will be initialized.
1 Press POWER to turn off the power.
2 While holding down CLOCK, keep pressing POWER for more than 5 seconds.
Two short beeps sound, and the AM channel step will be changed.
"9 kHz" (or "10 kHz") is displayed for about 3 seconds.
If you proceed to step 2 again, the channel step changes again.
Playing the Radio Manual Tuning
1 Press POWER to turn on the radio.
2 Press BAND repeatedly to select the band.
Each press changes the band as follows:
Each band memorizes the frequency you had tuned previously.
To change the band to WEATHER, press WEATHER. You can return to the previous frequency by
pressing BAND.
3 Turn TUNE/TIME SET.
When you turn TUNE/TIME SET a little to
or
, the frequency digits
move forward or backward one step at a time, and when you turn
TUNE/TIME SET further to
or
, the frequency digits move rapidly.
4 Adjust the volume using VOL.
To turn off the radio
Press POWER again.
To listen with an earphone (not supplied)
Connect an earphone (not supplied) to the v jack. The sound through the speaker will not be heard.
Improving the Reception (See fig. D)
TV/WEATHER/FM: Extend the telescopic antenna and adjust the length and the angle for best reception.
AM: Rotate the unit horizontally for optimum reception. A ferrite bar antenna is built in the unit.
Note
Adjust the direction of the antenna, holding the bottom of it. The antenna can be
damaged when you move the antenna with excessive force.
Presetting Your Favorite Station Preset Tuning
You can preset up to 5 stations in each TV, WEATHER, FM and AM.
Presetting a Station
1 Follow steps 1 to 4 in "Playing the Radio" and manually tune in to the station you wish to
preset.
2 Press the PRESET TUNING button you wish to preset for
more than a few seconds.
You will hear two confirmation beeps and preset number
appears in the display
To preset another station, repeat these steps.
To change the preset station, preset a new station. The previous
station will be cancelled.
Tuning in a Preset Station
1 Press POWER to turn on the radio.
2 Select the band with BAND or WEATHER.
3 Press the desired PRESET TUNING button.
4 Adjust the volume using VOL.
Note
Holding down the desired PRESET TUNING button for more than a few seconds will replace the previous
station on the PRESET TUNING button with the station you tuned in to.
Setting the Standby Timer
You can set the radio to turn on at a preset time.
You can set the standby timer whether or not the radio is turned on.
1 Hold down STANDBY until "
" starts flashing.
2 While holding down STANDBY, turn TUNE/TIME SET to set the time for the radio to be
turned on.
3 When STANDBY is released, the standby timer is activated and "
" stops flashing.
The radio is turned on and "
" is displayed at the preset time. After 60 minutes, the radio will
automatically turn off.
Once you set the standby timer, the radio will turn on at the same time everyday.
Deactivating the standby timer
Press STANDBY so that "
" disappears.
If holding down STANDBY for more than about a second, the standby timer is activated.
Setting the Sleep Timer
By setting the sleep timer, the radio turns off automatically after a set time
(60, 45, 30 or 15 minutes).
1 Press SLEEP.
The sleep timer setting of "60" is displayed and "
" flashes.
If you press SLEEP while the radio is off, the radio turns on.
2 Press SLEEP repeatedly to select the desired sleep timer
setting while "
" is flashing.
Each press changes the display as follows:
"
" is displayed for about three seconds and the frequency is
displayed.
The sleep timer starts operating.
The radio will turn off automatically after the set time.
To cancel the sleep timer
Press POWER to turn off the radio before the set time has elapsed, and press POWER again to turn on the
radio.
To extend the time
Reset the sleep timer to a longer one.
A
B
C
D
Example: Display window
when you preset FM
90.0 MHz in preset
number 2.