2
EN
Precautions
Safety
· This unit operates on 220 - 240 V AC, 50 Hz. Check
that the unit's operating voltage is identical with
your local power supply.
· If anything falls into the cabinet, unplug the unit and
have it checked by qualified personnel before
operating it any further.
· The unit is not disconnected from the mains as long
as it is connected to the mains outlet, even if the unit
itself has been turned off.
· Unplug the unit from the wall outlet if you do not
intend to use it for an extended period of time. To
disconnect the cord, pull it out by the plug, never by
the cord.
Installing
· Allow adequate air circulation to prevent internal
heat buildup.
· Do not place the unit on surfaces (rugs, blankets, etc.)
or near materials (curtains, draperies) that may block
the ventilation slots.
· Do not install the unit near heat sources such as
radiators or air dusts, or in a place subject to direct
sunlight, excessive dust, mechanical vibration or
shock.
· Do not install the unit in an inclined position. It is
designed to be operated in a horizontal position
only.
· Keep the unit and discs away from equipment with
strong magnets, such as microwave ovens or large
loudspeakers.
· Do not place heavy objects on the unit.
· If the unit is brought directly from a cold to a warm
location, moisture may condense inside the CD/
DVD player and cause damage to the lenses. When
you first install the unit, or when you move it from a
cold to a warm location, wait for about one hour
before operating the unit.
Welcome!
Thank you for purchasing the Sony CD/DVD Player. Before
operating the unit, please read this manual thoroughly and
retain it for future reference.
WARNING
To prevent fire or shock hazard, do not
expose the unit to rain or moisture.
To avoid electrical shock, do not open the
cabinet. Refer servicing to qualified personnel
only.
Mains cord must only be changed at qualified
service shop.
CAUTION
The use of optical instruments with this product will
increase eye hazard. As the laser beam used in this
CD/DVD Player is harmful to eyes, do not attempt to
disassemble the cabinet.
Refer servicing to qualified personnel only.
This label is located on the Laser protective housing
inside the enclosure.

3
EN
TABLE OF CONTENTS
This Player Can Play the Following Discs ................................................................ 4
Getting Started
Unpacking ............................................................................................................................. 6
Hooking Up the System ...................................................................................................... 6
Necessary Setup Before Using the Player ........................................................................ 9
Selecting the Language for On-screen Display ............................................................... 9
Basic Operations
Playing a DVD....................................................................................................................... 10
Playing a CD/VIDEO CD ................................................................................................... 14
Playing Discs in Various Modes
Using the On-Screen Display .......................................................................................... 18
Using the Front Panel Display ........................................................................................ 20
Playing Repeatedly (Repeat Play) .................................................................................. 22
Playing in Random Order (Shuffle Play) ...................................................................... 23
Creating Your Own Program (Program Play) .............................................................. 24
Resuming Playback from the Point Where You Stopped a Disc (Resume Play) ..... 25
Reducing the Picture Noise (DNR: Digital Video Noise Reduction) ........................ 26
Changing the Sounds ....................................................................................................... 26
Displaying the Subtitles ................................................................................................... 27
Changing the Angles ........................................................................................................ 27
Limiting Playback by Children (Parental Control) ...................................................... 28
Controlling the TV or the AV Amplifier (Receiver) with the Supplied Remote ..... 30
Settings and Adjustments
Using the Setup display ................................................................................................... 32
Setting the Language for Display and Sound (LANGUAGE SETUP) ...................... 33
Settings for Display (INITIAL SETUP 1) ....................................................................... 34
Settings for Sound (INITIAL SETUP 2) ......................................................................... 35
Dolby* Digital Surround
What is Dolby Digital Surround? ................................................................................... 36
Speaker System Hookups ................................................................................................ 36
Speaker Setup .................................................................................................................... 38
Setting for Dolby Digital Surround ................................................................................ 40
Additional Information
Precautions ........................................................................................................................ 42
Notes on Discs ................................................................................................................... 42
Troubleshooting ................................................................................................................ 43
Self-diagnosis function ..................................................................................................... 45
Specifications ..................................................................................................................... 46
Glossary .............................................................................................................................. 46
Index to Parts and Controls ............................................................................................. 48
Setup Display Item List .................................................................................................... 51
Language Code List .......................................................................................................... 52
Index .......................................................................................................................................... 53
* Manufactured under license from Dolby Laboratories.
"Dolby", "Pro Logic" and the double-D symbol a are trademarks of Dolby Laboratories.
Confidential Unpublished Works. ©1992-1997 Dolby Laboratories, Inc. All rights reserved.
EN
4
EN
Getting Started
Z
z
12 cm
74 min.
8 cm
20 min.
12 cm
74 min.
8 cm
(CD single)
20 min.
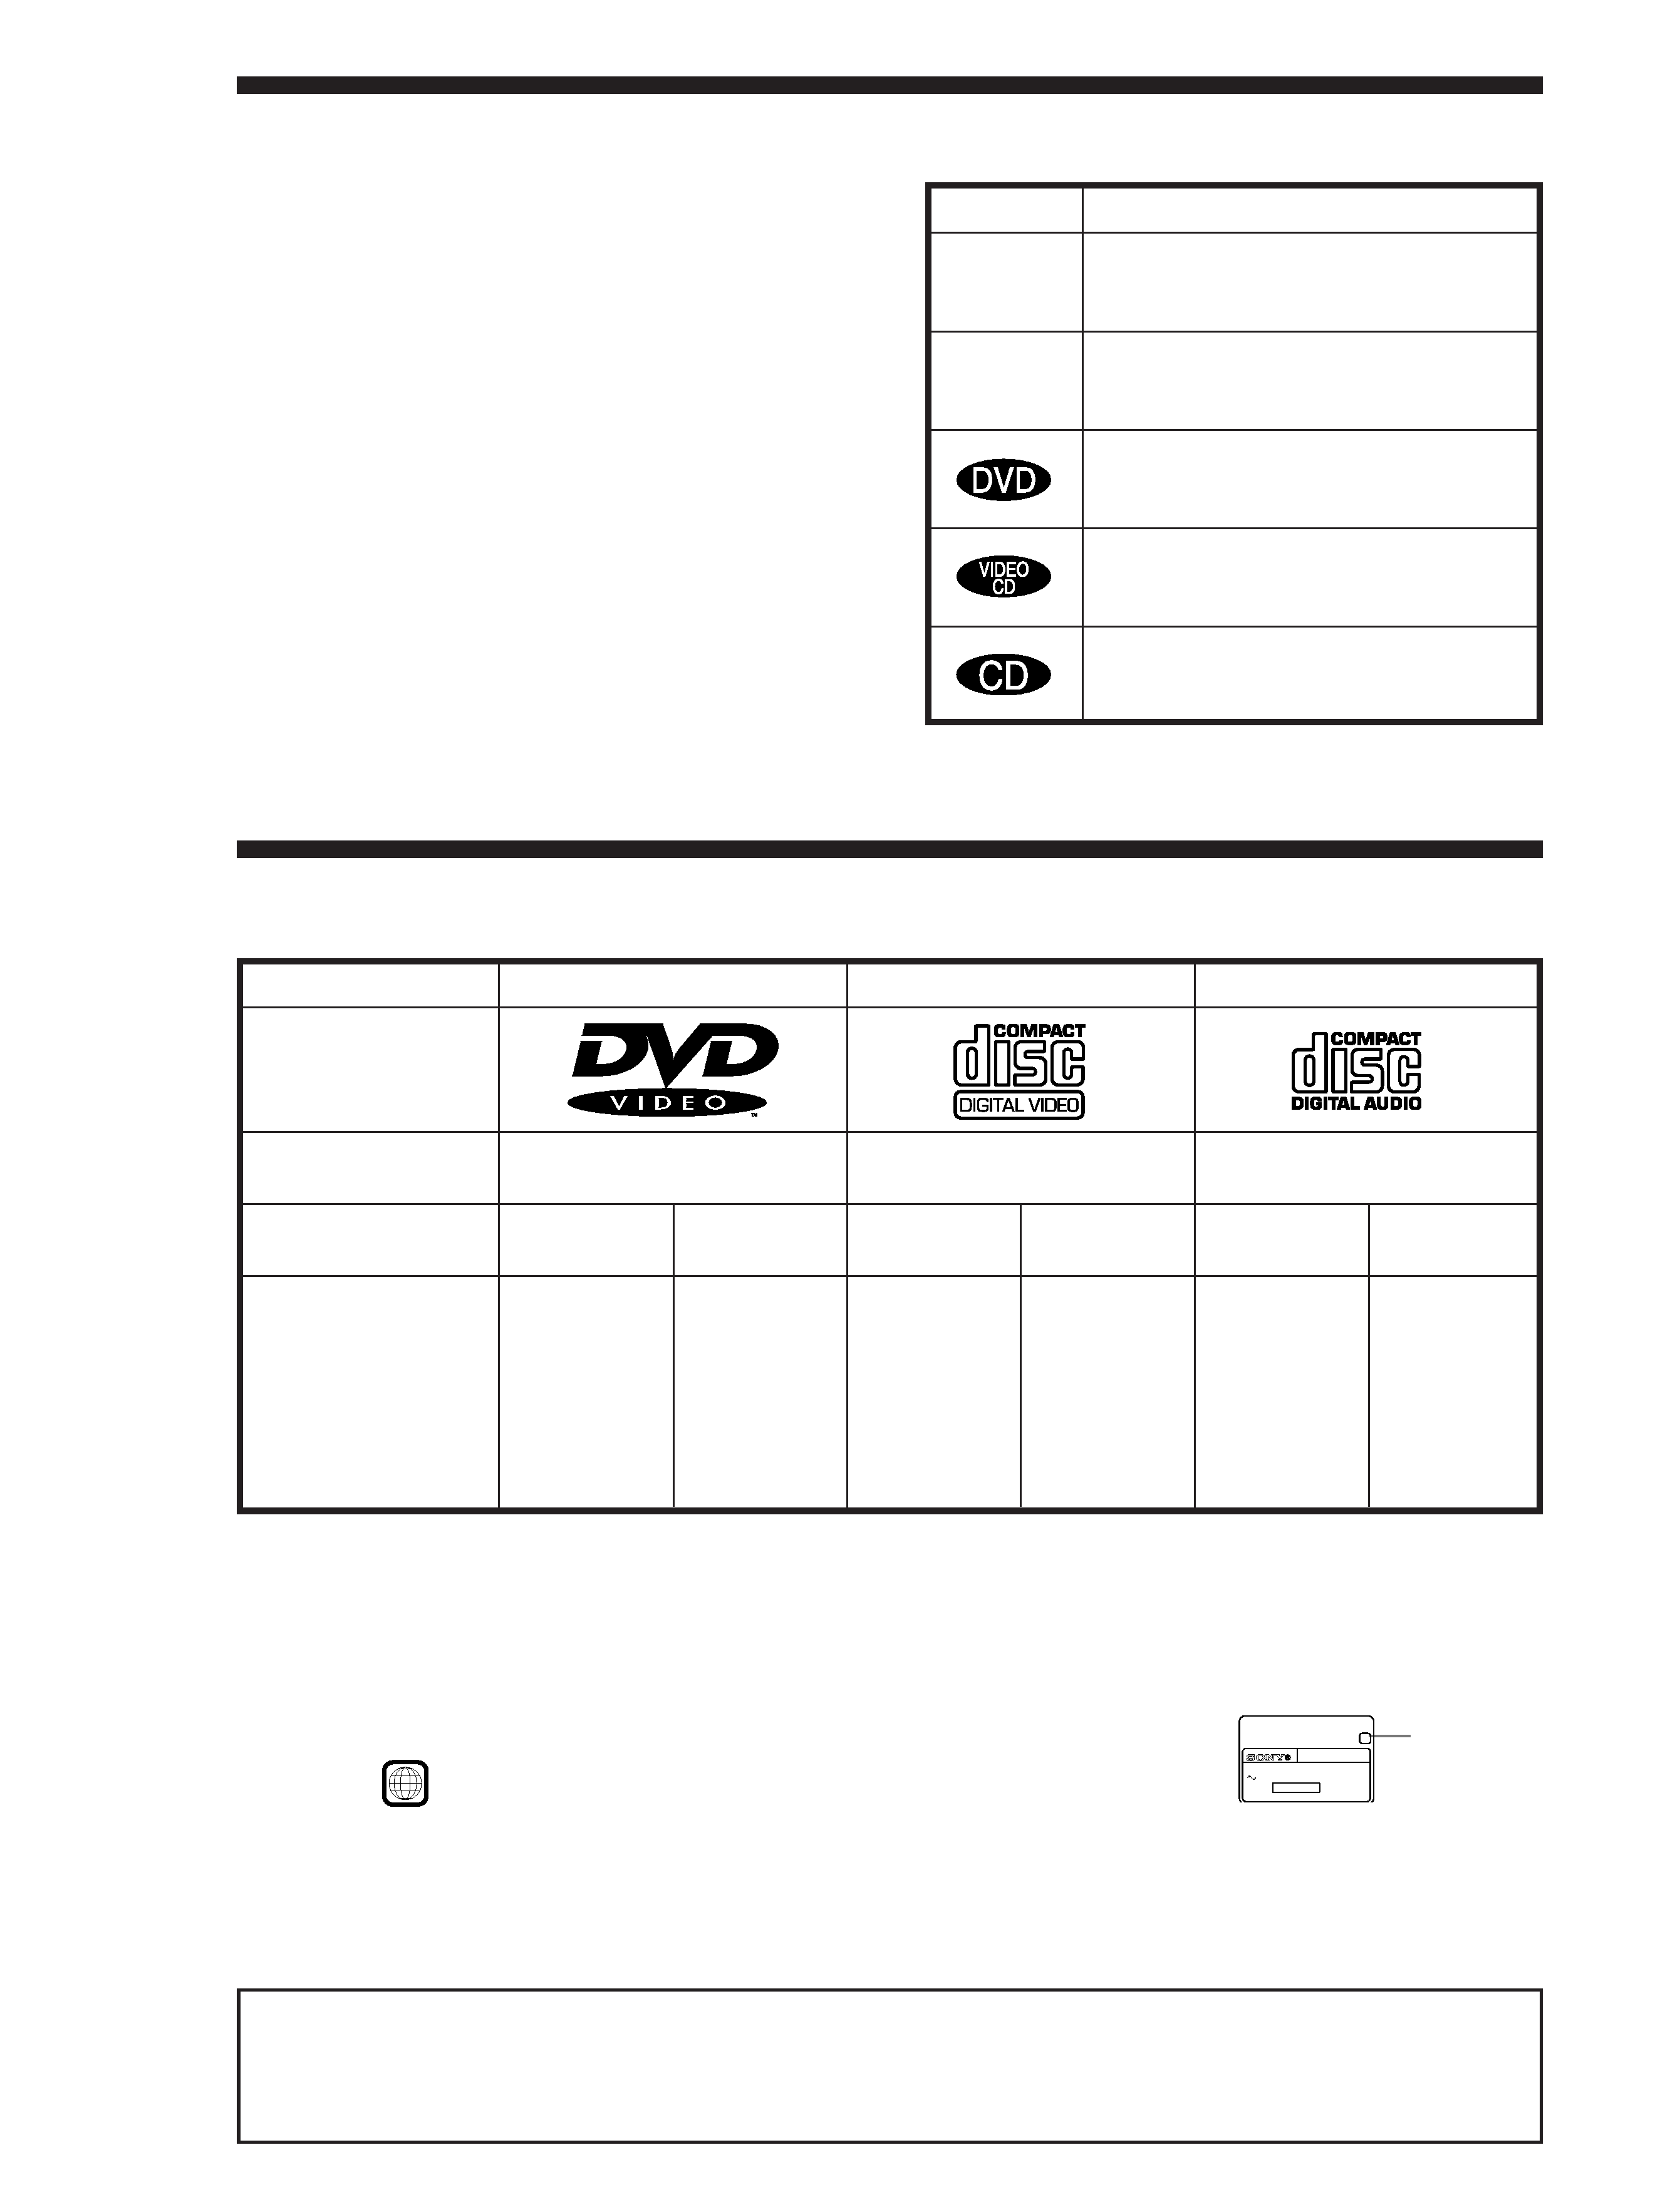
DVD VIDEOs
Audio + Video
12 cm
About 4 h (for
single-sided
DVD)/
about 8 h (for
double-sided
DVD)
8 cm
About 80 min.
(for
single-sided
DVD)/
about 160 min.
(for
double-sided
DVD)
VIDEO CDs
Audio + Video
Audio CDs
Audio
About This Manual
The instructions in this manual are for model DVP-S505D.
Conventions
· Instructions in this manual describe the controls on the
player.
You can also use the controls on the remote if they have
the same or similar names as those on the player.
· The icons on the right are used in this manual:
This Player Can Play the Following Discs
Disc logo
Contents
Disc size
Play time
"DVD VIDEO" logo is a trademark.
This player switches the color system, PAL or NTSC, according to the connected TV. (For details, see page 9.)
Region code of DVDs you can play on this unit
Your DVD player has a region code printed on the back of the unit and will only play DVDs
that are labeled with identical region codes.
DVDs labeled ALL will also play on this unit.
If you try to play any other DVD, the message "Playing this disc prohibited by area limits." will
appear on the TV screen.
Depending on the DVD, no region code indication may be labeled even though playing the DVD is prohibited by the area limits.
Note on playback operations of DVDs and VIDEO CDs
Some playback operations of DVDs and VIDEO CDs may be intentionally fixed by software producers. Since this player plays
DVDs and VIDEO CDs according to the disc contents the software producers designed, some playback features may not be
available. Also refer to the instructions supplied with the DVDs or VIDEO CDs.
Icon
Meaning
Indicates that you can use only the remote
to do the task.
Indicates tips and hints for making the task
easier.
Indicates the functions for DVD VIDEOs.
Indicates the functions for VIDEO CDs.
Indicates the functions for Audio CDs.
Region code
MODEL NO.
DVP8306
CD/DVD PLAYER
AC 110V 60Hz
22W
NO.
SONY CORPORATION
MADE IN JAPAN
3-444-464-01
X
Playing CDs
Getting Started
5
EN
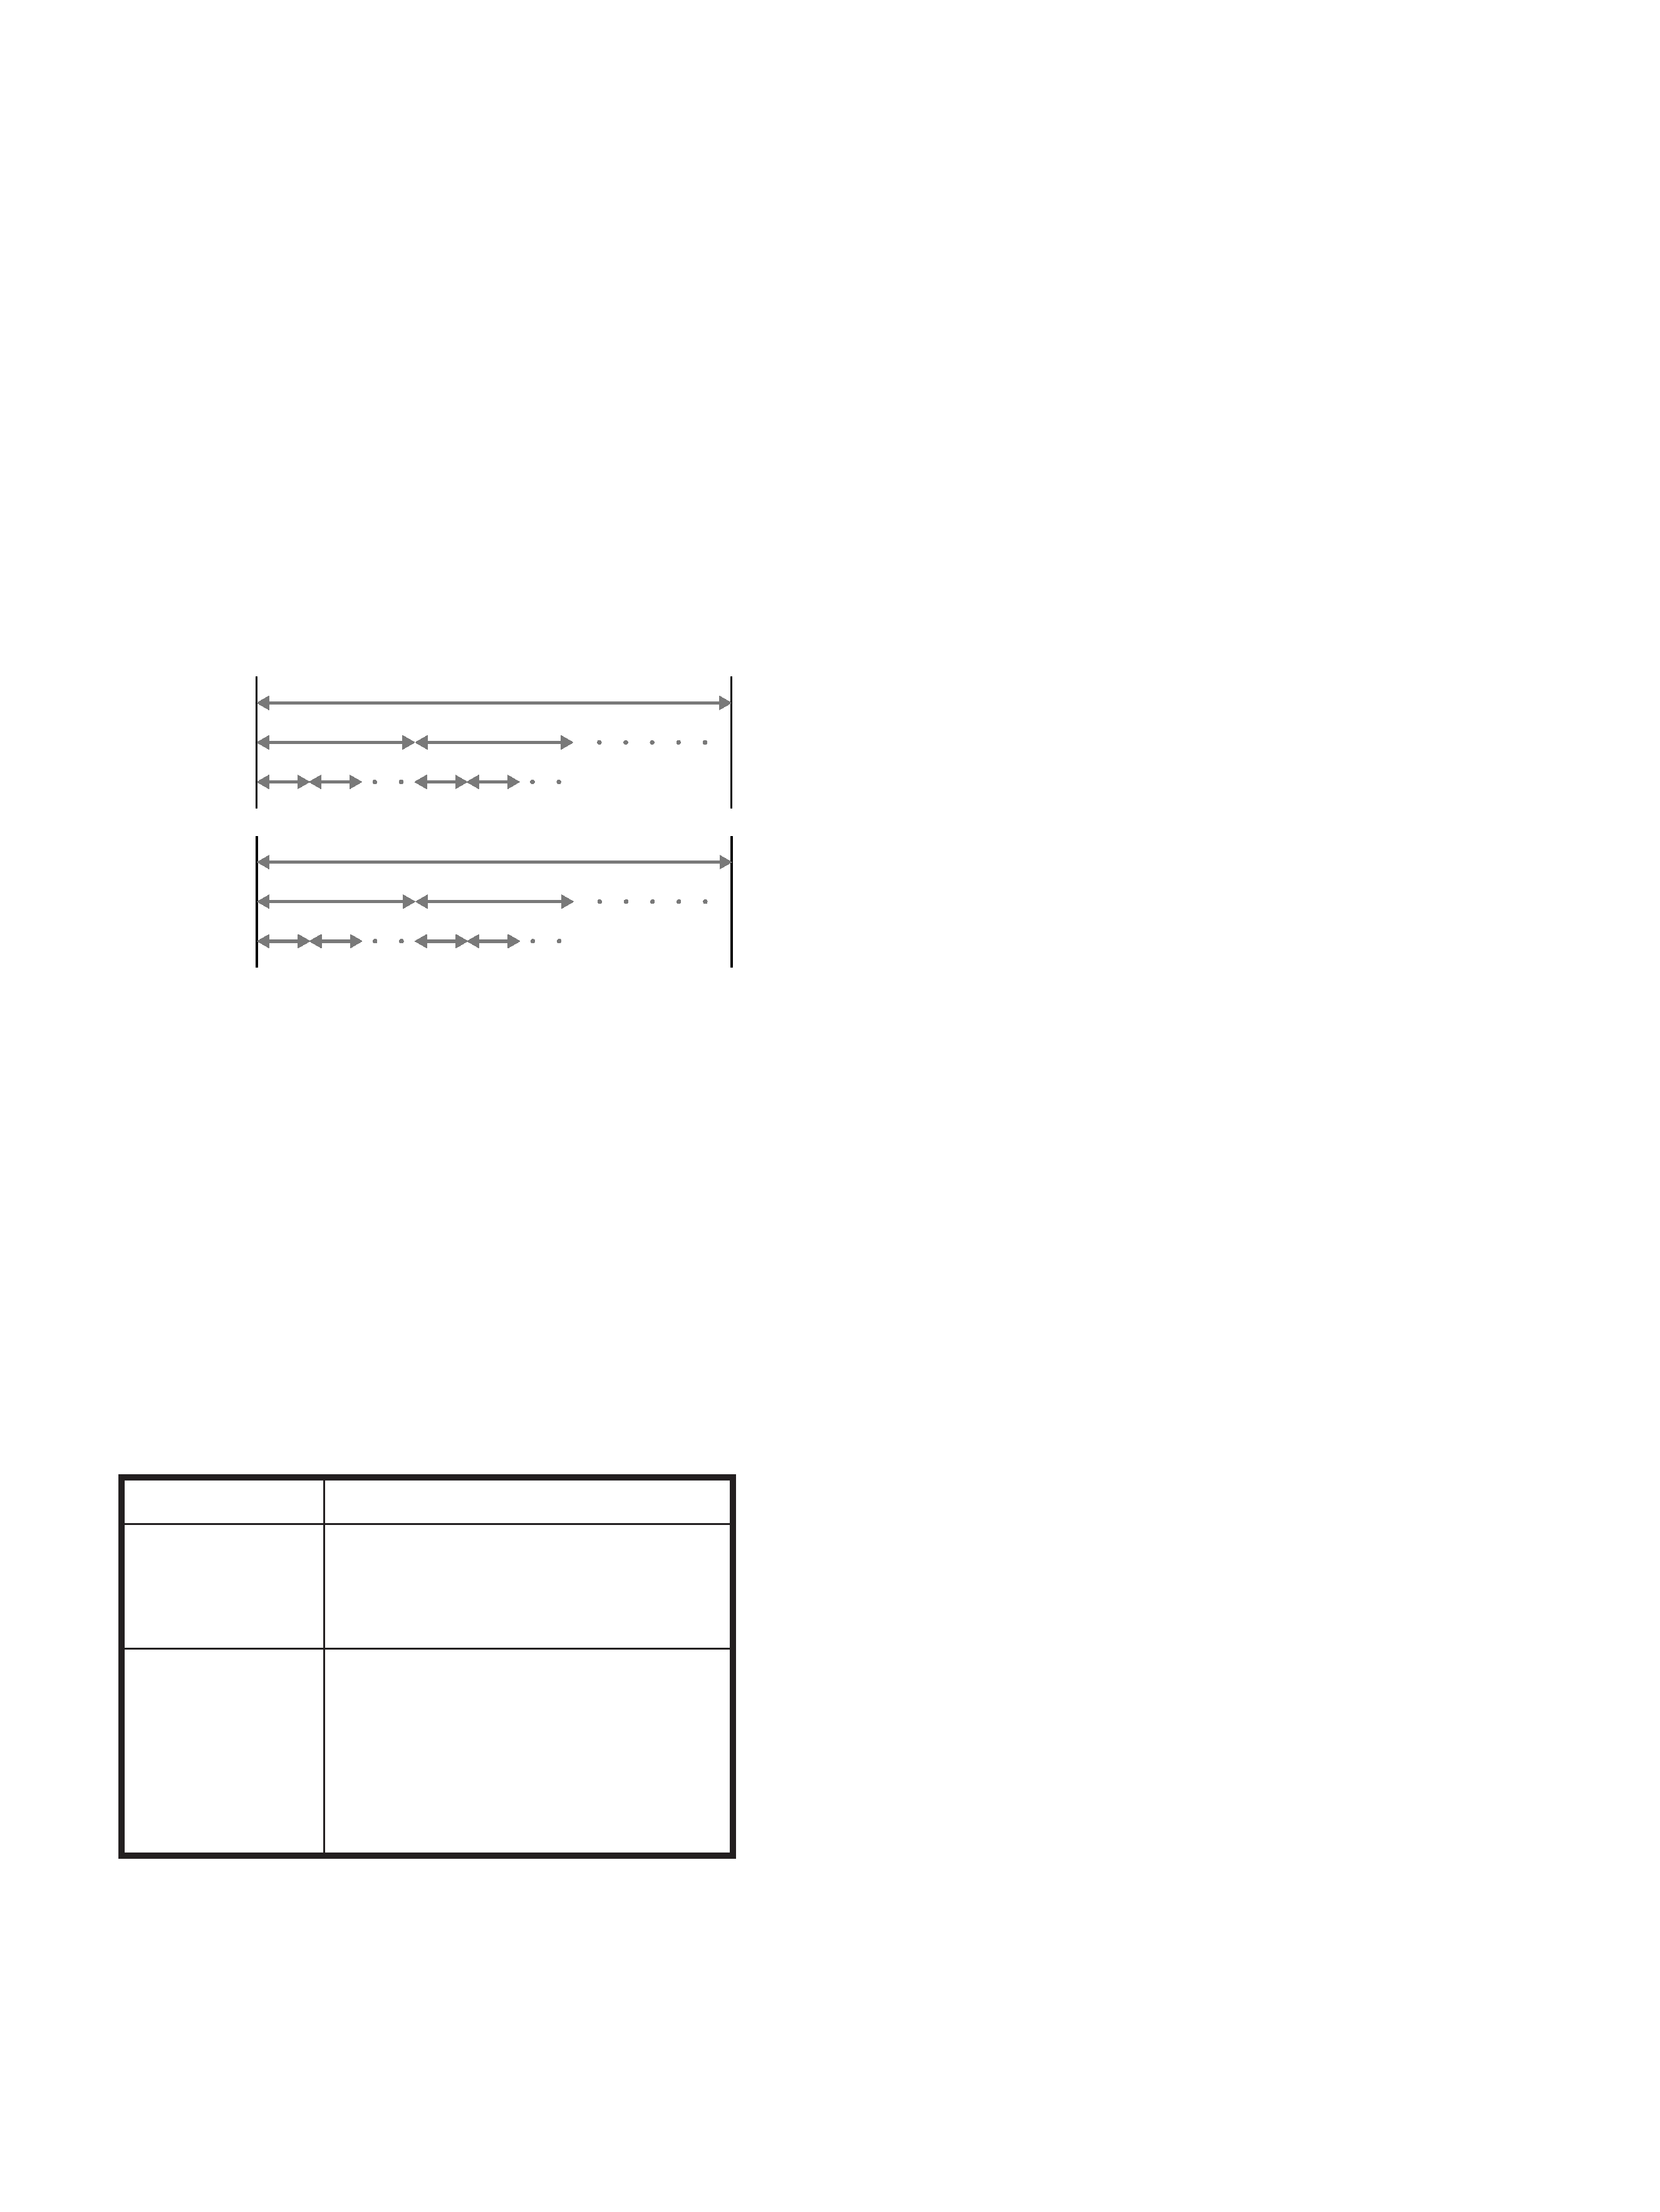
Getting Started
DVD
structure
VIDEO CD
or CD
structure
Disc
Title
Chapter
Disc
Track
You can
Enjoy video playback (moving
pictures) as well as music.
Play interactive software using menu
screens displayed on the TV screen
(PBC Playback), in addition to the
video playback functions of Ver 1.1
discs. Moreover, you can play high-
resolution still pictures, if they are
included on the disc.
Terms for discs
· Title
The longest sections of a picture or a music piece on a DVD;
a movie, etc, for a picture piece on a video software; or an
album, etc, for a music piece on an audio software. Each
title is assigned a title number enabling you to locate the
title you want.
· Chapter
Sections of a picture or a music piece that are smaller than
titles. A title is composed of several chapters. Each chapter
is assigned a chapter number enabling you to locate the
chapter you want. Depending on the disc, no chapters may
be recorded.
· Track
Sections of a picture or a music piece on a VIDEO CD or a
CD. Each track is assigned a track number enabling you to
locate the track you want.
· Index (CD) / Video Index (VIDEO CD)
A number that divides a track some sections to easily locate
the point you want on a VIDEO CD or a CD. Depending
on the disc, no indexes may be recorded.
· Scene
On a VIDEO CD with PBC functions, the menu screens,
moving pictures and still pictures are divided into sections
called "scenes." Each scene is assigned a scene number
enabling you to locate the scene you want.
Note on PBC (Playback Control) (VIDEO CDs)
This player conforms to Ver. 1.1 and Ver. 2.0 of VIDEO CD
standards. You can enjoy two kinds of playback according to
the disc type.
Disc type
VIDEO CDs
without PBC
functions
(Ver. 1.1 discs)
VIDEO CDs
with PBC
functions
(Ver. 2.0 discs)
Discs that the player cannot play
The player cannot play discs other than the ones listed in the
table on page 4. CD-ROMs including PHOTO CDs, data
sections in CD-EXTRAs and DVD-ROMs etc. can not be
played.
Index
This product incorporates copyright protection technology
that is protected by method claims of certain U.S. patents and
other intellectual property rights owned by Macrovision
Corporation and other rights owners. Use of this copyright
protection technology must be authorized by Macrovision
Corporation, and is intended for home and other limited
viewing uses only unless otherwise authorized by
Macrovision Corporation. Reverse engineering or
disassembly is prohibited.
6
EN
Getting Started
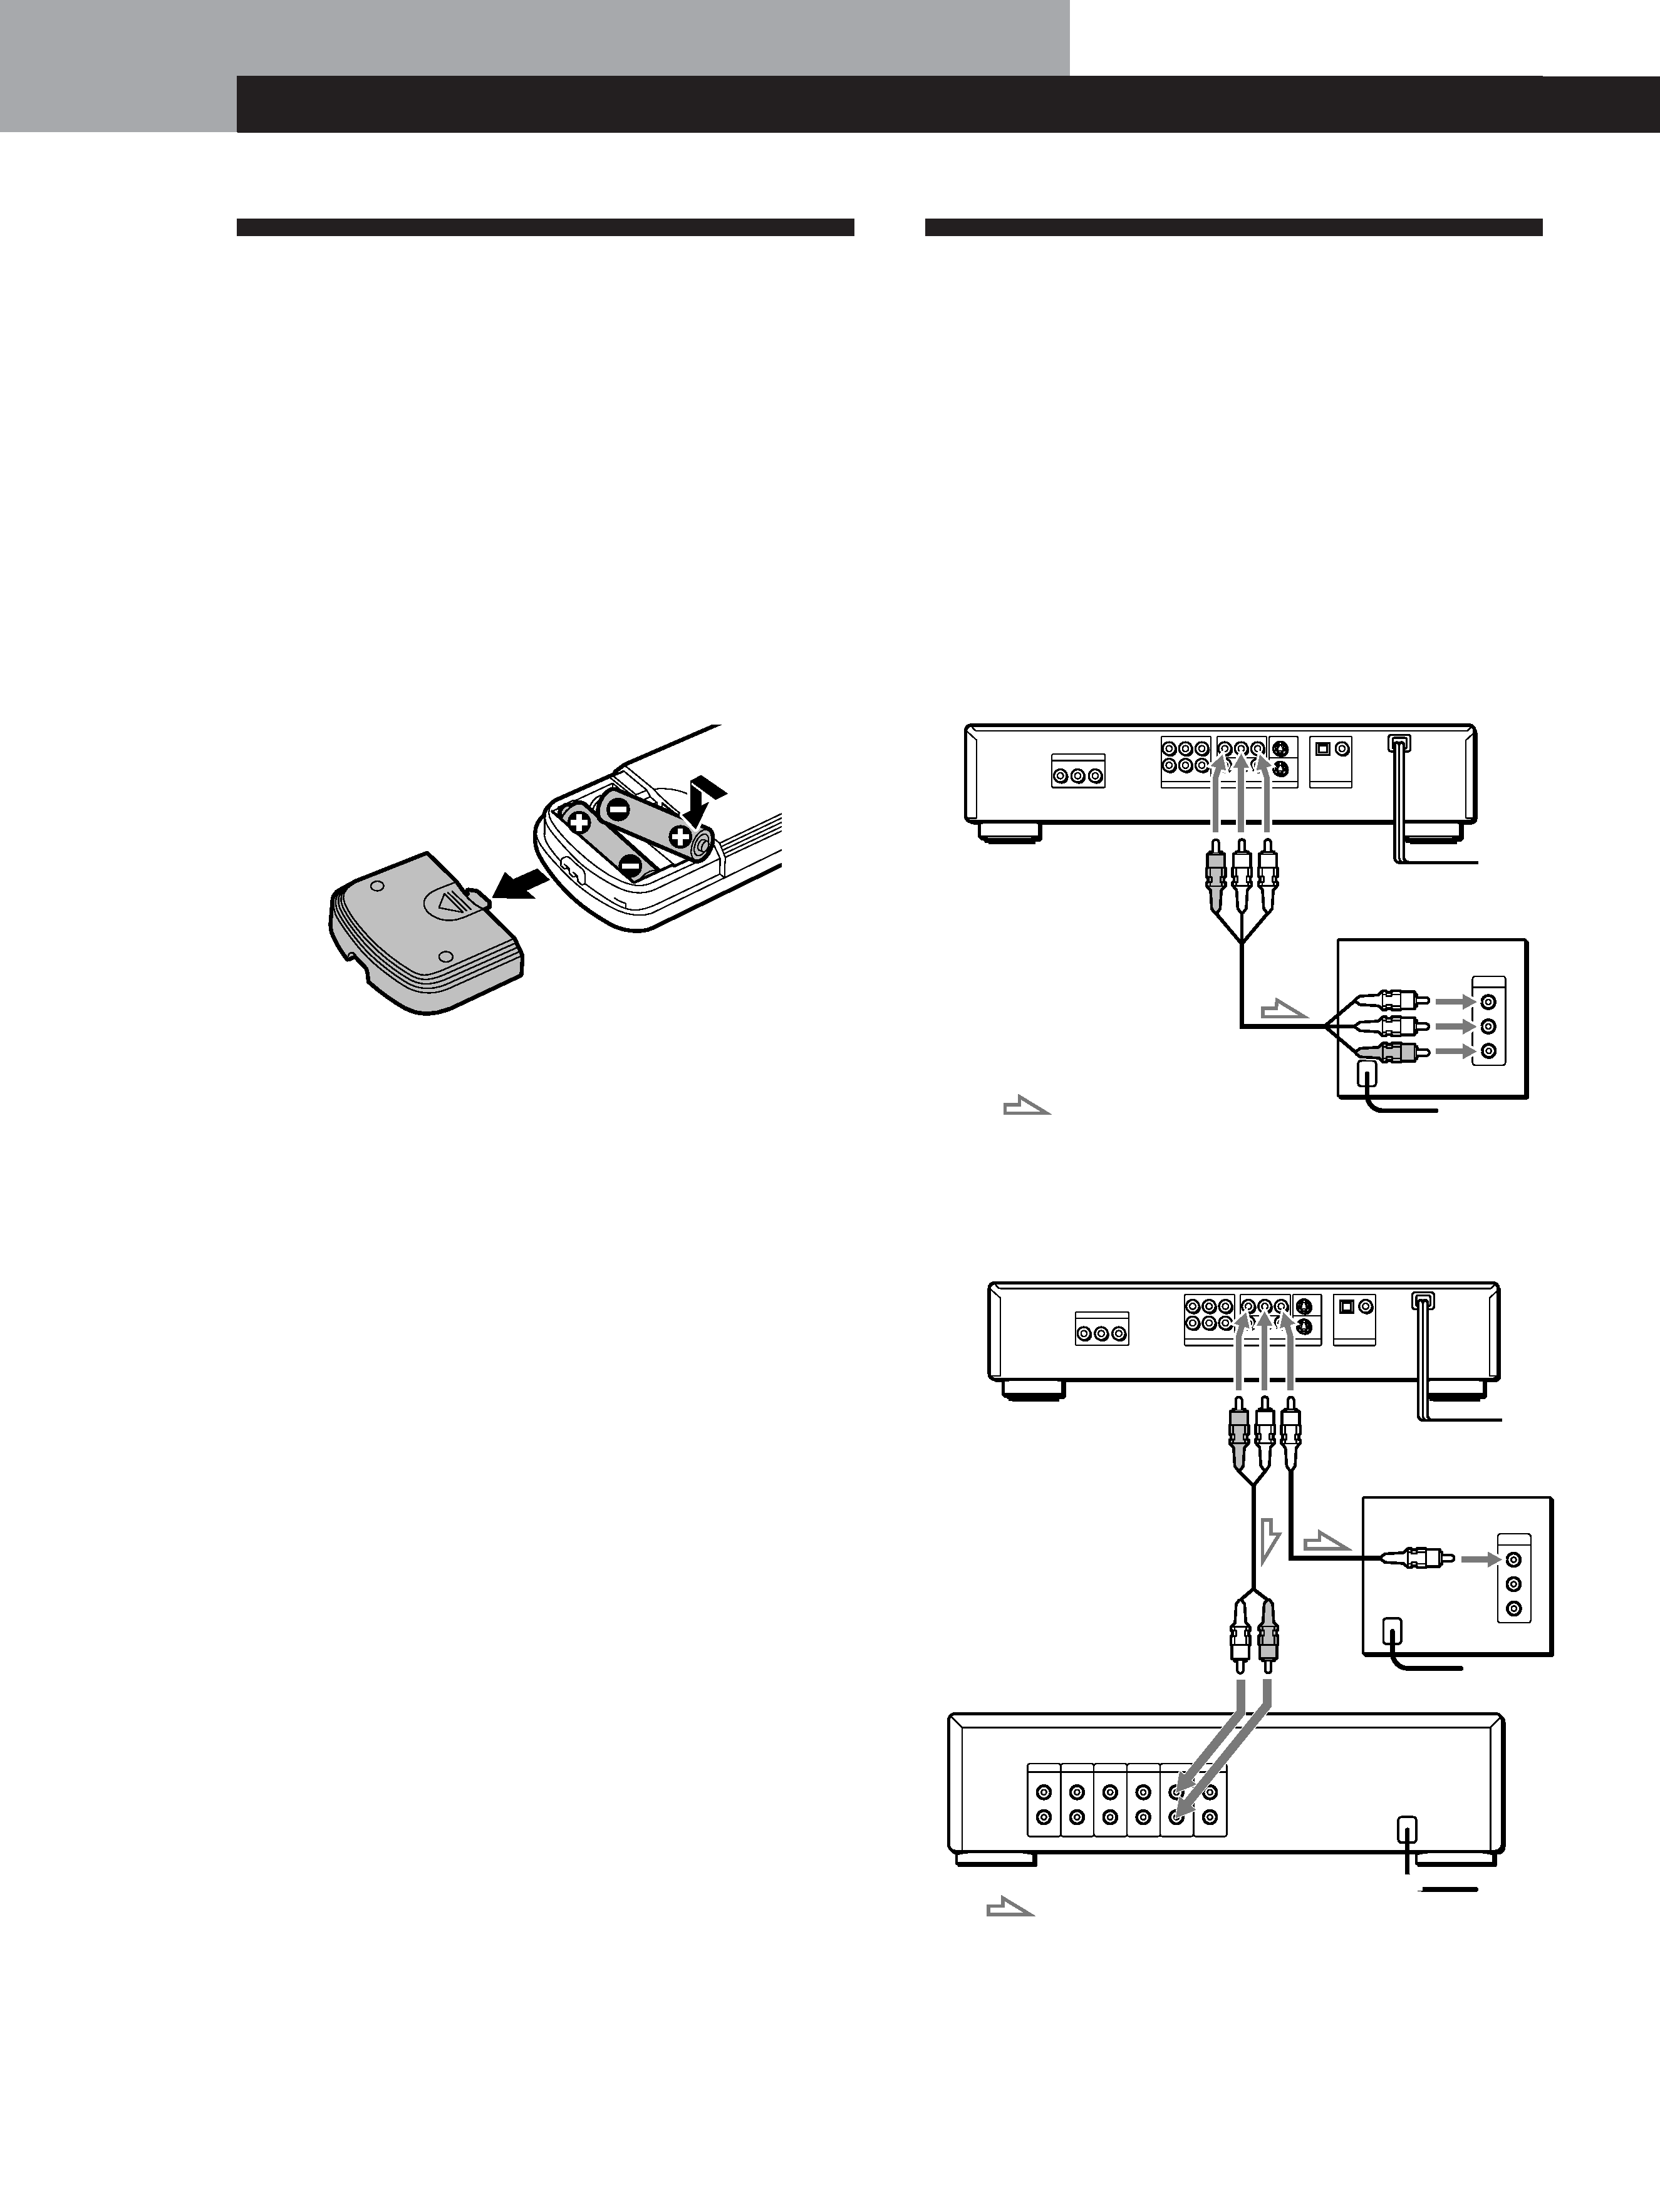
Hooking Up the System
Overview
This section describes how to hook up the CD/DVD
player to a TV (with audio/video input jacks) and/or
an amplifier. You cannot connect this player to a TV
without a video input connector. Be sure to turn off
the power of each component before making the
connections.
pTo listen to the sound through TV speakers (2ch L,R)
pTo listen to the sound through speakers connected to
an amplifier (receiver) (2ch L,R)
pTo enjoy Dolby Digital surround sound by connecting
the player to an amplifier with 5.1 channel inputs
See page 36.
CD/DVD player
To VIDEO
OUT
To an AC outlet
To audio
input
TV
To an AC outlet
: Signal flow
CD/DVD player
To
AUDIO
OUT
To
VIDEO
OUT
To an AC outlet
TV
To audio
input
: Signal flow
To an AC outlet
To an AC outlet
Amplifier
(Receiver)
Unpacking
Check that you have the following items:
· Audio/video connecting cord (1)
· S video cable (1)
· Remote commander (remote) RMT-D102E (1)
· Size AA (R6) batteries (2)
Inserting batteries into the remote
You can control the player using the supplied remote.
Insert two R6 (size AA) batteries by matching the + and
on the batteries. When using the remote, point it at
the remote sensor g on the player.
z You can control TVs and Sony AV receivers using the
supplied remote
See page 30.
Notes
· Do not leave the remote in an extremely hot or humid
place.
· Do not drop any foreign object into the remote casing,
particularly when replacing the batteries.
· Do not expose the remote sensor to direct sunlight or
lighting apparatuses. Doing so may cause a malfunction.
· If you will not use the remote for an extended period of
time, remove the batteries to avoid possible damage from
battery leakage and corrosion.
Getting Started
To video input
To AUDIO
OUT
To video input