3-084-861-11(1)
© 2003 Sony Corporation
Camera
Operations Guide
Read this first
Digital Video Camera Recorder
DCR-IP1
2
Read this first
Before operating the unit, please read this
manual thoroughly, and retain it for future
reference.
WARNING
To prevent fire or shock hazard, do not
expose the unit to rain or moisture.
This symbol is intended to alert
the user to the presence of
uninsulated "dangerous
voltage" within the product's
enclosure that may be of
sufficient magnitude to
constitute a risk of electric
shock to persons.
This symbol is intended to alert
the user to the presence of
important operating and
maintenance (servicing)
instructions in the literature
accompanying the appliance.
For customers in the U.S.A. and
CANADA
CAUTION
TO PREVENT ELECTRIC SHOCK, MATCH
WIDE BLADE OF PLUG TO WIDE SLOT,
FULLY INSERT.
RECYCLING LITHIUM-ION BATTERIES
Lithium-Ion batteries are
recyclable.
You can help preserve our
environment by returning your
used rechargeable batteries to
the collection and recycling
location nearest you.
For more information regarding recycling of
rechargeable batteries, call toll free 1-800-822-
8837, or visit http://www.rbrc.org/
Caution: Do not handle damaged or leaking
Lithium-Ion batteries.
"Memory Stick"
This device complies with Part 15 of the FCC
Rules. Operation is subject to the following two
conditions: (1) This device may not cause
harmful interference, and (2) this device must
accept any interference received, including
interference that may cause undesired
operation.
This Class B digital apparatus complies with
Canadian ICES-003.
For customers in the U.S.A.
If you have any questions about this product,
you may call:
Sony Customer Information Center 1-800-222-
SONY (7669)
The number below is for the FCC related
matters only.
Regulatory Information
Declaration of Conformity
Trade Name:
SONY
Model No.:
DCR-IP1
Responsible Party: Sony Electronics Inc.
Address:
680 Kinderkamack
Road, Oradell, NJ07649
U.S.A.
Telephone No.:
201-930-6972
This device complies with Part 15 of the FCC
Rules. Operation is subject to the following
two conditions: (1) This device may not cause
harmful interference, and (2)this device must
accept any interference received, including
interference that may cause undesired
operation.

3
Owner's Record
The model and serial numbers are located on the
bottom. Record the serial number in the space
provided below. Refer to these numbers
whenever you call upon your Sony dealer
regarding this product.
Model No.
DCR-IP ________________
Serial No.
_______________________
Model No.
AC-____________________
Serial No.
_______________________
CAUTION
You are cautioned that any changes or
modifications not expressly approved in this
manual could void your authority to operate this
equipment.
b
Note
This equipment has been tested and found to comply
with the limits for a Class B digital device, pursuant to
Part 15 of the FCC Rules. These limits are designed to
provide reasonable protection against harmful
interference in a residential installation. This
equipment generates, uses, and can radiate radio
frequency energy and, if not installed and used in
accordance with the instructions, may cause harmful
interference to radio communications. However, there
is no guarantee that interference will not occur in a
particular installation. If this equipment does cause
harmful interference to radio or television reception,
which can be determined by turning the equipment off
and on, the user is encouraged to try to correct the
interference by one or more of the following measures:
Reorient or relocate the receiving antenna.
Increase the separation between the equipment and
receiver.
Connect the equipment into an outlet on a circuit
different from that to which the receiver is
connected.
Consult the dealer or an experienced radio/TV
technician for help.
The supplied interface cable must be used with the
equipment in order to comply with the limits for a
digital device pursuant to Subpart B of Part 15 of FCC
Rules.
Notes on use
You can use only MICROMV
cassettes in your camcorder.
Your camcorder is based on the MICROMV format.
You can use only MICROMV cassettes with micro
Cassette Memory in your camcorder.
Notes on the MICROMV format
· Records and plays back for about 60 minutes with
quality equal to that of DV (digital video).
· The micro Cassette Memory feature is provided with
all
MICROMV cassettes. Your camcorder can
access any scene easily using the memory (Multi-
picture search function).
· Adopts the MPEG2 format as a data compression
method. This format is the same as the one for DVD
(digital versatile disc). Records in 12Mbps bit rate to
obtain a higher quality of image.
· Transition between the last scene you recorded and
the next scene is the still image. This is not a
malfunction.
The
mark is indicated on the MICROMV
cassette.
Note on the type of "Memory Stick" you
can use in your camcorder
You can use only a "Memory Stick Duo," which is
about half the size of an ordinary "Memory Stick," in
your camcorder (p. 97).
The
mark is indicated on the
"Memory Stick Duo."
Notes on recording
· Before starting to record, test the recording function
to make sure the picture and sound are recorded
without any problems.
· Compensation for the contents of recordings cannot
be provided, even if recording or playback is not
possible due to a malfunction of the camcorder,
storage media, etc.
· TV color systems differ depending on the countries/
regions. To view your recordings on a TV, you need
an NTSC system-based TV.
· Television programs, films, video tapes, and other
materials may be copyrighted.Unauthorized
recording of such materials may be contrary to the
copyright laws.
Notes on the LCD panel and lens
· The LCD screen is manufactured using extremely
high-precision technology, so over 99.99% of the
pixels are operational for effective use.
However, there may be some tiny black points and/
,continued
4
or bright points (white, red, blue, or green in color)
that appear constantly on the LCD screen.
These points are normal results of the manufacturing
process and do not affect the recording in any way.
· Exposing the LCD screen or the lens to direct
sunlight for long periods of time may cause
malfunctions. Be careful when placing the camera
near a window or outdoors.
· Do not aim at the sun. Doing so might cause your
camcorder to malfunction. Take pictures of the sun
only in low light conditions, such as at dusk.
Note on connecting other device
Before connecting your camcorder to other device
such as a VCR or a computer with an USB or i.LINK
cable, be sure to insert the connector plug in the proper
direction. If you insert the connector plug forcibly in
the wrong direction, the terminal may be damaged.
This may cause a malfunction of your camcorder.
Note on using this manual
· The images of the LCD screen used on this manual
are captured using a digital still camera, and thus
may appear different from what you see.
Notes on using the camcorder
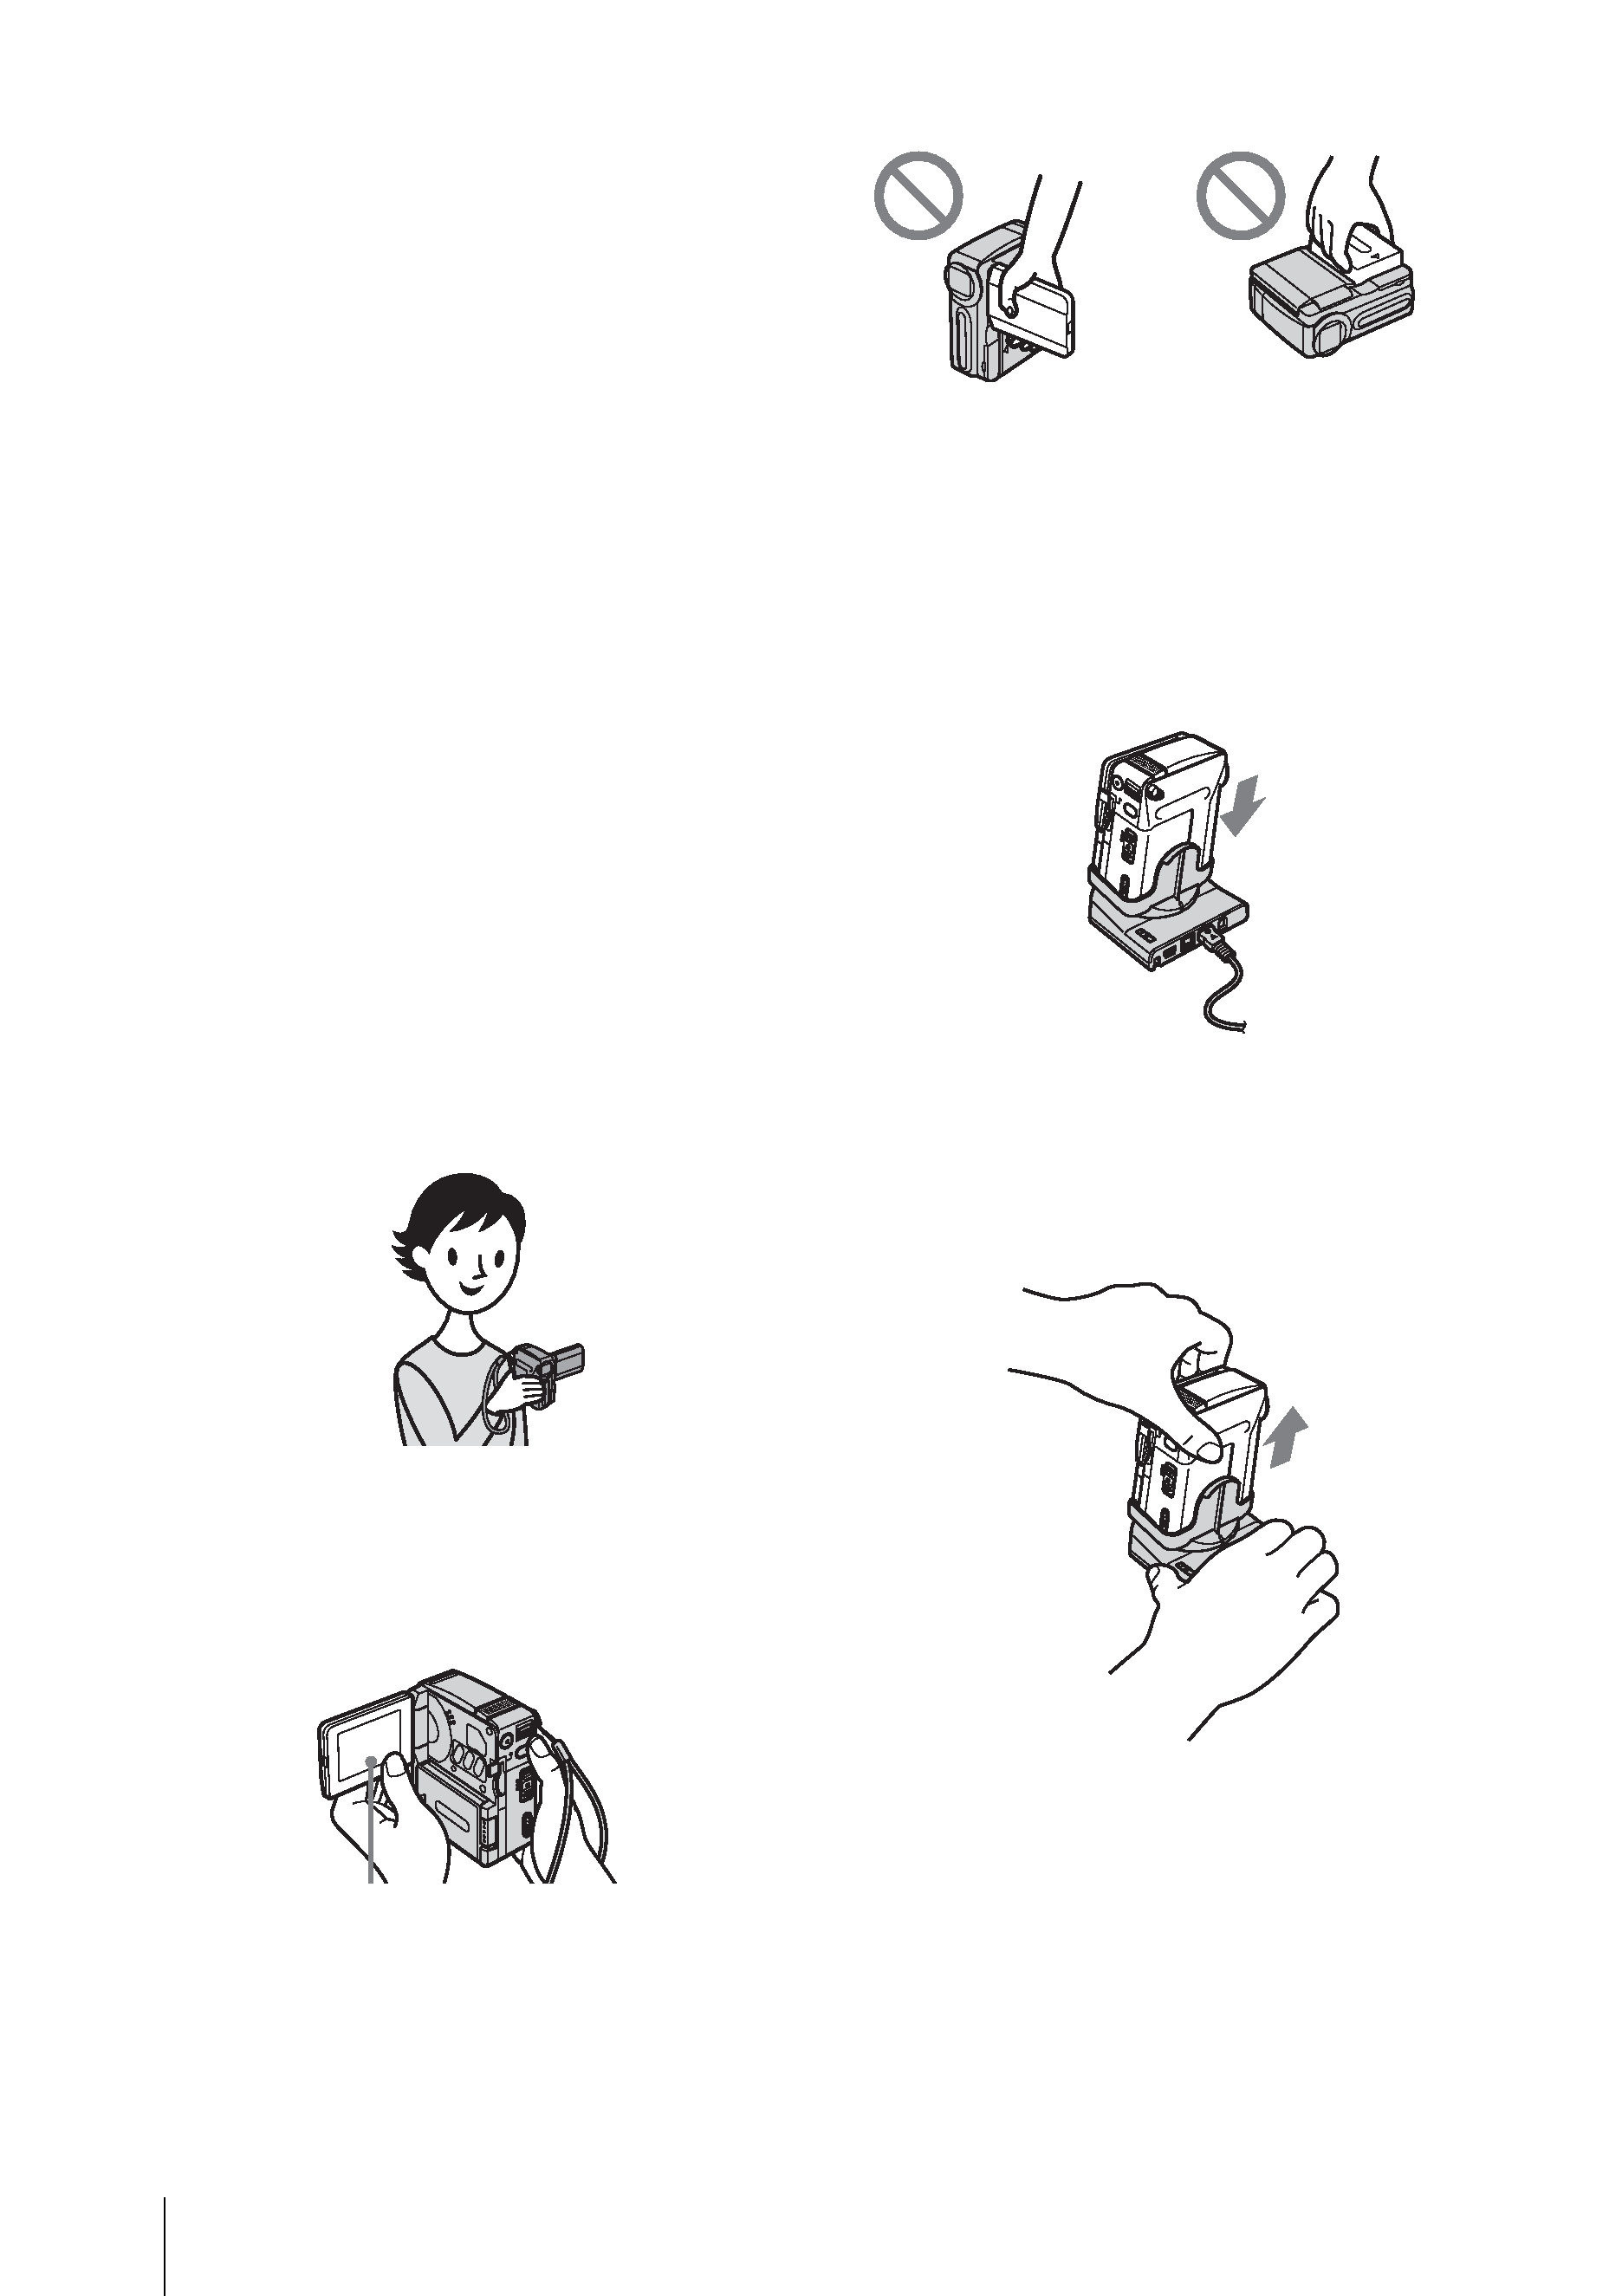
· Hold your camcorder with your hand through the
loop of the hand strap as shown in the following
illustration.
· Be careful not to touch the lens.
· When you are using the touch panel, place your hand
on the back side of the LCD panel to support it.
Then, touch the buttons displayed on the screen.
· You can change the language to be used for screen
display on your camcorder (p. 20).
· Do not hold the camcorder by the following parts.
Notes on handling the Handycam
Station
· When attaching your camcorder to the Handycam
Station, insert your camcorder in the direction of the
arrow as shown in the following illustration. Be sure
to insert it all the way.
· When removing your camcorder from the
Handycam Station, hold both your camcorder and
the Handycam Station as shown in the following
illustration, and remove it from the Handycam
Station.
b
Notes
· When disconnecting the AC Adaptor from the
Handycam Station, hold both the DC plug and the
Handycam Station and disconnect the AC Adaptor.
· Be sure to turn the power of your camcorder off
before inserting it into or removing it from the
Handycam Station.
· You may not be able to attach your camcorder to the
Handycam Station when the jack cover on your
camcorder is opened.
Touch the button on the LCD
screen.
LCD panel
Battery pack

5
Read this first ............................................................................................. 2
Quick Start Guide
Recording movies on a tape ...................................................................... 8
Recording still images on a "Memory Stick Duo" ..................................... 10
Getting started
Step 1: Checking supplied items.............................................................. 12
Step 2: Charging the battery pack............................................................ 13
Using an outside power source ................................................................................. 15
Step 3: Turning the power on................................................................... 16
Step 4: Adjusting the LCD panel .............................................................. 16
Step 5: Setting the date and time............................................................. 17
Step 6: Inserting the recording media ...................................................... 18
Inserting a cassette tape ........................................................................................... 18
Inserting a "Memory Stick Duo" ................................................................................ 19
Step 7: Setting the screen language ........................................................ 20
Recording
Recording movies .................................................................................... 21
To select the recording mode of the MPEG format picture ....................................... 22
Using zoom ............................................................................................................... 23
Recording in mirror mode ......................................................................................... 24
Using the self-timer ................................................................................................... 24
Recording still images
-- Memory photo recording ........................... 25
Selecting image quality or size ................................................................................. 26
Using the self-timer ................................................................................................... 27
Recording a still image on a "Memory Stick Duo" while recording movies on a tape 28
Adjusting the exposure............................................................................. 28
Adjusting the exposure for backlit subjects ............................................................... 28
Fixing the exposure for the selected subject -- Flexible spot meter ......................... 28
Adjusting the exposure manually .............................................................................. 29
Recording in a dark place
-- Color Slow Shutter............................... 30
Adjusting the focus................................................................................... 31
Adjusting the focus for an off-center subject -- SPOT FOCUS ................................ 31
Adjusting the focus manually .................................................................................... 31
: Features available for tape only.
: Features available for "Memory Stick Duo" only.
Table of Contents
,continued