©2003 Sony Corporation
4-243-237-13(1)
Micro Hi-Fi
Component
System
Operating Instructions
CMT-M373NT
CMT-M333NT

2GB
To prevent fire or shock hazard, do not
expose the unit to rain or moisture.
To prevent fire, do not cover the ventilation of the
apparatus with news papers, table-cloths, curtains, etc.
And don't place lighted candles on the apparatus.
To prevent fire or shock hazard, do not place objects
filled with liquids, such as vases, on the apparatus.
US and foreign patents licensed from Dolby Laboratories.
This appliance is
classified as a CLASS 1
LASER product. This
label is located on the
rear exterior.
The following caution label is located inside the
apparatus.
Don't throw away the battery with
general house waste, dispose of it
correctly as chemical waste.
NOTICE FOR THE CUSTOMERS IN CANADA
CAUTION
TO PREVENT ELECTRIC SHOCK, DO NOT USE
THIS POLARIZED AC PLUG WITH AN
EXTENSION CORD, RECEPTACLE OR OTHER
OUTLET UNLESS THE BLADES CAN BE FULLY
INSERTED TO PREVENT BLADE EXPOSURE.
Except for European model
ENERGY STAR® is a U.S.
registered mark. As an ENERGY
STAR® partner, Sony Corporation
has determined that this product
meets the ENERGY STAR®
guidelines for energy efficiency.
Features
This system is a desktop stereo component that
integrates a CD player, an MD player, a Tape,
and a tuner. The MD player supports 4x
extended recording/playback (MDLP), 4x high-
speed dubbing from a CD to an MD, and the
Group function that allows you to organize
recorded songs into groups that may be treated
like albums recorded on an MD.
By connecting the system to a personal
computer, you can play back songs from the
personal computer's hard disk or CD-ROM
drive through the system's speakers, and you
can also operate the system from the personal
computer if it is installed with the supplied
software (M-crew or SonicStage for Sony Net
MDs).
· For details on connecting the system to a
personal computer, see "Connecting a
personal computer to the system" on page 48.
· For details on the supplied software, see
"About the supplied M-crew" on page 50 and
"About the supplied SonicStage for Sony Net
MDs" on page 51 before installing the
software.
Tips
· For details on the software installation and basic
operations of M-crew or SonicStage for Sony Net
MDs, refer to the instruction manual of the respective
software.
· For details on advanced operations, refer to the
online help for the respective software.
· Microsoft, Windows, Windows NT and Windows
Media are trademarks or registered trademarks of
Microsoft Corporation in the United States and/or
other countries.
· All other trademarks are trademarks of their
respective owners. TM and ® marks are omitted in
this manual.
This manual mainly explains operations using
the remote, but the same operations can also be
performed using the buttons on the system
having the same or similar names.
WARNING
Do not install the appliance in a confined space,
such as a bookcase or built-in cabinet.
IN NO EVENT SHALL SELLER BE LIABLE
FOR ANY DIRECT, INCIDENTAL OR
CONSEQUENTIAL DAMAGES OF ANY
NATURE, OR LOSSES OR EXPENSES
RESULTING FROM ANY DEFECTIVE
PRODUCT OR THE USE OF ANY PRODUCT.
How to use this manual

3GB
How to use this manual........................... 2
Getting Started
Hooking up the system............................ 5
Setting the clock...................................... 6
CD Play
Loading a disc ......................................... 7
Playing a disc .......................................... 7
-- Normal Play/Shuffle Play/
Repeat Play
Creating your own program .................... 8
-- Program Play
Labeling a CD ......................................... 9
-- Disc Memo
MD Play
Loading an MD ..................................... 11
Playing an MD ...................................... 11
-- Normal Play/Shuffle Play/
Repeat Play
Programming MD tracks....................... 12
-- Program Play
Playing only the tracks in the desired
group ............................................... 13
MD Recording
Before you start recording .................... 14
Recording a CD on an MD ................... 15
-- CD-MD Synchro Recording/
High-Speed CD-MD Synchro
Recording
Recording a tape on an MD .................. 16
-- TAPE-MD Synchro Recording
Recording on an MD manually............. 17
-- Manual Recording
Starting recording with 6 seconds of
prestored audio data........................ 18
-- Time Machine Recording
Marking track numbers ......................... 19
Making a space between tracks 3 seconds
long automatically .......................... 20
-- Smart Space
Adjusting the recording level................ 21
Recording tips....................................... 22
MD Editing
Editing tips............................................ 23
Registering tracks in groups ................. 23
-- Group Function
Labeling an MD/group/track ................ 25
-- Name Function
Creating a new group............................ 27
-- Create Function
Releasing group registrations ............... 28
-- Release Function
Erasing recordings ................................ 29
-- Erase Function
Moving recorded tracks ........................ 31
-- Move Function
Combining recorded tracks................... 32
-- Combine Function
Dividing recorded tracks ...................... 33
-- Divide Function
Undoing the last edit............................. 34
-- Undo Function
Changing the recorded level after
recording......................................... 34
-- S.F Edit Function
Tuner
Presetting radio stations........................ 36
Listening to the radio ............................ 37
-- Preset Tuning
-- Manual Tuning
Labeling the preset stations .................. 38
-- Station Name
Using the Radio Data System (RDS) ... 39
(European model only)
Tape Play
Loading a tape ...................................... 39
Playing a tape........................................ 40
Table of Contents
continued

4GB
Tape Recording
Recording your favorite CD/MD tracks on
a tape............................................... 40
-- CD/MD-TAPE Synchro
Recording
Recording on a tape manually............... 41
-- Manual Recording
Sound Adjustment
Adjusting the sound .............................. 42
Timer
Falling asleep to music.......................... 42
-- Sleep Timer
Waking up to music .............................. 43
-- Daily Timer
Timer recording radio programs ........... 44
Display
Turning off the display.......................... 46
-- Power Saving Mode
Viewing information about the disc in the
display............................................. 46
Optional Personal Computer
Connecting a personal computer to the
system ............................................. 48
Listening to the sound of a connected
personal computer........................... 49
About the supplied M-crew .................. 50
About the supplied SonicStage for Sony
Net MDs ......................................... 51
Optional Components
Hooking up optional components ......... 52
Listening to audio from a connected
component ...................................... 53
Recording with optional components and
this system ...................................... 53
Troubleshooting
Problems and remedies ......................... 54
Self-diagnosis display ........................... 57
Messages ............................................... 58
Additional Information
Precautions ........................................... 61
System limitations of MDs ................... 63
Specifications ....................................... 64
List of button locations and reference
pages............................................... 66

Ge
tting
Star
te
d
5GB
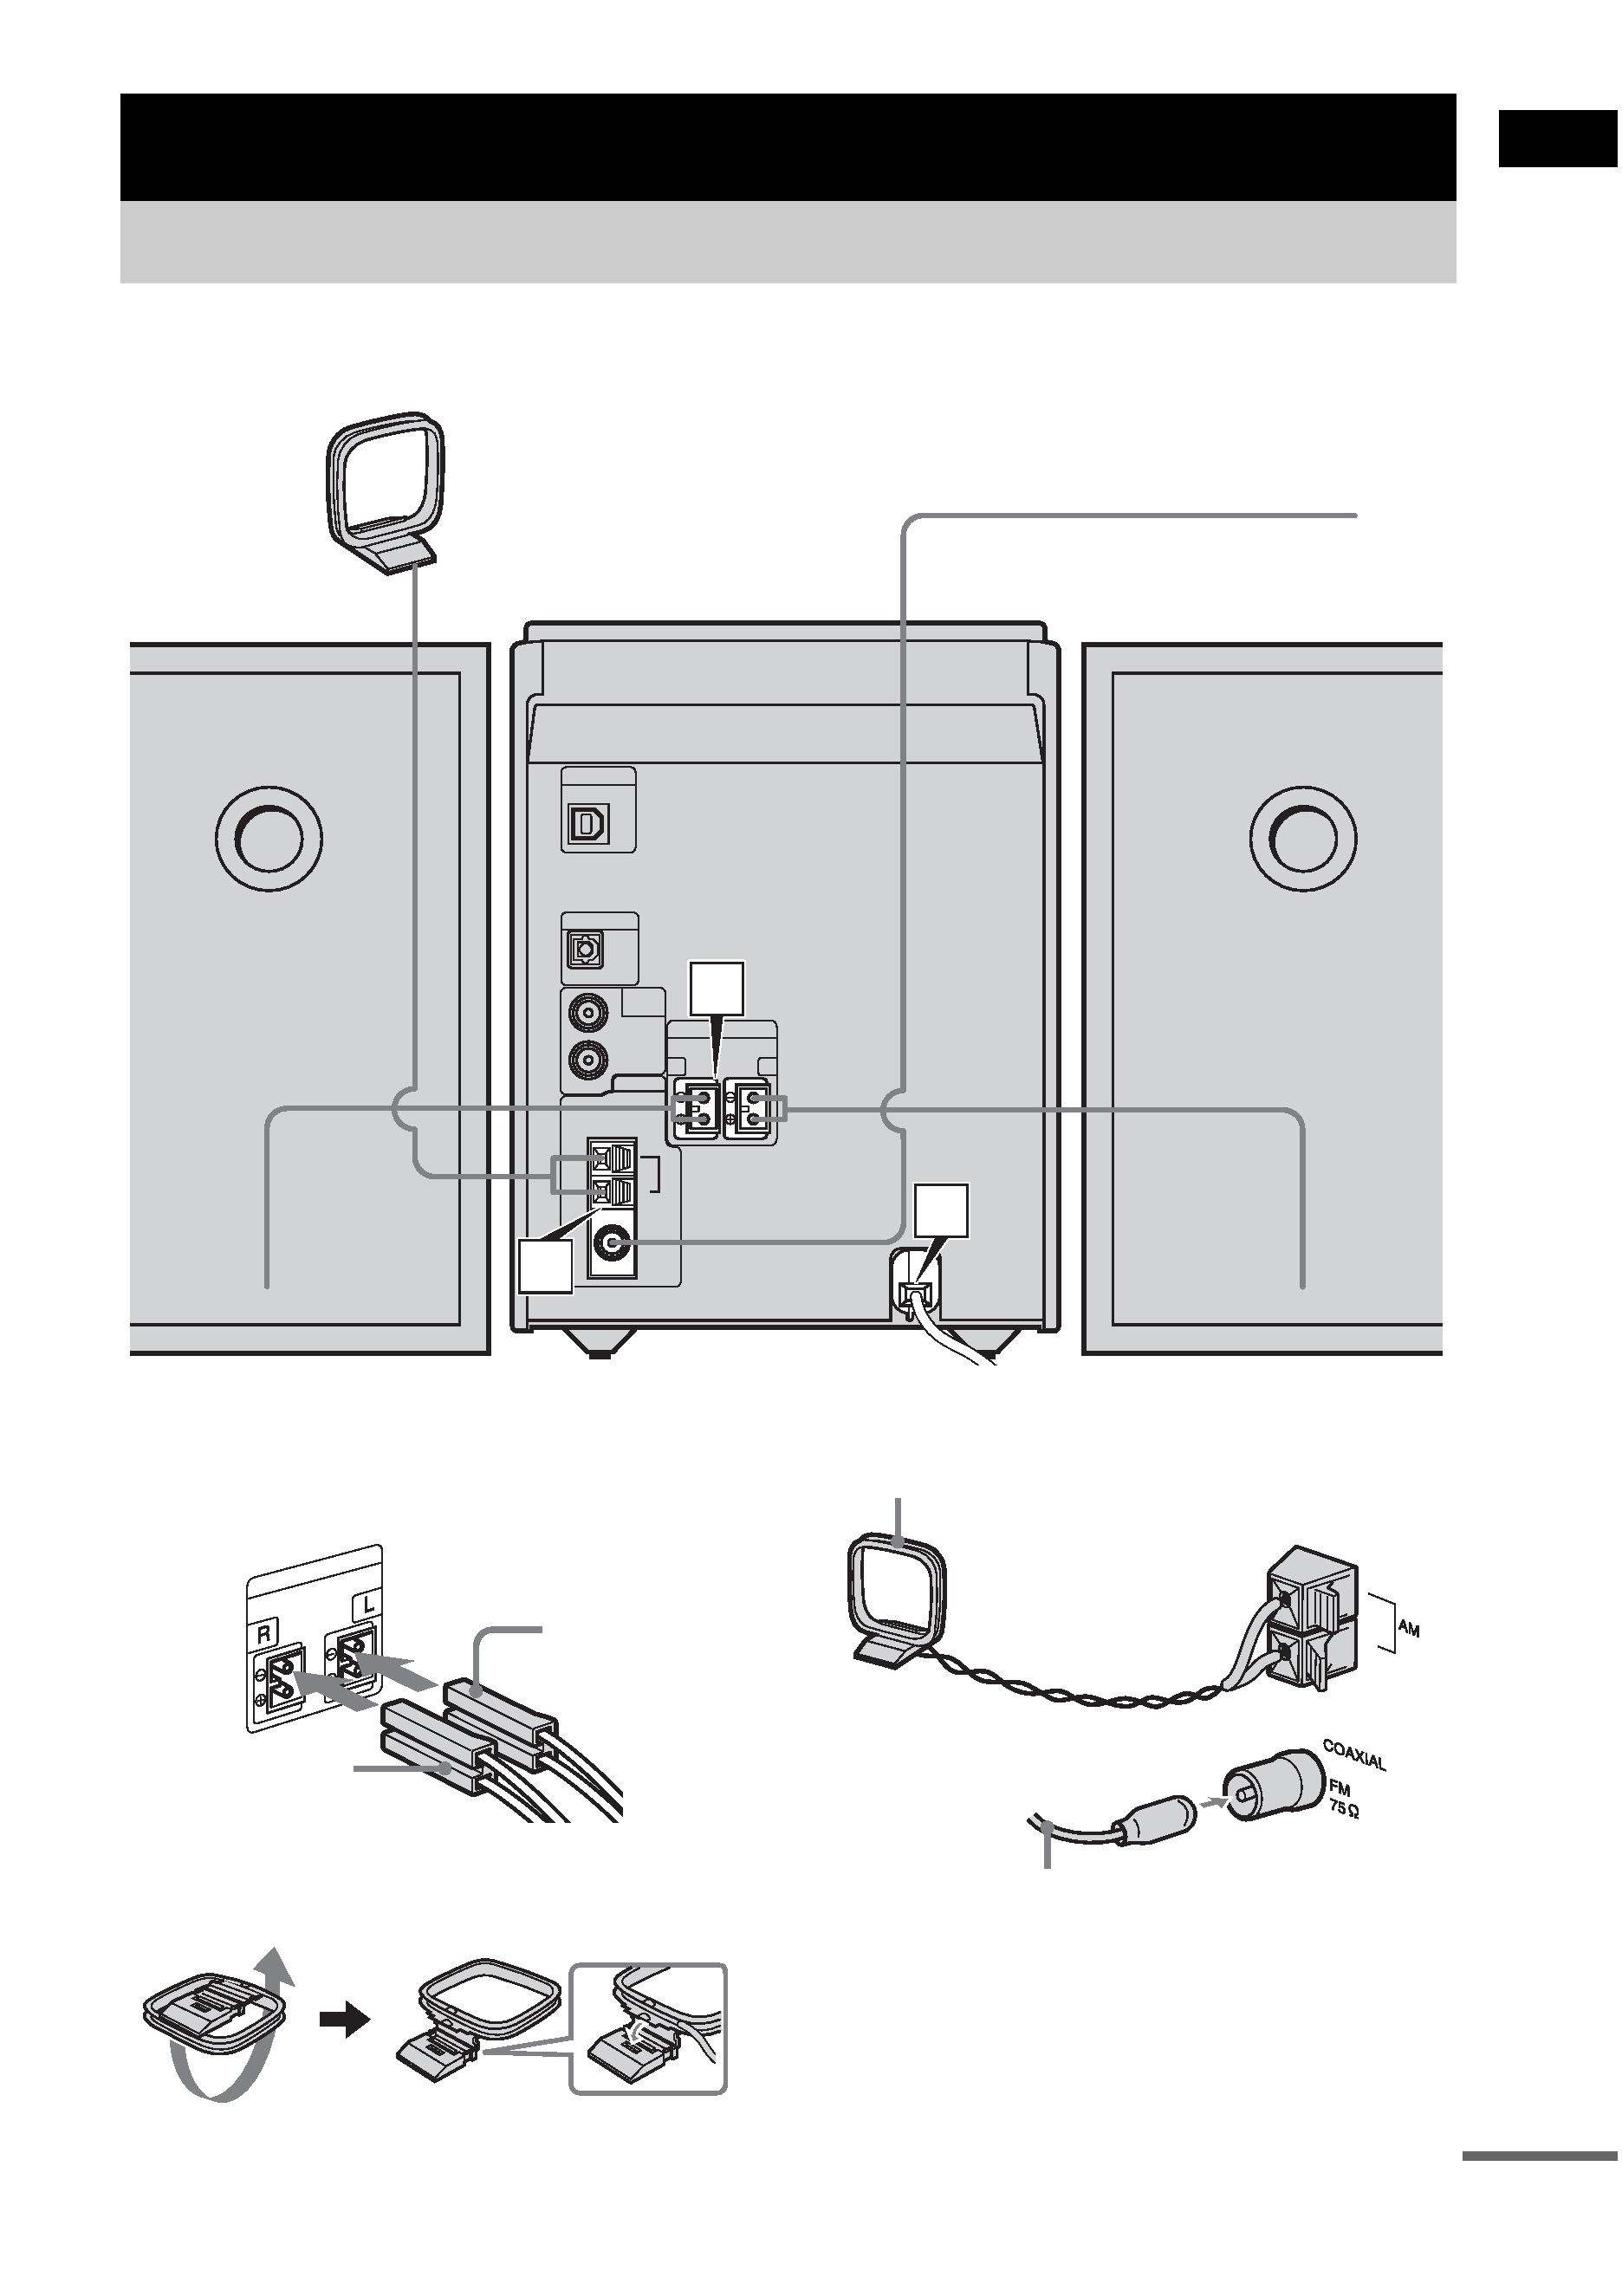
Perform the following procedures 1 to 3 to hook up your system using the supplied cords and
accessories.
1 Connect the speakers.
Connect the right and left speaker cords to
the SPEAKER terminals as shown below.
2 Connect the FM and AM aerials.
Set up the AM loop aerial, then connect it.
Jack type A
Getting Started
Hooking up the system
1
2
3
AM loop aerial
Right speaker
Left speaker
FM lead aerial
Left speaker
code
Right speaker
code
Extend the FM lead aerial horizontally
AM loop aerial
continued
