SERVICE MANUAL
COMPACT DISC CHANGER SYSTEM
US Model
Canadian Model
AEP Model
UK Model
E Model
SPECIFICATIONS
CDX-444RF
Model Name Using Similar Mechanism
CDX-434RF
CD Drive Mechanism Type
MG-251A-137
Optical Pick-up Name
KSS-720A
CD changer (CDX-444RF)
System
Compact disc digital audio system
Laser Diode Properties
Material
GaAlAs
Wavelength
780 nm
Emission Duration
Continuous
Laser output power
Less than 44.6
µW*
*This output is the value measured at a distance of 200 mm from the
objective lens surface on the Optical Pick-up Block.
Transmitting frequency
88.3 MHz/88.5 MHz/
88.7 MHz/88.9 MHz/
89.1 MHz/89.3 MHz/
89.5 MHz/89.7 MHz/
89.9 MHz (switchable)
Input/output terminals
Wired remote control (8 pin)
RF signal (FM) output
Power input (3 pin)
Current drain
800 mA (at playback)
800 mA (at disc loading/ejecting)
Operating temperature
10
°C to +55°C
(14
°F to 131°F)
Dimensions
Approx. 262
× 90 × 181.5 mm
(10 3/8
× 3 5/8 × 7 1/4 in.) (w/h/d)
Mass
Approx. 2.1 kg (4 lb. 10 oz.)
Relay box
Input/output
Antenna input terminal
Antenna output cord
CD Changer input cord
Dimensions
Approx. 40
× 40 × 27 mm
(1 5/8
× 1 5/8 × 1 1/8 in.) (w/h/d)
Mass
140 g (5 oz.)
Wired remote (RM-X82RF)
Dimensions
Approx. 122
× 36.5 × 15.5 mm
(4 7/8
× 1 7/16 × 5/8 in.) (w/h/d)
Mass
Approx. 255 g (9 oz.)
Supplied accessories
Disc magazine (1)
Parts for installation and connections (1 set)
Design and specifications are subject to change without notice.
Ver 1.3 2002.03
9-870-222-14
Sony Corporation
2002C0500-1
e Vehicle Company
C
2002.03
Published by Sony Engineering Corporation
2
SERVICING NOTES
ATTENTION AU COMPOSANT AYANT RAPPORT
À LA SÉCURITÉ!
LES COMPOSANTS IDENTIFIÉS PAR UNE MARQUE 0
SUR LES DIAGRAMMES SCHÉMATIQUES ET LA LISTE
DES PIÈCES SONT CRITIQUES POUR LA SÉCURITÉ
DE FONCTIONNEMENT. NE REMPLACER CES COM-
POSANTS QUE PAR DES PIÈCES SONY DONT LES
NUMÉROS SONT DONNÉS DANS CE MANUEL OU
DANS LES SUPPLÉMENTS PUBLIÉS PAR SONY.
SAFETY-RELATED COMPONENT WARNING!!
COMPONENTS IDENTIFIED BY MARK 0 OR DOTTED
LINE WITH MARK 0 ON THE SCHEMATIC DIAGRAMS
AND IN THE PARTS LIST ARE CRITICAL TO SAFE
OPERATION. REPLACE THESE COMPONENTS WITH
SONY PARTS WHOSE PART NUMBERS APPEAR AS
SHOWN IN THIS MANUAL OR IN SUPPLEMENTS PUB-
LISHED BY SONY.
CAUTION
Use of controls or adjustments or performance of procedures
other than those specified herein may result in hazardous ra-
diation exposure.
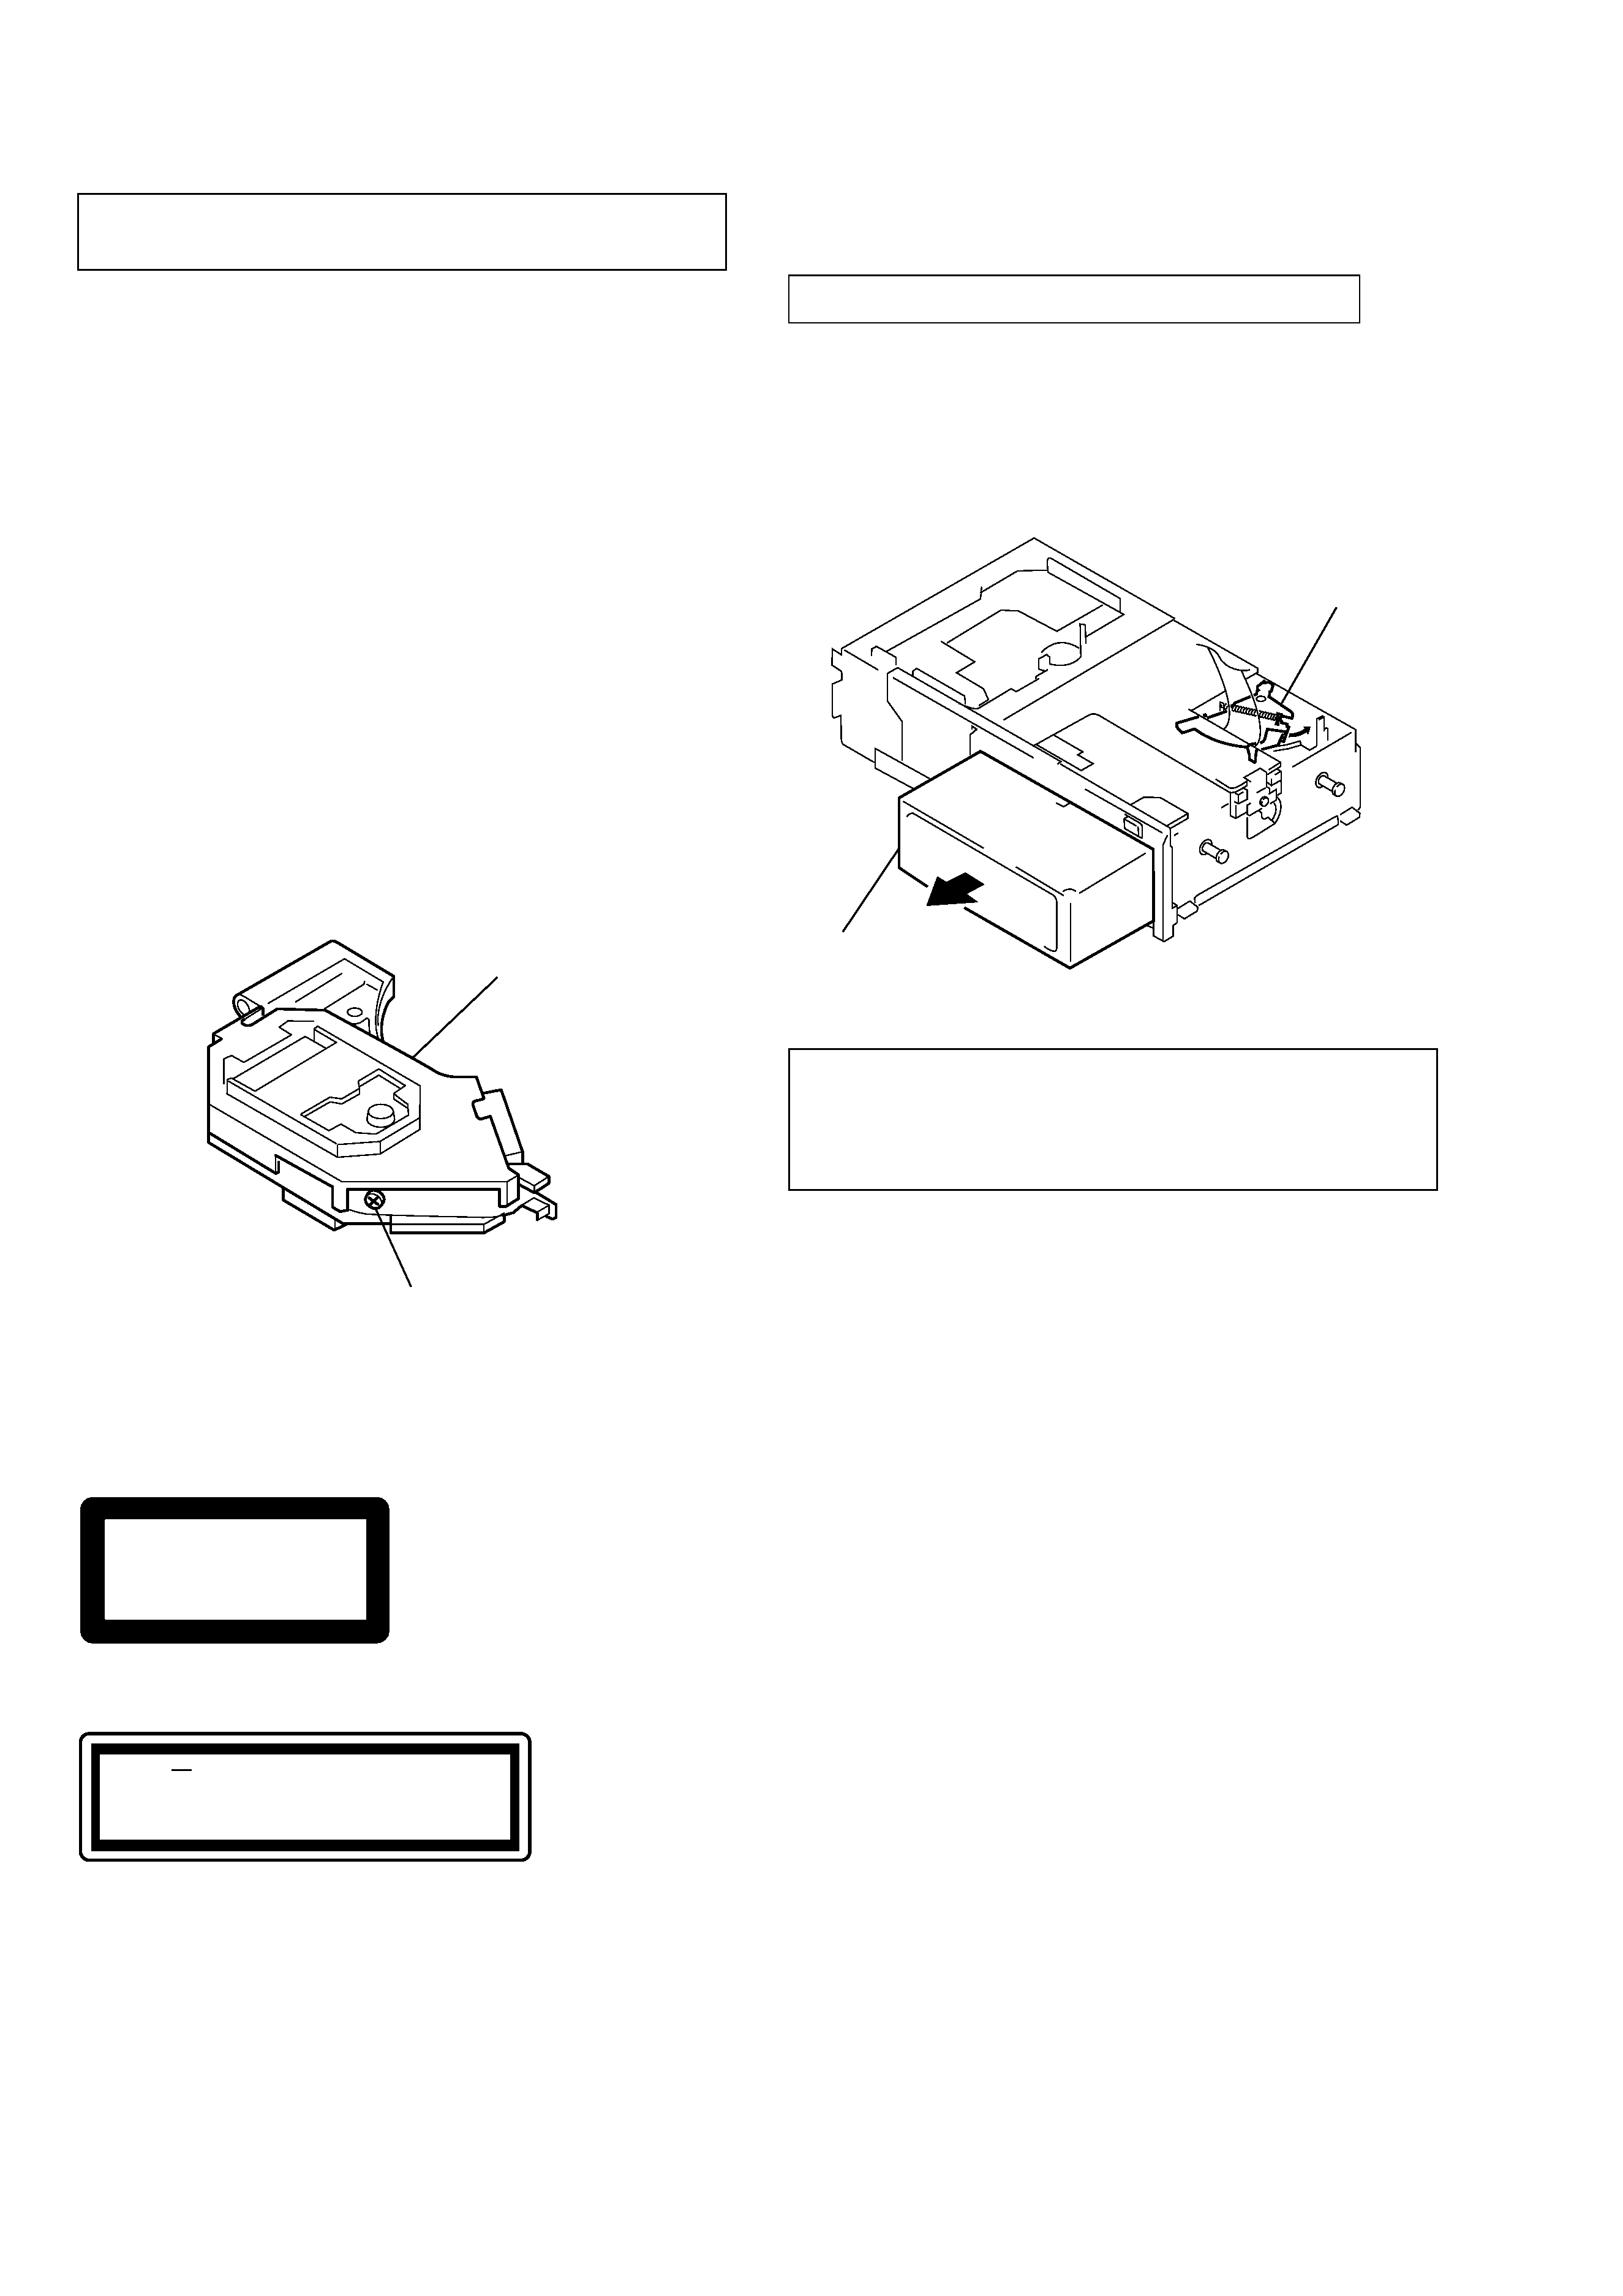
DISC MAGAZINE GETTING OUT PROCEDURE
ON THE POWER SUPPLY IS OFF
Remove the COVER (LOWER.T) ass'y beforehand
1) Press the lever (ML.S) to arrow direction.
2) Removal the magazine assy.
Note: Take out the magazine only when the tray is completely within the
magazine. If the disk or tray is sticking out, turn on the power and
eject the magazine.
NOTES ON HANDLING THE OPTICAL PICK-
UP BLOCK OR BASE UNIT
Lever (ML.S)
Magazine assy
Notes on chip component replacement
· Never reuse a disconnected chip component.
· Notice that the minus side of a tantalum capacitor may be dam-
aged by heat.
Flexible Circuit Board Repairing
· Keep the temperature of the soldering iron around 270 °C dur-
ing repairing.
· Do not touch the soldering iron on the same conductor of the
circuit board (within 3 times).
· Be careful not to apply force on the conductor when soldering
or unsoldering.
AEP/UK model:
The CLASS 1 LASER PRODUCT label is
located on the rear exterior.
This label is located on the drive unit's internal chassis.
When replacing the chassis (U.S) sub assy of mechanism deck
which have the "CAUTION LABEL" attached, please be sure to
put a new CAUTION LABEL (3-223-913-11) to the chassis (U.S)
sub assy.
OPTICAL
PICK-UP
BLOCK
SEMI-FIXED
RESISTOR
The laser diode in the optical pick-up block may suffer electro-
static breakdown because of the potential difference generated by
the charged electrostatic load, etc. on clothing and the human body.
During repair, pay attention to electrostatic breakdown and also
use the procedure in the printed matter which is included in the
repair parts.
The flexible board is easily damaged and should be handled with
care.
NOTES ON LASER DIODE EMISSION CHECK
The laser beam on this model is concentrated so as to be focused
on the disc reflective surface by the objective lens in the optical
pick-up block. Therefore, when checking the laser diode emis-
sion, observe from more than 30 cm away from the objective lens.
US/Canadian model:
If the optical pick-up block is defective, please replace the whole
optical pick-up block.
Never turn the semi-fixed resistor located at the side of optical
pick-up block.
CAUTION
INVISIBLE
DO NOT STARE INTO BEAM OR
VIEW DIRECTLY WITH OPTICAL INSTRUMENTS
LASER RADIATION WHEN OPEN
CLASS
PRODUCT
LASER
1
3
CDX-444RF
Ver 1.3
TABLE OF CONTENTS
SERVICING NOTES .......................................................... 2
1.
GENERAL
Location and Function of controls ..................................
4
Installation .......................................................................
8
Connections .....................................................................
9
2.
DISASSEMBLY ......................................................... 10
3.
MECHANISM DECK ASSEMBLY ................... 16
4.
MECHANICAL ADJUSTMENTS ....................... 18
5.
ELECTRICAL CHECK .......................................... 19
6.
DIAGRAMS
6-1. Block Diagram SERVO Section .............................. 21
6-2. Block Diagram MAIN Section ................................ 22
6-3. Note for Printed Wiring Boards and
Schematic Diagrams ....................................................... 23
6-4. Printed Wiring Boards RF/LSW Boards ................. 24
6-5. Schematic Diagram RF/LSW Boards ...................... 25
6-6. Printed Wiring Boards
MAIN Board (Component Side) .............................. 26
6-7. Printed Wiring Boards
MAIN (Conductor Side)/SW Boards ....................... 27
6-8. Schematic Diagram MAIN Board (1/2) .................. 28
6-9. Schematic Diagram MAIN (2/2)/SW Boards ......... 29
6-10. Printed Wiring Boards FM Board ............................ 30
6-11. Schematic Diagram FM Board ................................. 31
6-12. IC Pin Function Description ........................................... 35
7.
EXPLODED VIEWS ................................................ 37
8.
ELECTRICAL PARTS LIST ............................... 43
TEST DISC
This set can playback a CD-R, CD-RW for audio use. When test
this set, use the following test disc.
Test disc for CD-R: TCD-R082LMT (Part No.: J-2502-063-1)
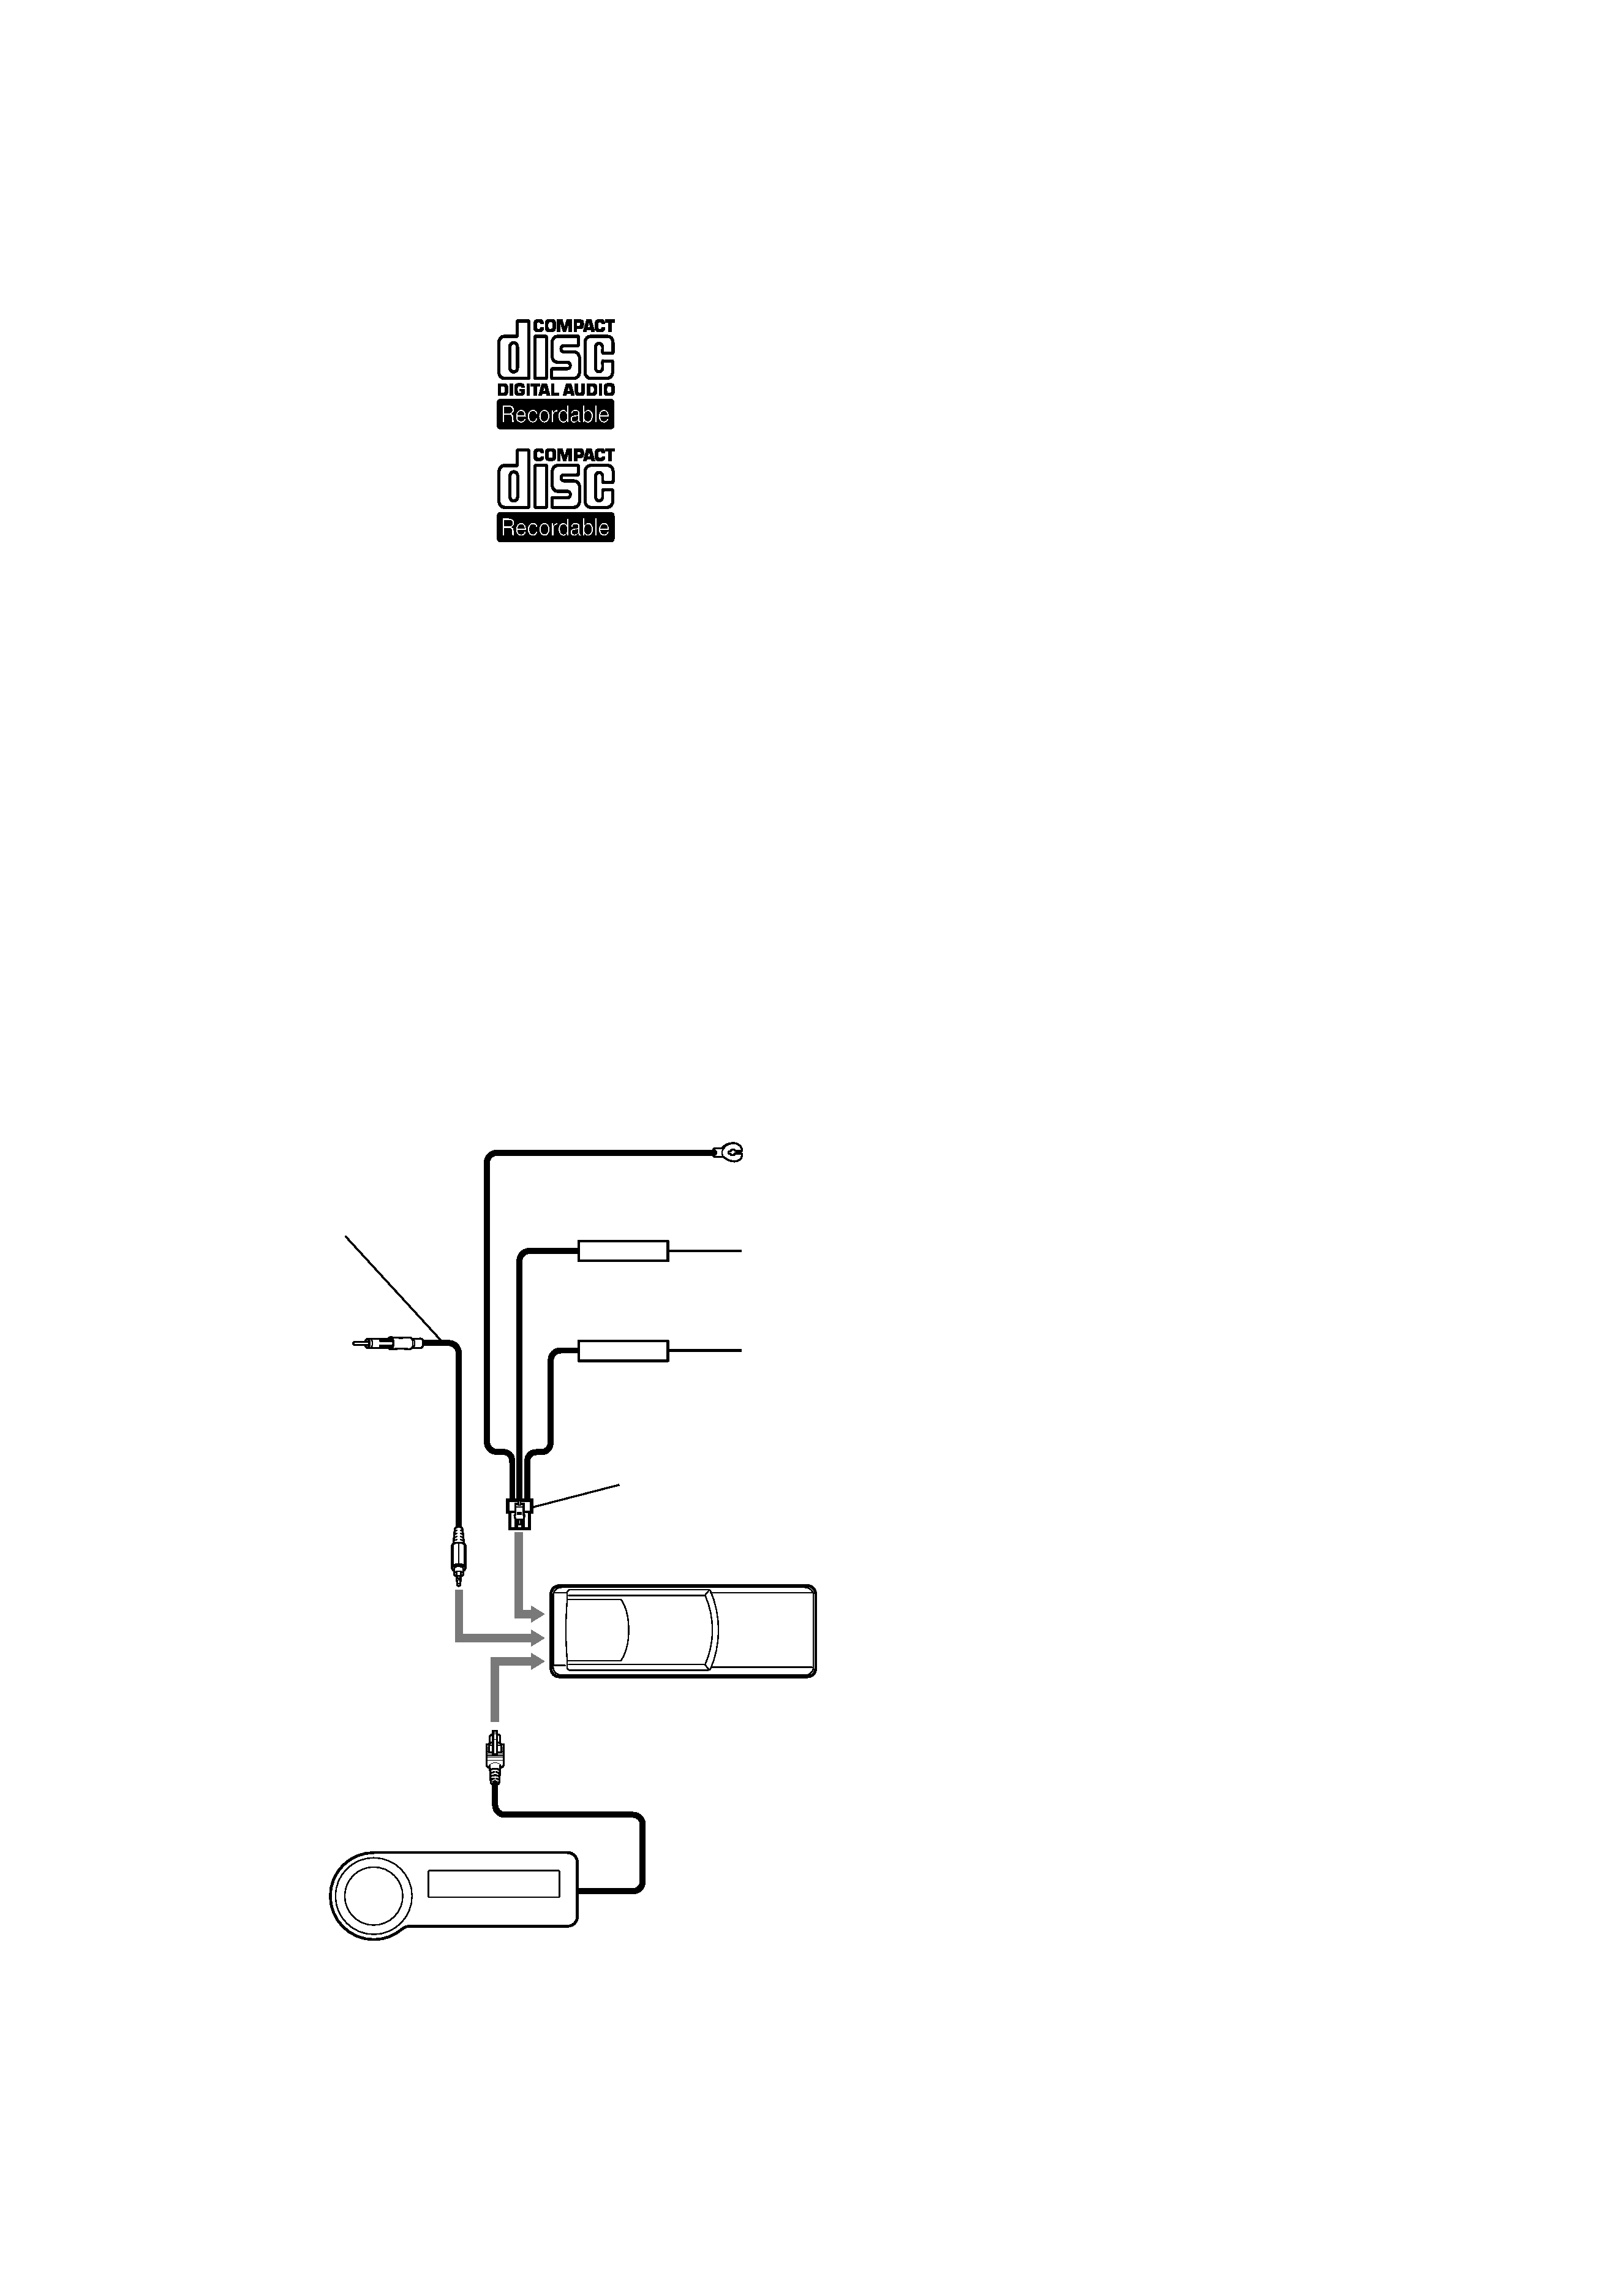
Notes on CD-R discs
You can play CD-Rs (recordable CDs)
designed for audio use on this unit.
Look for this mark to
distinguish CD-Rs for audio use.
This mark denotes that a disc is
not for audio use.
Some CD-Rs (depending on the equipment
used for its recording or the condition of
the disc) may not play on this unit.
You cannot play a CD-R that is not
finalized*.
* A process necessary for a recorded CD-R disc to
be played on the audio CD player.
power supply cord
(J-2502-058-2)
compact disc changer
RF output cord
(J-2502-058-1)
wirerd remote commander
JIG ON REPAIRING
When repairing this set, connect the jig (cord) for RF output ex-
tract (Part No. J-2502-058-1) and power supply (Part No. J-2502-
058-2) as the figure shown below.
4
SECTION 1
GENERAL
This section is extracted from
instruction manual.
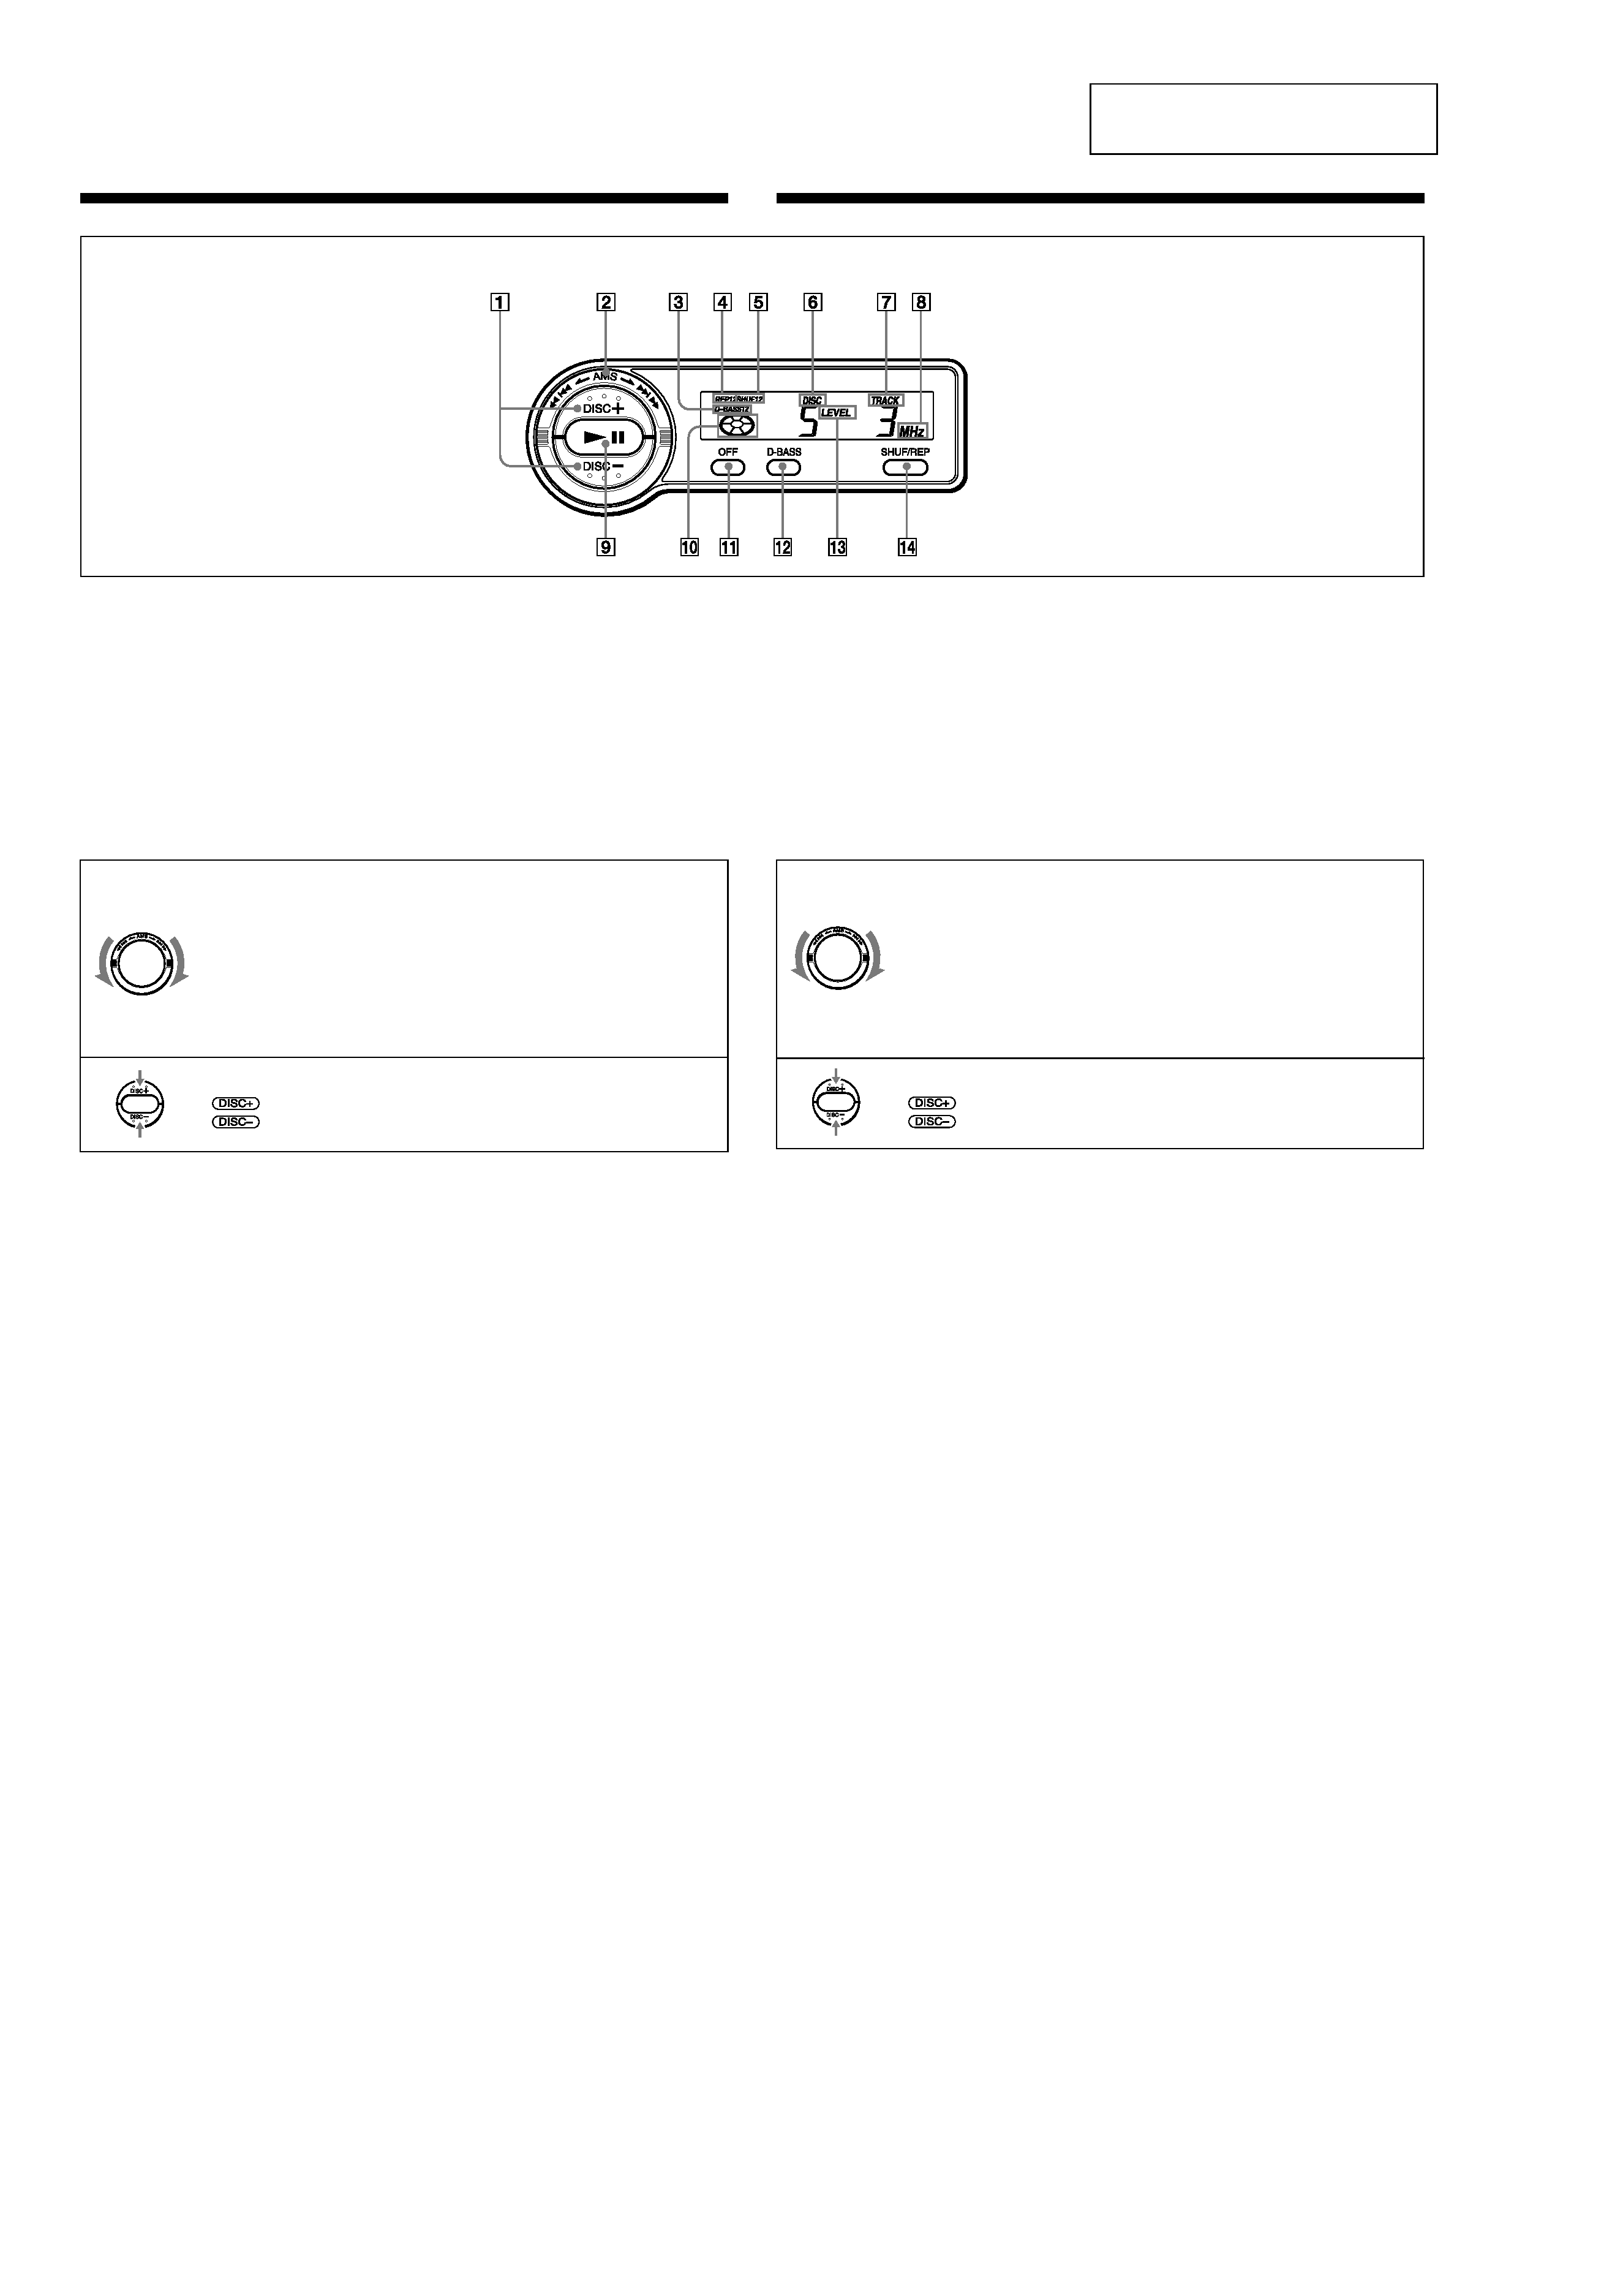
Location and function of controls
Wired remote (RM-X82RF)/Télécommande à fil (RM-X82RF)
1 Touches DISC (sélection de disques)
2 Commande AMS (détecteur automatique de
musique/recherche manuelle)
Suivant le côté de la commande sur lequel vous
appuyez, vous pouvez sélectionner les
fonctions suivantes.
3 Indication D-BASS
4 Indication REP (répétition de la lecture)
5 Indication SHUF (lecture aléatoire)
6 Indication DISC (numéro de disque)
Le numéro de disque indiqué correspond au
numéro de disque dans le chargeur de disques.
7 Indication TRACK (numéro de plage)
8 Indication MHz (fréquence)
9 Touche u (lecture/pause)
Si vous appuyez sur cette touche en cours de
lecture CD, le CD passe en mode de pause. Si
vous appuyez de nouveau sur cette touche, la
lecture CD reprend.
0 Indication de lecture/pause
Tourne pendant la lecture d'un CD et clignote
lorsque la touche de pause est actionnée.
qa Touche OFF (arrêt de la lecture de CD)
qs Touche D-BASS
qd Indication LEVEL (niveau de sortie)
qf Touche SHUF/REP (lecture aléatoire/lecture
répétée/mode de réglage)
1 DISC (disc select) buttons
2 AMS (Automatic Music Sensor/manual
search) control
Depending on which side of the control you
push down, you can select from the following
functions.
3 D-BASS indication
4 REP (repeat play) indication
5 SHUF (shuffle play) indication
6 DISC (disc number) indication
The indicated disc number matches the disc
number in the disc magazine.
7 TRACK (track number) indication
AMS function
To locate the beginning of a track, push down
> to locate the beginning of the next track.
. to locate the beginning of the track currently played.
If you push down the control repeatedly, the beginnings of all following or
previous tracks will be located until the end of the disc is reached.
Manual search function
To quickly locate a desired point of a track, push down and hold
M to fast-forward.
m to fast-reverse.
The elapsed playing time of the track will be shown in the display window during
manual search.
Disc select function
To select a desired disc, press momentarily
to select the next disc.
to select the previous disc.
Fonction AMS
Pour localiser le début d'une plage, appuyez sur
> pour localiser le début de la plage suivante.
. pour localiser le début de la plage en cours.
Si vous appuyez plusieurs fois de suite sur la commande, le début de chacune des
plages précédentes ou des suivantes est localisé jusqu'à la fin du disque.
Fonction de recherche manuelle
Pour localiser rapidement un point désiré d'une plage, maintenez enfoncé
M pour avancer rapidement.
m pour reculer rapidement.
La durée écoulée de la plage apparaît sur l'afficheur pendant la recherche
manuelle.
Fonction de sélection de disques
Quand vous voulez sélectionner un disque, appuyez momentanément sur
pour choisir le disque suivant.
pour choisir le disque précédent.
Nomenclature
8 MHz (frequency) indication
9
u (play/pause) button
If pressed during CD playback, the CD will
pause. If pressed again, CD playback will
continue.
0 Play/pause indication
Turns around during CD playback and
flashes when the pause button is pressed.
qa OFF button
qs D-BASS button
qd LEVEL (output level) indication
qf SHUF/REP (shuffle play/repeat play/
control mode set) button
5
Notes on handling discs
A dirty or defective disc may cause sound drop-outs during playback. To enjoy optimum sound, handle
the disc as follows.
· Handle the disc by its edge, and do not touch the unlabled surface. (fig. A)
· Do not stick paper or tape on the disc. (fig. B)
· Keep your discs in their cases or disc magazines when not in use.
Do not expose the discs to direct sunlight or heat sources such as hot air-ducts. Do not leave the
discs in a car parked in direct sunlight where there can be a considerable rise in temperature
inside the car. (fig. C)
· Before playing, clean the discs with an optional cleaning cloth. Wipe each disc in the direction of
the arrows. (fig. D)
Do not use solvents such as benzine, thinner, commercially available cleaner, or antistatic spray intended
for analog discs.
· Discs with special shapes (heart-shaped discs, octagonal discs etc.) cannot be played on this unit.
Attempting to do so may damage the unit. Do not use such discs.
Notes on discs
If you use the discs explained below, the sticky residue can cause the disc to stop spinning and may cause
malfunction or ruin your discs.
Do not use second-hand or rental CDs that have a sticky residue on the surface (for example, from peeled-
off stickers or from ink, or glue leaking from under the stickers).
· There are paste residue. Ink is sticky. (fig. E)
Do not use rental CDs with old labels that are beginning to peel off.
· Stickers that are beginning to peel away, leaving a sticky residue. (fig. F)
Do not use your discs with labels or stickers attached.
· Labels are attached. (fig. G)
Notes on CD-R discs
· You can play CD-Rs (recordable CDs) designed for audio use on this unit (fig. H).
· Some CD-Rs (depending on the equipment used for its recording or the condition of the disc) may
not play on this unit.
· You cannot play a CD-R that is not finalized*.
* A process necessary for a recorded CD-R disc to be played on the audio CD player.
Remarques sur la manipulation des disques
Un disque sale ou défectueux peut provoquer des pertes de son à la lecture. Manipuler le disque comme
suit pour obtenir un son optimal.
· Saisissez les disques par les bords et n'en touchez jamais la surface. (fig. A)
· Ne collez pas de papier ni de bande adhésive sur le disque. (fig. B)
· Conservez vos disques dans leurs boîtiers ou des pochettes de rangement lorsqu'ils ne sont pas
utilisés.
N'exposez pas les disques au rayonnement direct du soleil ni à des sources de chaleur comme des
conduits d'air chaud. Ne laissez pas les disques dans une voiture parquée en plein soleil où la
température intérieure de l'habitable risque d'augmenter considérablement. (fig. C)
· Avant la lecture, essuyer les disques avec un chiffon de nettoyage optionnel. Essuyer chaque
disque dans le sens des flèches. (fig. D)
Ne pas utiliser de solvants tels que de la benzine, du diluant, des produits de nettoyage vendus dans le
commerce ou des vaporisateurs anti-statiques destinés aux disques analogiques.
· Il n'est pas possible d'utiliser les disques de formes spéciales (en forme de coeur ou octogonaux,
etc.) avec cet appareil. Vous risquez d'endommager l'appareil. N'essayez jamais de lire ces disques.
Remarques sur les disques
Si vous utilisez les disques décrits ci-dessous, le résidu adhésif risque de provoquer l'arrêt de la rotation
du disque et d'entraîner un dysfonctionnement ou d'endommager vos disques.
N'utilisez pas de CD de seconde main ou de location qui présentent des résidus adhésifs à la surface (par
exemple d'étiquettes décollées ou d'encre, de colle dépassant de l'étiquette).
· Résidus de colle. L'encre colle. (fig. E)
N'utilisez pas de CD de location avec d'anciennes étiquettes qui commencent à se décoller.
· Les étiquettes qui commencent à se décoller laissent des résidus adhésifs. (fig. F)
N'utilisez pas vos disques avec des étiquettes ou des autocollants apposés dessus.
· Les étiquettes sont fixées. (fig. G)
Remarques sur les disques CD-R
· Vous pouvez écouter avec cet appareil des CD-R (CD enregistrables) conçus pour une utilisation
audio. (fig. H)
· Certains CD-R (en fonction des conditions de l'équipement d'enregistrement ou du disque)
risquent de ne pas être lus avec cet appareil.
· Vous ne pouvez pas lire de disques CD-R non finalisés*.
* Un processus nécessaire à la lecture des disques CD-R enregistrés sur le lecteur de CD audio.
Remarques sur le chargeur de disques
·Ne pas laisser le chargeur de disques dans un endroit très chaud ou très humide comme sur le tableau
de bord ou sur la plage arrière d'une voiture où il serait en plein soleil.
·Ne placez pas plus d'un disque à la fois par plateau, faute de quoi vous risquez d'endommager le
changeur de CD et les disques.
·Ne pas laisser tomber le chargeur de disques ni le cogner.
Notes on the disc magazine
·Do not leave the disc magazine in locations with high temperature and high humidity, such as on a car
dashboard or in the rear window where the disc magazine will be subject to direct sunlight.
·Do not place more than one disc at a time onto a tray, otherwise the CD changer and the discs may be
damaged.
·Do not drop the disc magazine or subject it to a violent shock.
2
1
4
3
Use the supplied disc magazine or the disc magazine XA-250. The
disc magazine XA-10B cannot be used with this unit. If you use any
other disc magazine, it may cause a malfunction.
Notes
· To listen to an 8 cm (3 in.) CD, use the optional Sony CD adaptor
CSA-8. Be sure to always use the specified adaptor, as failing to do so
may cause a malfunction of the unit. If you use any other adaptor, the
unit may not operate properly. When using the Sony CD adaptor,
make sure that the three catches on the adaptor are firmly latched
onto the 8 cm (3 in.) CD.
· Do not insert the Sony CD adaptor CSA-8 in the disc magazine without
a disc, malfunction may result.
Utilisez le magasin à disques fourni ou un magasin à disques XA-250.
Vous ne pouvez pas utiliser de magasin à disques XA-10B avec cet
appareil. L'utilisation d'un autre type de magasin à disques risque de
provoquer un dysfonctionnement.
Remarques
· Pour écouter un CD de 8 cm (3 po.) CD, utilisez l'adaptateur CD Sony
en option CSA-8. Veillez à toujours utiliser l'adaptateur spécifié, faute
de quoi vous risquez de provoquer un dysfonctionnement de
l'appareil. Si vous utilisez un autre adaptateur, l'appareil risque de ne
pas fonctionner correctement. Lorsque vous employez l'adaptateur CD
Sony, assurez-vous que les trois encoches de l'adaptateur soient
fermement engagées sur le CD de 8 cm (3 po.).
· N'introduisez pas l'adaptateur CD Sony CSA-8 dans le chargeur sans
disque, car il pourrait en résulter un dysfonctionnement.
Use the unit with the door closed completely
Otherwise, foreign matter may enter the unit and contaminate the lenses
inside the CD changer.
Utilisez cet appareil avec la fenêtre complètement fermée
Sinon, des corps étrangers risquent de pénétrer à l'intérieur de l'appareil et
d'encrasser les lentilles à l'intérieur du changeur de CD.
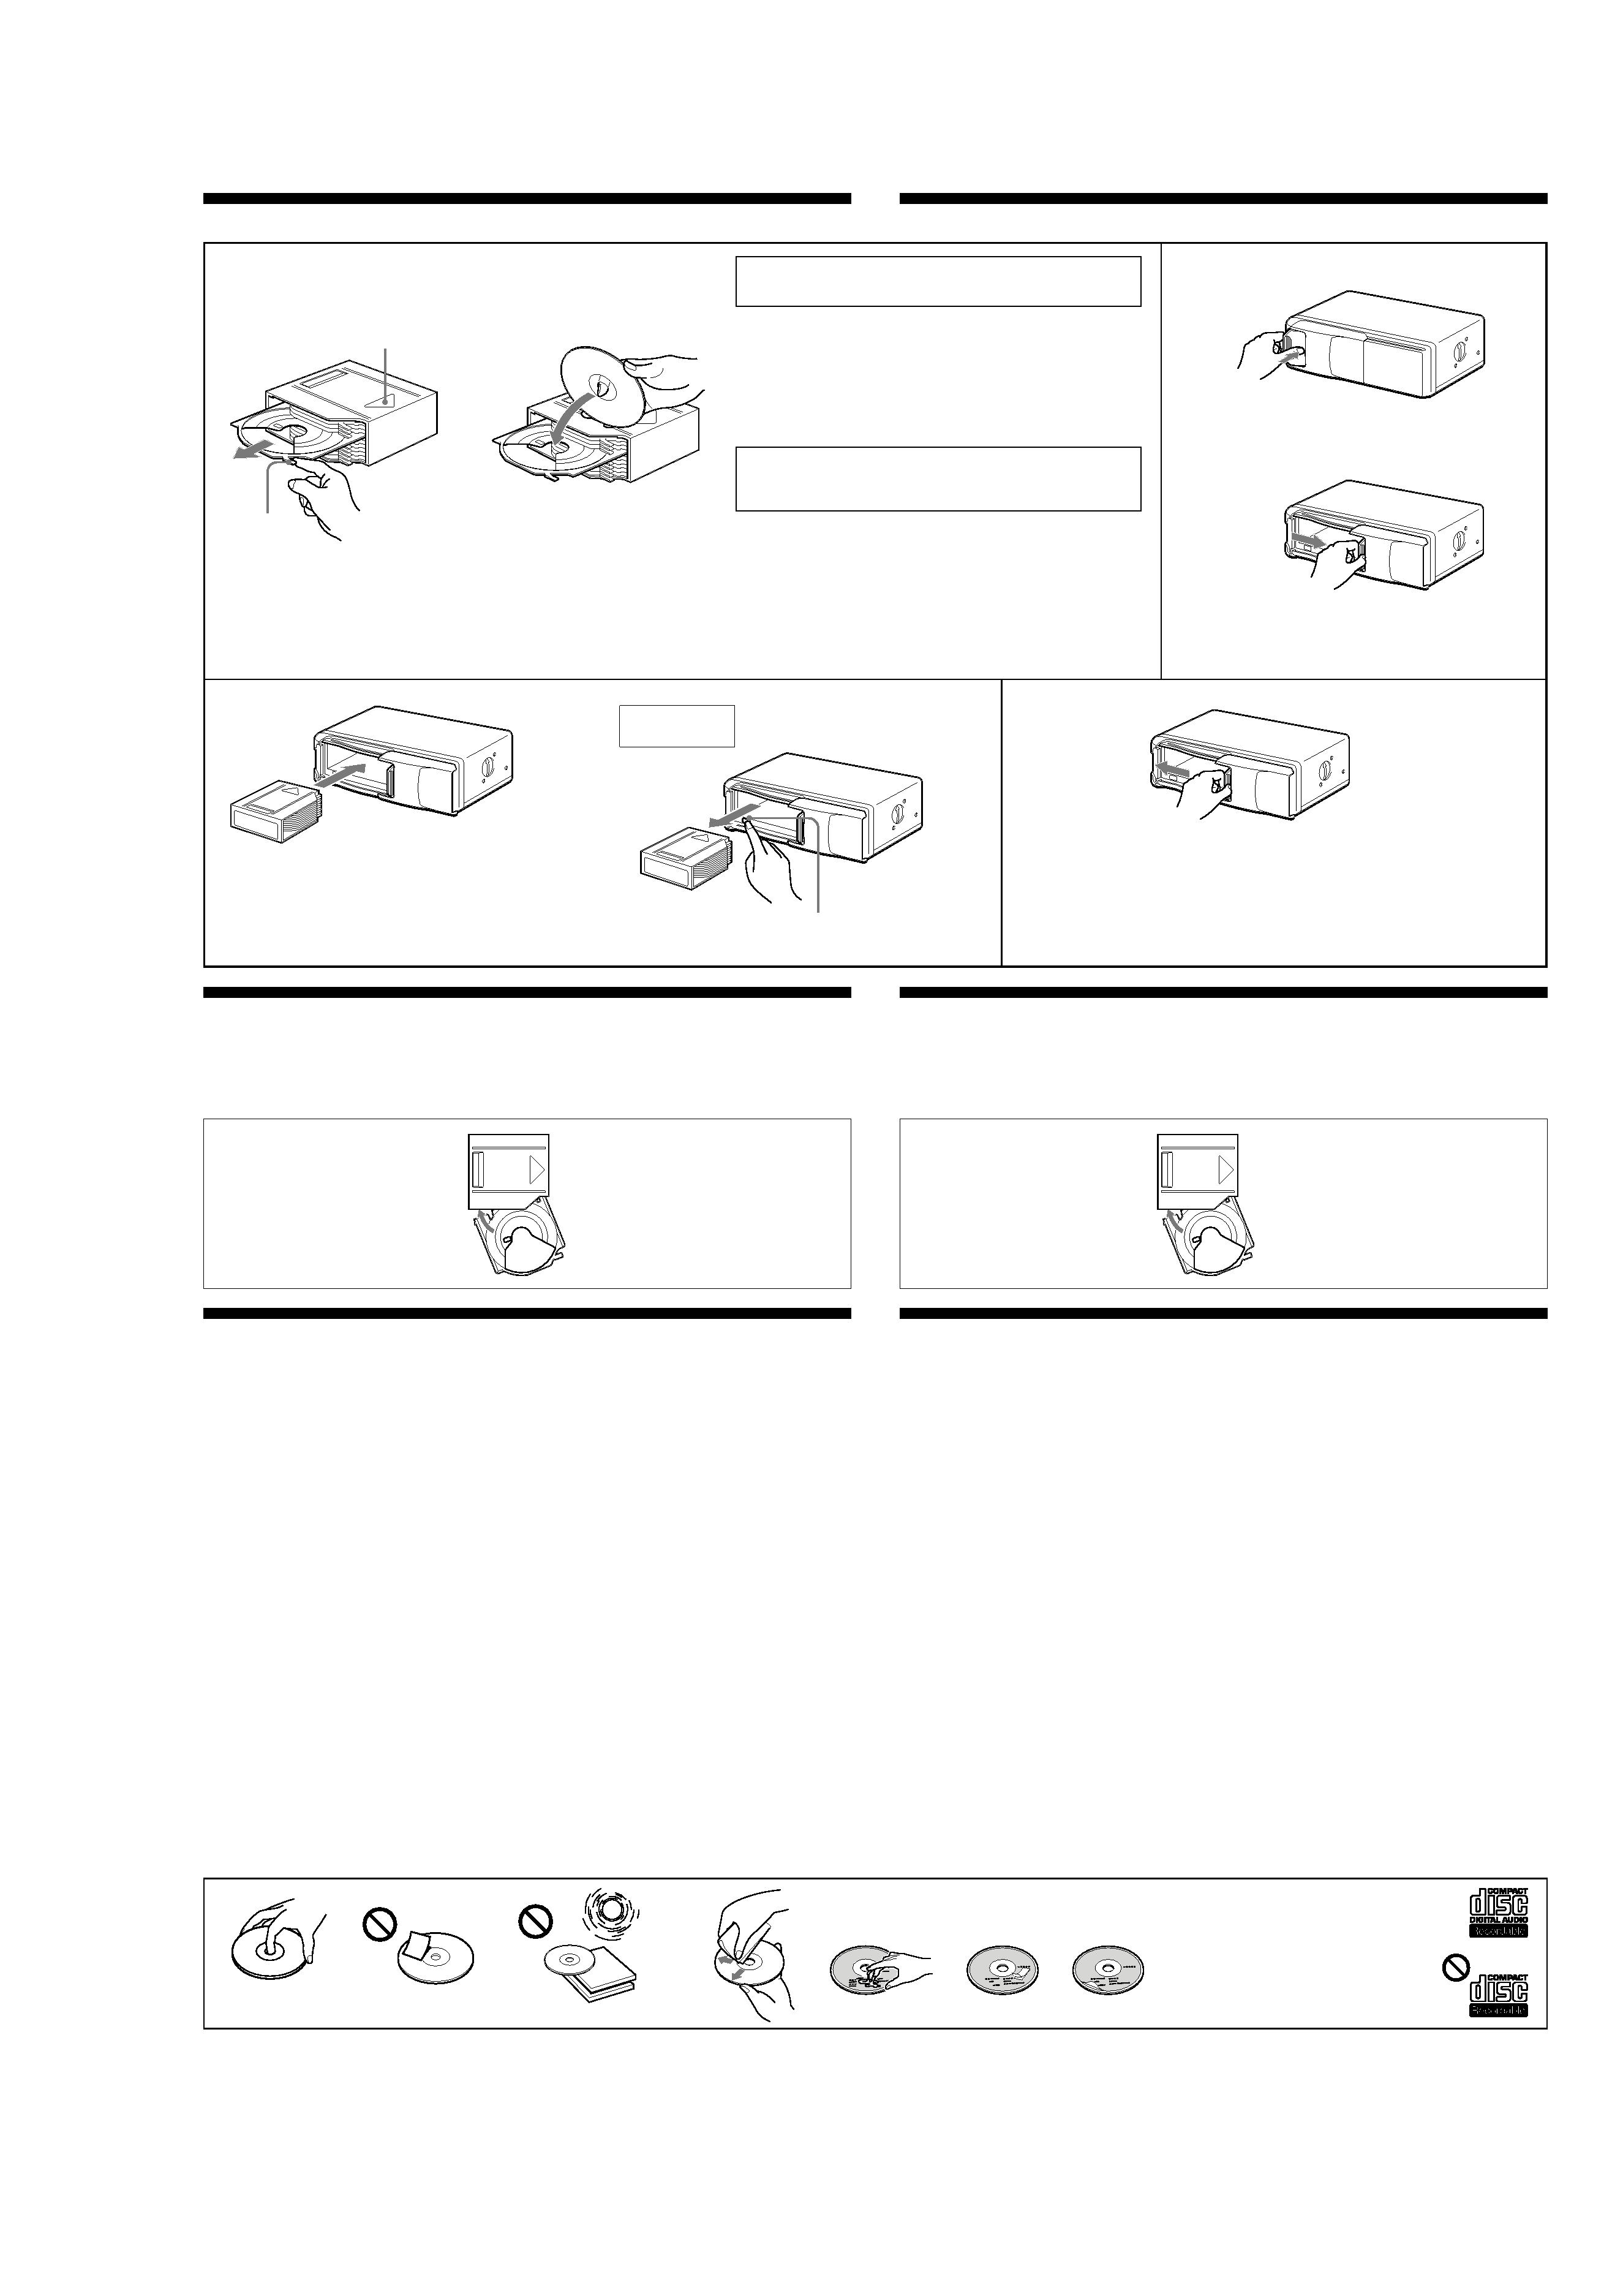
To remove
Retrait
If the disc magazine does not lock properly
Take out the disc magazine, press Z, and re-insert it.
Si vous ne pouvez pas fermer le chargeur de disques
Retirez le chargeur, appuyez sur Z et réintroduisez-le.
Z (EJECT)
Inserting a disc
Insertion d'un disque
x
When the tray comes out
Normally, the trays will not come out of
the disc magazine. However, if they are
pulled out of the disc magazine, it is
easy to re-insert them.
With the cut-away portion of the
tray facing you, insert the right
corner of the tray in the slot, then
push in the left corner until it clicks.
Note
Do not insert the tray upside down or in
the wrong direction.
Si un plateau s'enlève
En principe, les plateaux ne s'enlèvent
pas du magasin. S'ils s'enlèvent du
magasin, il est cependant facile de les y
réintroduire.
L'encoche du plateau étant face à
vous, introduisez l'angle droit du
plateau dans la fente et poussez
ensuite sur l'angle gauche jusqu'à ce
qu'il s'encliquette.
Remarque
N'introduisez pas le plateau à l'envers ni
dans le mauvais sens.
Slide open
Coulissez pour ouvrir
Labeled surface up
Face imprimée vers le haut
10 discs, one in each tray
10 disques, un par plateau
Disc magazine
Chargeur de disques
Tab
Onglet
c
This way
Oui
Not this way
Non
Not this way
Non
This way
Oui
ABC
D
E
F
G
With the arrow side facing up
Avec le côté portant la flèche orienté
vers le haut
Push to unlock the door
Poussez pour déverrouiller la porte
Moisture condensation
On a rainy day or in a very damp area, moisture may condense on the lenses inside the unit, and the unit
will not operate properly. In such a case, remove the disc magazine and wait for about an hour until
the moisture has evaporated.
If you have any questions or problems concerning your unit that are not covered in this manual, please
consult your nearest Sony dealer.
Remarque sur la condensation d'humidité
Les jours de pluie et dans les régions très humides, il se peut que de l'humidité se condense sur les
objectifs à l'intérieur de l'appareil, qui risque alors de ne pas fonctionner correctement. En pareil cas,
retirez le chargeur de disques et attendez environ une heure que l'humidité se soit complètement
évaporée.
Si vous avez des questions ou des problèmes au sujet de votre appareil qui ne sont pas abordés dans le
présent mode d'emploi, consultez votre revendeur Sony.
H Look for this mark to distinguish CD-Rs
for audio use.
Ce symbole permet de distinguer les
CD-R conçus pour une utilisation audio.
This mark denotes that a disc is not for
audio use.
Ce symbole indique qu'un disque n'est
pas conçu pour une utilisation audio.
Note
To prevent injury, do not insert your hand in the CD changer.
Remarque
Pour éviter toute blessure, ne pas introduire la main dans le
changeur de CD.