ORDER NO.
PIONEER CORPORATION 4-1, Meguro 1-chome, Meguro-ku, Tokyo 153-8654, Japan
PIONEER ELECTRONICS (USA) INC. P.O. Box 1760, Long Beach, CA 90801-1760, U.S.A.
PIONEER EUROPE NV Haven 1087, Keetberglaan 1, 9120 Melsele, Belgium
PIONEER ELECTRONICS ASIACENTRE PTE. LTD. 253 Alexandra Road, #04-01, Singapore 159936
PIONEER CORPORATION 2008
Surround
left
Center
Front
left
Center
Surround
right
Front
right
Subwoofer
SSP-LX03
RRV3850
T-ZZR AUG. 2008 Printerd in Japan
SPEAKER SYSTEM
SSP-LX03
/SXTM/WL5

2
SSP-LX03
12
3
4
C
D
F
A
B
E
1
23
4
1. REASSEMBLY AND DISASSEMBLY PRECAUTIONS
1.1 FRONT SPEAKER
The grille is attached to the cabinet by 8 external screws.
To detach it, unfasten those screws.
The 2 speaker units (52mm) is attached together with grille assy
to the cabinet by 8 external screws. To detach it, first unfasten
those screws.
Next remove the cabinet. Then remove the cable.
When attaching it, face its terminal right side.
The top panel is attached to the cabinet by press-fitting.
To detach, pry it open by inserting a flat head screwdriver into
back side hole.
When attaching it, press-fit it carefully it the direction of the
panel.
The top grille is attached to the speaker unit (Tw) by press-fitting.
To detach it, first pry top panel open by inserting a flat head
screwdriver into back side hole.
Then detach by pulling the top grille toward you.
When attaching it, press-fit it carefully it the direction of the
grille.
The speaker unit (Tw) is attached to the cabinet by 2 external
screws.
To detach it, first pry top panel open by inserting a flat head
screwdriver into back side hole.
Next detach by pulling the top grille toward you.
Next unfasten the screws. Then remove the cable.
When attaching it, face its (-) terminal front side
1.2 CENTER SPEAKER
The grille is attached to the cabinet by 4 external screws.
To detach it, unfasten those screws.
The speaker unit (52mm) is attached together with grille assy to
the cabinet by 4 external screws. To detach it, first unfasten those
screws.
Next remove the cabinet. Then remove the cable.
When attaching it , face its terminal right side.
1.3 SURROUND SPEAKER
The grille is attached to the cabinet by 4 external screws.
To detach it, unfasten those screws.
The speaker unit (52mm) is attached together with grille assy to
the cabinet by 4 external screws. To detach it, first unfasten those
screws.
Next remove the cabinet. Then remove the cable.
When attaching it, face its terminal right side.
The top panel is attached to the cabinet by press-fitting.
To detach, pry it open by inserting a flat head screwdriver into
back side hole.
When attaching it, press-fit it carefully it the direction of the
panel.
The top grille is attached to the speaker unit (Tw) by press-fitting.
To detach it, first pry top panel open by inserting a flat head
screwdriver into back side hole.
Then detach by pulling the top grille toward you.
When attaching it, press-fit it carefully it the direction of the
grille.
The speaker unit (Tw) is attached to the cabinet by 2 external
screws.
To detach it, first pry top panel open by inserting a flat head
screwdriver into back side hole.
Next detach by pulling the top grille toward you.
Next unfasten the screws. Then remove the cable.
When attaching it, face its (-) terminal front side.
1.4 SUBWOOFER
The stand board is attached to the cabinet by 4 external screws.
To detach it, unfasten those screws.
The plastic foot L & R is attached to the cabinet by 4 external
screws.
Then it is attached to the cabinet by its bosses applied with
adhesive.
To detach it, first remove the stand board.
Next detach by pulling it toward you.
To attach it, apply adhesive to the holes on the bottom board.
Then press it to the cabinet.
The speaker unit is attached to the cabinet by 4 external screws.
To detach it, first remove the stand board.
Then unfasten those screws.
When attaching it, face its terminal toward the acoustic felt.
3
SSP-LX03
5
67
8
5
6
7
8
C
D
F
A
B
E
2. EXPLODED VIEWS AND PARTS LIST
Parts marked by "NSP" are generally unavailable because they are not in our Master Spare Parts List.
The
mark found on some component parts indicates the importance of the safety factor of the part.
Therefore, when replacing, be sure to use parts of identical designation.
NOTES:
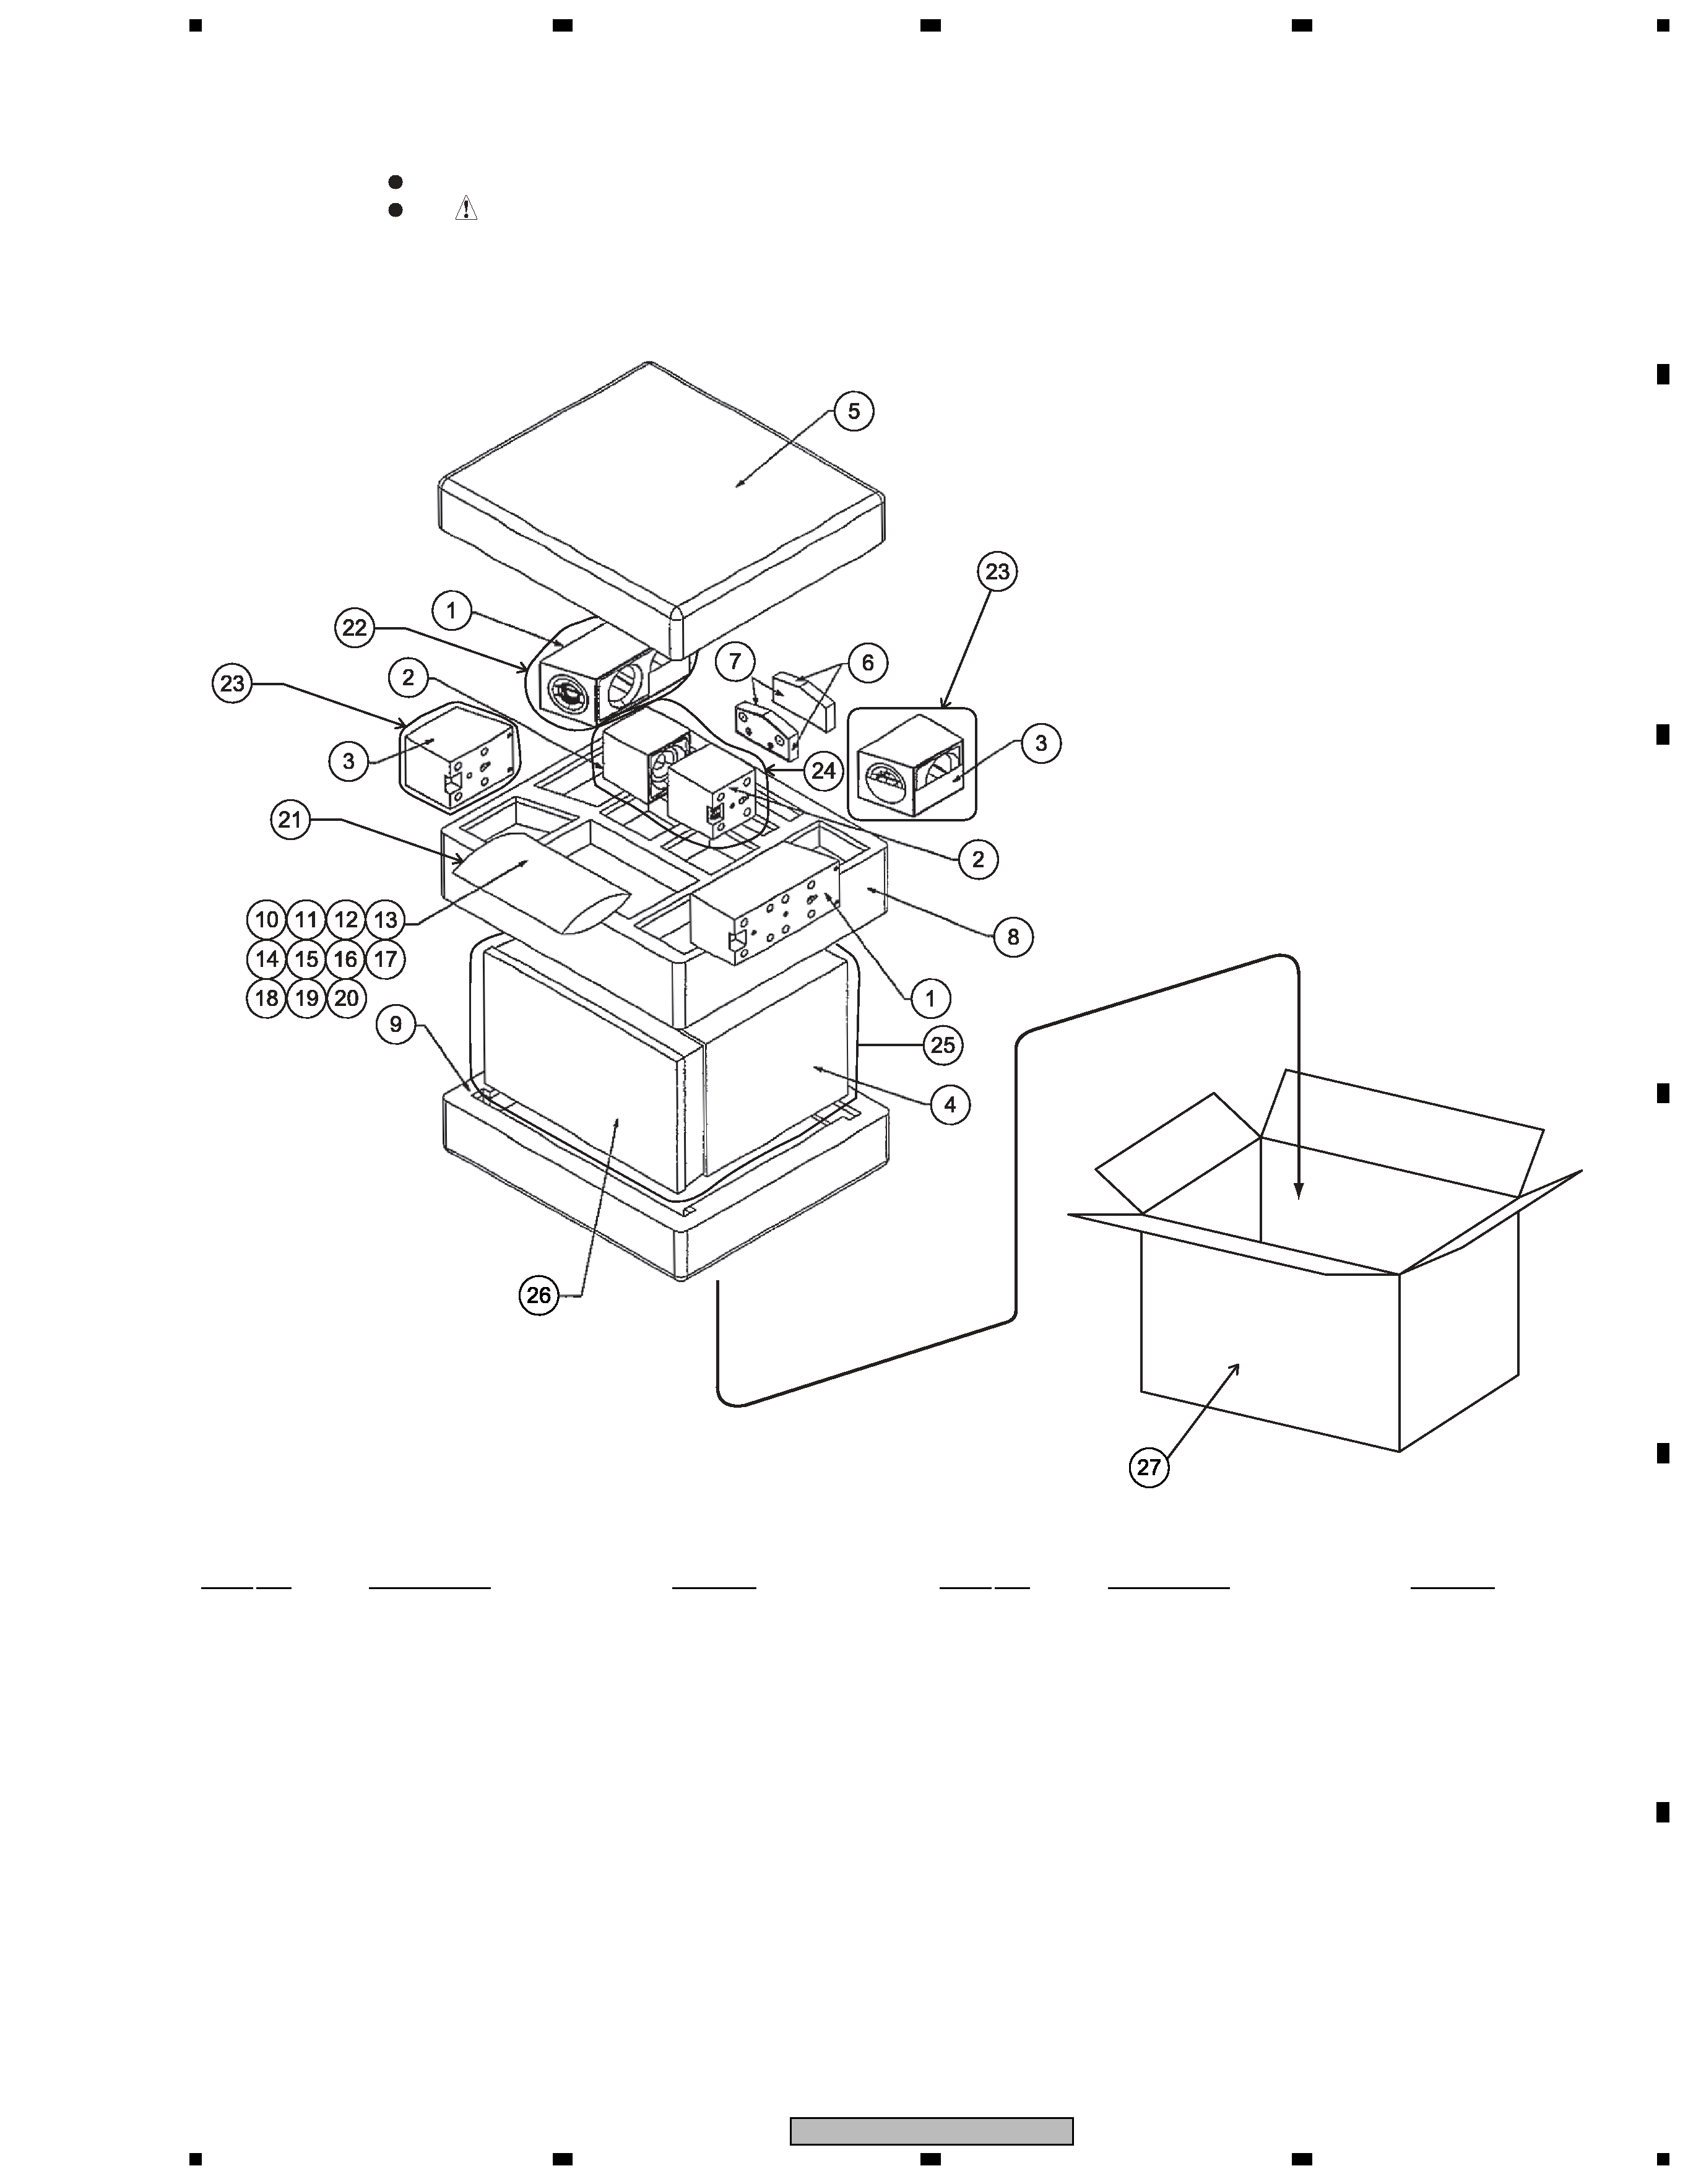
2.1 PACKING
1
Speaker (for Front)
- - - - - - - -
2
Speaker (for Center)
- - - - - - - -
3
Speaker (for Surround)
- - - - - - - -
4
Speaker (for Subwoofer)
- - - - - - - -
5
Protector (Top)
ITP70005-0000
6
Stand Assy
ASW70011-0001
7
Felt (for Top Panel)
IVF70007-0010
8
Protector (Center)
ITP70006-1000
9
Protector (Bottom)
ITP70007-2000
1..Accessory Set
- - - - - - - -
10
2..Spiral Tube
AAA70001-0001
11
2..Non Skid Pad (for Subwoofer)
DUF70002-0001
12
2..Non Skid Pad (for Satelite)
IVF70005-0010
13
2..Non Skid Pad (for Stand)
IVF70006-0010
14
2..Bracket Assy
ASW70001-0011
15
2..Screw (M5 x 12 mm)
NSS70002-0001
(Accessory Bracket)
16
2..Speaker Wire (for Frt L, R)
VWW70006-0001
17
2..Speaker Wire (for Cnt)
VWW70007-0001
18
2..Speaker Wire (for Sur L, R)
VWW70008-0001
19
2..Speaker Wire (for SWF 4M)
VWW70009-0001
20
2..Speaker Wire (for SWF 10M)
VWW70010-0001
21
Polyethylene Bag
IVB70007-0000
22
Poly Sheet (for Front SP)
IVB70004-1101
23
Poly Sheet (for Surround SP)
IVB70005-1101
24
Poly Sheet (for Center SP)
IVB70006-1101
25
Protection Sheet (for Subwoofer)
IVM70004-0001
26
Stand Board
- - - - - - - -
27
Packing Case
ICC70ADV-0WL5
PACKING Parts List
Mark No.
Description
Part No.
Mark No.
Description
Part No.
4
SSP-LX03
12
3
4
C
D
F
A
B
E
1
23
4
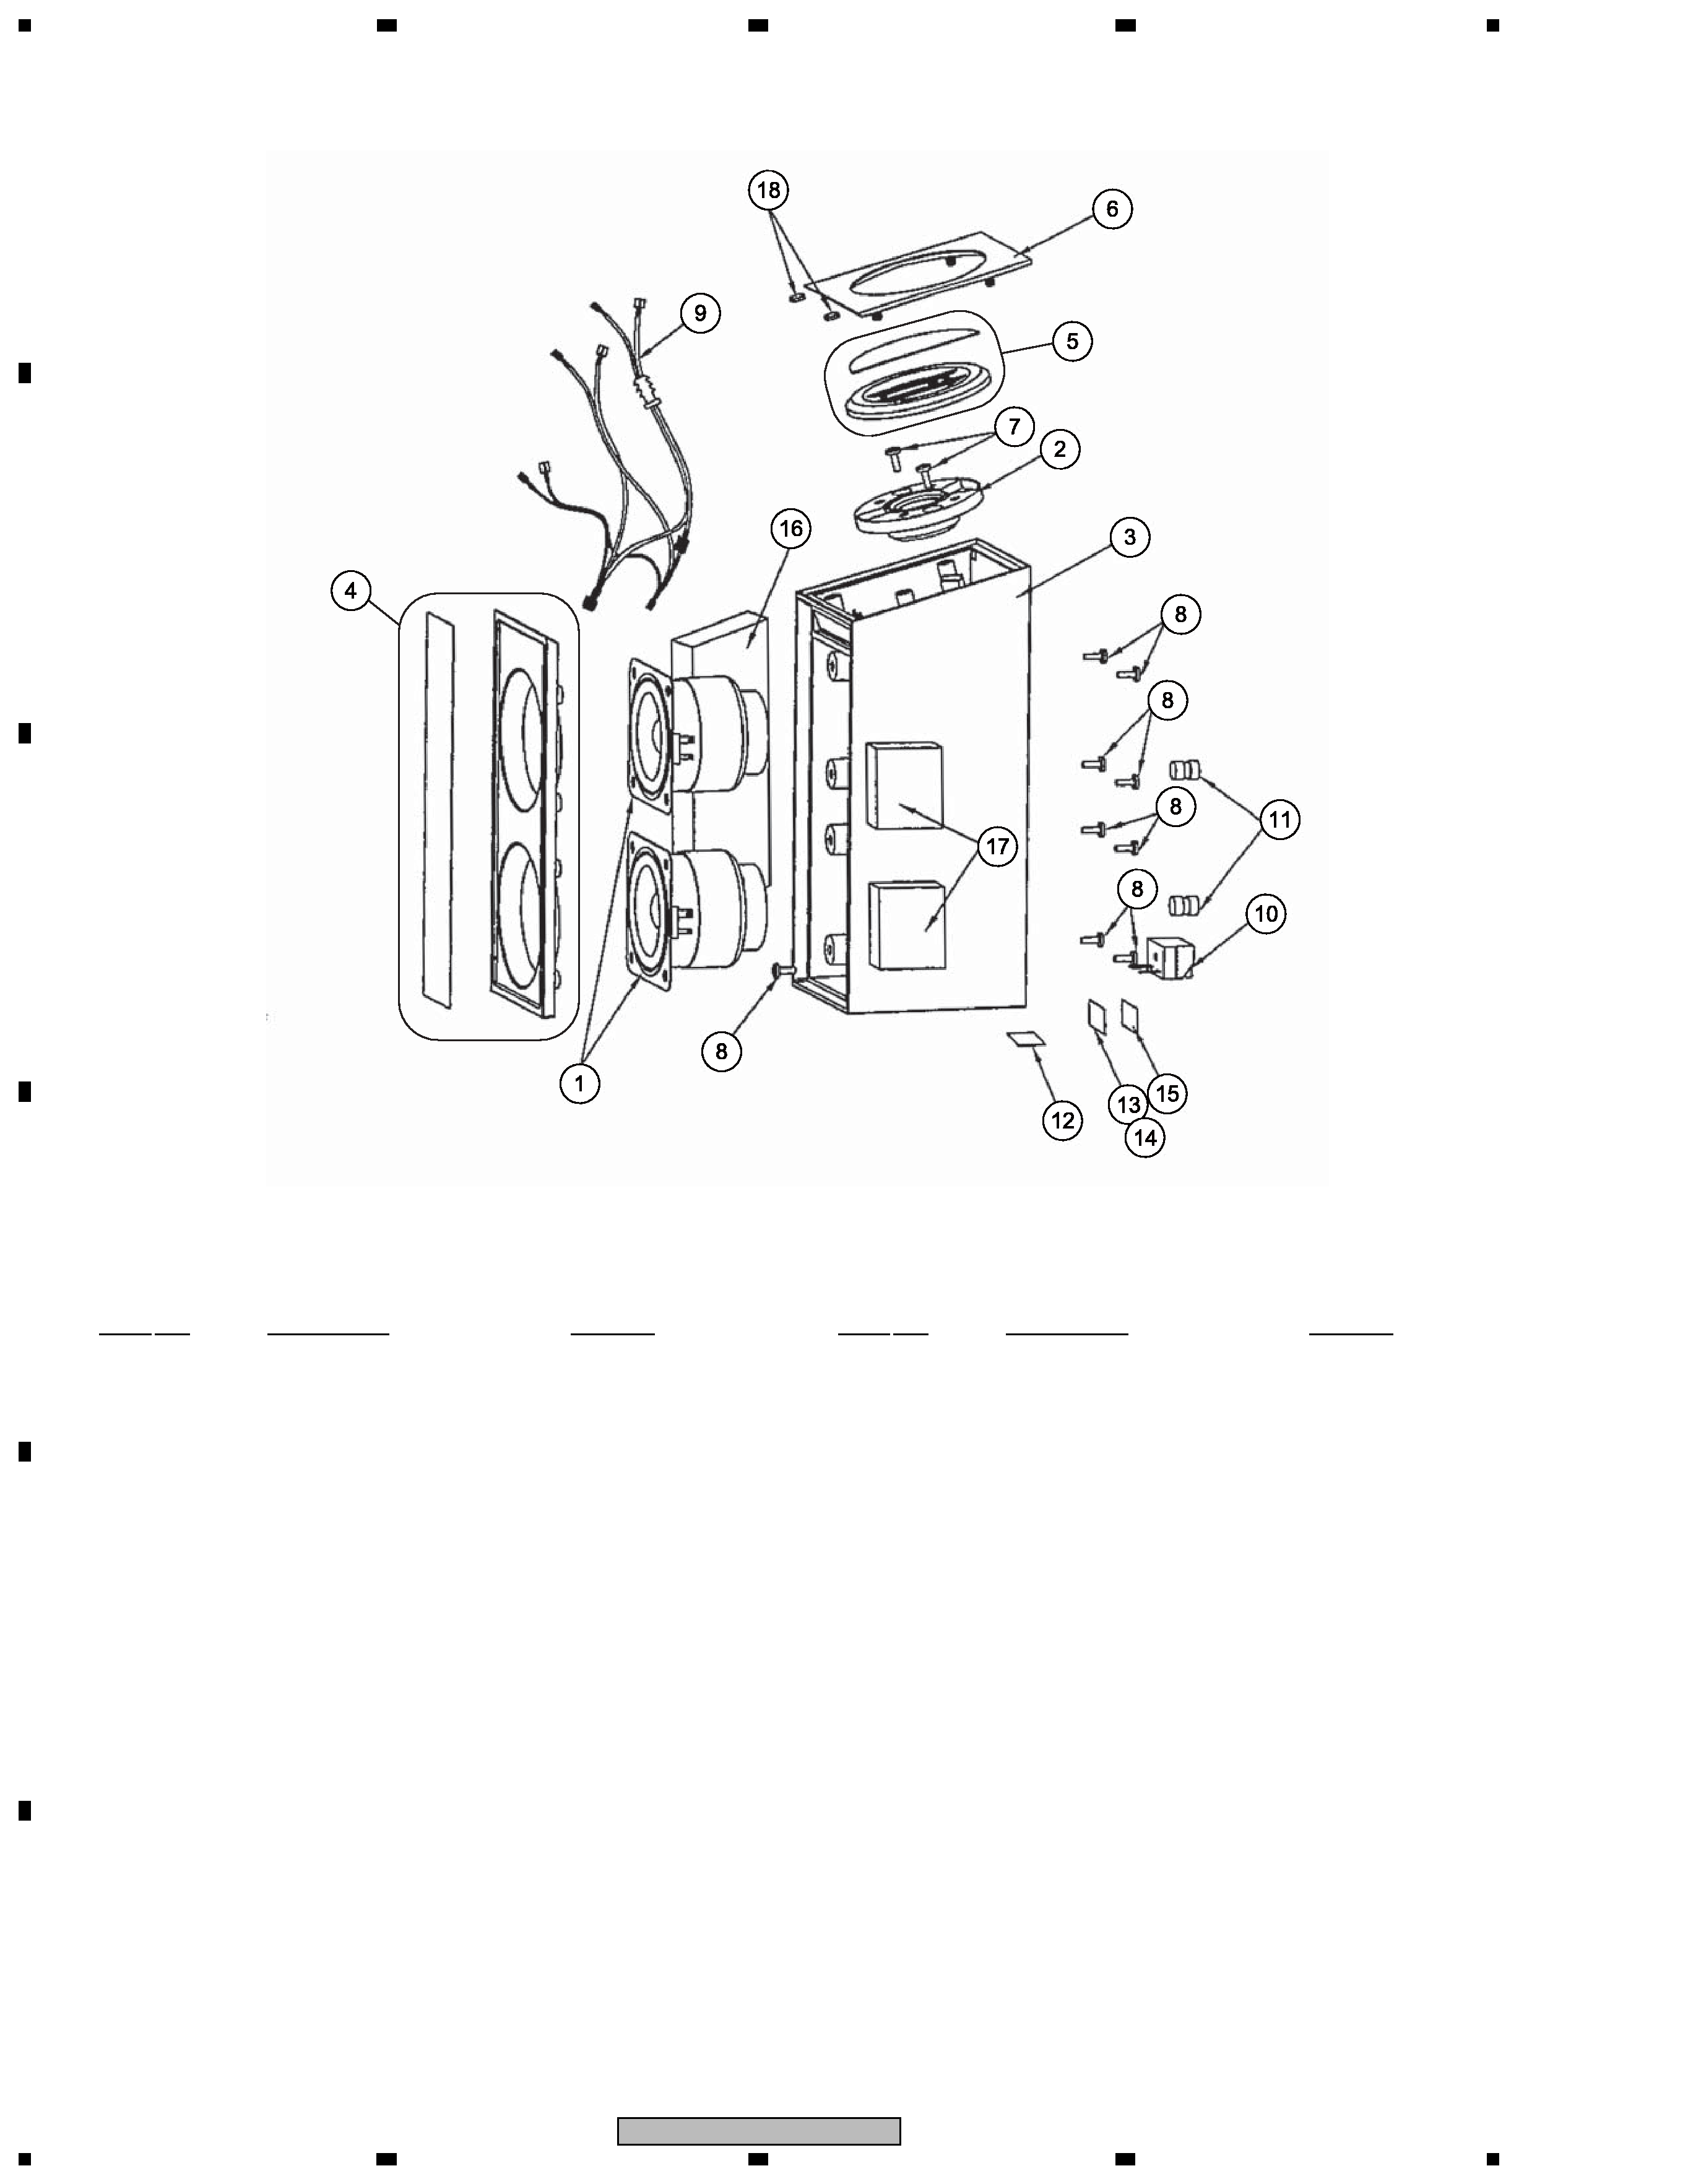
2.2 CS ASSY (FRONT)
1
Speaker (for Front)
B52MC45-54F
2
Tweeter Speaker (for Front)
FK26AP32-54F
3
Front Cabinet
- - - - - - - -
4
Grille Ass'y
ASW70001-0000
5
Grille Ass'y (for Front)
ASW70002-0100
6
Cosmetic Panel
BRP7004-1011
7
Screw (for Tweeter)
NSS70801-0701
8
Screw (for Cabinet)
NSS70207-0701
9
Connecting Cord (for Front)
VWW7003-2200
10
Input Terminal (for Front)
CJC70002-0101
11
T-Nut
- - - - - - - -
12
Label
- - - - - - - -
13
L-Tarminal Label
- - - - - - - -
14
R-Tarminal Label
- - - - - - - -
15
Caution Label
- - - - - - - -
16
Acoustic Felt
- - - - - - - -
17
Acoustic Felt
- - - - - - - -
18
Felt (for Cosmetic Top)
IVF70007-0010
(for Frt Top Panel)
CS Assy (Front) Parts List
Mark No.
Description
Part No.
Mark No.
Description
Part No.
5
SSP-LX03
5
67
8
5
6
7
8
C
D
F
A
B
E
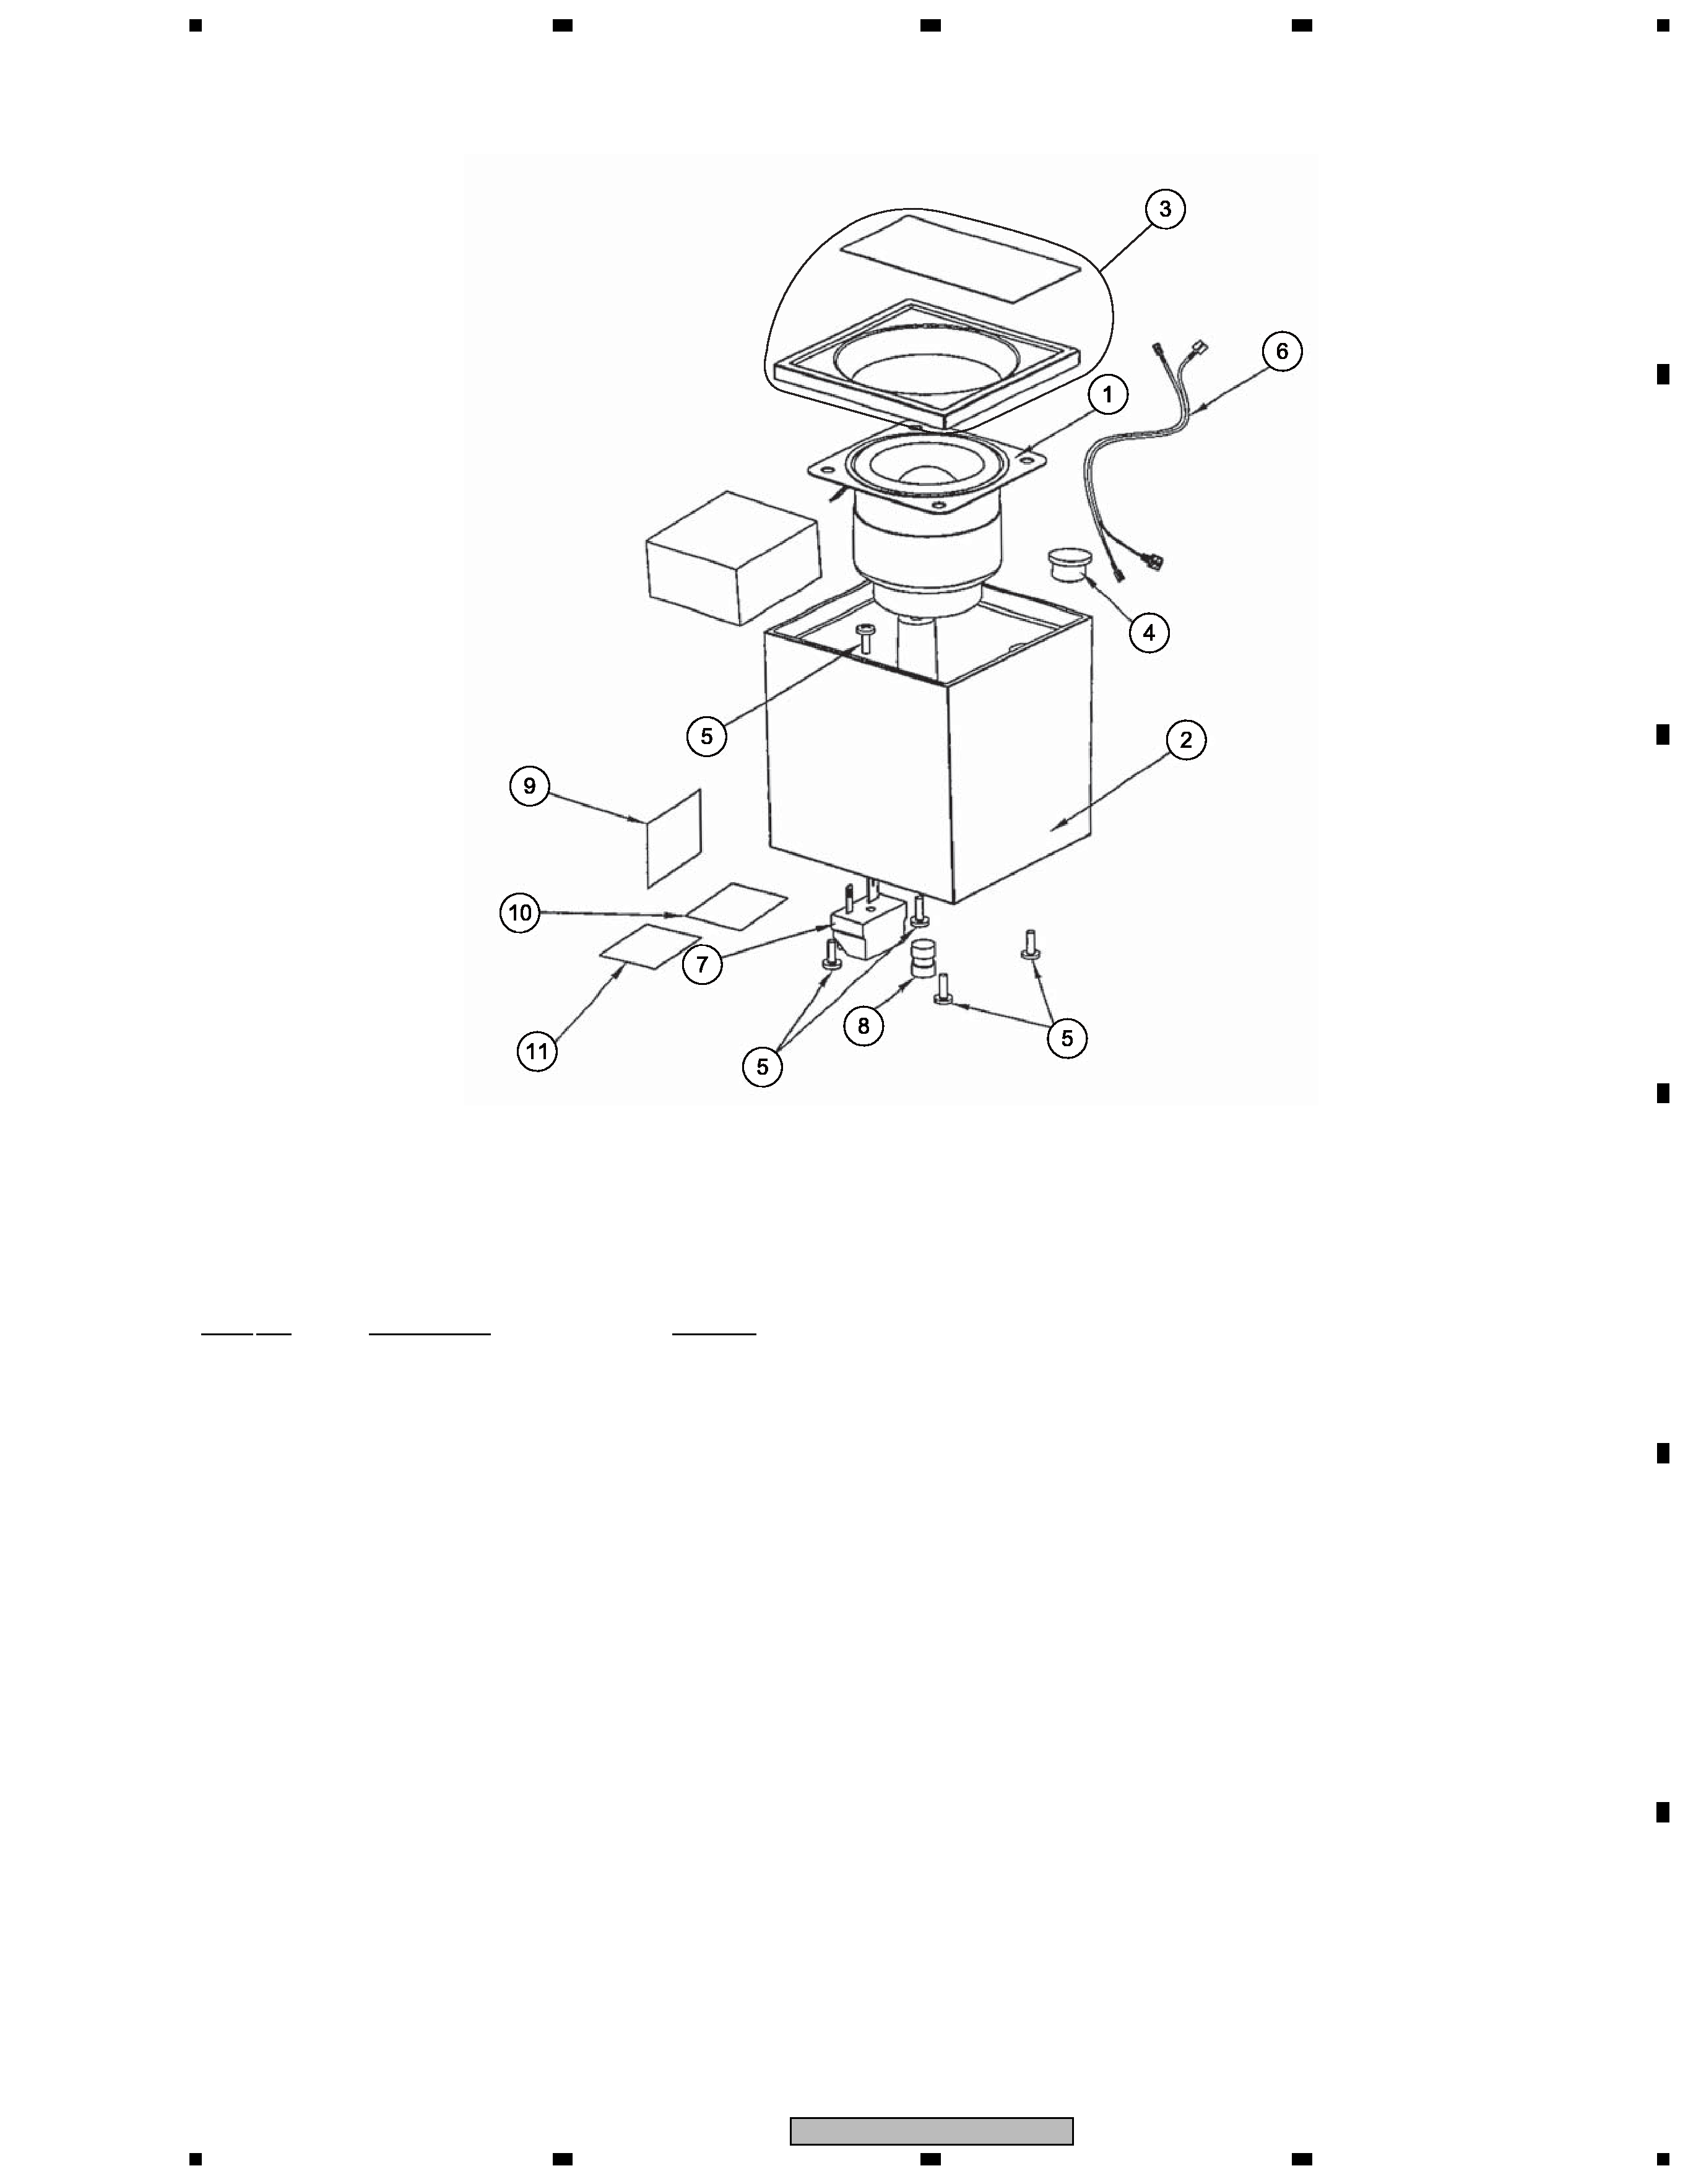
2.3 CS ASSY (CENTER)
1
Speaker (Center)
B52MC45-54F
2
Center Cabinet
- - - - - - - -
3
Grille Ass'y
ASW70003-0000
4
Cap
- - - - - - - -
5
Screw (for Cabinet)
NSS70207-0701
6
Connecting Cord (for Center)
VWW7005-2200
7
Input Terminal (for Center)
CJC70002-0101
8
T-Nut
- - - - - - - -
9
Label
- - - - - - - -
10
L-Tarminal
- - - - - - - -
11
Caution
- - - - - - - -
CS Assy (CENTER) Parts List
Mark No.
Description
Part No.