1
En
S -MS500T-LR
SPEAKER SYSTEM
OPERATING GUIDE
SISTEMA DE ALTAVOCES
GUÍA DE OPERACIÓN
BEFORE OPERATION
· Thank you for buying this PIONEER product.
· Read the operating instructions carefully before using these
speakers so that you can operate them properly. After you have
finished reading the instructions, put them away in a safe place for
future reference.
· The rated impedance of these speakers is 8
. They must be
connected to a stereo amplifier which accepts this type of load
(miminum and maximum impedances accepted by the amplifier are
generally indicated near the loudspeaker outlets: for example "4-16
" or "6-16 ").
· To guard against damage to these speakers due to an electric
power overload, take the following precaustions:
] Do not supply more than the maximum permitted power to the
speakers (see Specifications).
] Any connection or switching on or off of part of the audio
system (CD player, tuner etc.) must be carried out after
switching off the amplifier or at least with the loudspeaker
outlets disconnected (if the amplifier allows). Interference
caused by these operations will otherwise reach the speakers
and may damage the treble loudspeaker units.
] When boosting particular frequencies using a graphic equaliser
or bass and treble controls, make sure that you do not increase
the amplifier volume excessively, as the speakers will be
overloaded more quickly.
] Do not force a low-power amplifier to produce a high level of
sound as harmonic distortion increases rapidly in this situation
and may pose a danger to the treble loudspeaker units.
· Avoid touching the diaphragms and suspensions of loudspeakers as
they are fragile.
The loudspeaker units in these speakers are magnetically shielded.
However, colours may blur if the speakers are positioned too close
to a television screen. If this happens, switch off the television and
switch it back on again after 15 to 30 minutes. If the problem
persists, move the speakers away from the television set.
INSTALLATION PRECAUTIONS
· Do not install these speakers close to an oven or heating appliance.
Avoid exposing them to direct sunlight. High temperatures can
distort the structure of the enclosure and adversely affect the
sound.
· These speakers are heavy and fragile, and it is therefore dangerous
to install them in an unstable position.
· For optimum sound reproduction of high frequencies, the treble
loudspeaker units must be at the same height as the listener's ears.
For low frequencies, it is possible to increase the level of bass
sounds by positioning the speakers close to a wall (the maximum
increase being obtained for a position in a corner of the listening
room).
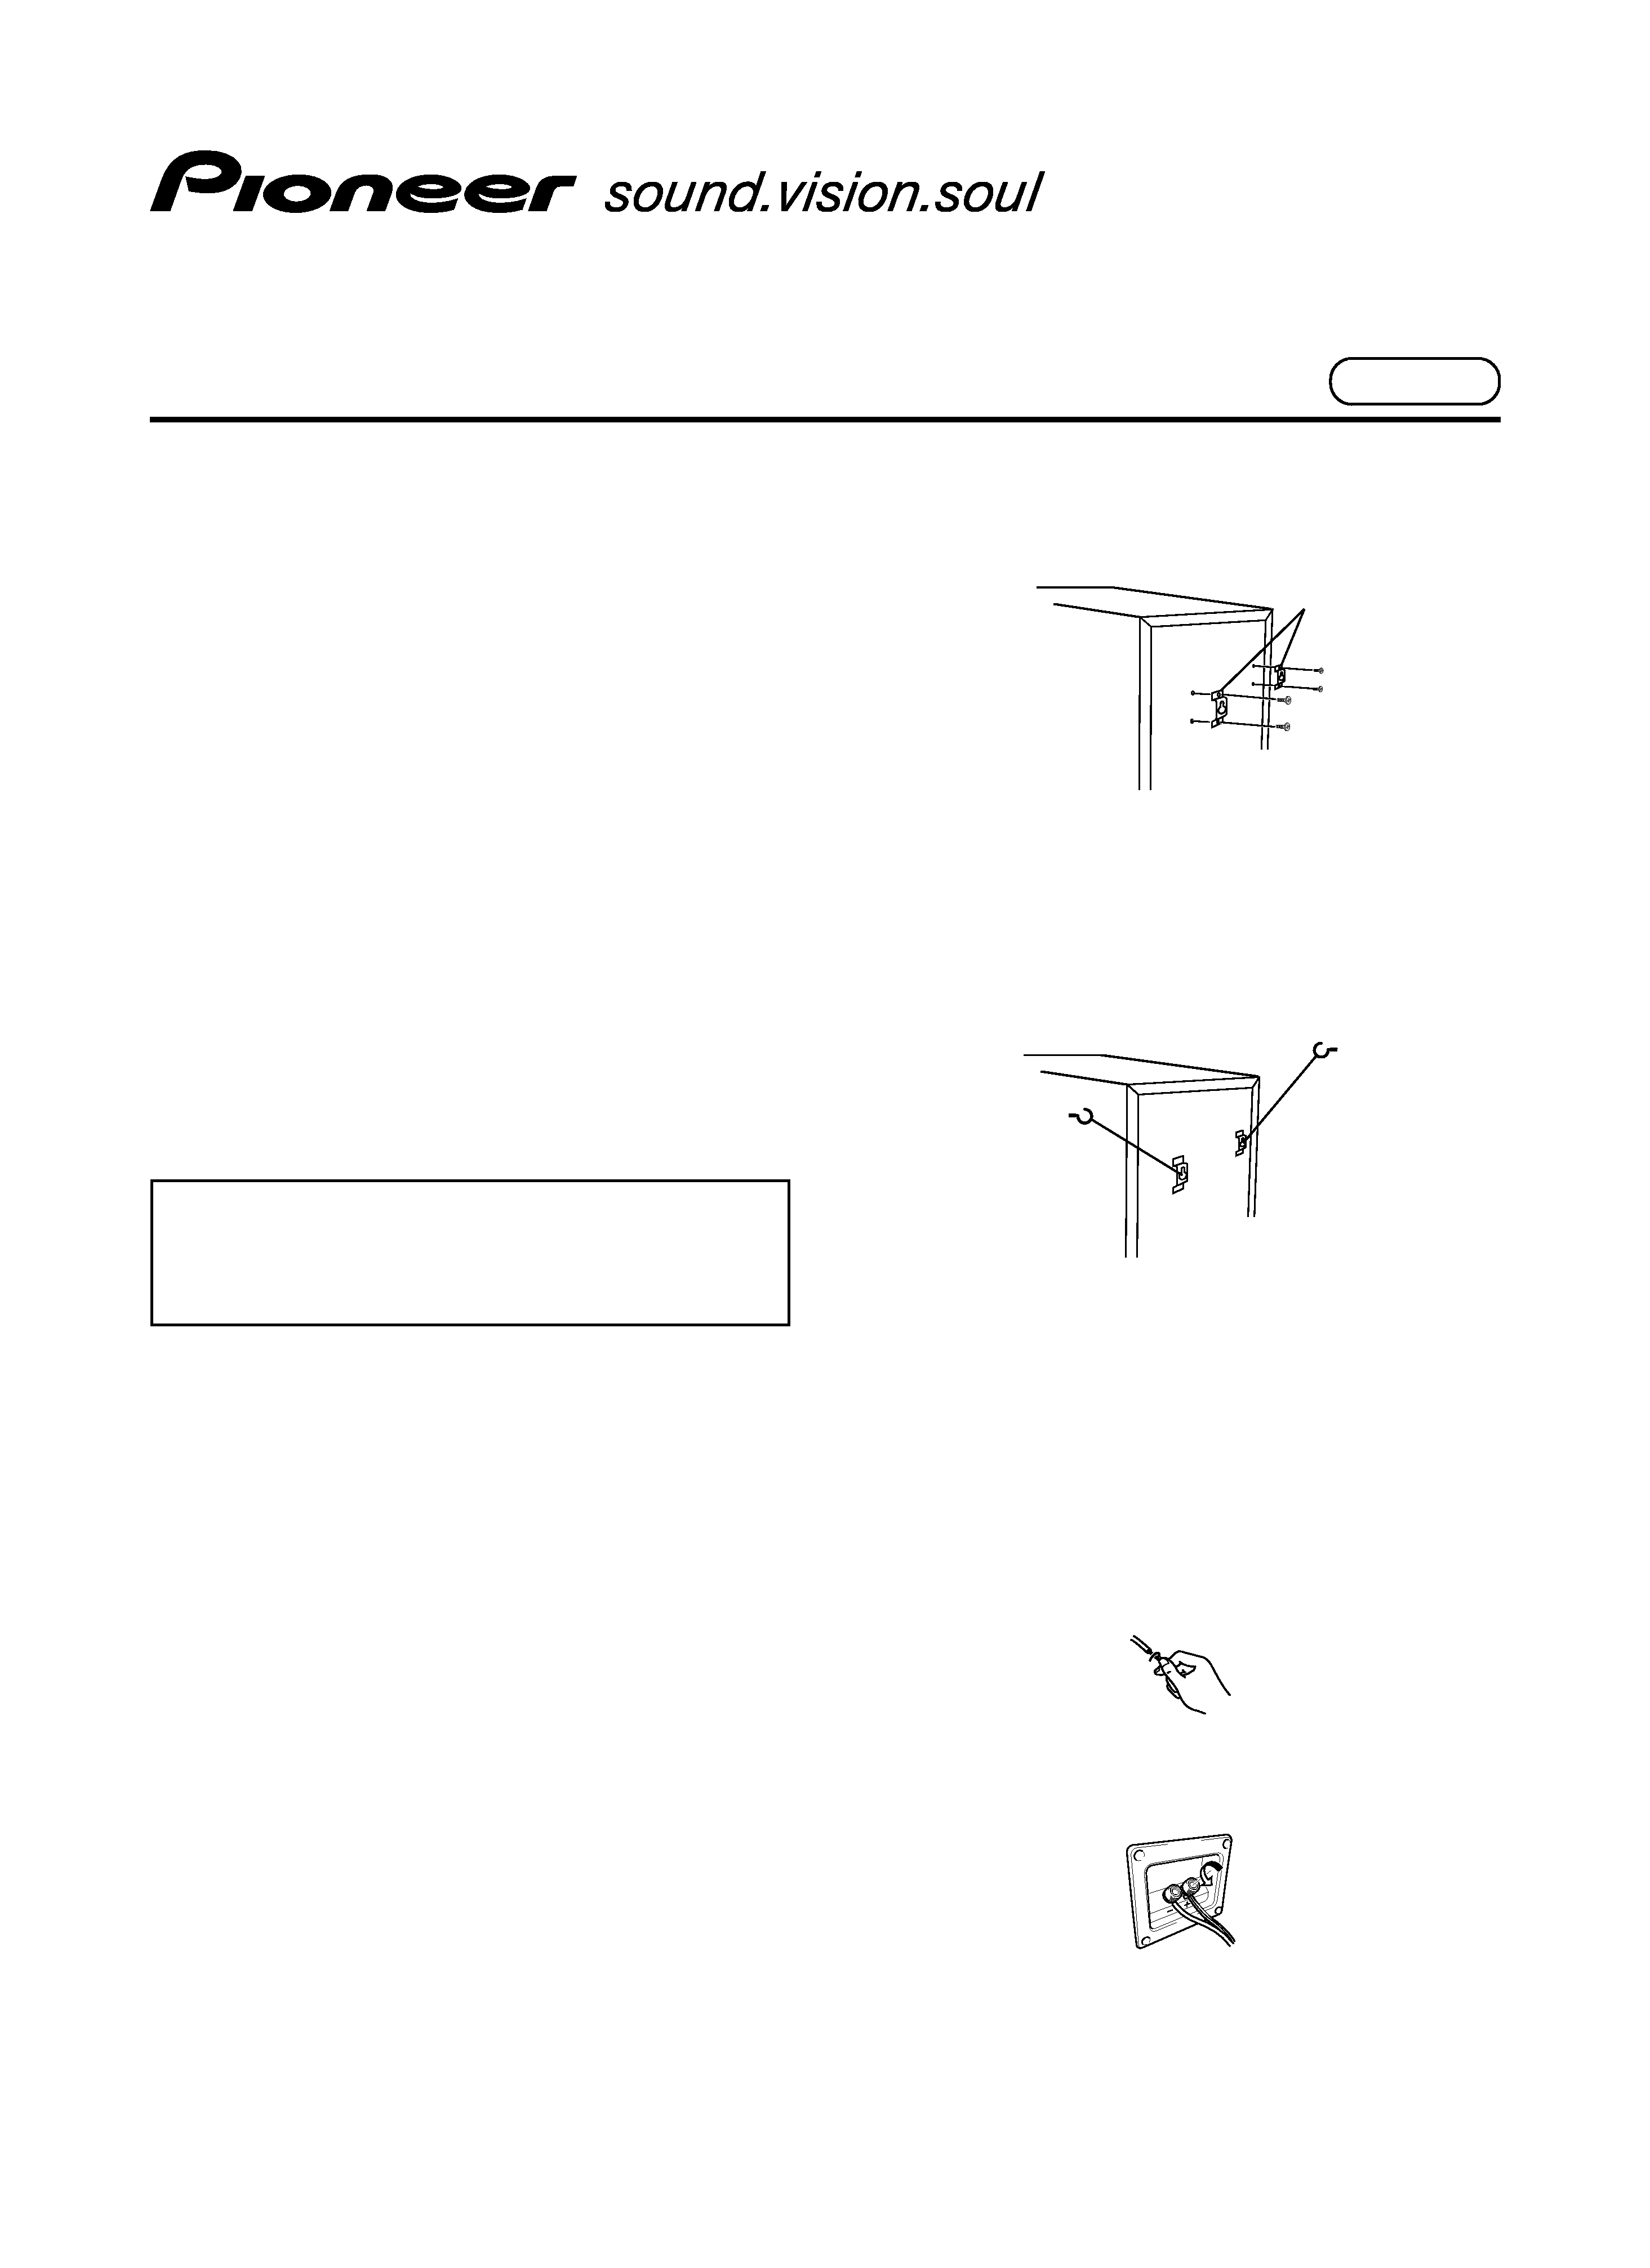
Installing your speaker
To mount the speakers (on a wall etc.), first attach two metal catches to
the rear of each speaker using the supplied screws.
Please observe the following points when installing speakers:
· Sounds played through speaker systems are easily affected in
subtle ways by the conditions in the listening space.
· These are for stabilizing the speaker so that in the event of an
earthquake, etc., the speaker does not fall over.
· Screw two picture hooks or similar into the wall behind the speaker.
Pass a chain or cord around the hooks and through the metal
catches so that the speaker is stabilized.
· After installing, make sure the speaker is securely fixed.
Pioneer cannot take responsibility for injuries or accidents arising from
improper installation of this speaker.
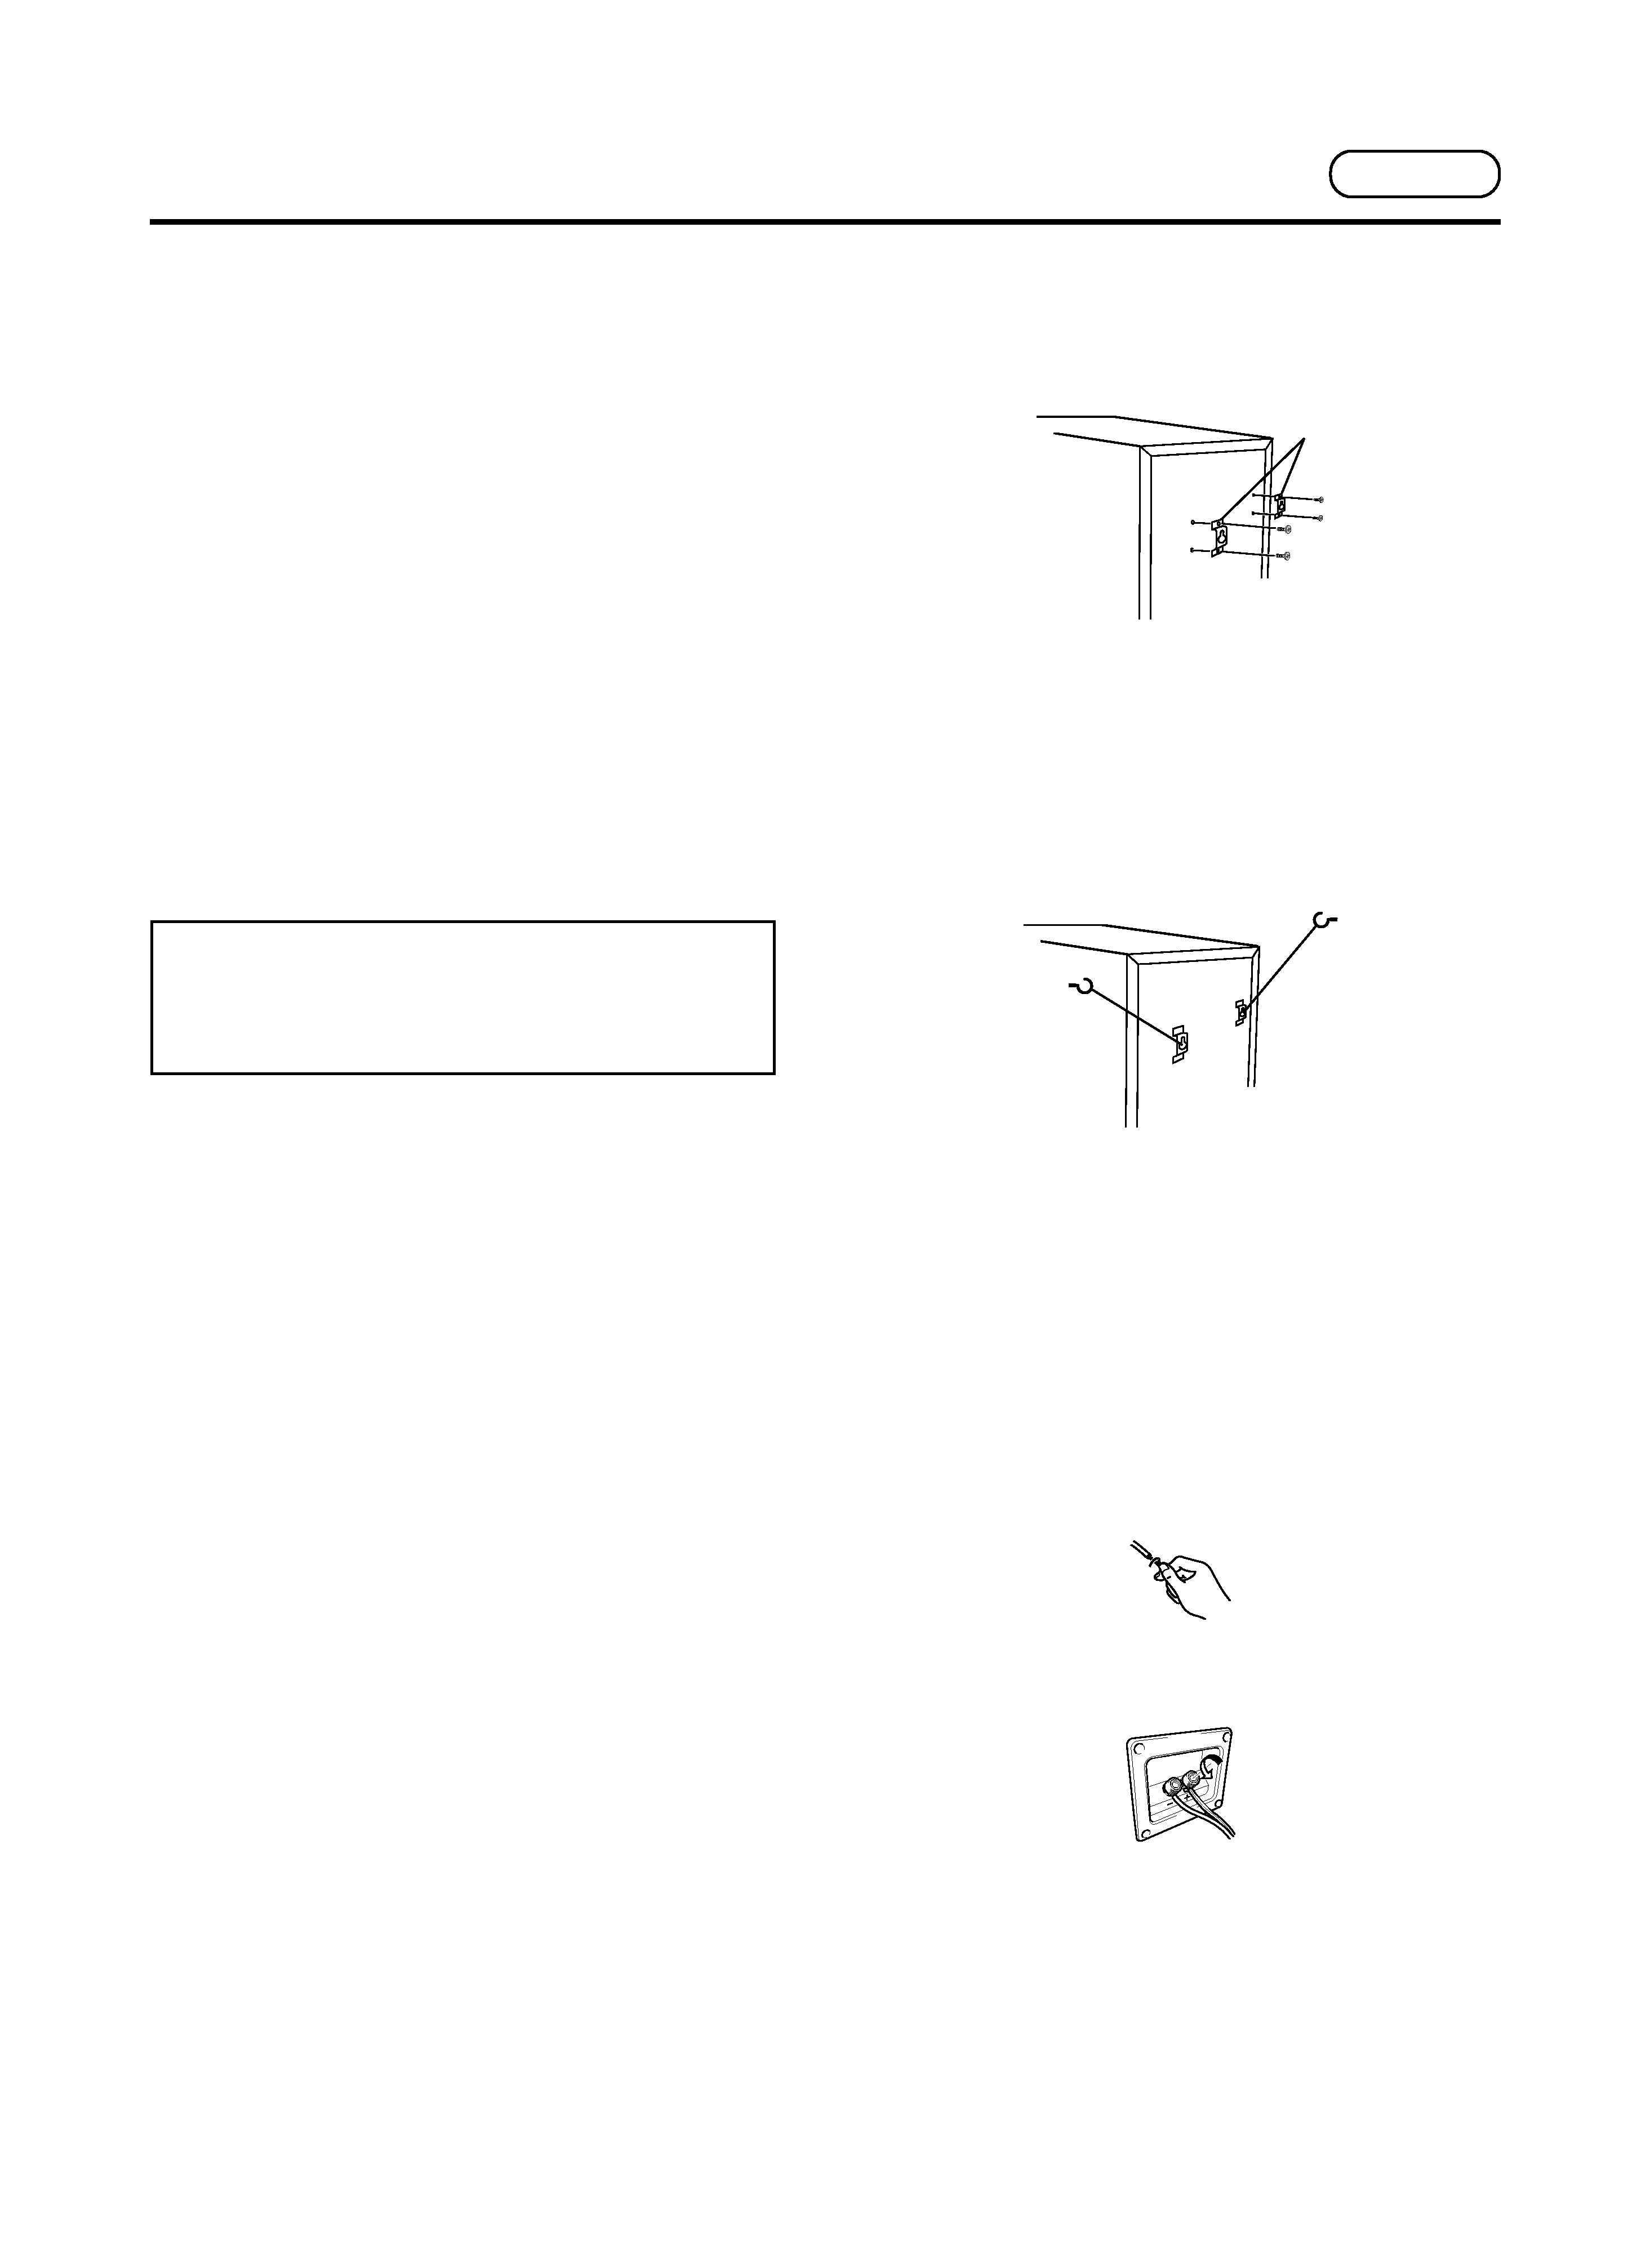
CONNECTIONS
Each speaker has two terminals; one red (+), the other black ().
These need to be matched up to the red and black terminals on the
amplifier for proper stereo sound.
1. Make sure your amplifier is switched off.
2. Strip off the insulation at the end of the cord and twist the strands
together.
3. Connect one end of the speaker cord to the speaker terminals.
Loosen the two terminal knobs so that you can insert the exposed
speaker wire through the hole in the terminal post. Tighten the
knobs to secure the speaker cord.
4. Connect the other end of the speaker cord to the amplifier terminals.
Make sure that the amplifier terminals (red (+) and black ()) are
connected to the corresponding speaker terminals.
English
metal catches

2
En
REMARKS:
·
Check that the cables are securely connected to the terminals. A
loose connection may cause not just intermittent or distorted sound
but short-circuiting and breakdown of the amplifier.
·
If the cables of one of the speakers have been connected with the
wrong polarities, you will find when listening to a stereo recording
that bass sounds are weakened and the stereo effect normally
obtained between the two speakers does not exist.
MAINTENANCE OF THE ENCLOSURE
· Use a cloth to wipe away dust and dirt.
· If the enclosure is very dirty, wipe with a soft cloth dipped in a
neutral detergent diluted five to six times with water, then wipe
again with the dry cloth. Do not use thinner, benzene, cleaning
sprays or other chemical products on or near the enclosures as the
surfaces could be adversely affected.
DETACHING AND REPLACING THE FRONT GRILLE
The front grille of this speaker system is removable.
Proceed as follows:
1. Use both hands to hold the top part of the grille, and pull it gently
towards you. You will then be able to free the top part of grille.
2. Similarly, take hold of the bottom part of the grille, and pull it towards
you; the whole grille will then be detached from the speaker system.
3. To replace the grille, align the projections in each of the grille's corners
with the openings in the speaker system, and push each of the corners
into place.
SPECIFICATIONS
Enclosure ................................................................. bass-reflex tall type
(magnetically shielded)
System ....................................................... 3 ways, 3 loudspeaker units
Loudspeaker units
Woofer ...................................................................... 20 cm cone type
Mid-range loudspeaker ............................................... 8 cm cone type
Tweeter ....................................................................... 4 cm cone type
Nominal impedance ........................................................................... 8
Frequency range .............................................................. 30 20000 Hz
Sensitivity ....................................................... 88 dB/W at 1 m distance
Maximum power .......................................................................... 150 W
External dimensions ......................... 240 X 900 X 250 mm (W X H X D)
Weight ......................................................................................... 10.7 kg
Accessories
Speaker cords ........................................................................................ 2
Metal catches ........................................................................................ 2
Screws ................................................................................................... 4
Operating instructions
REMARK:
The specifications and design of this product are subject to change
without notice, in the interests of improvements.
Published by Pioneer Corporation.
Copyright © 2005 Pioneer Corporation.
All rights reserved.
English
3
Sp
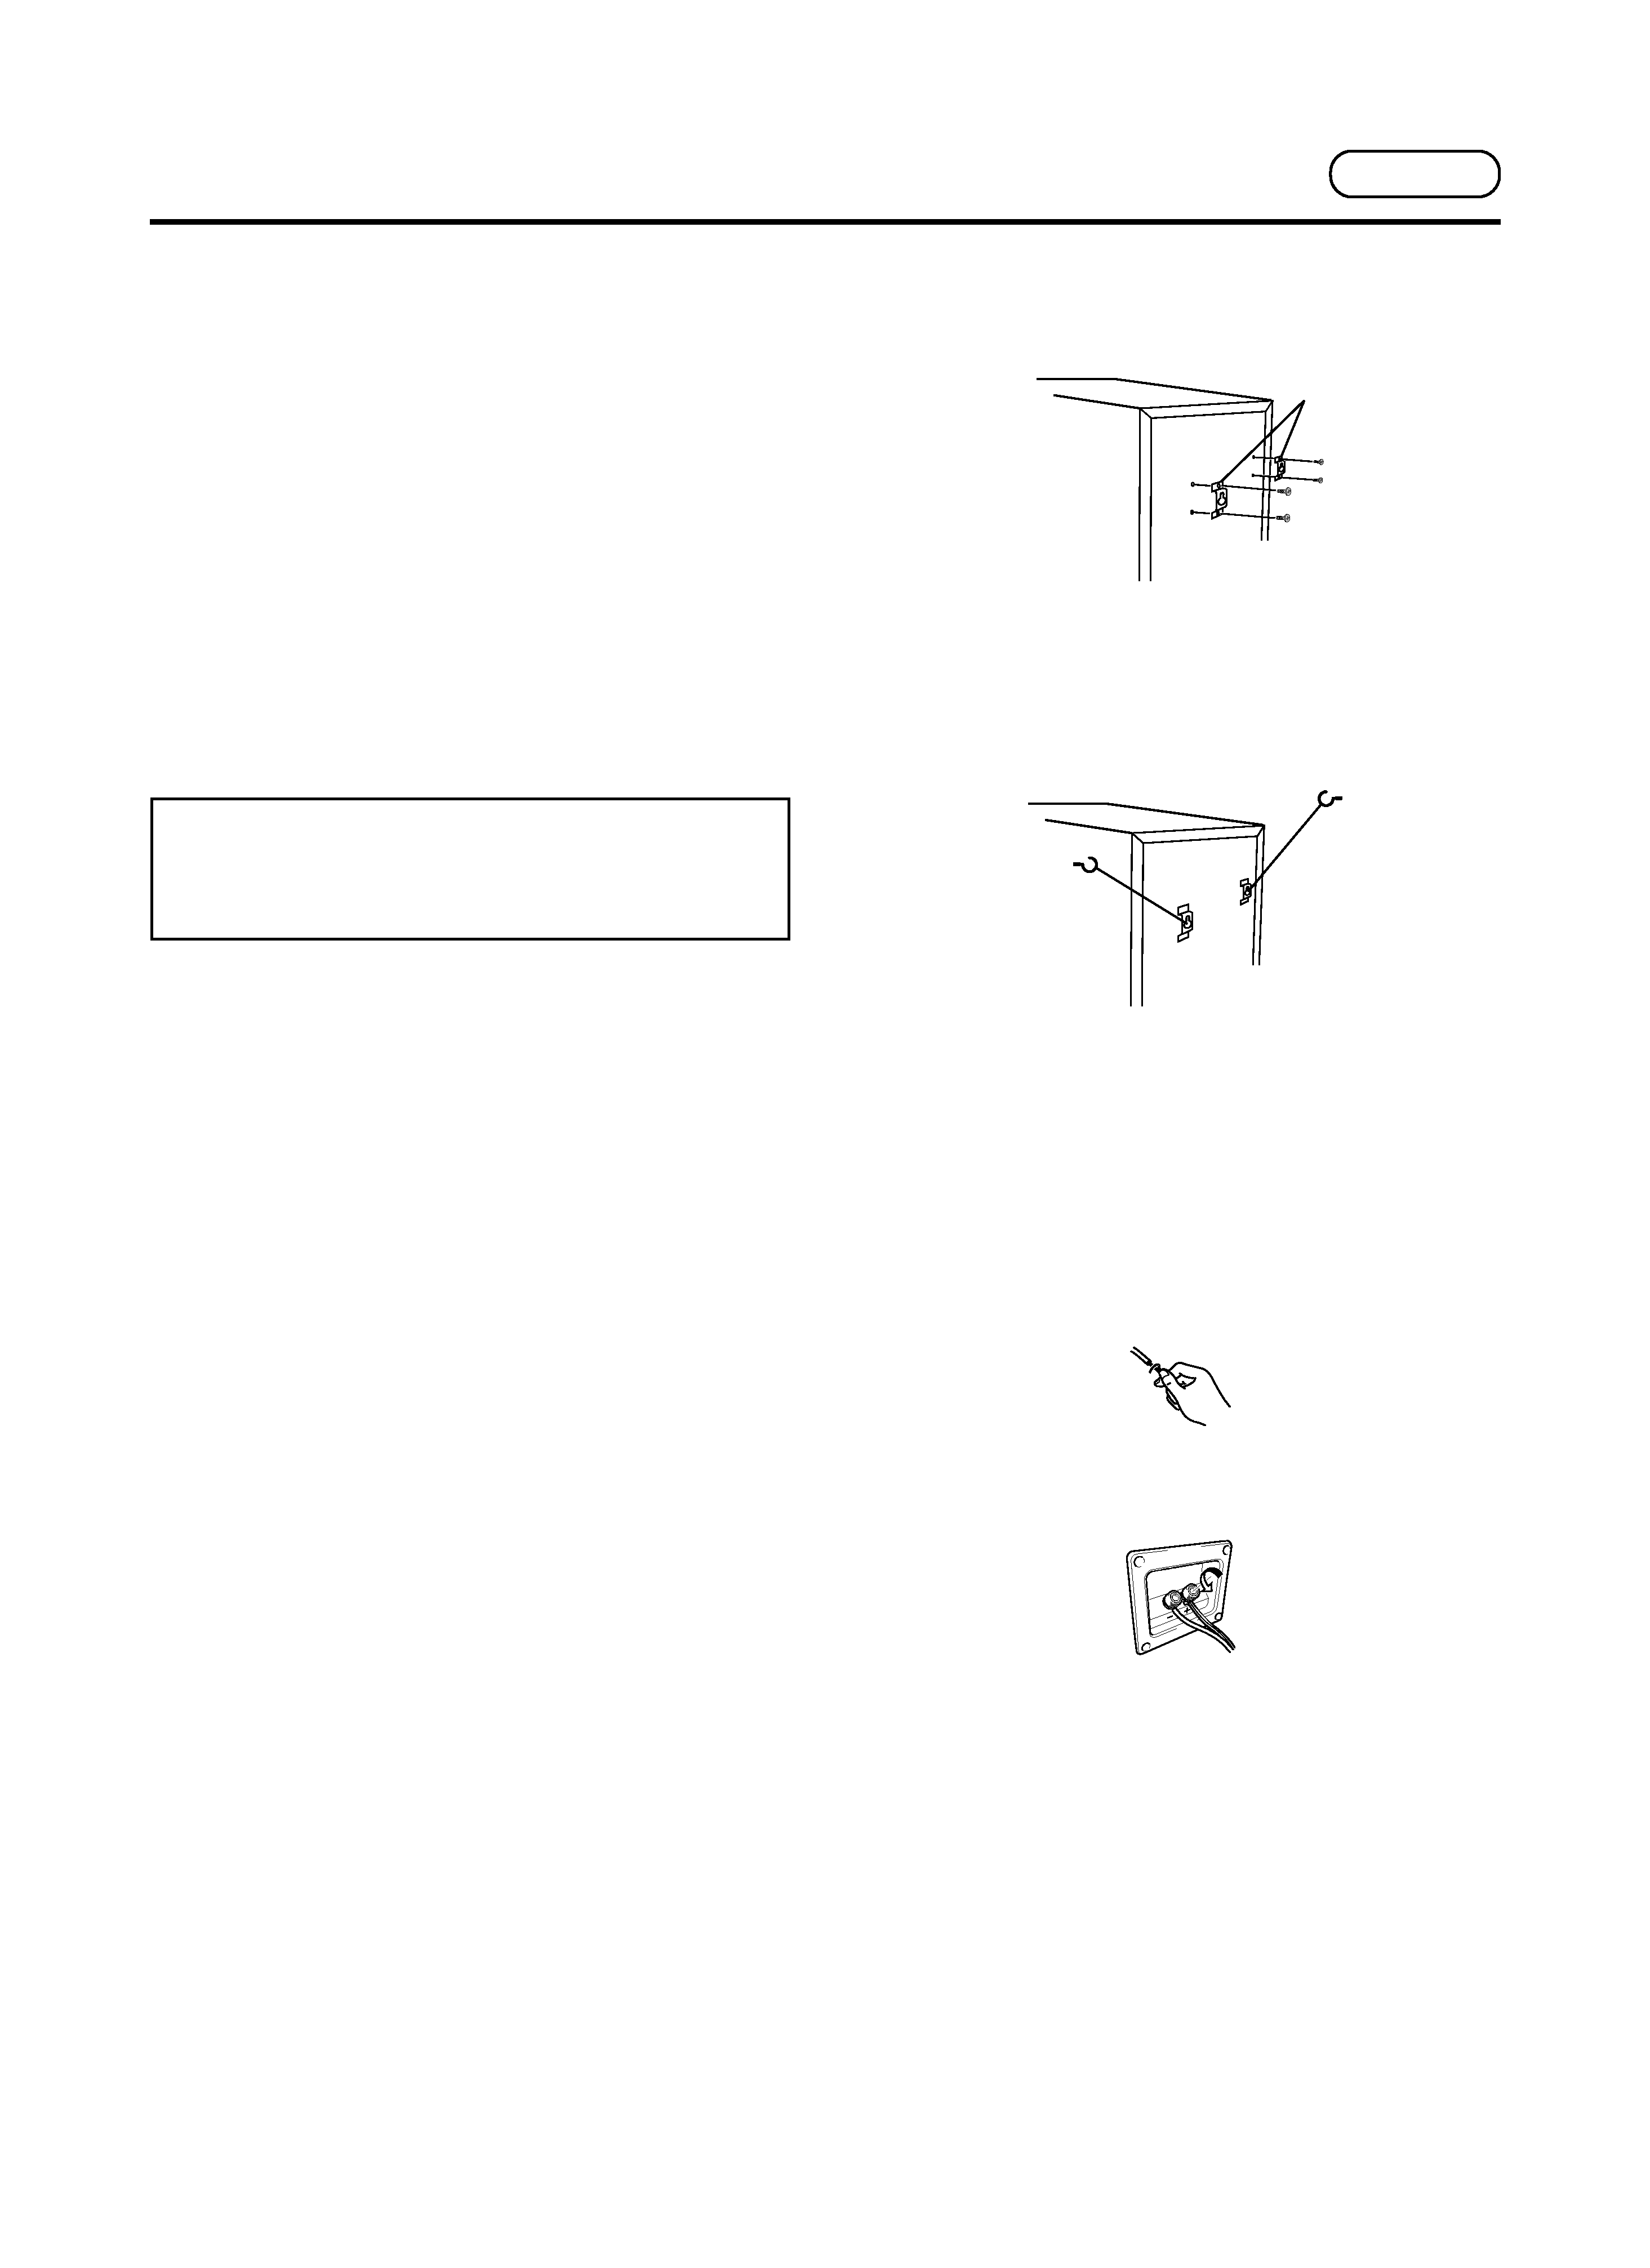
Instalación de los altavoces
Para montar los altavoces (en una pared, etc.), primero coloque los
dos retenedores metálicos en la parte posterior de cada altavoz
empleando los tornillos suministrados.
Le rogamos que respete las siguientes recomendaciones al instalar los
altavoces:
· Los sonidos que se reproduzcan a través de estos sistemas de
altavoces se verán fácilmente afectados sutilmente por las
condiciones del espacio de audición.
· Su propósito es estabilizar el altavoz para que en caso de que
ocurra un terremoto, etc. el altavoz no se caiga.
· Atornille dos ganchos o similar a la pared de detrás del altavoz.
Pase una cadena o cable entre los ganchos y por los amarres
metálicos para que el altavoz quede estabilizado.
· Terminada la instalación, asegúrese de que el altavoz quede fijado
con seguridad.
Pioneer no puede aceptar ninguna responsabilidad por lesiones o accidentes
que puedan ocurrir por el mal montaje de los altavoces en una pared o en
el techo.
CONEXIONES
Cada altavoz tiene dos terminales: uno rojo (+) y otro negro (). Para obtener
un sonido estéreo adecuado, deberá hacer coincidir estos terminales con los
terminales rojo y negro del amplificador.
1. Asegúrese de que el amplificador está encendido.
2. Pele el aislamiento del extremo del cable y retuerza los conductores para
trenzarlos.
3. Conecte un extremo del cable de altavoz a los terminales del altavoz.
Afloje las perillas de los dos tornillas para poder insertar los conductores
trenzados por el orificio del terminal. Apriete las perillas para fijar el cable
del altavoz.
4. Conecte el otro extremo del cable de altavoz a los terminales del
amplificador. Asegúrese de que los terminales del amplificador (rojo (+) y
negro (-)) estén conectados a los terminales correspondientes del altavoz.
OBSERVACIONES GENERALES
· PIONEER aprecia su confianza en este producto.
· Lea atentamente las instrucciones para utilizar idealmente las
características de sus altavoces, y consérvelas entre sus documentos de
referencia.
· Los altavoces tienen una impedancia nominal de 8
. Compruebe si su
amplificador estéreo acepta esta carga (los valores mínimo y máximo de
impedancia están indicados generalmente junto a los conectores para
altavoces: por ejemplo, "4-16
" o "6-16 ").
· Precauciones para evitar el riesgo de dañar los altavoces con una potencia
eléctrica excesiva:
] Limitarse al valor máximo de potencia autorizado para los altavoces
(véase la ficha de características técnicas).
] Antes de enchufar, conectar o desconectar la corriente de uno de los
elementos del equipo (lector de CD, sintonizador...), desconecte la
alimentación del amplificador o corte los conectores de altavoces
(posible en algunos amplificadores). Así evitará la transmisión de
ruidos parásitos producidos por estas manipulaciones a los altavoces,
que podrían dañar los difusores de agudos.
] Al amplificar determinadas frecuencias mediante un ecualizador
gráfico o controles de bajos y agudos, asegúrese de que no aumenta
excesivamente el volumen del amplificador, ya que los altavoces se
sobrecargarían con mayor rapidez.
] No debe forzar un amplificador de baja potencia a producir altos
niveles sonoros. La distorsión armónica aumentaría rápidamente y
podría de dañar los difusores de agudos.
· Las membranas y las suspensiones de los altavoces son delicadas. Evite
tocarlas.
Los altavoces de esta caja acústica tienen un blindaje magnético, pero
siempre hay un riesgo de perturbación de los colores de un televisor
cuando se encuentran demasiado cerca. En este caso, desconectar el
televisor y esperar entre 15 y 30 minutos para conectarlo nuevamente. Si
el problema se repite, aumentar la distancia entre la caja de altavoces y el
televisor.
PRECAUCIONES PARA LA
INSTALACIÓN
· No debe instalar los altavoces cerca de un horno ni de aparatos de
calefacción. Evitar también la exposición a una fuerte radiación solar. Una
temperatura excesiva puede deformar la estructura de la caja y afectar la
calidad del sonido.
· No es prudente instalar estas cajas de altavoces, que son pesadas y
delicadas, en un posición inestable.
· Para obtener la mejor reproducción sonora posible de las altas frecuencias
es importante colocar los altavoces de agudos al nivel de los oídos de la
persona que escucha. Para las bajas frecuencias, el nivel de graves puede
elevarse colocando la caja de altavoces cerca de una pared (la máxima
diferencia se obtiene instalando los altavoces en una de las esquinas del
cuarto donde escucha).
Español
amarres metálicos

4
Sp
OBSERVACIONES:
·
Comprobar si los cables están correctamente conectados a los bornes. Un
error de conexión puede provocar la interrupción o la deformación del
sonido, o provocar un cortocircuito que puede dañar el amplificador.
·
En caso de conexión de los cables de los altavoces con la polaridad
incorrecta, los tonos graves se escuchan atenuados en la reproducción de
una grabación estéreo, y se pierde la imagen estéreo que se sitúa,
normalmente, entre las dos cajas de altavoces.
LIMPIEZA DE LA CAJA DE ALTAVOCES
· Eliminar el polvo y la suciedad de la caja de altavoces con un paño suave.
· Si fuera necesaria una limpieza más completa, utilizar un paño suave
mojado en un detergente neutro diluido cinco a seis veces en agua, y
secar la superficie con otro paño. No aplicar sobre la caja ni utilizar a
proximidad disolventes, bencina, aerosoles y otros productos químicos que
podrían deteriorar la superficie.
DESMONTAJE Y MONTAJE DE LA
MALLA ACÚSTICA DELANTERA
La malla acústica delantera del sistema de altavoces puede desmontarse
de la siguiente manera:
1. Utilizar las dos manos y tirar hacia adelante, con cuidado, de la parte
superior de la malla.
2. De la misma manera tirar hacia adelante la parte inferior de la malla. La
malla completa puede entonces ser desmontada.
3. Para montar la malla en su lugar, coloque las salientes de las esquinas
de la malla en su posición en los altavoces y aprete con cuidado.
CARACTERÍSTICAS TÉCNICAS
Caja acústica .......................................... Tipo alto de reflejo de graves
(con protección magnética)
Sistema .......................................................... 3 vías, 3 unidades de altavoz
Unidades de altavoces
Altavoz de graves ............................................ Tipo cono de 20 cm
Altavoz de medios ............................................. Tipo cono de 8 cm
Altavoz de graves .............................................. Tipo cono de 4 cm
Impedancia nominal .................................................................................... 8
Gama de frecuencias ........................................................ 30-20000 Hz
Sensibilidad ........................................................... 88 dB/W a 1 m de distancia
Potencia máxima .................................................................................. 150 W
Dimensiones externas ......................... 240 X 900 X 250 mm (An X Al X Prf)
Peso ....................................................................................................... 10,7 kg
Accessories
Cables de altavoz ............................................................................................. 2
Fijadores metálicos ......................................................................................... 2
Tornillos ............................................................................................................ 4
Guía de operación
OBSERVACIÓN :
Nos reservamos el derecho de modificar las características y el diseño sin
previo aviso para mejorar el producto.
Publicado por Pioneer Corporation.
Copyright © 2005 Pioneer Corporation.
Todos los derechos reservados.
Español
5
ChH
·
·
·
8
4-16
6-16
·
]
]
CD
]
]
·
15
30
·
·
·
·
·
·
·
1.
2.
3.
4.