ORDER NO.
PIONEER CORPORATION 4-1, Meguro 1-chome, Meguro-ku, Tokyo 153-8654, Japan
PIONEER ELECTRONICS (USA) INC. P.O. Box 1760, Long Beach, CA 90801-1760, U.S.A.
PIONEER EUROPE NV Haven 1087, Keetberglaan 1, 9120 Melsele, Belgium
PIONEER ELECTRONICS ASIACENTRE PTE. LTD. 253 Alexandra Road, #04-01, Singapore 159936
PIONEER CORPORATION 2008
PDP-S65
RRV3732
T-ZZR APR. 2008 printerd in Japan
SPEAKER SYSTEM
PDP-S65
SXTW/E5
* Be careful in handling this product, because scratches on cabinet coating are easily
noticeable. When working on this unit, be sure to place the cabinet on a piece of
soft cloth for protection.
SERVICE PRECAUTIONS
2
PDP-S65
1
2
3
4
C
D
F
A
B
E
1
2
3
4
1. REASSEMBLY AND DISASSEMBLY PRECAUTIONS
Network ASSY
1
2
1
Input terminal
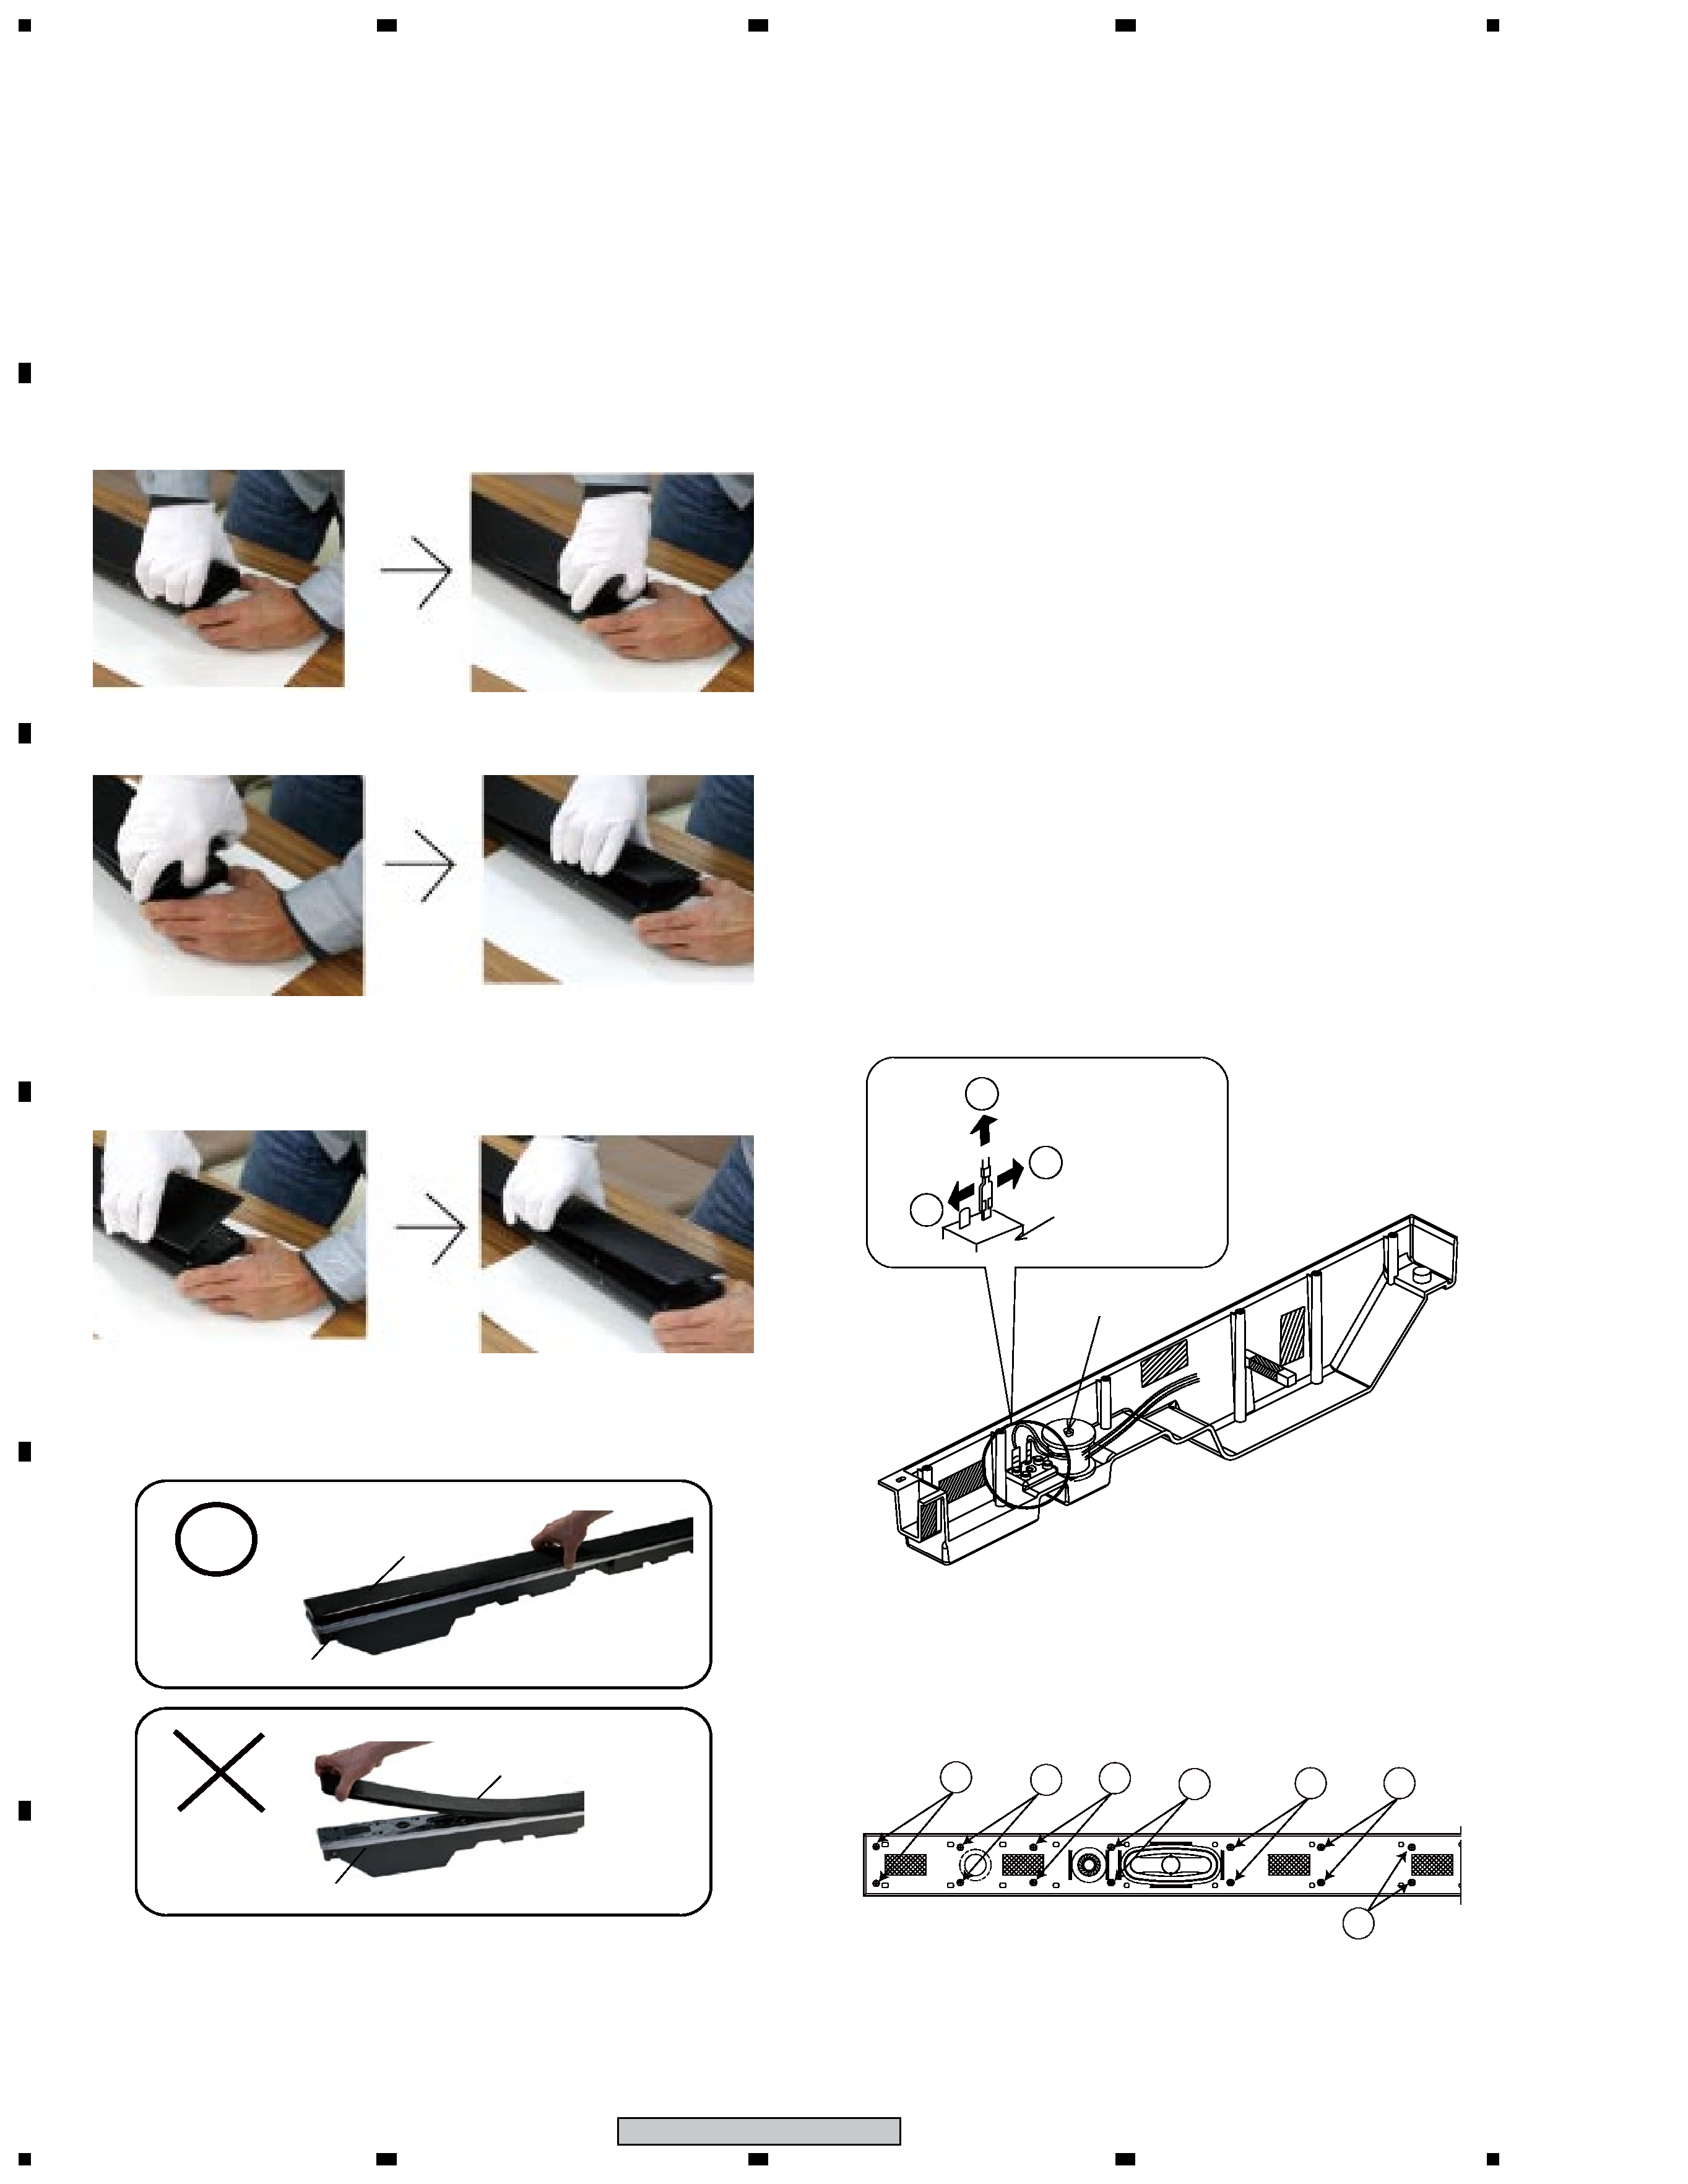
1.1 GRILLE ASSY
Baffle
5
6
7
4
3
2
1
Grille ASSY
Baffle
Grille ASSY
Baffle
OK
NG
1.2 WOOFER(Disassembly)
1.3 TWEETER(Disassembly)
Disassembly
Reasassembly
Baffle Assy(Caution)
Network Assy(Caution)
Reasassembly
Reasassembly
The Grille Assy is secured to the baffle plate with two-sided tape
and bosses. When removing the Grille Assy, it is necessary to
wear cotton gloves.
1. Insert the tip of your gloved finger into the gap between the
Grille Assy in front and the corner of the baffle plate so that the
Grille Assy is slightly lifted.
2. Insert the gloved finger to the extent of the second joint into the
gap between the cabinet and the Grille Assy.
3. Alternately and gradually lift the left and right sides of the Grill
Assy by about 5 cm, sliding gloved fingers along the cabinet.
When lifting the Grille Assy, be sure to lift the left and right sides
alternately, but not both sides simultaneously.
Note: Be careful not to bend the Grill Assy too far. Otherwise, it
may be damaged.
OK : Good example NG : Bad example
Remove the old two-sided tape attached to the rear side of the
Grille Assy and the front side of the Baffle, and adhere new two-
sided tape. Press the bosses into the baffle plate and press the
entire grille into position.
The woofer is secured to the baffle plate with four screws from the
inside. To remove the woofer, first remove the baffle plate.
When reassembling the woofer, place it so that its + terminal is
suitable for the inside. Tighten the screws to the baffle.
The tweeter is secured to the baffle plate with two screws from the
inside. To remove the tweeter, first remove the baffle plate.
When reassembling the tweeter, + terminal faces it aloft.
When removing the Network Assy, pull it out a little at a time
from alternate sides, because it is seated tightly.
When reassembling the cabinet L , R and the baffle plate, secure
the screws in the order shown in the figure below:
3
PDP-S65
5
6
7
8
5
6
7
8
C
D
F
A
B
E
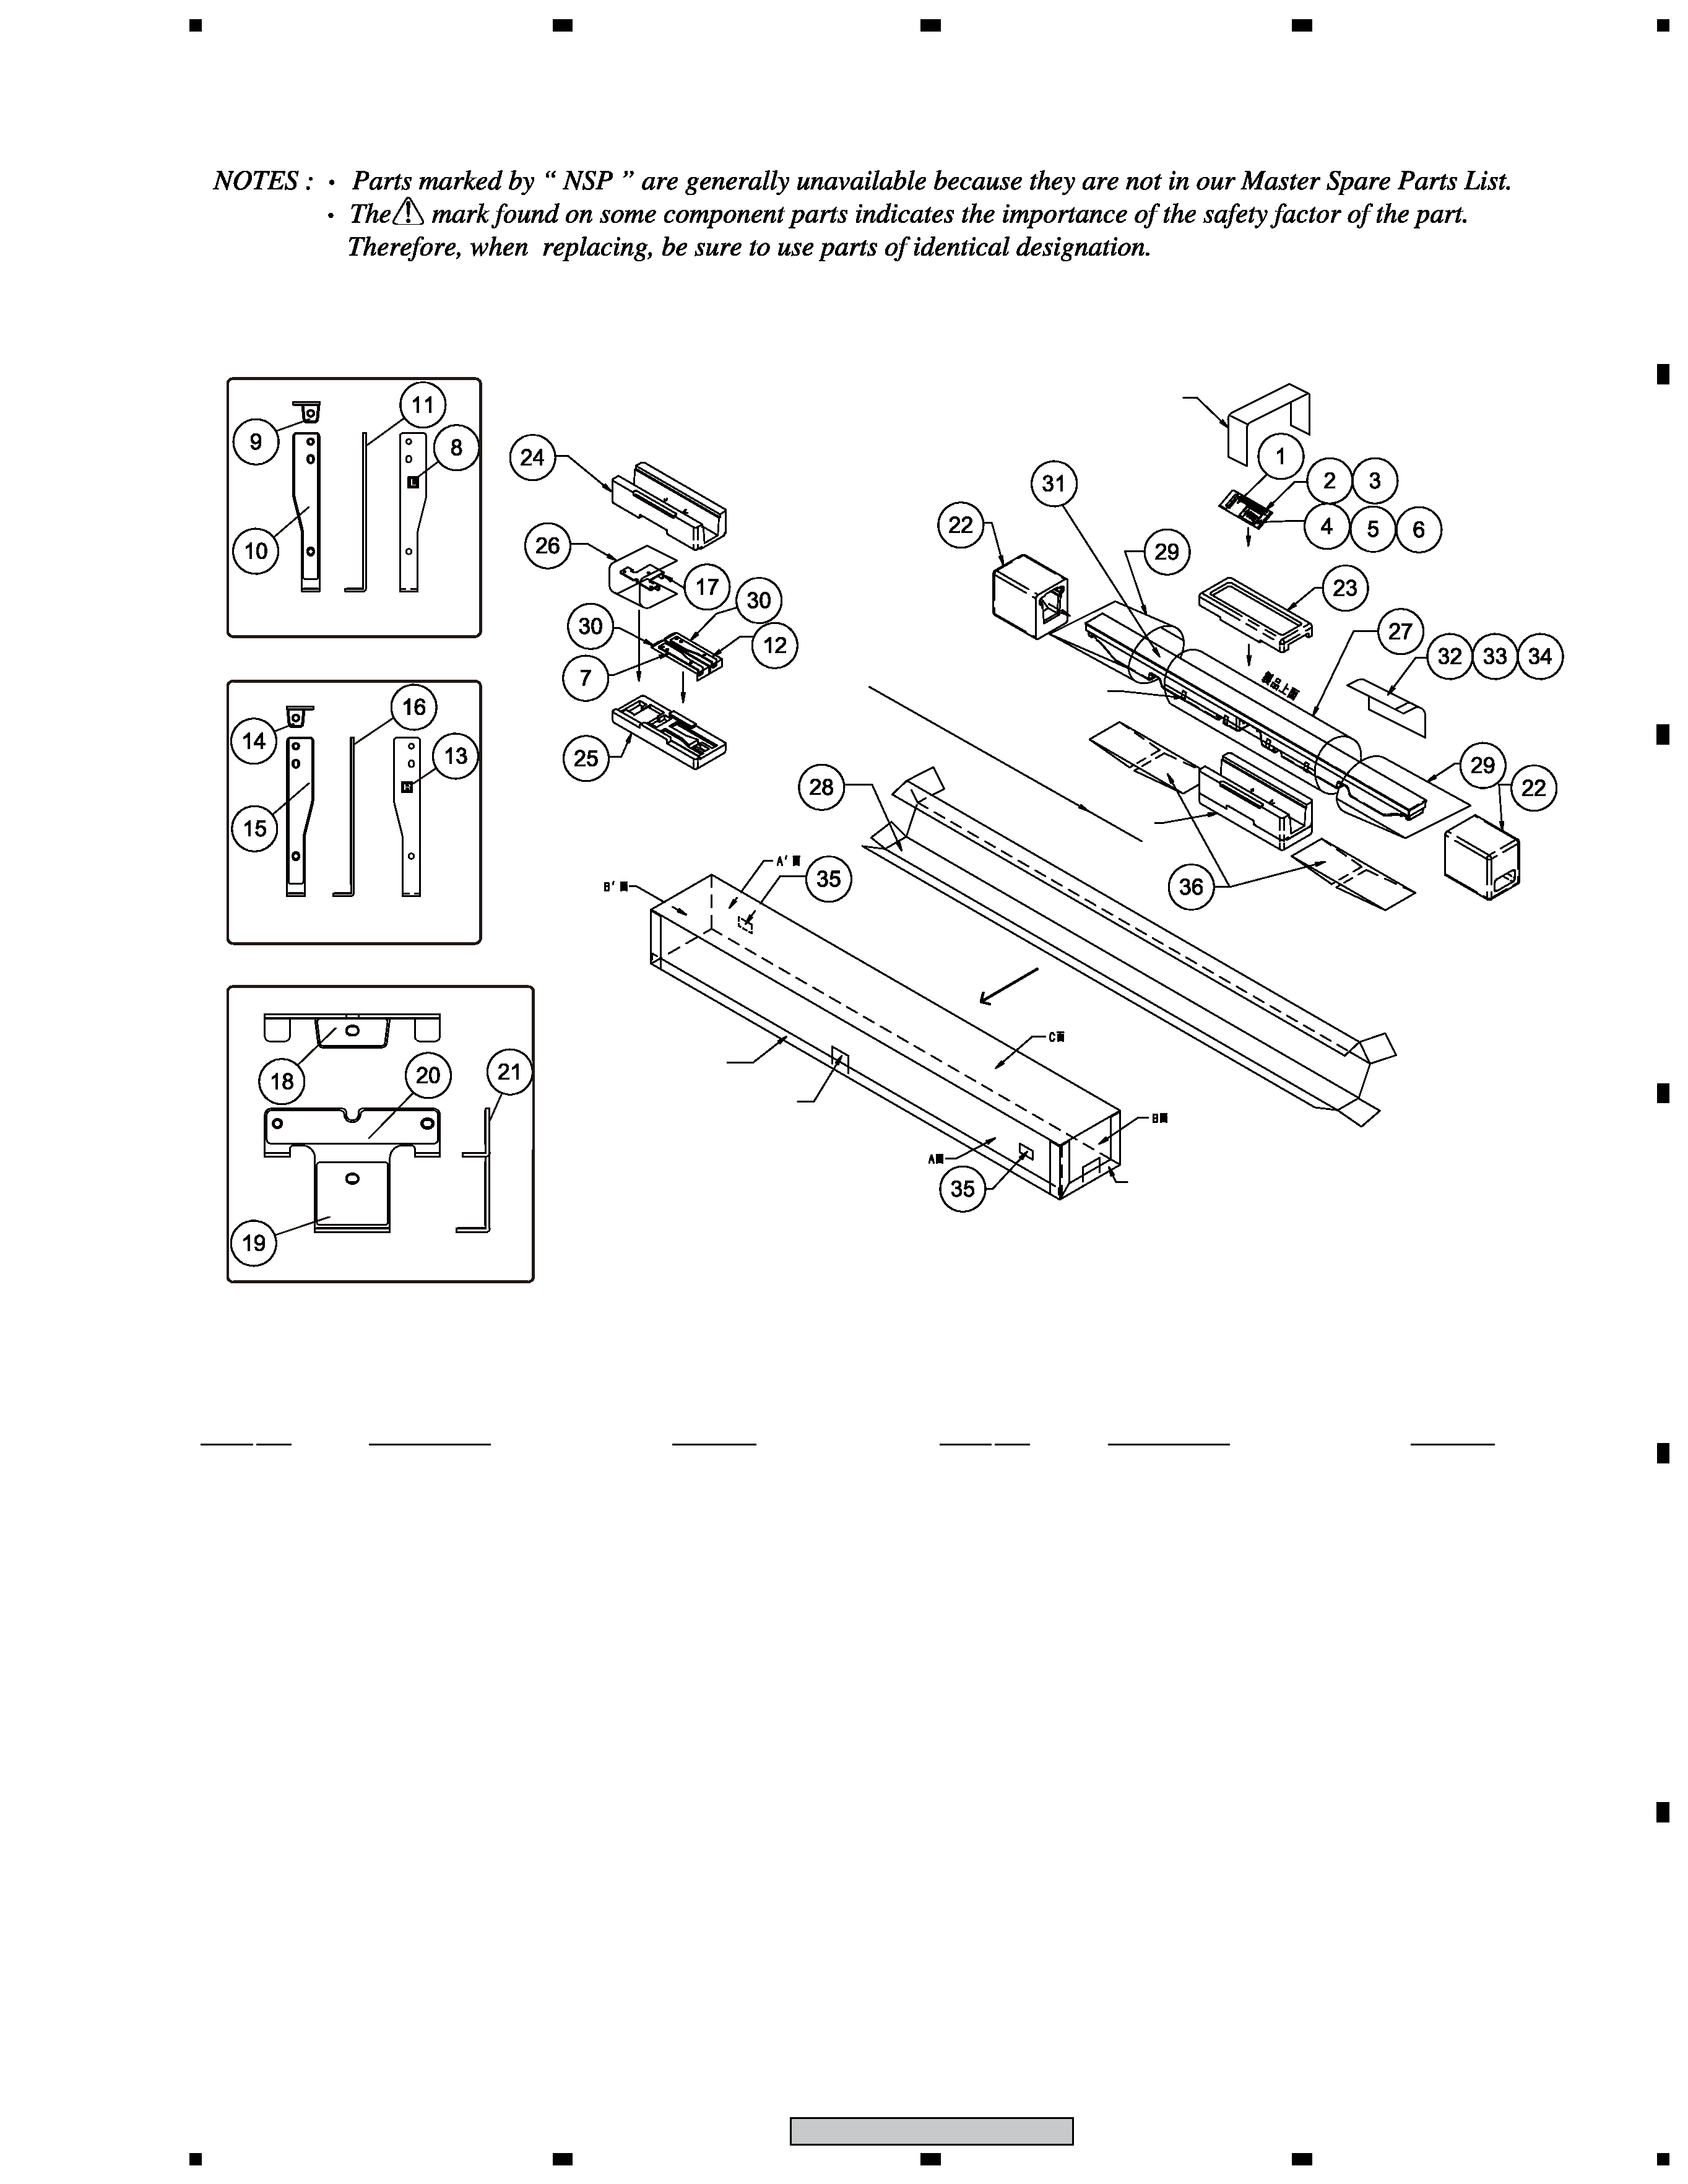
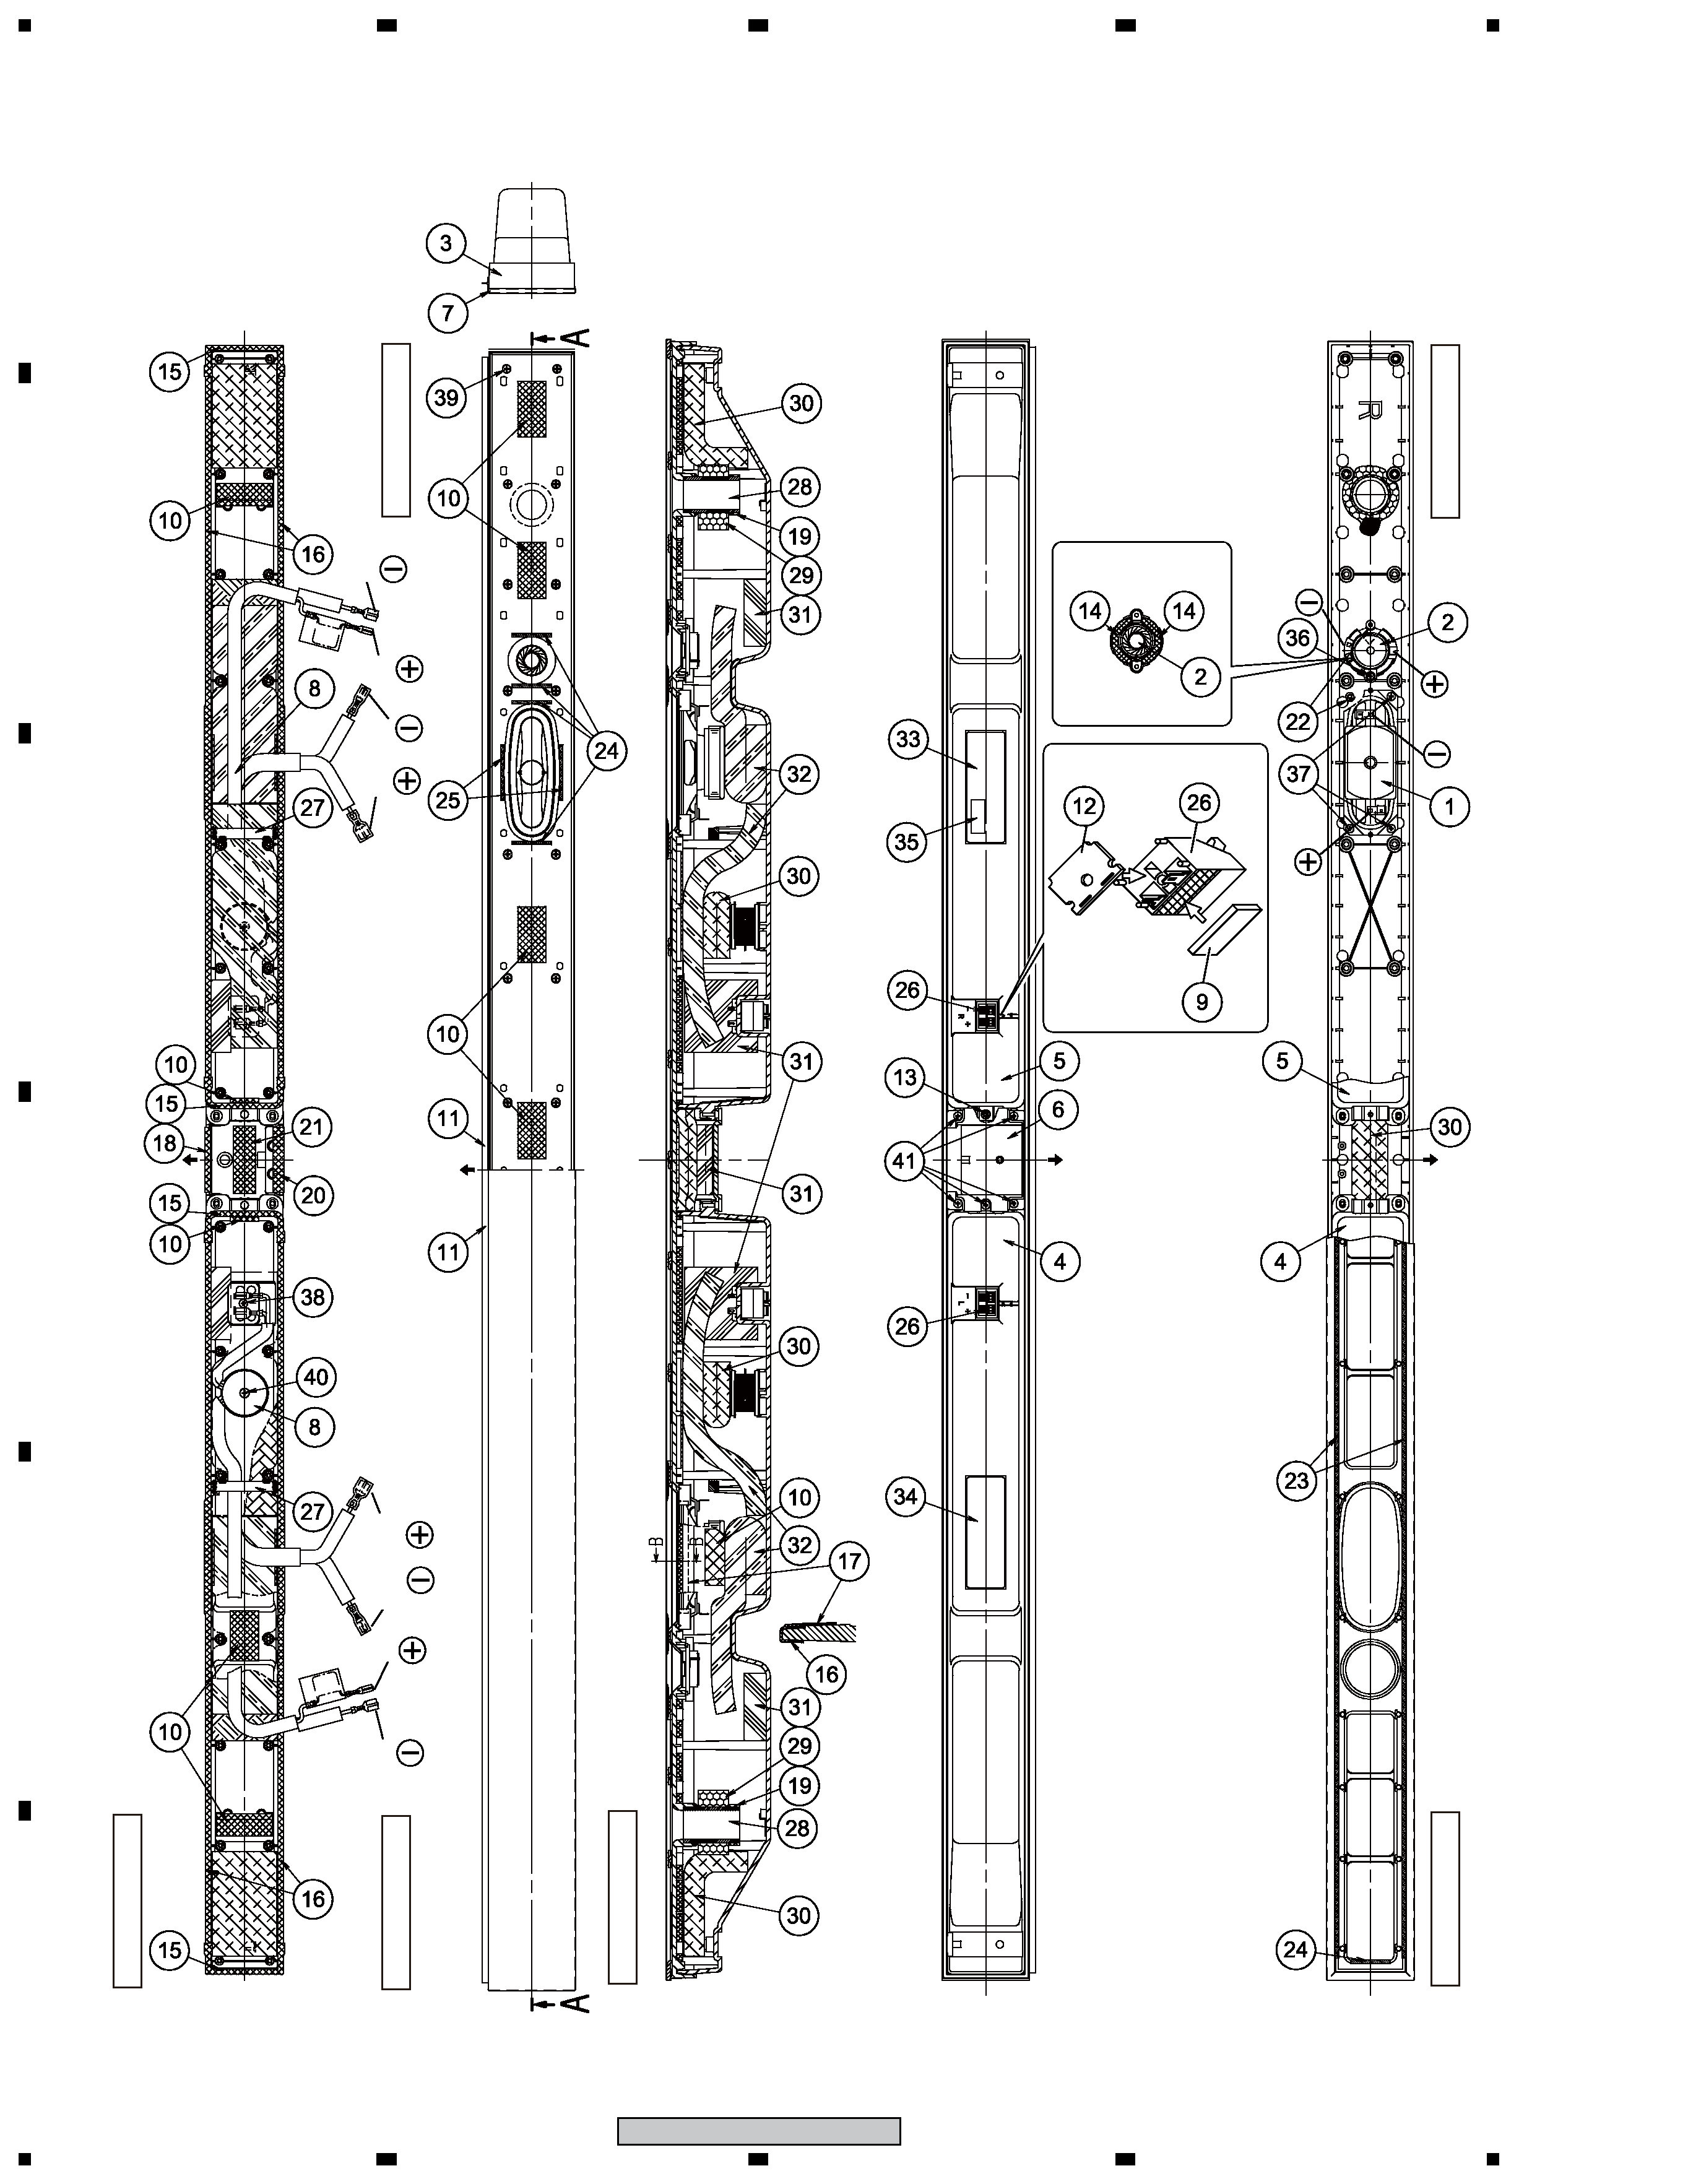
2. EXPLODED VIEWS AND PARTS LIST
2.1 PACKING
Accessory
Assy
Tape
Tape
Tape
Tape
Tape
Speaker System
No.17 Bracket Assy (C)
No.7 Bracket Assy (L)
No.12 Bracket Assy (R)
Front
Side
Back
Top
Front
Side
Back
Top
Front
Side
Top
NSP 1
1..Accessory Set
SME3854
2
2..Speaker Wire
SDS1202
3
2..Polyethylene Bag S1
SHL1439
NSP 4
2..Screws Set
SME3853
5
3..Cosmetic Screw (M5)
SBA1292
6
3..Polyethylene Bag S0
SHL1438
7
1..Bracket Assy (L)
SXG1173
NSP 8
2..Label (L)
SAK1024
9
2..Gasket
SED1191
10
2..Gasket
SED1192
NSP 11
2..Bracket (L)
SNA1503
12
1..Bracket Assy (R)
SXG1174
NSP 13
2..Label (R)
SAK1025
14
2..Gasket
SED1191
15
2..Gasket
SED1193
NSP 16
2..Bracket (R)
SNA1504
17
1..Bracket Assy (C)
SXG1175
18
2..Gasket
SED1194
19
2..Gasket
SED1195
PACKING Parts List
Mark No.
Description
Part No.
Mark No.
Description
Part No.
20
2..Gasket
SED1196
NSP 21
2..Bracket (C)
SNA1505
22
Protector (Side)
SHA2608
23
Protector (C-T)
SHA2609
24
Protector (C-M)
SHA2610
25
Protector (C-B)
SHA2611
26
Protection Sheet S1
SHC1869
27
Protection Sheet S3
SHC1876
28
Packing Case
SHG2814
29
Packing Bag S2
SHL1450
30
Polyethylene Bag S0
SHL1451
31
CS Assy
- - - - - - - -
NSP 32
1..Operating Inst. Set
SME3832
33
2..Polyethylene bag s2
SHL1437
34
2..Operating Instructions
SRD1358
(English, French, German,
Italian, Dutch, Spanish, Chinese)
NSP 35
Label Serial
SRW1112
NSP 36
lnner Carton Board
SHB1193
4
PDP-S65
1
2
3
4
C
D
F
A
B
E
1
2
3
4
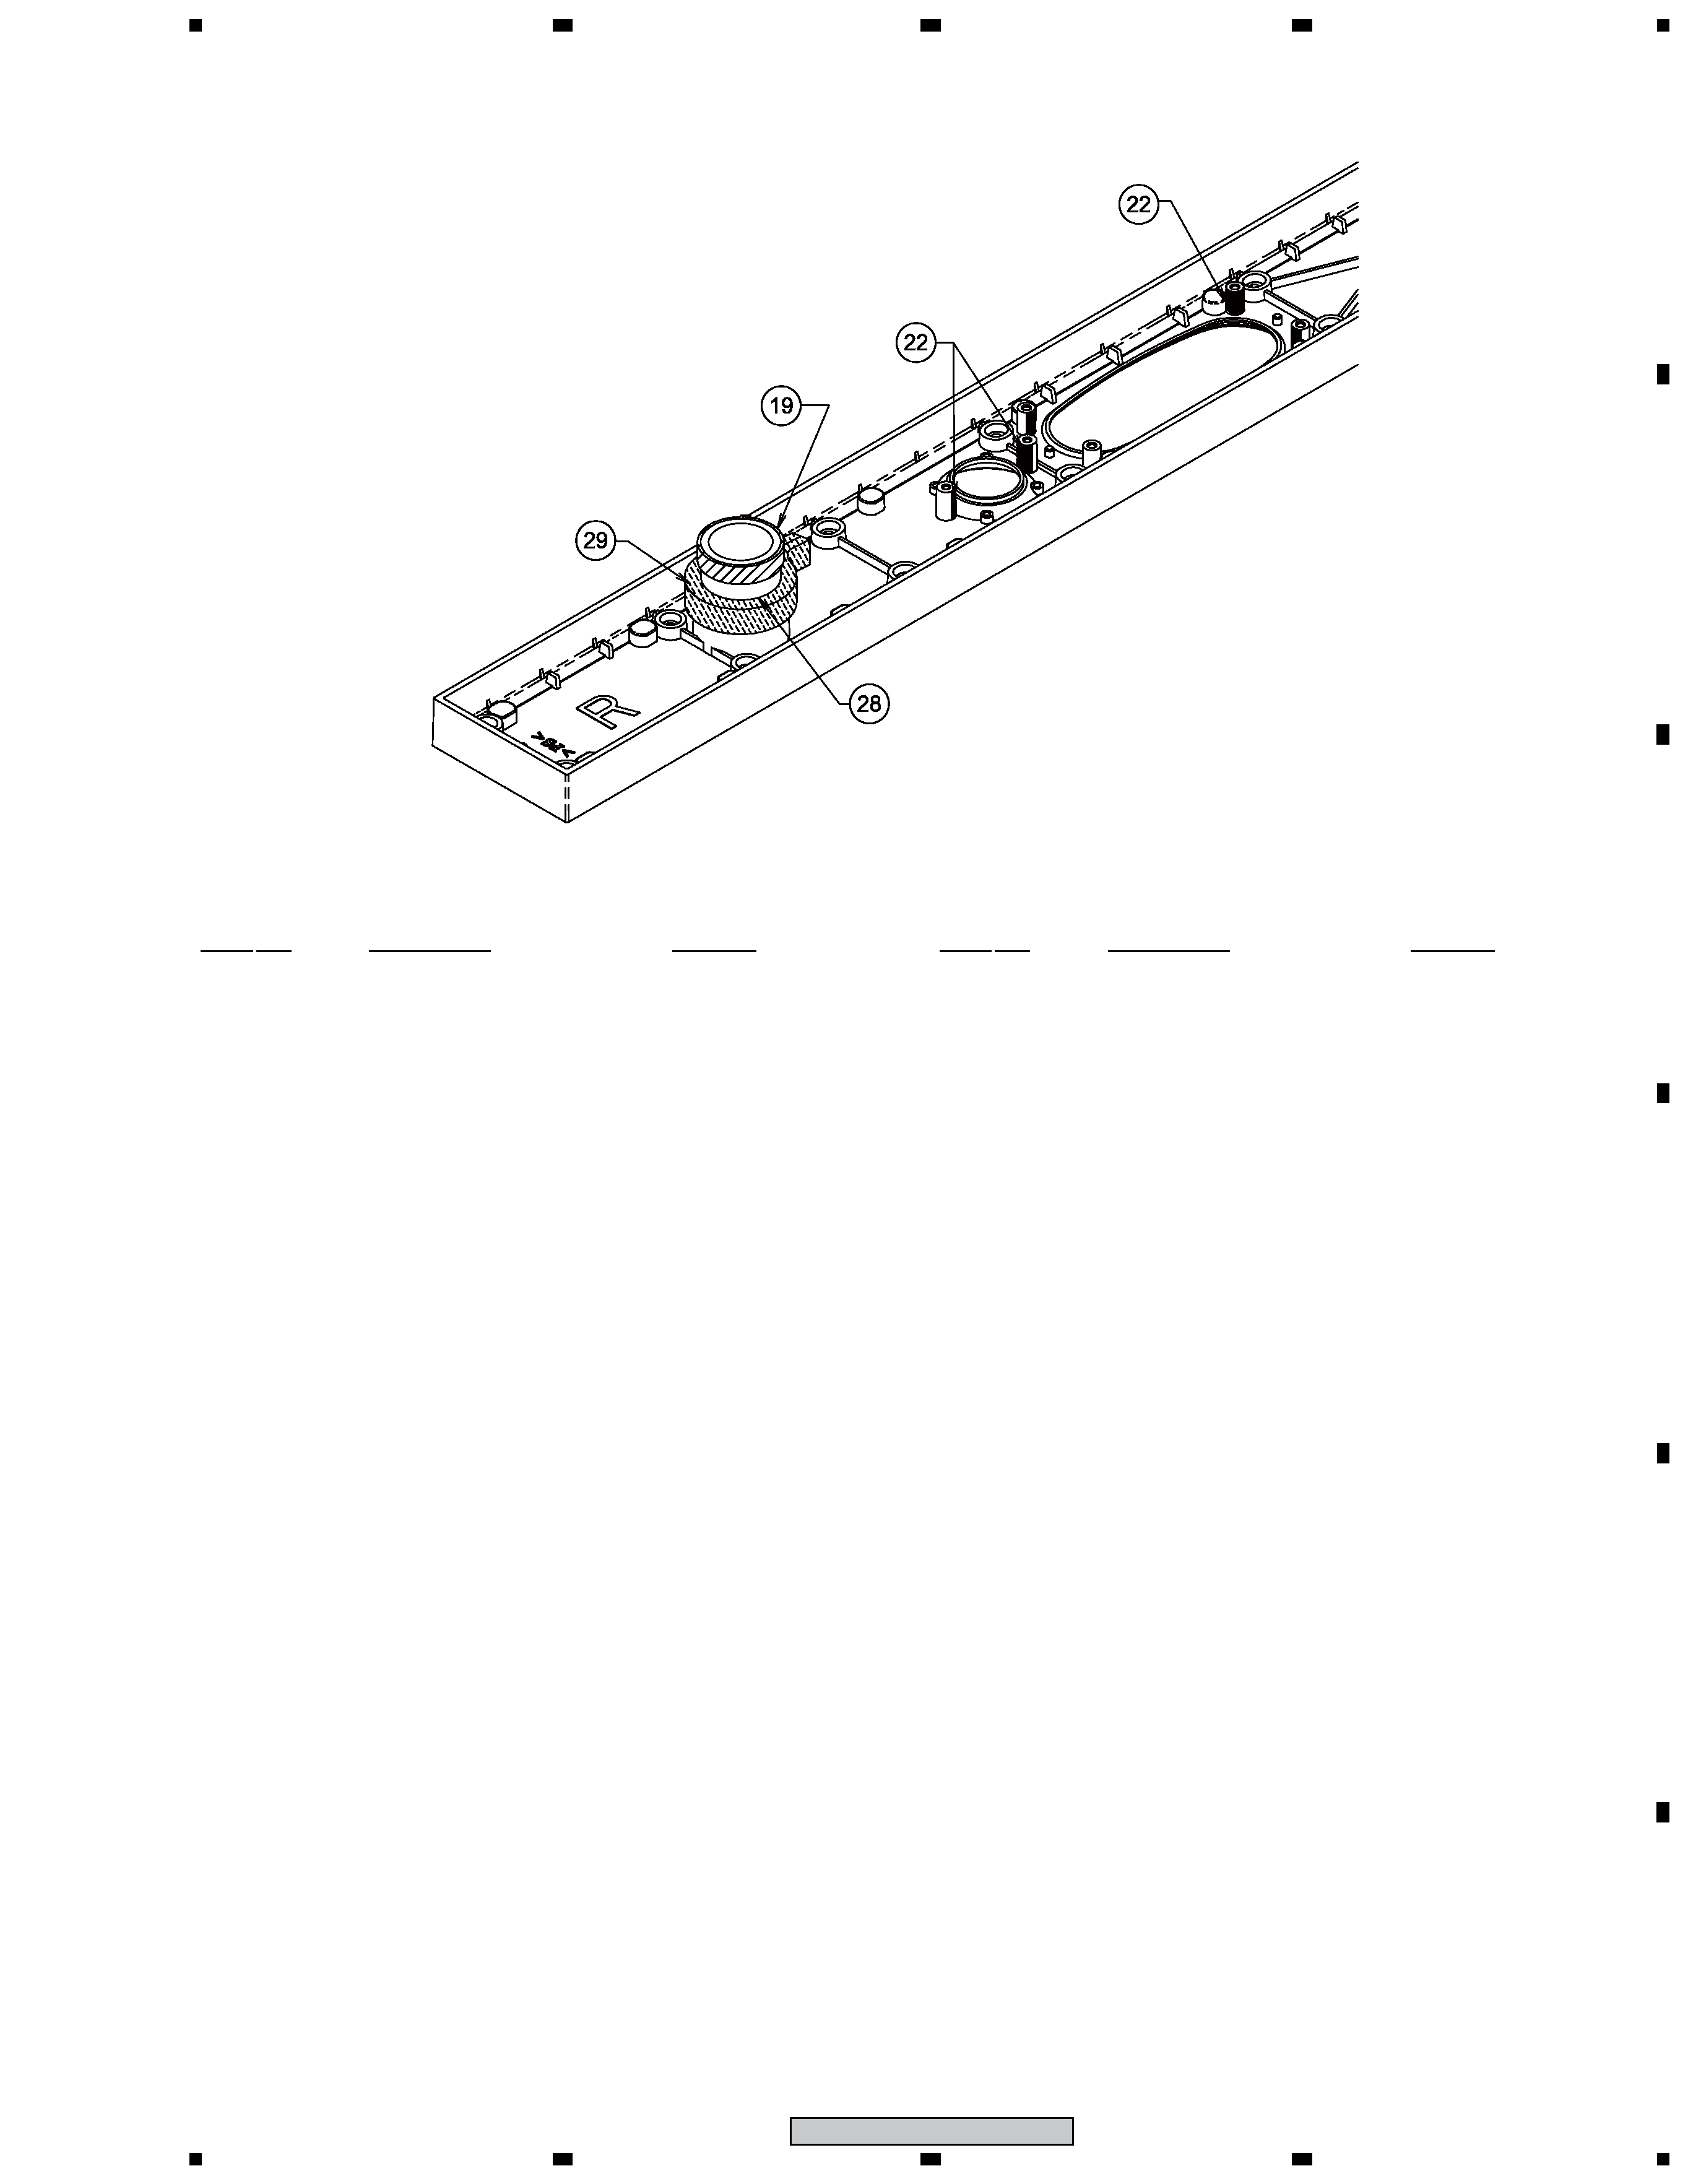
2.2 CS ASSY
Baffle
(bac
k)
Gr
ille
(bac
k)
Baffle
(F
ront)
Gr
ille
(F
ront)
Cabinet
(inside)
(T
op)
(T
op)
(T
op)
(T
op)
B-B
Inside
Outside
Section:
A
Tweeter
TW
WF
TW
WF
TW
TW
WF
WF
TW
WF
TW
WF
Input Terminal
5
PDP-S65
5
6
7
8
5
6
7
8
C
D
F
A
B
E
1
Speaker
H132DC65-53D
2
Speaker
FK26AP32-58H
NSP 3
Baffle
SNK3012
NSP 4
Cabinet Assy L
SXG1171
NSP 5
Cabinet Assy R
SXG1172
NSP 6
Cabinet Assy C
SXG1170
7
Grille
SMG1897
8
1..Network Assy
SWN1793
2..Capacitor 1.5
SCE1034
2..Choke Coil 0.47
STH1271
NSP 9
Gasket
SEB1299
NSP 10
Gasket
SEB1300
NSP 11
Blinder
SEB1328
NSP 12
Gasket
SEC2074
13
Gasket
SEC2076
14
Gasket
SEC2083
NSP 15
Gasket
SEC2201
NSP 16
Gasket
SEC2202
NSP 17
Gasket
SEC2203
NSP 18
Gasket
SEC2208
NSP 19
Gasket
SEC2229
NSP 20
Gasket
SEC2236
NSP 21
Felt
SED1127
NSP 22
Felt
SED1130
23
Tape
SEH1091
24
Tape
SEH1099
25
Tape
SEH1115
26
Input Terminal
SKX1098
NSP 27
MDF Bar
SLX1176
NSP 28
Paper Tube 26
SMR1403
NSP 29
Acoustic Absorbent
SMT1331
NSP 30
Acoustic Absorbent
SMT1333
NSP 31
Acoustic Absorbent
SMT1335
NSP 32
Acoustic Absorbent
SMT1359
NSP 33
Model Label
SAN4018
CS ASSY Parts List
Mark No.
Description
Part No.
BAFFLE
NSP 34
Caution Label
SRR1032
NSP 35
Label Serial
SRW1111
36
Screw
BPZ30P080FTC
37
Screw
BPZ35P080FTC
38
Screw
BPZ35P120FTC
39
Screw
BPZ35P140FTB
40
Screw
BPZ40P350FTC
41
Screw
SBA1291
Mark No.
Description
Part No.