
Owner's Manual
Manual de instrucciones
Bedienungsanleitung
Mode d'emploi
Manuale d'istruzioni
Handleiding
BRIDGEABLE TWO-CHANNEL POWER AMPLIFIER
AMPLIFICADOR DE POTENCIA DE DOS CANALES DE PUENTE
UBERBRUCKBARER 2-KANAL-LEISTUNGSVERSTARKER
AMPLIFICATEUR DE PUISSANCE PONTABLE A DEUX CANAUX
AMPLIFICATORE DI POTENZA BICANALE COLLEGABILE A PONTE
BRUGSCHAKELBARE TWEEKANAALS EINDVERSTERKER
GM-5400T
English
Español
Deutsch
Français
Italiano
Nederlands

Thank you for purchasing this PIONEER product.
Please read through this manual before using the product for the first time, to en-
sure proper use. After reading, please keep the manual in a safe and accessible place
for future reference.
Before you start
Visit our website
3
In case of trouble
3
Before connecting/installing the amplifier
3
Setting the Unit
What
's what 5
Setting gain properly
5
Connecting the units
Connection diagram
7
Before connecting the amplifier
7
About bridged mode
8
About suitable specification of speaker
8
Connecting the speakers
8
Connections when using the speaker input
wire
9
Connecting the power terminal
9
Connecting the speaker output
terminals
10
Installation
Before installing the amplifier
12
Example of installation on the floor mat or
chassis
12
Additional information
Specifications
13
Contents
En
2
If you want to dispose this product, do not mix
it with general household waste. There is a se-
parate collection system for used electronic
products in accordance with legislation that re-
quires proper treatment, recovery and recy-
cling.
Private households in the member states of
the EU, in Switzerland and Norway may return
their used electronic products free of charge
to designated collection facilities or to a retai-
ler (if you purchase a similar new one).
For countries not mentioned above, please
contact your local authorities for the correct
method of disposal.
By doing so you will ensure that your disposed
product undergoes the necessary treatment,
recovery and recycling and thus prevent po-
tential negative effects on the environment
and human health.
Visit our website
Visit us at the following site:
http://www.pioneer.co.uk
! Register your product. We will keep the de-
tails of your purchase on file to help you
refer to this information in the event of an
insurance claim such as loss or theft.
! We offer the latest information about
Pioneer Corporation on our website.
In case of trouble
Should this product fail to operate properly,
contact your dealer or nearest authorized
Pioneer Service Station.
Before connecting/
installing the amplifier
WARNING
! The use of a special red battery and ground
wire RD-223, available separately, is recom-
mended. Connect the battery wire directly to
the car battery positive terminal
+ and the
ground wire to the car body.
! This unit is for vehicles with a 12 V battery and
negative grounding. Before installing in re-
creational vehicles, trucks or buses, check the
battery voltage.
! Always use a fuse of the rating prescribed.
The use of an improper fuse could result in
overheating and smoke, damage to the pro-
duct and injury, including burns.
! Check the connections of the power supply
and speakers if the fuse of the separately sold
battery wire or the amplifier fuse blows. Deter-
mine and resolve the cause, then replace the
fuse with identical equivalent.
! Do not allow this unit to come into contact
with liquids. Electrical shock could result.
Also, damage to this unit, smoke, and over-
heating could result from contact with liquids.
The surfaces of the amplifier and any attached
speakers may also heat up and cause minor
burns.
! In the event of any abnormality, the power
supply to the amplifier is cut off to prevent
equipment malfunction. If this occurs, switch
the system power OFF and check the power
supply and speaker connections. If you are un-
able to determine the cause, please contact
your dealer.
Before you start
En
3
English
Section
01

! Always disconnect the negative * terminal of
the battery beforehand to avoid the risk of
electric shock or short circuit during installa-
tion.
CAUTION
! Always keep the volume low enough so that
you can hear sounds from outside the vehicle.
! Extended use of the car stereo while the en-
gine is at rest or idling may exhaust the
battery.
Before you start
En
4
Section
01
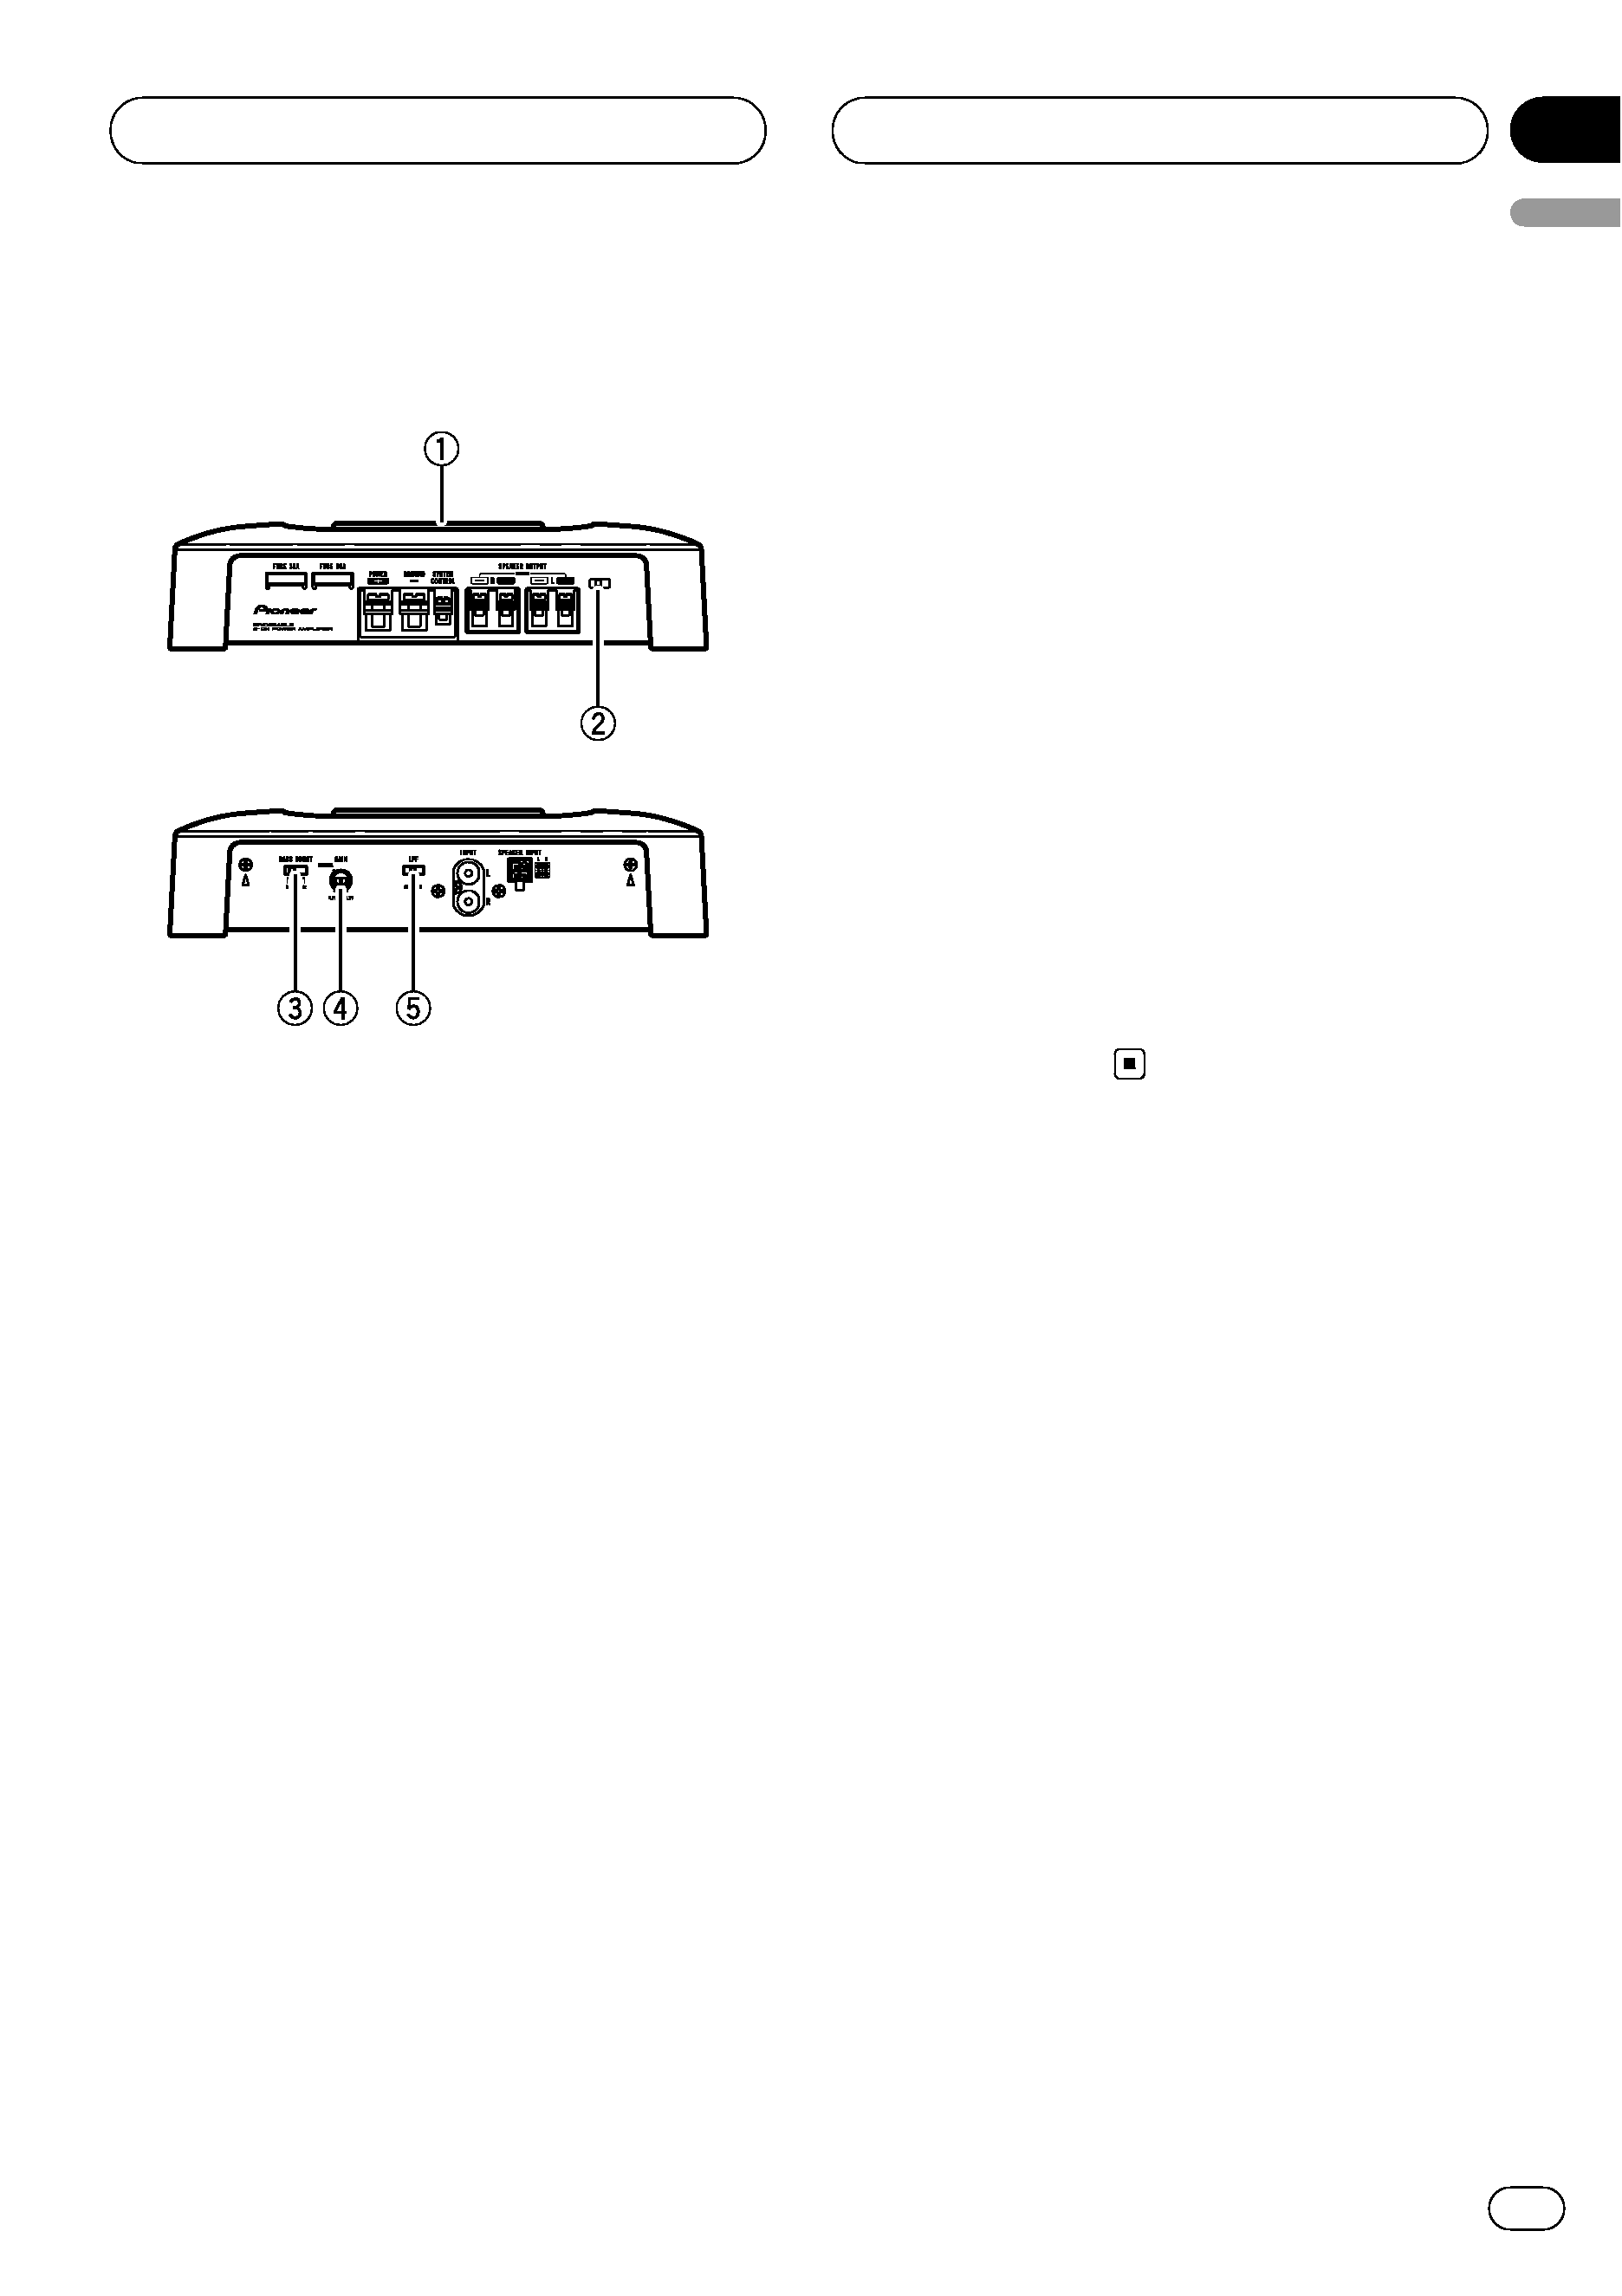
What
's what
Front side
Rear side
To adjust the switch, use a flathead screwdri-
ver if needed.
1 Power indicator
The power indicator lights up to indicate
power ON.
2 BFC (beat frequency control) switch
Located front side the unit. If beats are audi-
ble while listening to MW/LW broadcasts via
car stereo, change the
BFC switch using a
small flathead screwdriver.
3 BASS BOOST (bass boost level control)
switch
You can select a bass boost level from 0 dB,
6 dB and 12 dB.
4 GAIN (gain) control
If output remains low, even when the car
stereo volume is turned up, turn controls to
lower level. If distortion occurs when the car
stereo volume is turned up, turn these con-
trols to higher level.
! For use with an RCA equipped car stereo
(standard output of 500 mV), set to the
NORMAL position. For use with an RCA
equipped Pioneer car stereo, with max.
output of 4 V or more, adjust level to
match that of the car stereo output.
! If you hear too much noise when using
the speaker input terminals, turn the
gain control to higher level.
5 LPF (low-pass filter) switch
Switch the settings based on the connected
speaker.
! When the Subwoofer is connected:
Select
ON. This eliminates high range
frequency and outputs low range fre-
quency.
! When the full range speaker is con-
nected:
Select
OFF. OFF outputs the entire fre-
quency range.
Setting gain properly
! Protective function included to prevent
malfunction of the unit and/or speakers
due to excessive output, improper use or
improper connection.
! When outputting high volume sound etc.,
this function cuts off the output for a few
seconds as a normal function, but output
is restored when the volume of the head
unit is turned down.
! A cut in sound output may indicate impro-
per setting of the gain control. To ensure
continuous sound output with the head
unit at a high volume, set amplifier gain
control to a level appropriate for the preout
maximum output level of the head unit, so
that volume can remain unchanged and to
control excess output.
! Despite correct volume and gain settings,
the unit sound still cuts out periodically. In
such cases, please contact the nearest
authorized Pioneer Service Station.
Setting the Unit
En
5
English
Section
02