DVD Player
DV-510K-S
DV-410V-S
DV-410V-K
DV-310-S
DV-310-K
DV-210K-K
Operating Instructions
DV510K_IBD_EN.book
1
2
En
Thank you for buying this Pioneer product.
Please read through these operating instructions so you will know how to operate your model properly.
After you have finished reading the instructions, put them away in a safe place for future reference.
The exclamation point within an equilateral
triangle is intended to alert the user to the
presence of important operating and
maintenance (servicing) instructions in the
literature accompanying the appliance.
The lightning flash with arrowhead symbol,
within an equilateral triangle, is intended to
alert the user to the presence of uninsulated
"dangerous voltage" within the product's
enclosure that may be of sufficient
magnitude to constitute a risk of electric
shock to persons.
CAUTION:
TO PREVENT THE RISK OF ELECTRIC
SHOCK, DO NOT REMOVE COVER (OR
BACK). NO USER-SERVICEABLE PARTS
INSIDE. REFER SERVICING TO QUALIFIED
SERVICE PERSONNEL.
CAUTION
RISK OF ELECTRIC SHOCK
DO NOT OPEN
IMPORTANT
D3-4-2-1-1_En-A
CAUTION
This product is a class 1 laser product, but this
product contains a laser diode higher than Class 1.
To ensure continued safety, do not remove any
covers or attempt to gain access to the inside of the
product.
Refer all servicing to qualified personnel.
The following caution label appears on your unit.
Location: inside of the unit
CLASS 1
LASER PRODUCT
D3-4-2-1-8_B_En
Singapore and Taiwanese model only
WARNING
This equipment is not waterproof. To prevent a fire
or shock hazard, do not place any container filled
with liquid near this equipment (such as a vase or
flower pot) or expose it to dripping, splashing, rain
or moisture.
D3-4-2-1-3_B_En
WARNING
The voltage of the available power supply differs
according to country or region. Be sure that the
power supply voltage of the area where this unit
will be used meets the required voltage (e.g., 230 V
or 120 V) written on the rear panel.
D3-4-2-1-4_A_En
Before plugging in for the first time, read the following
section carefully.
Operating Environment
Operating environment temperature and humidity:
+5 ºC to +35 ºC (+41 ºF to +95 ºF); less than 85 %RH
(cooling vents not blocked)
Do not install this unit in a poorly ventilated area, or in
locations exposed to high humidity or direct sunlight (or
strong artificial light)
D3-4-2-1-7c_A_En
WARNING
To prevent a fire hazard, do not place any naked
flame sources (such as a lighted candle) on the
equipment.
D3-4-2-1-7a_A_En
VENTILATION CAUTION
When installing this unit, make sure to leave
space around the unit for ventilation to improve
heat radiation (at least 10 cm at top, 10 cm at
rear, and 10 cm at each side).
WARNING
Slots and openings in the cabinet are provided for
ventilation to ensure reliable operation of the
product, and to protect it from overheating. To
prevent fire hazard, the openings should never be
blocked or covered with items (such as
newspapers, table-cloths, curtains) or by
operating the equipment on thick carpet or a bed.
D3-4-2-1-7b_A_En
DV510K_IBD_EN.book
2

3
En
NOTE: This equipment has been tested and found to comply with the limits for a Class B digital device, pursuant to
Part 15 of the FCC Rules. These limits are designed to provide reasonable protection against harmful interference in
a residential installation. This equipment generates, uses, and can radiate radio frequency energy and, if not
installed and used in accordance with the instructions, may cause harmful interference to radio communications.
However, there is no guarantee that interference will not occur in a particular installation. If this equipment does
cause harmful interference to radio or television reception, which can be determined by turning the equipment off
and on, the user is encouraged to try to correct the interference by one or more of the following measures:
Reorient or relocate the receiving antenna.
Increase the separation between the equipment and receiver.
Connect the equipment into an outlet on a circuit different from that to which the receiver is connected.
Consult the dealer or an experienced radio/TV technician for help.
D8-10-1-2_En
CAUTION: This product satisfies FCC regulations when shielded cables and connectors are used to connect the
unit to other equipment. To prevent electromagnetic interference with electric appliances such as radios and
televisions, use shielded cables and connectors for connections.
D8-10-3a_En
Information to User
Alteration or modifications carried out without appropriate authorization may invalidate the user's right to operate
the equipment.
D8-10-2_En
CAUTION : USE OF CONTROLS OR ADJUSTMENTS OR PERFORMANCE OF PROCEDURES OTHER THAN THOSE
SPECIFIED HEREIN MAY RESULT IN HAZARDOUS RADIATION EXPOSURE.
CAUTION : THE USE OF OPTICAL INSTRUMENTS WITH THIS PRODUCT WILL INCREASE EYE HAZARD. D6-8-2-1_En
If the AC plug of this unit does not match the AC
outlet you want to use, the plug must be removed
and appropriate one fitted. Replacement and
mounting of an AC plug on the power supply cord of
this unit should be performed only by qualified
service personnel. If connected to an AC outlet, the
cut-off plug can cause severe electrical shock. Make
sure it is properly disposed of after removal.
The equipment should be disconnected by removing
the mains plug from the wall socket when left
unused for a long period of time (for example, when
on vacation).
D3-4-2-2-1a_A_En
CAUTION
The
STANDBY/ON switch on this unit will not
completely shut off all power from the AC outlet.
Since the power cord serves as the main disconnect
device for the unit, you will need to unplug it from
the AC outlet to shut down all power. Therefore,
make sure the unit has been installed so that the
power cord can be easily unplugged from the AC
outlet in case of an accident. To avoid fire hazard,
the power cord should also be unplugged from the
AC outlet when left unused for a long period of time
(for example, when on vacation).
D3-4-2-2-2a_A_En
This product is for general household purposes. Any
failure due to use for other than household purposes
(such as long-term use for business purposes in a
restaurant or use in a car or ship) and which
requires repair will be charged for even during the
warranty period.
K041_En
POWER-CORD CAUTION
Handle the power cord by the plug. Do not pull out the
plug by tugging the cord and never touch the power
cord when your hands are wet as this could cause a
short circuit or electric shock. Do not place the unit, a
piece of furniture, etc., on the power cord, or pinch the
cord. Never make a knot in the cord or tie it with other
cords. The power cords should be routed such that they
are not likely to be stepped on. A damaged power cord
can cause a fire or give you an electrical shock. Check
the power cord once in a while. When you find it
damaged, ask your nearest PIONEER authorized
service center or your dealer for a replacement.
S002_En
This product incorporates copyright protection
technology that is protected by method claims of
certain U.S. patents and other intellectual property
rights owned by Macrovision Corporation and other
rights owners. Use of this copyright protection
technology must be authorized by Macrovision
Corporation, and is intended for home and other
limited viewing uses only unless otherwise authorized
by Macrovision Corporation. Reverse engineering or
disassembly is prohibited.
This product includes FontAvenue® fonts licenced by
NEC Corporation. FontAvenue is a registered
trademark of NEC Corporation.
For Australia Model
For Taiwan exclusively
Taiwanese two pin flat-bladed plug
K056_En
DV510K_IBD_EN.book
3

4
En
Contents
01 Before you start
Features
. . . . . . . . . . . . . . . . . . . . . . . . . . . . 5
What's in the box
. . . . . . . . . . . . . . . . . . . . . 5
Hints on installation
. . . . . . . . . . . . . . . . . . 6
Disc/content format playback
compatibility
. . . . . . . . . . . . . . . . . . . . . . . . 6
02 Connections
Easy connections
. . . . . . . . . . . . . . . . . . . . 10
Connecting using the S-Video output
. . . . 11
Connecting using the component video
output
. . . . . . . . . . . . . . . . . . . . . . . . . . . . 11
Connecting to an AV receiver
. . . . . . . . . . . 12
Connecting using HDMI
. . . . . . . . . . . . . . 13
03 Controls and displays
Front panel
. . . . . . . . . . . . . . . . . . . . . . . . 15
Remote control
. . . . . . . . . . . . . . . . . . . . . 16
04 Getting started
Switching on
. . . . . . . . . . . . . . . . . . . . . . . 17
Using the on-screen displays
. . . . . . . . . . . 17
Setting up the player for your TV
. . . . . . . . 18
Setting the language of this player's on-screen
displays
. . . . . . . . . . . . . . . . . . . . . . . . . . . 18
Playing discs
. . . . . . . . . . . . . . . . . . . . . . . 19
Singing Your Favorite Songs Along with
Karaoke Discs
. . . . . . . . . . . . . . . . . . . . . . 22
05 Playing discs
Scanning discs
. . . . . . . . . . . . . . . . . . . . . 24
Playing in slow motion
. . . . . . . . . . . . . . . . 24
Frame advance/frame reverse
. . . . . . . . . . 25
Viewing a JPEG slideshow
. . . . . . . . . . . . . 25
Browsing Discs with the
Disc Navigator
. . . . . . . . . . . . . . . . . . . . . . 26
Browsing Files with the
Disc Navigator
. . . . . . . . . . . . . . . . . . . . . . 26
Looping a section of a disc
. . . . . . . . . . . . 27
Using repeat play
. . . . . . . . . . . . . . . . . . . . 28
Using random play
. . . . . . . . . . . . . . . . . . 28
Creating a program list
. . . . . . . . . . . . . . . 29
Searching a disc
. . . . . . . . . . . . . . . . . . . . 30
Switching subtitles
. . . . . . . . . . . . . . . . . . 30
Switching audio language/channels
. . . . . 31
Zooming the screen
. . . . . . . . . . . . . . . . . . 31
Switching camera angles
. . . . . . . . . . . . . .31
Displaying disc information
. . . . . . . . . . . .31
06 USB playback
Using the USB interface
. . . . . . . . . . . . . . .32
07 Audio Settings and Video Adjust
menus
Audio Settings menu
. . . . . . . . . . . . . . . . .33
Video Adjust menu
. . . . . . . . . . . . . . . . . . .34
08 Initial Settings menu
Using the Initial Settings menu
. . . . . . . . . .35
Digital Audio Out settings
. . . . . . . . . . . . . .35
Video Output settings
. . . . . . . . . . . . . . . . .36
Language settings
. . . . . . . . . . . . . . . . . . .37
Display settings
. . . . . . . . . . . . . . . . . . . . .38
Options settings
. . . . . . . . . . . . . . . . . . . . .38
Parental Lock
. . . . . . . . . . . . . . . . . . . . . . .39
DTS Downmix
. . . . . . . . . . . . . . . . . . . . . . .40
About DivX® VOD content
. . . . . . . . . . . . .40
About the HDMI audio output settings
. . . .41
09 Additional information
Taking care of your player and discs
. . . . . .42
Screen sizes and disc formats
. . . . . . . . . .43
Setting the TV system
. . . . . . . . . . . . . . . . .44
Resetting the player
. . . . . . . . . . . . . . . . . .44
DVD-Video regions
. . . . . . . . . . . . . . . . . . .44
Selecting languages using the language code
list
. . . . . . . . . . . . . . . . . . . . . . . . . . . . . . . .44
Troubleshooting
. . . . . . . . . . . . . . . . . . . . .45
Glossary
. . . . . . . . . . . . . . . . . . . . . . . . . . .49
Language code list
. . . . . . . . . . . . . . . . . . .50
Country/Area code list
. . . . . . . . . . . . . . . .50
Specifications
. . . . . . . . . . . . . . . . . . . . . . .51
DV510K_IBD_EN.book
4
01
5
En
Chapter 1
Before you start
Features
·
PureCinema Progressive Scan video
When connected to a progressive
scan-compatible TV or monitor using the
component video outputs, you can enjoy
extremely stable, flicker free images, with the
same frame refresh rate as the original movie.
·
24-bit/96 kHz compatible DAC
The integrated 24-bit/96 kHz DAC means that
this player is compatible with high
sampling-rate discs, capable of delivering
exceptional sound quality in terms of dynamic
range, low-level resolution and high-frequency
detail.
What's in the box
Please confirm that the following accessories
are in the box when you open it.
· Remote control
· AA/R6P dry cell batteries x 2
· Audio/video cable (red/white/yellow plugs)
· Power cable (Central American, South
American and Taiwan model x2)
· Operating instructions x 2 (Australian,
Thailand and PX model x 1)
· Front panel button names sticker (Taiwan
models only) Chinese language button
names for the front panel controls.
· Remote control overlay (Taiwan models
only) Place the overlay on the remote
control to be able to read the buttons in
Chinese.
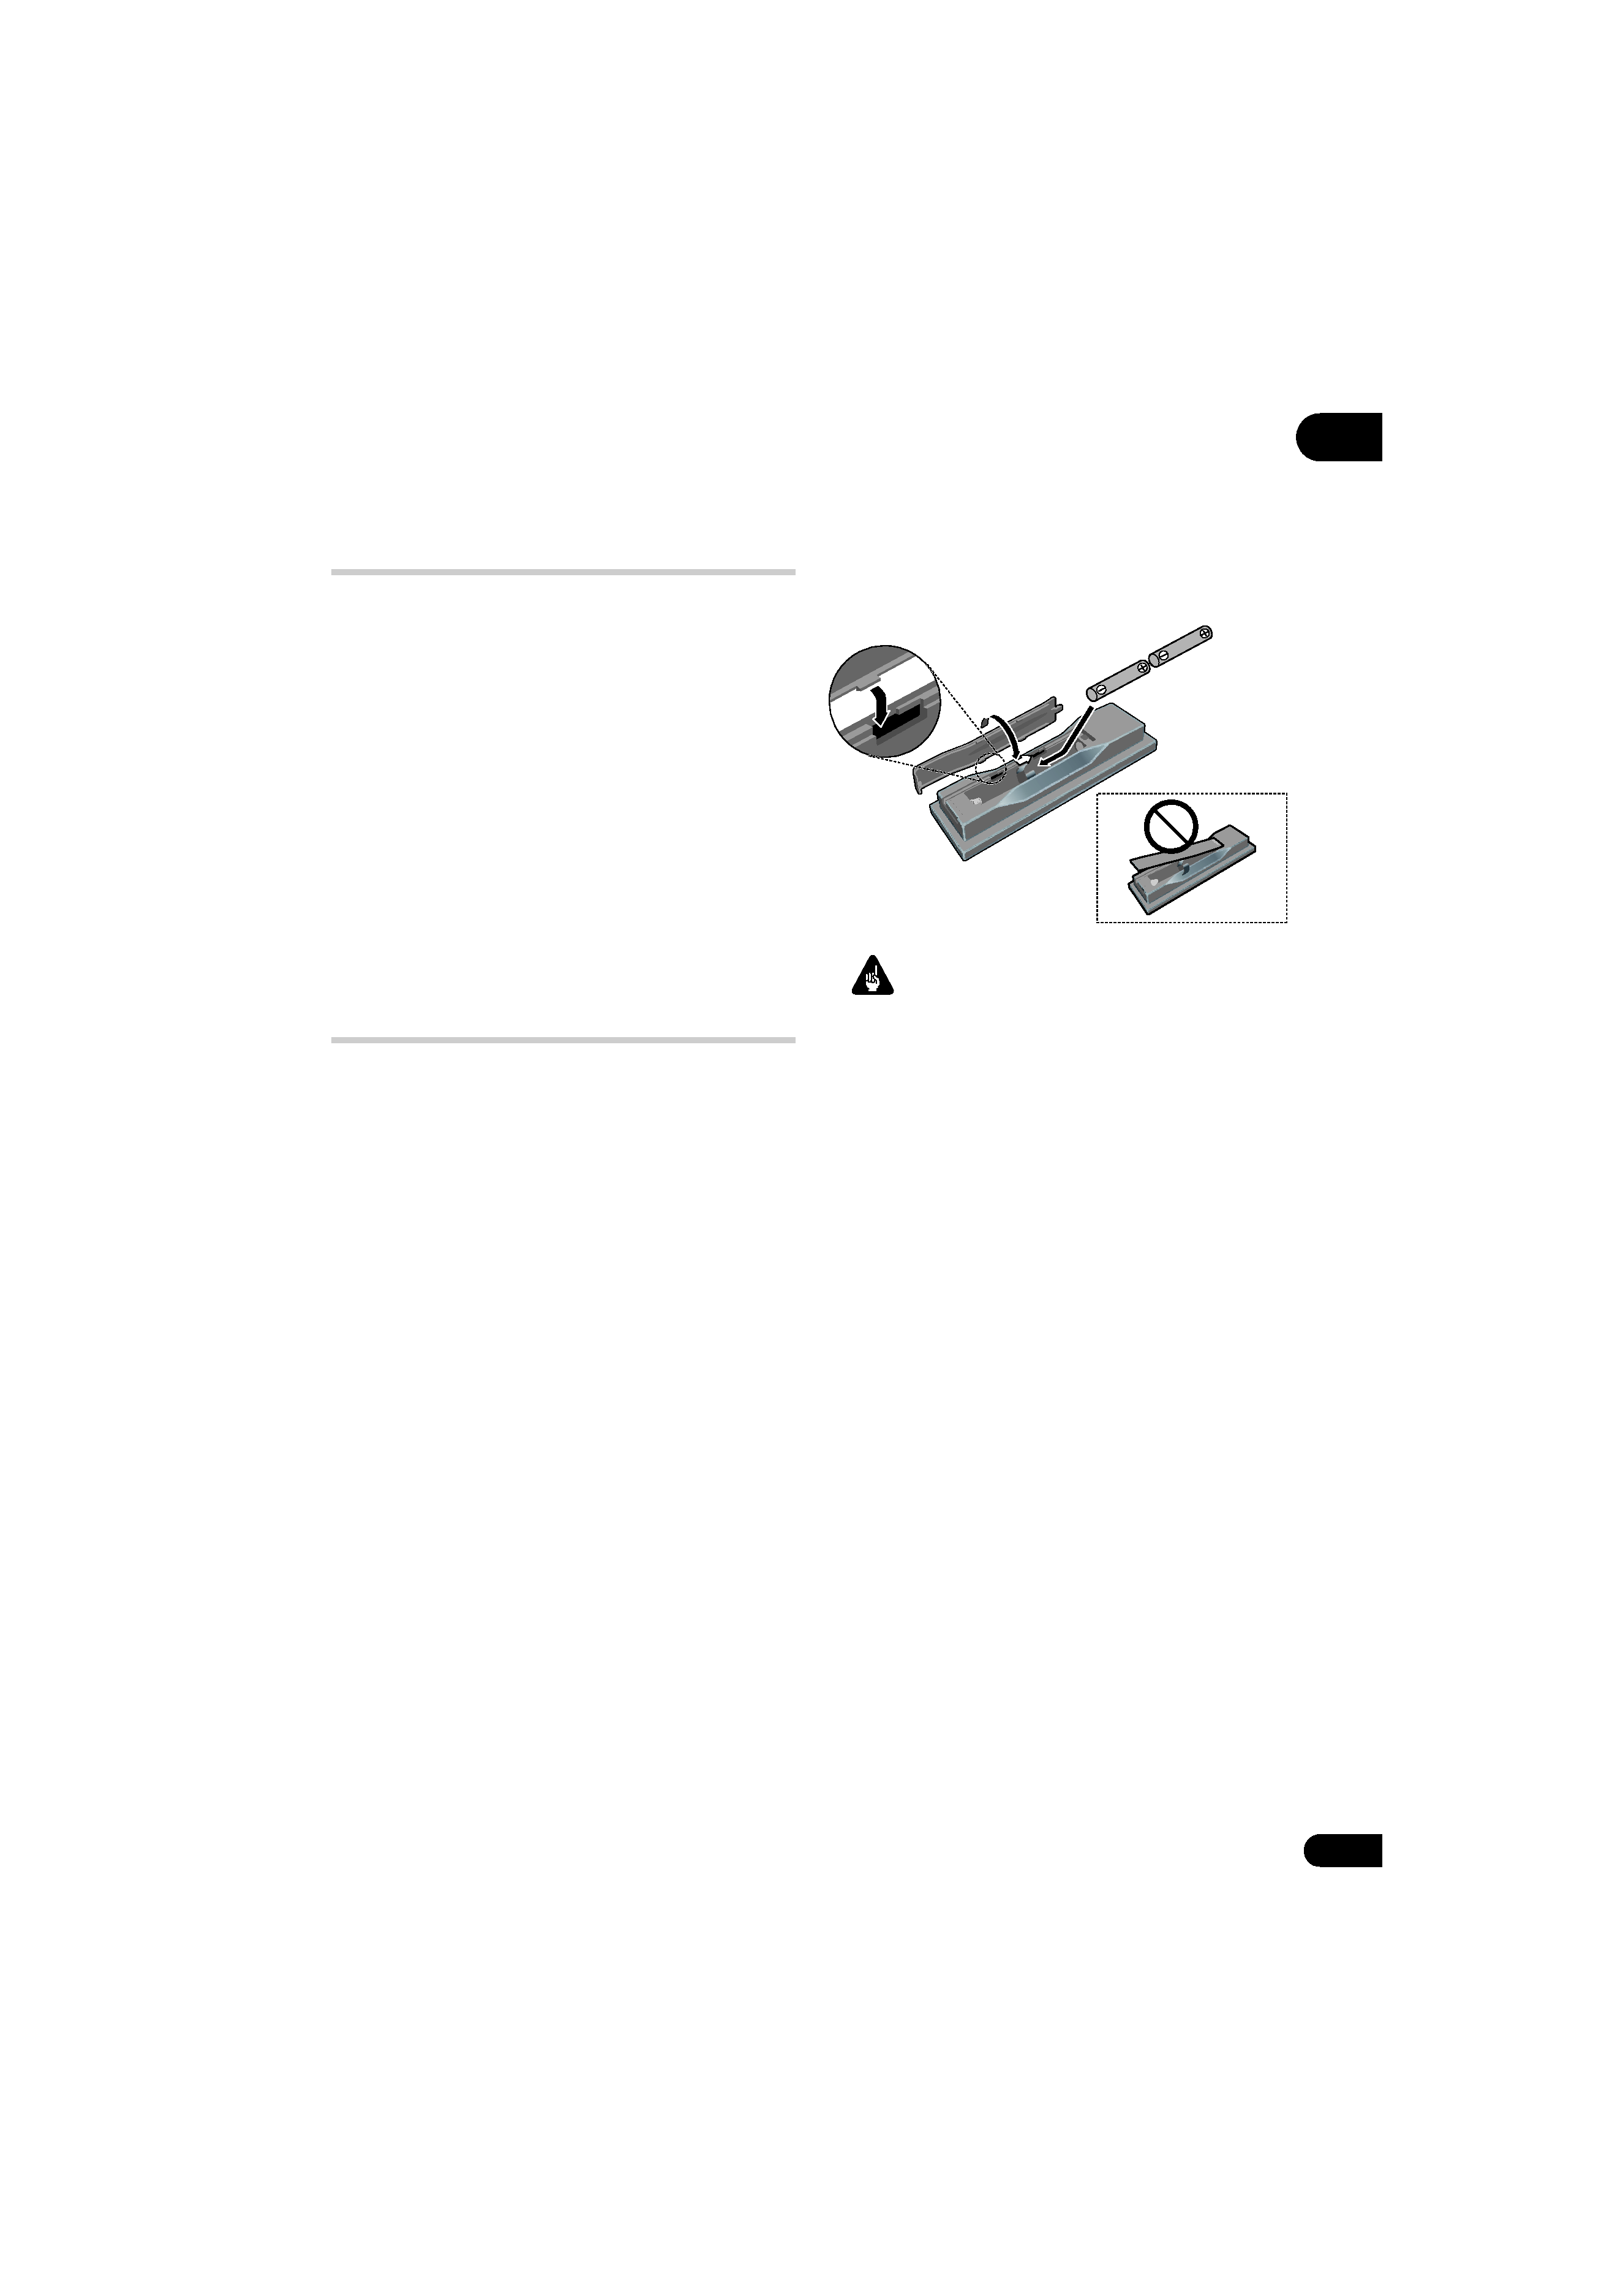
Putting the batteries in the remote
·
Open the battery compartment cover
and insert the batteries as shown.
Use two AA/R6P batteries and follow the
indications (
, ) inside the compartment.
Close the cover when you're finished.
When closing the cover, align the notch and
tab, and slide in the direction indicated by the
arrow
.
Important
Incorrect use of batteries can result in hazards
such as leakage and bursting. Please observe
the following:
· Don't mix new and old batteries together.
· Don't use different kinds of battery
together -- although they may look
similar, different batteries may have
different voltages.
· Make sure that the plus and minus ends of
each battery match the indications in the
battery compartment.
· Remove batteries from equipment that
isn't going to be used for a month or more.
· When disposing of used batteries, please
comply with governmental regulations or
environmental public instruction's rules
that apply in your country/area.
· Do not use or store batteries in direct
sunlight or other excessively hot place,
such as inside a car or near a heater. This
can cause batteries to leak, overheat,
explode or catch fire. It can also reduce the
life or performance of batteries.
DV510K_IBD_EN.book
5