
Operation Manual
7 inch Wide AV System Display
AVX-7650
English
E
Po
rtuguês
(B)
Español

Thank you for buying this Pioneer product.
Please read through these operating instructions so you will know how to operate
your model properly. After you have finished reading the instructions, keep this man-
ual in a safe place for future reference.
Precautions
IMPORTANT SAFEGUARDS 3
To ensure safe driving 3
To avoid battery exhaustion 3
Before You Start
About this unit 4
About this manual 4
Precautions 4
To protect the LCD screen 4
For viewing LCD comfortably 4
Resetting the microprocessor 4
Use and care of the remote control 5
Whats What
Display unit 6
Remote control 7
Basic Operations
Turning the unit on and selecting a
source 8
Turning the unit off 8
Opening and closing the LCD panel 8
Changing the wide screen mode 9
Adjusting the picture adjustment 10
Protecting your unit from theft 11
Other Functions
Introduction of setup adjustments 12
Setting the video input 1 12
Setting the video input 2 12
Switching the warning tone 13
Setting the automatic open function 13
Setting the clock 13
Switching the background display 14
Additional Information
Troubleshooting 15
Using the display correctly 16
Specifications 18
Contents
En
2
IMPORTANT SAFEGUARDS
Please read all of these instructions regarding
your display and retain them for future refer-
ence.
1 Read this manual fully and carefully before
operating your display.
2 Keep this manual handy as a reference for
operating procedures and safety informa-
tion.
3 Pay close attention to all warnings in this
manual and follow the instructions care-
fully.
4 Do not allow other persons to use this sys-
tem until they have read and understood
the operating instructions.
5 Do not install the display where it may (i)
obstruct the drivers vision, (ii) impair the
performance of any of the vehicles operat-
ing systems or safety features, including
air bags, hazard lamp buttons or (iii) impair
the drivers ability to safely operate the ve-
hicle.
6 As with any accessory in your vehiclesin-
terior, the display should not divert your
attention from the safe operation of your
vehicle. If you experience difficulty in oper-
ating the system or reading the display,
please park safely before making adjust-
ments.
7 Do not attempt to install or service your
display by yourself. Installation or servi-
cing of the display by persons without
training and experience in electronic
equipment and automotive accessories
may be dangerous and could expose you
to the risk of electric shock or other ha-
zards and can cause damage to the system
that is not covered by warranty.
8 Please remember to wear your seat belt at
all times while operating your vehicle. If
you are ever in an accident, your injuries
can be considerably more severe if your
seat belt is not properly buckled.
9 Never use headphones while driving.
To ensure safe driving
WARNING
! LIGHT GREEN LEAD AT POWER CON-
NECTOR IS DESIGNED TO DETECT
PARKED STATUS AND MUST BE CON-
NECTED TO THE POWER SUPPLY SIDE
OF THE PARKING BRAKE SWITCH. IM-
PROPER CONNECTION OR USE OF
THIS LEAD MAY VIOLATE APPLICABLE
LAW AND MAY RESULT IN SERIOUS IN-
JURY OR DAMAGE.
! To avoid the risk of accident and the potential
violation of applicable laws, the front DVD or
TV feature should never be used while the ve-
hicle is being driven. Also, rear displays
should not be in a location where it is a visible
distraction to the driver.
! In some countries or states the viewing of
images on a display inside a vehicle even by
persons other than the driver may be illegal.
Where such regulations apply, they must be
obeyed.
This unit detects whether your vehicles park-
ing brake is engaged or not, and prevents you
from watching a DVD or TV on the front dis-
play while driving. When you attempt to watch
a DVD or TV, the warning VIDEO VIEWING IS
NOT AVAILABLE WHILE DRIVING will appear
on the front display.
To watch a DVD or TV on the front display, park
your vehicle in a safe place and apply the park-
ing brake.
To avoid battery exhaustion
Be sure to run the vehicle engine while using
this unit. Using this unit without running the
engine can result in battery drainage.
WARNING
Do not use with vehicles that do not feature an
ACC position.
Precautions
En
3
English
Section
01
About this unit
NTSC/PAL compatibility
This unit is NTSC/PAL system compatible.
When connecting other components to this
unit, be sure components are compatible with
the same video system otherwise images will
not be correctly reproduced.
About this manual
This unit features a number of sophisticated
functions ensuring superior reception and op-
eration. All the functions have been designed
for the easiest possible use, but many are not
self-explanatory. This operation manual will
help you benefit fully from this units potential
and to maximize your listening enjoyment.
We recommend that you familiarize yourself
with the functions and their operation by read-
ing through the manual before you begin
using this unit. It is especially important that
you read and observe precautions noted on
this page and in other sections.
Precautions
! Keep this manual handy as a reference for
operating procedures and precautions.
! Always keep the volume low enough so
that you can hear sounds from outside the
vehicle.
! Protect this unit from moisture.
! If the battery is disconnected or dis-
charged, the preset memory will be erased
and must be reprogrammed.
! If this unit does not operate properly, con-
tact your dealer or nearest authorized Pio-
neer Service Station.
To protect the LCD screen
! Do not allow direct sunlight to fall on the
display when this unit is not being used.
Extended exposure to direct sunlight can
result in LCD screen malfunction due to
the resulting high temperatures.
! When using a portable phone, keep the an-
tenna of the portable phone away from the
display to prevent disruption of the video by
the appearance of spots, colored stripes,
etc.
For viewing LCD comfortably
Due to its construction, the view angle of the
LCD screen is limited. The viewing angle (verti-
cal and horizontal) can be increased, however,
by using BRIGHT to adjust the black density of
the video. When using for the first time, adjust
the black density in accordance with the view-
ing angle (vertical and horizontal) to adjust for
clear viewing. DIMMER can also be used to
adjust the brightness of the LCD screen itself
to suit your personal preference.
Resetting the microprocessor
The microprocessor must be reset under the
following conditions:
! Prior to using this unit for the first time
after installation
! If the unit fails to operate properly
! When strange or incorrect messages ap-
pear on the display
Before You Start
En
4
Section
02
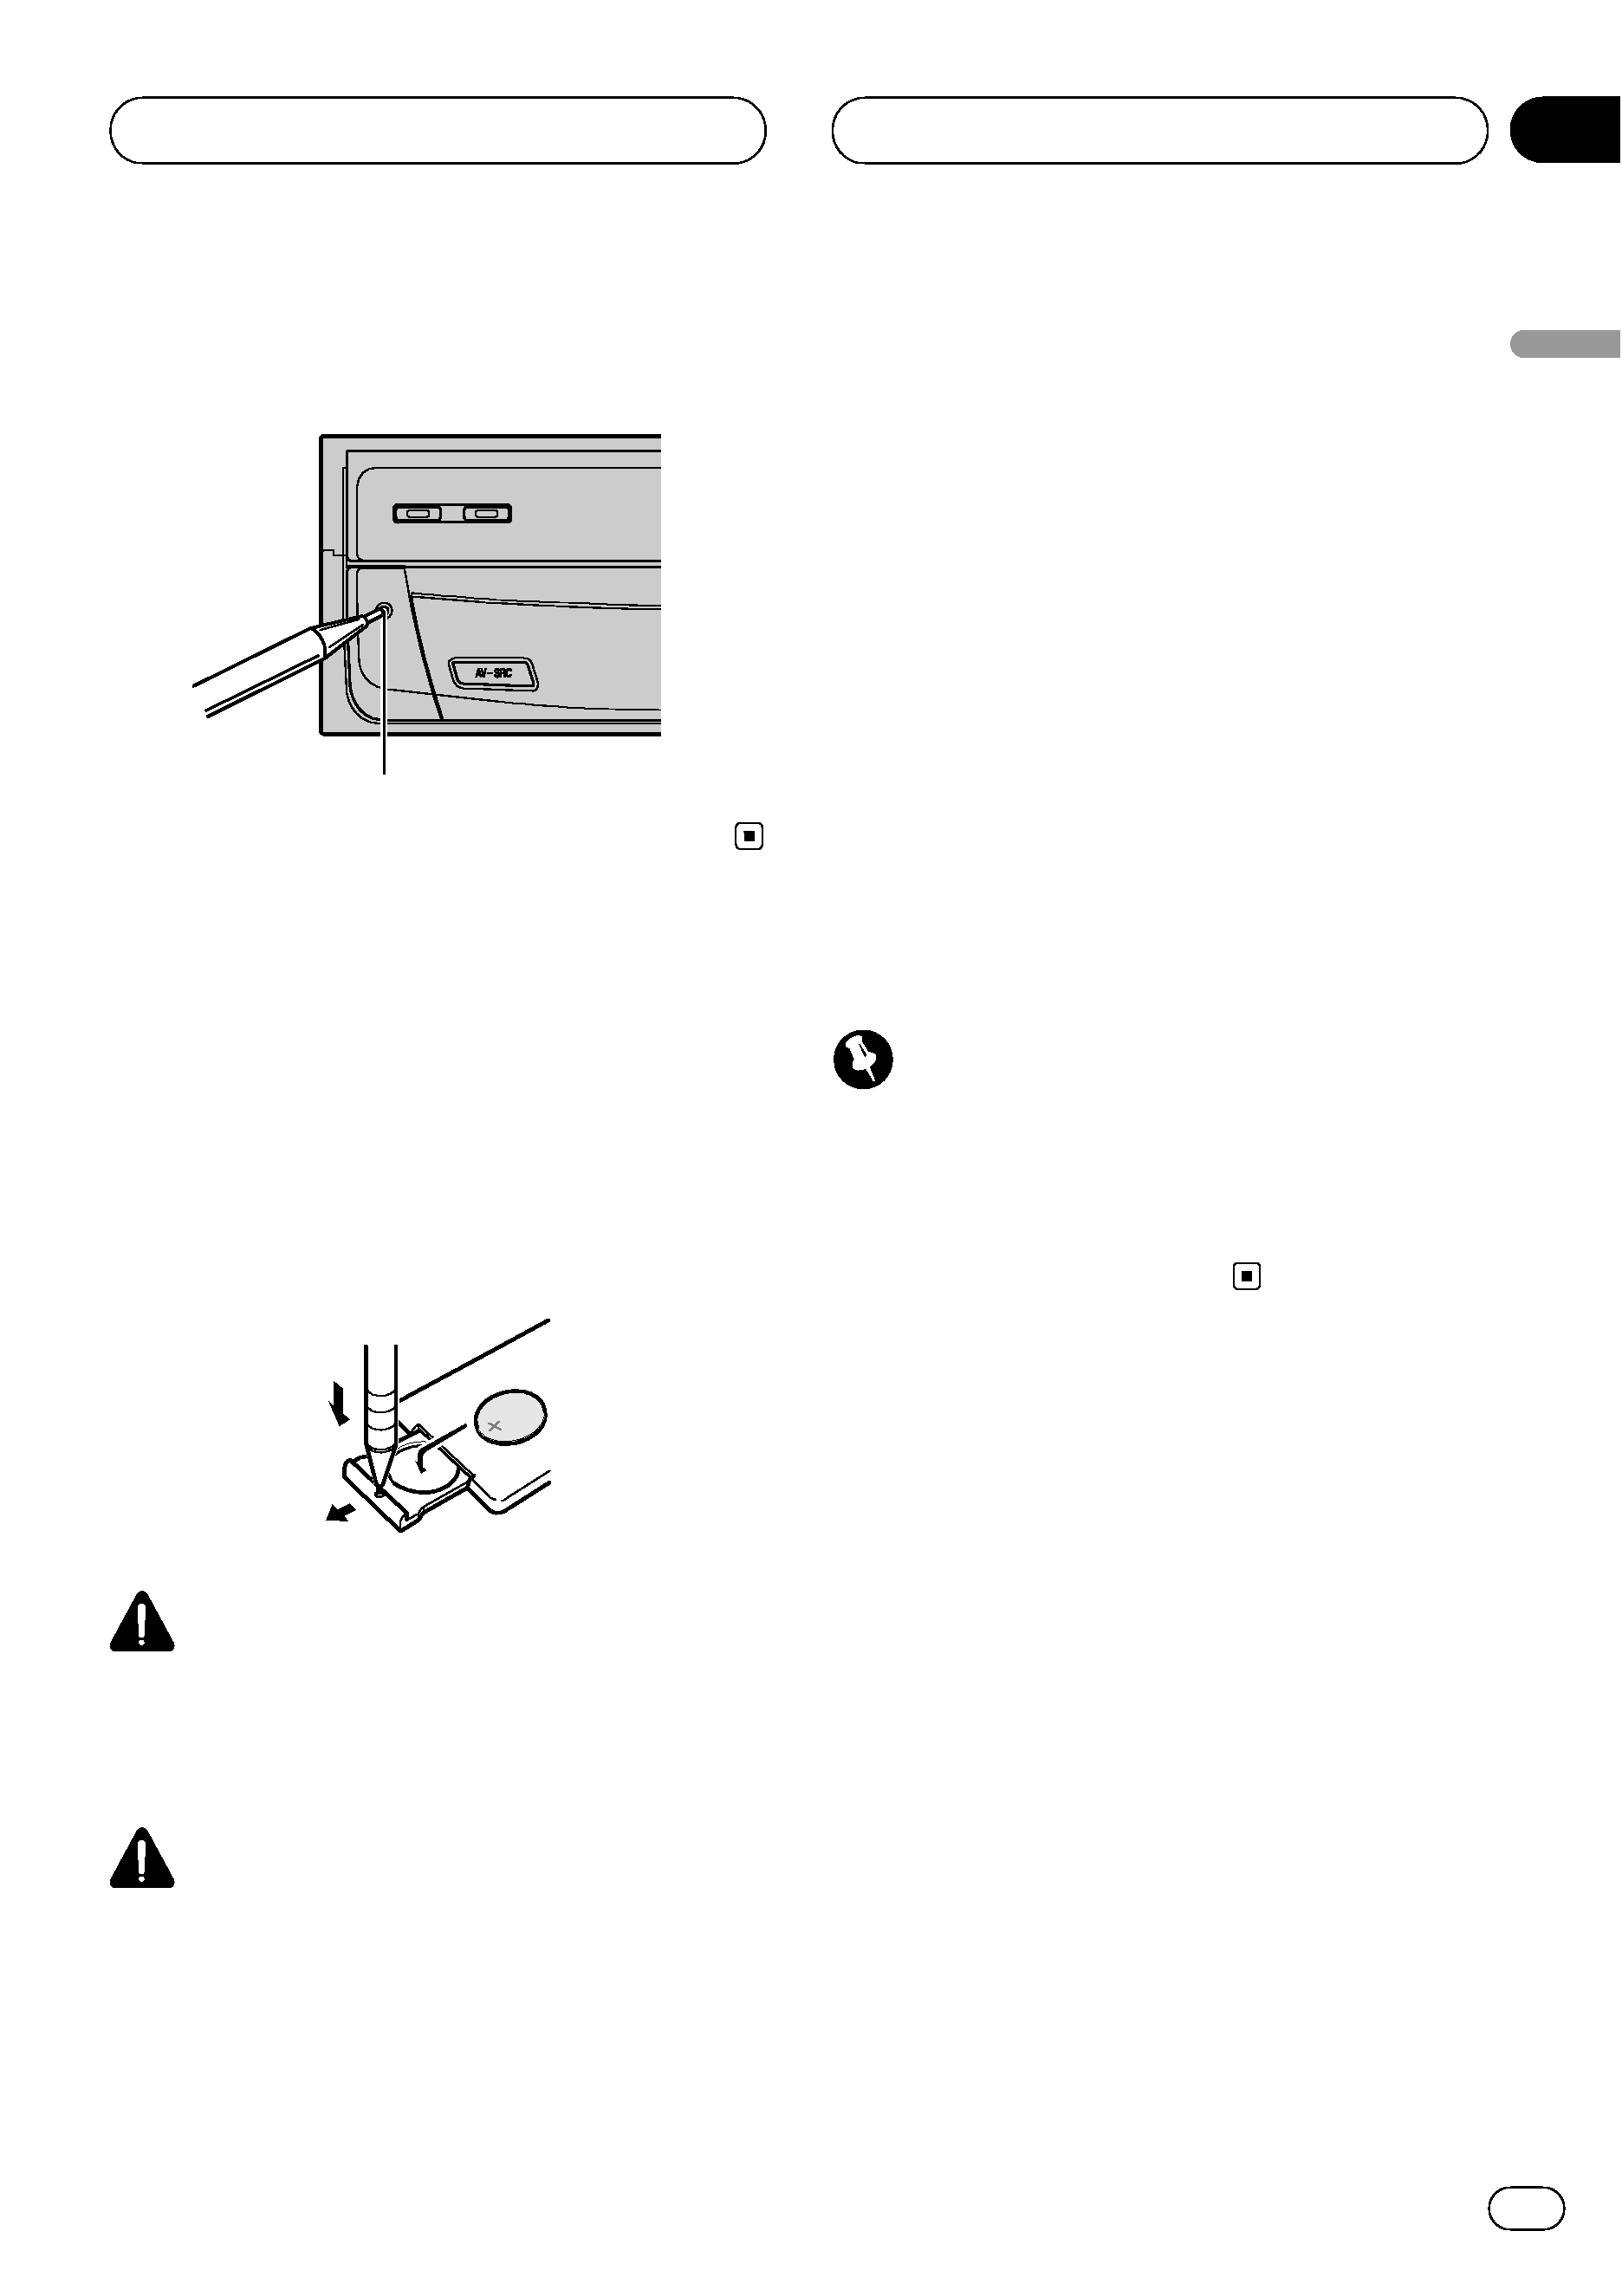
% Press RESET with a pen tip or other
pointed instrument.
RESET button
Use and care of the remote
control
Installing the battery
Slide the tray out on the back of the remote
control and insert the battery with the plus (+)
and minus () poles pointing in the proper di-
rection.
WARNING
Keep the battery out of the reach of children.
Should the battery be swallowed, immediately
consult a doctor.
CAUTION
! Use only one CR2025 (3 V) lithium battery.
! Remove the battery if the remote control is not
used for a month or longer.
! Do not recharge, disassemble, heat or dispose
of the battery in fire.
! Do not handle the battery with metallic tools.
! Do not store the battery with metallic materi-
als.
! In the event of battery leakage, wipe the re-
mote control completely clean and install a
new battery.
! When disposing of used batteries, please
comply with governmental regulations or en-
vironmental public institutions rules that
apply in your country/area.
Using the remote control
Point the remote control in the direction of the
front panel to operate.
! The remote control may not function prop-
erly in direct sunlight.
Important
! Do not store the remote control in high tem-
peratures or direct sunlight.
! Do not let the remote control fall onto the
floor, where it may become jammed under the
brake or accelerator pedal.
Before You Start
En
5
English
Section
02