GB
F
D
E
I
P
S
NAD
613
· OWNER'S MANUAL
· MANUEL D'INSTALLATION
· BEDIENUNGSANLEITUNG
· MANUAL DEL USUARIO
· MANUALE DELLE ISTRUZIONI
· BRUKSANVISNING
· MANUAL DO PROPRIETÁRIO
©
1995.
NAD
ELECTRONICS
LTD.
613.

REAR PANEL CONNECTIONS
WARNING:TO PREVENT FIRE OR ELECTRIC
SHOCK, DO NOT EXPOSE THIS APPLIANCE
TO RAIN OR MOISTURE
CAUTION: TO PREVENT ELECTRIC SHOCK DO
NOT USE THIS POLARISED PLUG WITH AN
EXTENSION CORD RECEPTACLE OR OTHER
OUTLET UNLESS THE BLADES CAN BE FULLY
INSERTED TO PREVENT BLADE EXPOSURE.
ATTENTION: POUR PREVENIR LES CHOCS ELEC-
TRIQUES NE PAS UTILISER CETTE FICHE
POLARISEE AVEC UN PROLONGATEUR, UNE
PRISE DE COURANT OU UNE AUTRE SORTIE DE
COURANT, SAUF SI LES LAMES PEUVENT ETRE
INSEREES A FOND SANS EN LAISSER AUCUNE
PARTIE A DECOUVERT.
The lightning flash with arrowhead, within an equilateral tri-
angle is intended to alert the user of the presence of unin-
sulated "dangerous voltage" within the product's enclo-
sure; that may be of sufficient magnitude to constitute a
risk of electric shock to persons.
The exclamation point within an equilateral triangle is intend-
ed to alert the user of the presence of important operating
and maintenance (servicing) instructions in the literature
accompanying the appliance
Note to CATV system installer: This reminder is provided
to call the CATV installer's attention to Section 820-40 of
the NEC , which provides guidelines for proper grounding
and, in particular, specifies that the cable should be con-
nected to the grounding system of the building, as close to
the point of cable entry as practical.
NAD
2
CAUTION
RISK OF ELECTRIC
SHOCK DO NOT OPEN
ATTENTION:
RISQUE DE CHOC ELECTRIQUE
NE PAS OUVRIR
CAUTION: TO REDUCE THE RISK OF ELECTRIC
SHOCK, DO NOT REMOVE COVER (OR BACK).
NO USER SEVICEABLE PARTS INSIDE.
REFER SERVICING TO QUALIFIED
SERVICE PERSONNEL.
AFIN DEVITER UN CHOC
ELECTRIQUE, ET LES
CONSEQUENCES GRAVES
QUI POURRAIENT EN
RESULTER, TENTEZ PAS
D'OUVRIR L'APPAREIL ET
DE TOUCHER AUX
COMPOSANTS INTERNES
SANS LA PRESENCE D'UNE
SERVICE PERSONNEL.
THIS DIGITAL APPARATUS DOES NOT EXCEED THE CLASS B
LIMITS FOR RADIO NOISE EMISSIONS FROM DIGITAL
APPARATUS AS SET OUT IN THE RADIO INTERFERENCE
REGULATIONS OF THE CANADIAN DEPARTMENT OF
COMMUNICATIONS.
LE PRESENT APPAREIL NUMVERIQUE N'EMET PAS DE
BRUITS RADIOELECTRIQUES DEPASSANT LES LIMITES
APPLICABLES AUX APPAREILS NUMERIQUES DE LA CLASSE
B PRESCRITES DANS LE REGLEMENT SUR LE BROUILLAGE
RADIO ELECTRIQUE EDICTE PAR LE MINISTERE DES
COMMUNICATIONS DU CANADA.
©
1995.
NAD
ELECTRONICS
LTD.
613.
CAUTION : TO REDUCE THE RISK OF ELECTRIC SHOCK, DO
NOT REMOVE COVER (OR BACK). NO USER-SERVICEABLE
PARTS INSIDE, REFER SERVICING TO QUALIFIED SERVICE
PERSONNEL.
ATTENTION FOR EUROPEAN MODEL:
THIS APPARATUS COMPLIES WITH THE REQUIREMENTS OF
EC DIRECTIVE 87/308/EEC.
WARNING : BEFORE PLUGGING IN THE UNIT FOR THE FIRST
TIME, READ THE FOLLOWING SECTION CAREFULLY.
Some models are designed for use only with the power supply volt-
age of the region where they are sold.
European models:
AC 230V, 50Hz
U.S.A. anmd Canadian models:
AC 120V, 60Hz
NAD
3
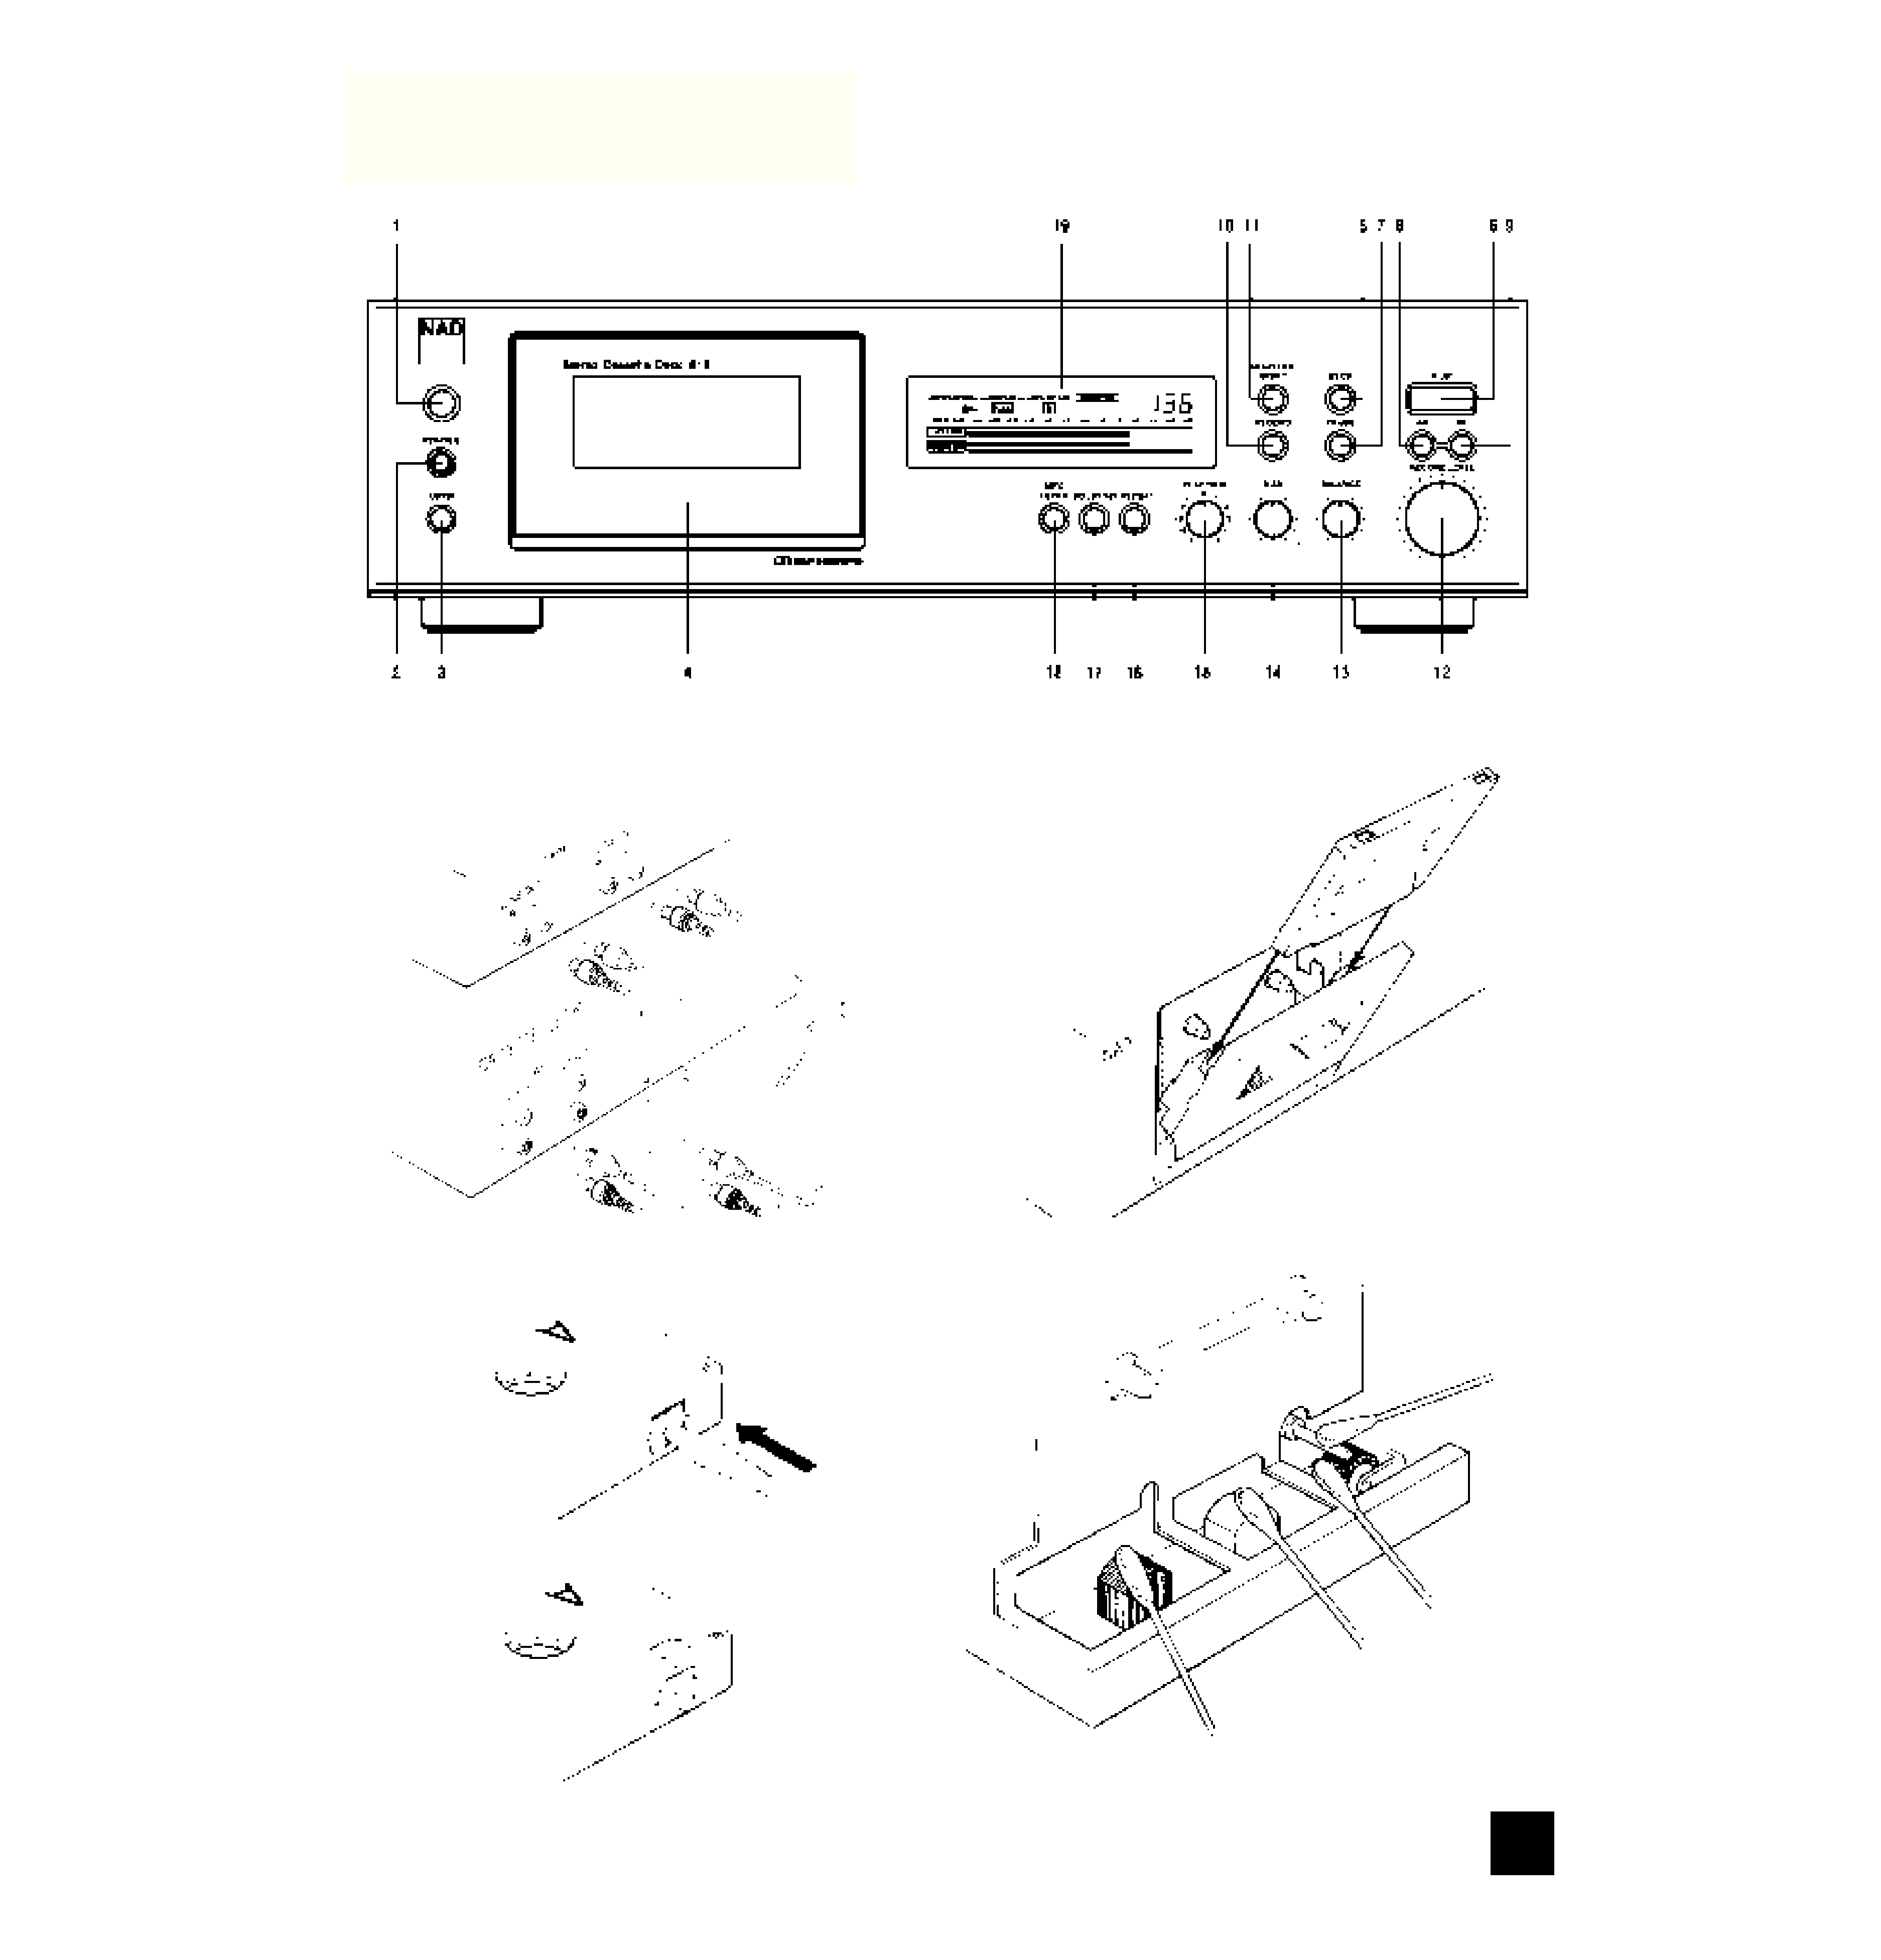
FRONT PANEL CONTROLS
Figure 1.
Figure 2.
Figure 3.
Figure 4.
©
1995.
NAD
ELECTRONICS
LTD.
613.

GB
NAD
4
NAD 613 CASSETTE DECK
INSTALLATION
The recorder may be installed on any stable sur-
face that is not subjected to vibration or intense mag-
netic fields. It should not be placed directly on a loud-
speaker, a television set, or a large power amplifier
where it might pick up hum from the amplifier's power
transformer. if you wish to install the recorder next to
an amplifier on the same shelf, place the recorder on
the left so that its cassette compartment will be locat-
ed away from the amplifier.
WARNING TO UK USERS. If this appartus is not fit-
ted with a UK three-pin plug, do not attempt to insert
the attached plug into a UK mains socket. Instead, cut
the plug from the mains lead and attach a fused UK
three-pin plug using the following safety advice on
wiring.
IMPORTANT. The wires in this mains lead are
coloured BLUE and BROWN;
BLUE: NEUTRAL
BROWN: LIVE
The colours of these mains lead wires may not corre-
spond with the coloured markings identifying the ter-
minals in your plug. In this case the BROWN wire
must be connected to the terminal which is marked
L(ive) or coloured RED. The BLUE wire must be con-
nected to the terminal marked N(eutral) or coloured
BLACK. No connection should be made to the termi-
nal marked E or coloured green or green and yellow
PRECAUTIONS
To ensure that maximum performance of the NAD
613 cassette deck is maintained over time, please
bear the following precautions in mind:
THE DECK
A. Make sure the heads and transport are cleaned
regularly. Please refer to page 8.
B. Demagnetise both heads and tape guidance from
time to time. Please refer to page 8.
C. The bearings and other moving parts have been
treated with special lubricants and are therefore main-
tenance-free. Additional lubrication can actually cause
malfunctioning.
D. Do not position the deck near equipment with
strong magnetic fields, such as loudspeakers or tele-
visions, etc.
E. Place the deck on a solid, flat surface.
F. Avoid dirt, dust, sand, etc. from entering the deck.
G. Avoid placing near transmitters: they can generate
high frequencies which may cause malfunctioning of
the deck.
H. Ensure the cassette deck compartment lid is
closed when the deck is not in use. Open it only for
taking a cassette in or out, or for cleaning the heads
and tape guides.
I. Do not place the deck directly on top of a (power)
amplifier or receiver. The deck may pick up hum from
the amplifier's power transformer. Some amplifiers
can also generate a fair amount of heat, even when
on stand-by.
WARNING : BEFORE PLUGGING IN THE UNIT FOR
THE FIRST TIME, READ THE FOLLOWING SECTION
CAREFULLY.
Some models are designed for use only with the
power supply voltage of the region where they are
sold.
European models:
AC 230V, 50Hz
U.S.A. and Canadian models:
AC 120V, 60Hz
THE CASSETTE TAPES
A. Store the cassette tapes in their jewel case, away
from dust. Never store tapes in direct sunlight or very
hot places.
B. Always use cassette tapes of a good quality.
Besides mediocre results, poor quality tapes can
cause excessive head wear.
C. Never touch the exposed tape itself or take it out of
its cassette casing.
D. In most cases the cassette tape has a five to eight
second leader tape at both the beginning and end of
a cassette tape. As you cannot record on this leader
tape, be sure to commence recording beyond this
tape.
REAR PANEL CONNECTIONS &
CONTROLS.
The numbers in the text refer to the connections in
figure "REAR PANEL CONNECTIONS"
This cassette deck can be connected to almost all
pre-amplifiers, integrated amplifiers or receivers.
Ensure the plugs are fully inserted and the recording
and playback cables are connected properly.
1. INPUT.
Connect a cable from the deck's "LINE IN" jacks at
the rear panel to the TAPE OUT or REC jacks of your
amplifier. Connect the left channel of the deck to the
left channel of the amplifier and connect the right
channel of the deck to the right channel of the amplifi-
er. Normally, the red plug is used for the right chan-
nel, the black or white plug for the left channel.
Please refer to figure 1.
2. OUTPUT.
Connect a cable from the deck's "LINE OUT" jacks
at the rear panel to the TAPE IN, PLAY, or MONITOR
jacks of your amplifier. Connect the left channel of the
deck to the left channel of the amplifier and connect
the right channel of the deck to the right channel of
the amplifier. Normally, the red plug is used for the
right channel, the black or white plug for the left chan-
nel. Please refer to figure 1.
3. NAD LINK.
The "NAD Link IN" connector allows the NAD 613
to be operated by external remote control signals
passed from another NAD remote control component
featuring NAD Link, e.g. AV 716 receiver. NAD Link
works in a "daisy chain" fashion, connections going
from one unit to the next one. Many NAD receivers
and AV components come supplied as standard with
an NAD system remote control which sports buttons
for most used tape transport functions (Play, Record,
Fast Forward, Rewind, Stop, etc.). It is recommened
that the NAD 613 is the second unit in the daisy chain
after the "master" unit, usually a receiver. Connect a
cable from the master unit Link Out (e.g. the AV 716)
to the NAD Link IN jack on the 613.

The "NAD Link OUT" connector allows remote con-
trol commands to be relayed from the 613 to other
products equipped with a NAD Link (or compatible)
input. For example, you can operate a CD player, a
tuner and this cassette deck from a single system
remote control. Connect a cable from the recorder's
NAD Link OUT socket to the NAD Link IN jack on
another product.
4. POWER.
Connect the AC mains cable to a convenient wall
socket or to an AC convenience outlet at the rear of
your amplifier or receiver.
FRONT PANEL CONTROLS
The numbers in the text refer to the controls in fig-
ure "FRONT PANEL CONTROLS".
1. POWER.
Press this button to switch on the power to the cas-
sette deck. The display will light up and the Pause
icon "ll" will flash for three seconds during which time
the deck will not respond to any commands. To turn
off the power, press again and release. Always press
STOP before switching off the deck.
2.PHONES.
Insert a stereo headphone with a 6.5 mm jack here.
When recording or playing back a tape the sound can
be monitored through the heaphones at a fixed level.
3. OPEN.
When this button is pressed, the door of the cas-
sette compartment swings open to allow a tape to be
inserted or to be removed. During play-back or
recording the door cannot be opened.
4. CASSETTE COMPARTMENT.
The cassette tape must be inserted into this com-
partment. Use the "OPEN" button to open the com-
partment. With a gentle push, until a click is heard,
the compartment can be closed.
5. STOP.
This button will stop all tape transport functions
such as play, record, fast forward and rewind. It will
also disengage the Record-pause and Play-pause
mode.
6. PLAY.
To play-back a tape use this button. The Play icon
will light up in the display.
·To load a cassette tape, remove it from its protec-
tive jewel case. Before inserting the cassette, ensure
the tape is straight and taut where it is exposed at the
thick edge of the cassette.
N.B. If necessary, insert a pencil into either hub
and manually wind the tape spool until any slack is
taken up.
· Switch on the unit by pressing the POWER (1)
switch. After use, the unit can be switched off by
pressing the button again.
· Press the OPEN (3) button to release the cas-
sette compartment door and insert the tape with the
thick edge -where the tape is exposed- downwards.
The cassette tape is held in a carrier within the door
assembly.
Refer to figure 2.
· Press the cassette compartment door shut until a
light "click" is heard. The tape is now in position.
· The tape can be removed by again using the
OPEN (3) button.
Please note the button doesn't work during tape
travel.
· Reset the tape counter (in the display) to "0000"
by pressing the RESET (11) button.
· Select the appropriate DOLBY NR (17) position
(Dolby NR Off, Dolby B NR or Dolby C NR) to suit the
particular tape you wish to play back. Refer to the
chapter "How to get the best performance from your
NAD 613 cassette deck" section "Dolby NR noise
reduction systems B & C" for more information.
· Press the PLAY (6) button to engage tape trans-
port. The play icon
in the display will light up to
indicate the play status.
· If the recording sounds dull, turn the PLAY TRIM
control (15) up (clock-wise) to restore accurate highs.
If the recording sounds edgy or sibilant, turn the Play-
Trim down to obtain smoother treble. Refer to chapter
"How to get the best performance from your NAD 613
cassette deck", section "The Play Trim control" for
further information.
· Press the STOP (5) button if you wish to end
play-back.
7. PAUSE.
If you wish to interrupt play-back or recording for a
moment, use this button. By pressing PLAY, you can
resume play-back or recording. In the display the icon
for Pause "l l" will light up to indicate the tape pause
status. Press Play again to resume playing back or
recording.
8. REWIND
.
With the
function you can rewind the tape from
right to left. Fast rewind is stopped automatically
once the beginning of a tape is reached or if
REPEAT Block had been engaged and the tape has
reached the beginning of the block (see also section
"REPEAT" (16) of this chapter). You can stop rewind
manually by using the STOP button.
9. FAST FORWARD
.
With the
function you can wind the tape forward
from left to right. Fast forward is stopped automatical-
ly once the end of a tape is reached. You can stop
fast forward manually by using the STOP button.
NAD
5
GB