
3
2
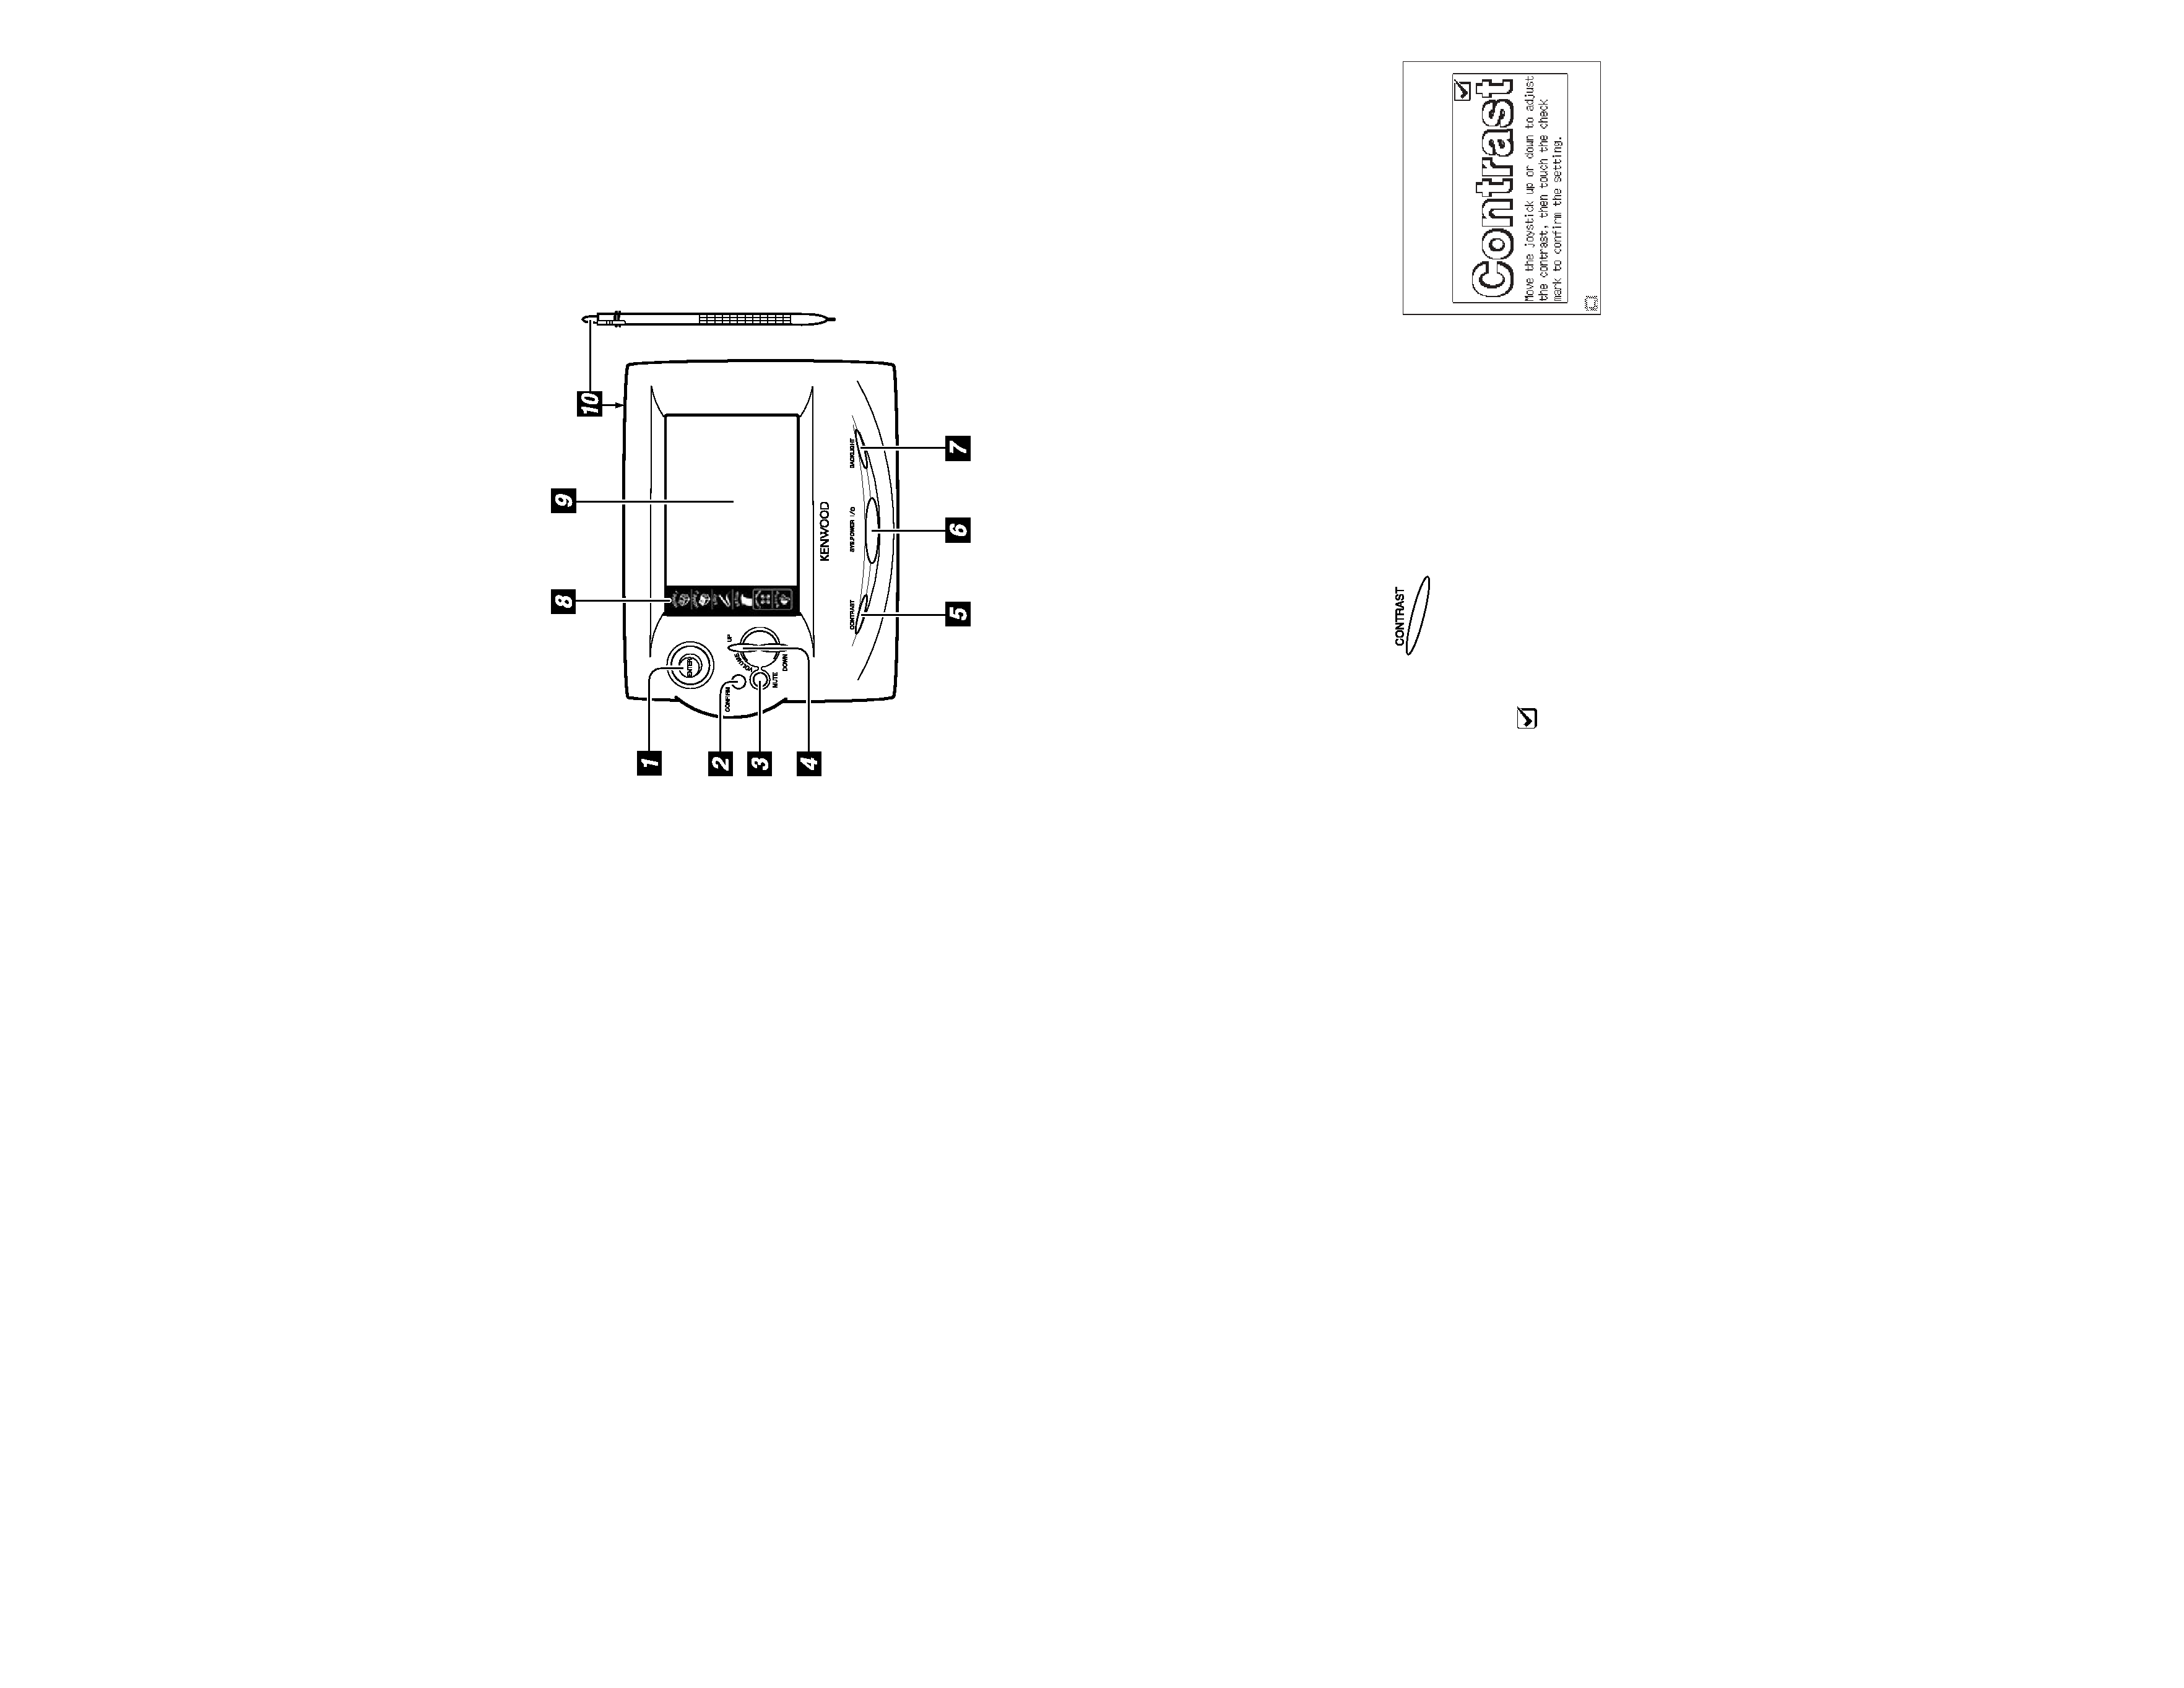
1. JJoystick (see page 17)
2. C
Confirm bbutton (re-establishes interrupted communication with receiver)
3. M
Mute bbutton (push to mute the receiver's sound; push again to restore the sound)
4. VVolume U
Up/Down bbuttons (increase and decrease the receiver's volume)
5. D
Display C
Contrast bbutton (see below)
6. S
System PPower bbutton (turns the receiver on and off)
7. B
Backlight O
On/Off bbutton (push to turn the touch-screen illumination on and off)
8. Q
Quick AAccess m
menu (see page 16)
9. TTouch sscreen ddisplay (see page 16)
10. S
Stylus (stored on top edge)
Adjusting the Screen Contrast
You can adjust PowerTouch III's screen contrast to improve its visibility from different viewing
angles.
1. Press and hold
(CONTRAST) until the
Contrast screen appears:
2. Move the joystick up or down to increase or decrease
the contrast.
3. Touch
to save the setting and return to the previ-
ous screen.
What's On PowerTouch III?
5
4
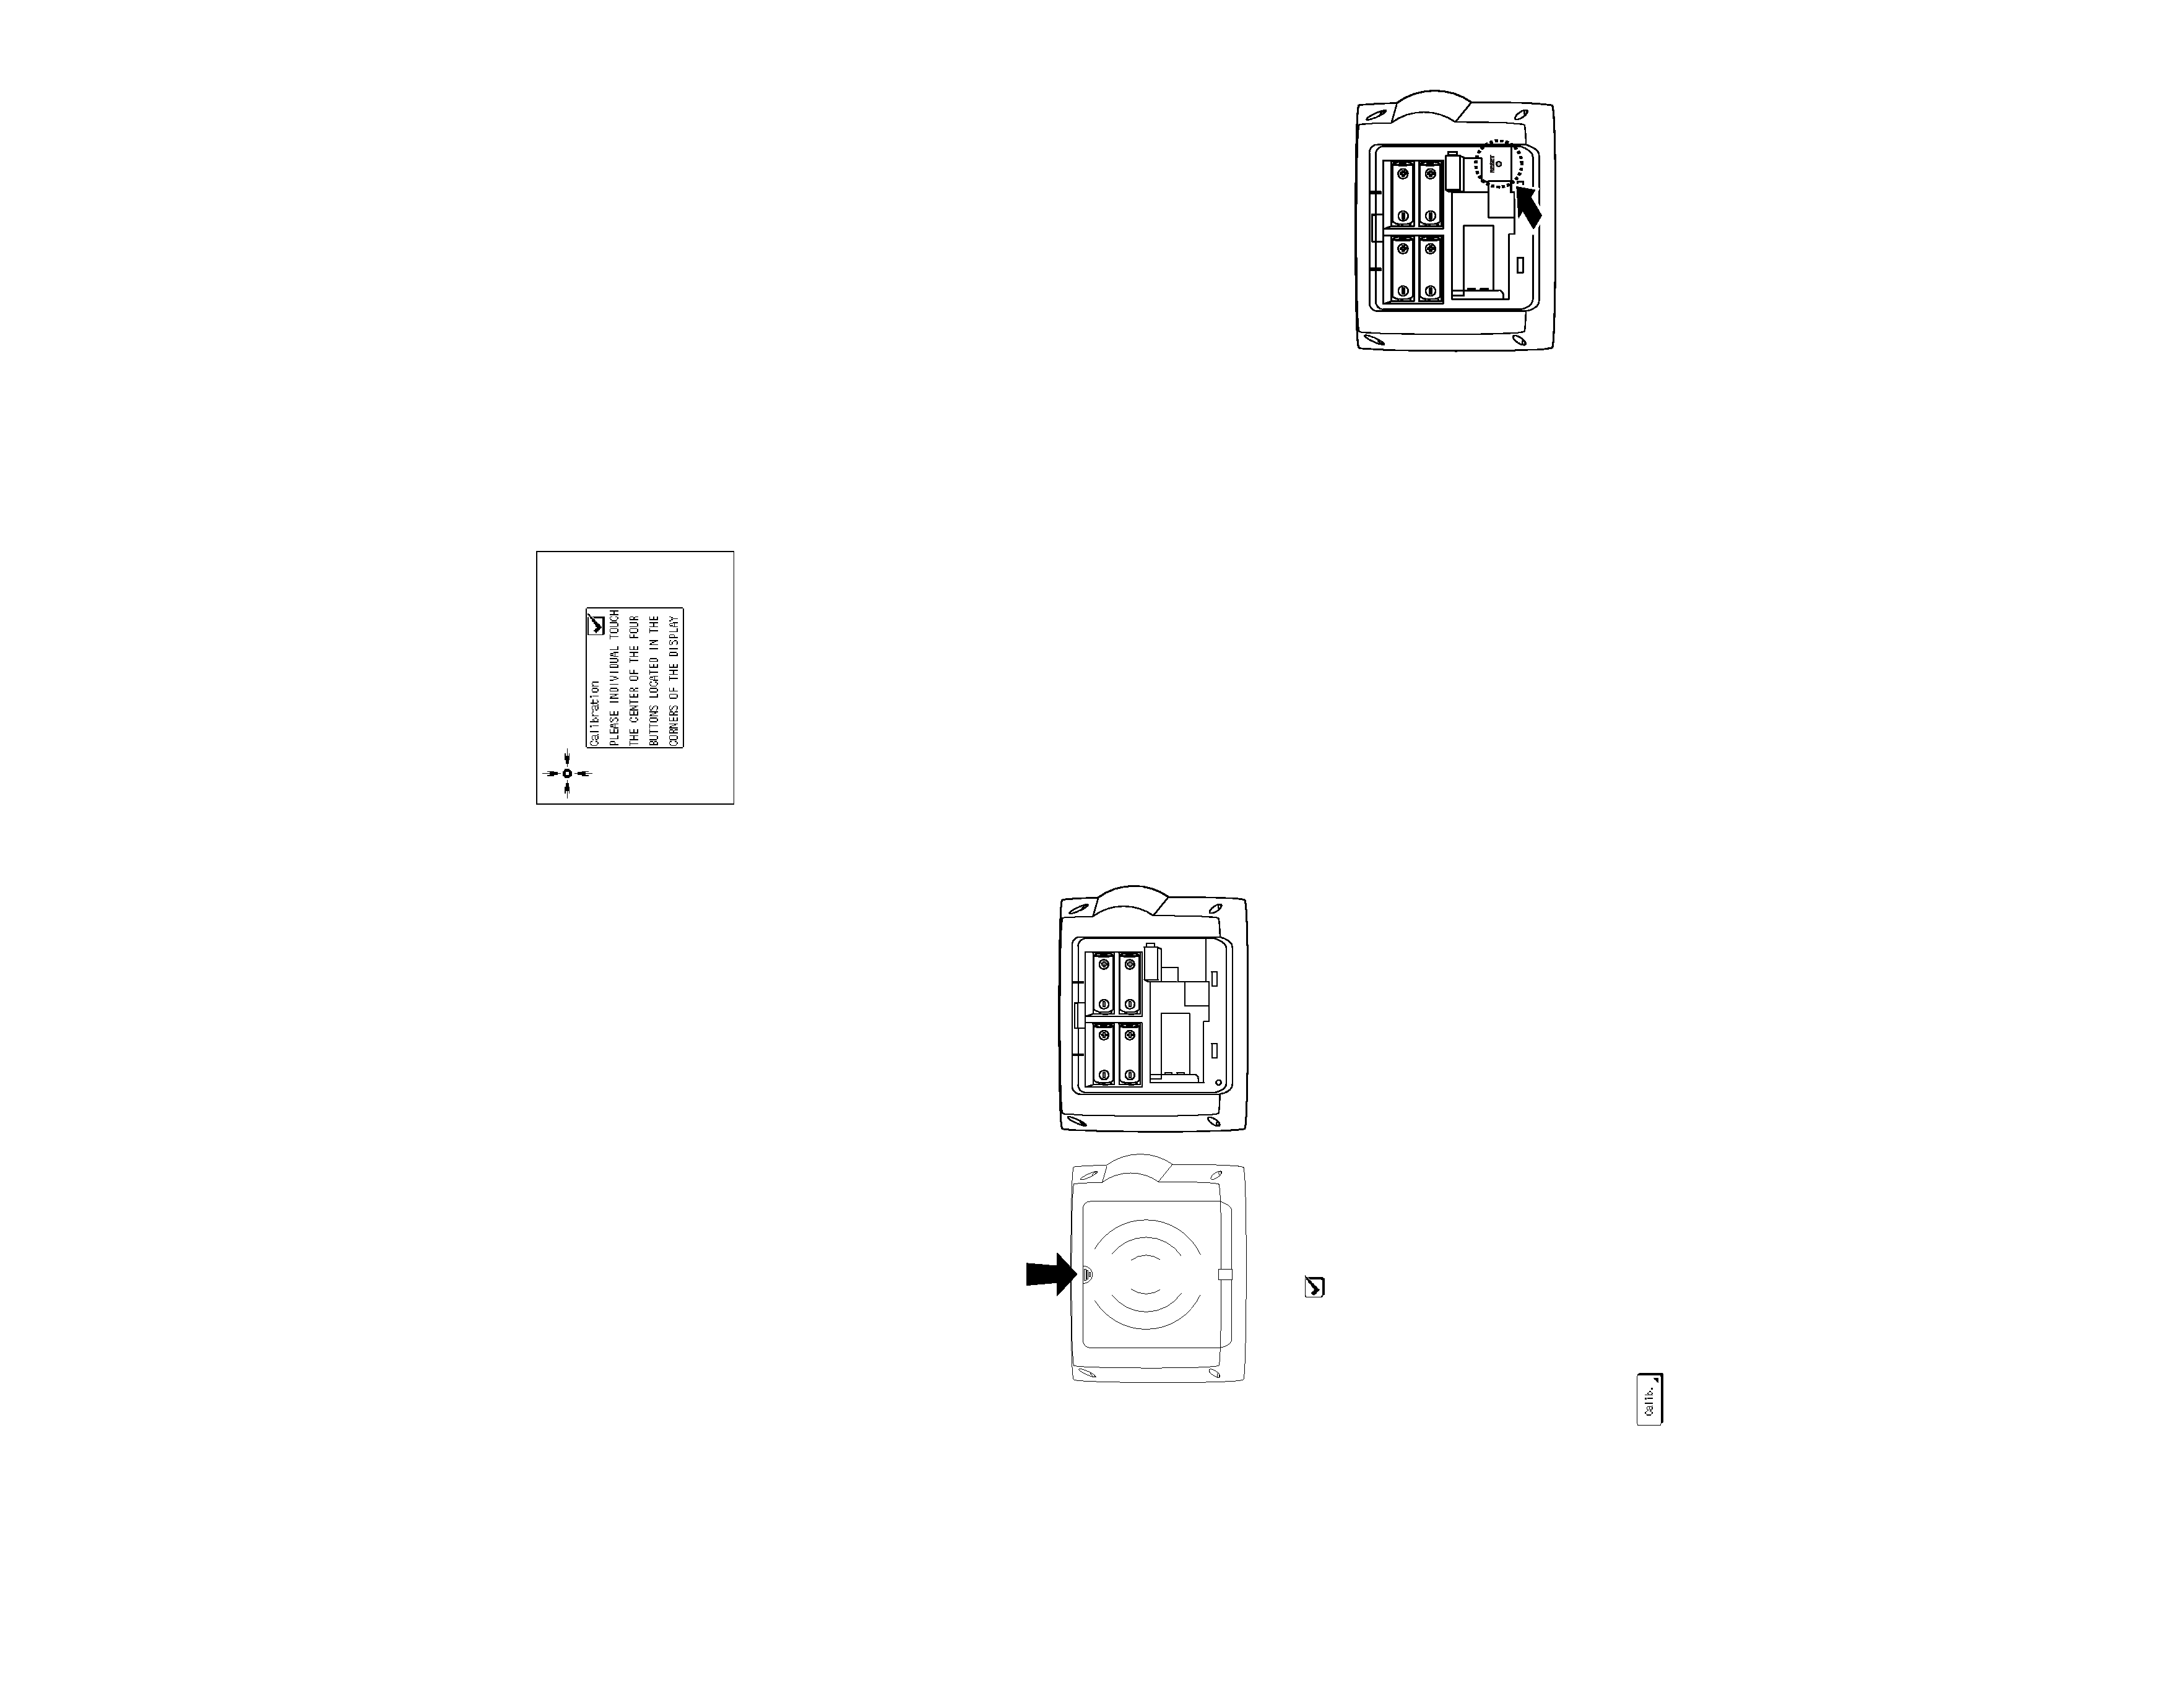
To calibrate the touch screen, use the stylus to touch the center of each of the calibration
points displayed on the screen:
When you touch each calibration point, you should hear a
beep and see the next point, indicating that area of the
screen is now calibrated. If you do not hear a beep, touch
the calibration point until you do.
The touch screen is sensitive to pressure, not to move-
ment. Press firmly but gently on any touch screen ele-
ment. The screen will not respond if you simply brush the
stylus or your finger along the surface.
Selecting the Model Type
After calibrating the touch screen, "Selecting the Model Type" appears automatically. The
model type selection lets PowerTouch III recognize which model Kenwood receiver you have.
· Once the model type is selected, it does not have to be selected again even after
PowerTouch III is reset.
To set the model type:
1. Press the receiver's ON STANDBY button to turn it ON.
2. Aim PowerTouch III towards the receiver and press the "MODEL 1" button on the display.
3. The receiver automatically transmits its type code to PowerTouch III. Once PowerTouch III
stores it, the model type selection is complete.
If you made a mistake in the model type selection, restart it as follows.
· While holding the CONFIRM and VOLUME DOWN buttons together, press and release the
RESET button under the battery cover (see above diagram). Do not release the CONFIRM
and VOLUME DOWN buttons until you hear a short beep indicating the completion of setting.
Note: This resets PowerTouch to its factory default settings, so you will have to re-calibrate the
touch screen before re-selecting the model type.
Resetting PowerTouch
If you experience a problem and need to reconfigure PowerTouch III, you can reset it..
1. Open the cover.
2. Use the stylus to press the blue button at the
bottom of the battery case:
The items you set up in this chapter will remain in
PowerTouch III. If you want to return PowerTouch to
its factory default condition, please follow the
restart instructions under "Selecting the Model
Type", above.
Your new PowerTouch III is a powerful controller that you can easily set up to remotely control
a Kenwood receiver as well as all of the IR-controllable audio and video components in your
entertainment system. PowerTouch III can also control home automation devices like lighting
systems, video screens and motorized curtains, and PowerTouch III's extensive macro capabil-
ities make it easy for you to perform complex operations by touching a single button. You can
even customize PowerTouch III's screens by adding or deleting buttons, changing their shape,
position and even their function.
PowerTouch III displays a separate set of controls for each component or device on its large
LCD screen. To control the component or access further controls or menus you simply touch
buttons and icons on the screen.
A component's controls will appear on PopwerTouch's screen after you have programmed
PowerTouch to control the component. Programming PowerTouch to control components will
be described later in this chapter.
Installing the Batteries
Before you can set up any remote control item, you need to install batteries.
· The batteries included with your new remote are intended for an operation check--they may
not last as long as alkaline batteries. We recommend replacing them with fresh alkaline
batteries for normal use.
To install the batteries:
1. Press down on the indenta-
tion on the battery cover
and slide it off.
2. Insert four C (LR14)
batteries, as shown.
3. Replace the battery cover.
When the batteries begin to run low, PowerTouch III displays a Low Battery message. Clear the
message by touching the check mark icon (
) and replace all batteries as described here.
Maximize the life of your batteries by turning the Backlight off if you are not trying to use
PowerTouch III in the dark. (See page 3).
If you cannot see anything on the screen after replacing the batteries, try to adjust the screen
contrast. (See page 3).
Calibrating the Touch Screen
After you first install the batteries or reset PowerTouch III, you need to calibrate the touch
screen so it properly responds to pressure from the included stylus or your finger.
· If you are replacing batteries and complete the battery replacement within 3 minutes, you
do not need to calibrate the screen; calibration is stored in memory.
If the screen's performance begins to change, you can recalibrate it without resetting
PowerTouch III by pressing
on the Setup menu.
Setting Up Your PowerTouch III Controller
7
Changing the RF Transmission Frequency
The RF remote function may be affected by radio interference, etc. If this happens, you can
change the RF transmission frequency.
To change the RF remote transmission frequency:
1. Open the battery cover on PowerTouch's rear.
2. Change the RF switch setting.
After changing PowerTouch III's RF transmission frequency, you also must change the receiv-
er's RF reception frequency to match it.
To change the receiver's RF reception frequency:
· Press and hold the RF BAND button (TAPE2/CD2 /MONITOR button) behind the receiver's
front panel door for more than 2 seconds. Each time you do this, the RF reception frequen-
cy switches between RF Band 1 and RF Band 2. Select the same band as the position num-
ber of PowerTouch's RF switch.
Remote Controllable Range
PowerTouch III transmits RF signals to the receiver, and the receiver sends IR signals back to
PowerTouch.
PowerTouch III's range is about 30
ft provided there are no obstacles
(see illustration to right).
PowerTouch III transmits an infrared
signal in addition to an RF signal.
When RF operation is not possible
because of radio wave conditions,
you can aim PowerTouch towards
the receiver and use it as a conven-
tional infrared remote control.
Since PowerTouch III uses infrared
signals to control other A/V compo-
nents and devices, aim PowerTouch
towards the respective unit.
6
The following factors can maximize the performance of your PowerTouch III:
1. Position the receiver's RF antenna to achieve maximum RF range.
2. Do not position the receiver near metal (such as heat ducts). Metal can absorb RF signals.
3. Do not install the receiver where direct sunlight or high-frequency fluorescent lighting can
shine directly into the infrared remote sensor. This can limit PowerTouch III's operating range.
4. Make sure that PowerTouch III's range is not being affected by other radio frequency trans-
missions.
5. Do not block the IR transmitter on PowerTouch or on the receiver's front panel . Even a
brief blockage of the transmission (such as someone
walking by) can cause the communication and feed-
back to become temporarily erratic. If this happens,
press the CONFIRM button and PowerTouch III will
resume normal operation (you might need to reenter
the interrupted command).
6. When PowerTouch III's operating range gets shorter
or PowerTouch III displays the low battery alarm
shown at the right, replace all 4 batteries:
Adjusting PowerTouch's "Sleep Time"
In order to reduce the battery consumption, PowerTouch III has been designed so that the
screen shuts off when it is not operated for a given time. This time can be changed.
1. Touch
(SETUP) to access the SETUP screen.
2. Touch
to access the Standby Time setting screen.
3. Touch
or
to set the desired time. The time until the screen shuts off can be
changed to any value from 5 to 30 seconds.
4. Touch
to return to the original screen.
Programming PowerTouch to Control Other Components
PowerTouch III can be programmed to control almost any IR-controllable audio-video source
component and television. If the component's code is not already part of PowerTouch III's
extensive library, you can use PowerTouch's Learn feature to teach the component's com-
mands to PowerTouch III. You can also use the Learn function to expand the control capabili-
ties of components with existing codes. For more information, see "Programming a Function
in a Button (Learning)", on page 13.
1. Touch
(SETUP) on the Quick Access menu to access the Setup menu.
2. Touch
on the Setup menu to access the IR Setup menu:

9
8
3. Touch
to open the list of receiver input jacks:
· CD1
· CD2/TAPE2
· MD/TAPE1
· CD-R
· VIDEO1 through VIDEO4
· DVD
· AV AUX
· TV1 and TV2 (these allow PowerTouch III to control your TV or cable tuner, even if it isn't
connected to one of the receiver's input jack sets).
Select the input jack set that the component you want to set up is connected to.
6. Touch
to select the type of component you have connected to the jack set.
7. Touch
to select the component's brand.
8. Touch
. You can now choose from a list of all the codes available for the
component. Touch the first code on the list.
· If you are programming to control a Kenwood component that is connected to the receiv-
er with a system control cable, be sure to select the code that is preceded by "Sys-" or
"System". This instructs PowerTouch III to send all commands for the component to the
receiver, which will control the device via the system control cable.
· If the component is a Kenwood Dual-Play 200-Disc CD Changer, you will need to set both
CD1 and CD2/ TAPE2 to the correct code for this component ("Sys- Mega").
9. Touch
. This instructs PowerTouch III to send a "power" test signal to the device. If
your device turns on, the code you entered was correct. If it does not turn on, try the next
code in the list. Continue until one of the codes works. If none of the codes work, see
"Programming a Function in a Button (Learning)", on page 13.
· If you enter a code preceded by "Sys-" or "System" on step 8, skip this step.
10. When you have a code that works, touch
.
Repeat steps 5 through 10 for each component you want PowerTouch to control.
Replacing a Setup Code with a New One
If you replace an existing component with a new one, you will need to program PowerTouch III
to control the new component. After connecting the component, follow the steps under
"Programming PowerTouch to Control Other Components" on page 7 for that input. The new
code will replace the old code.
Deleting a Setup Code
If you disconnect a component from your system and do not plan to replace it, you may want
to delete the setup code from PowerTouch III. To do so:
1. Follow the steps under "Programming PowerTouch to Control Other Components" on page
7 to select a jack set.
2. Touch
. Scroll to the component "Nothing" then touch it. That component is
no longer controlled by PowerTouch III.