
MZ360229EX (LZH-80WM4)
OVERHEAD CONSOLE WITH 8" LCD SCREEN
INSTRUCTION MANUAL
© B64-3764-00/00 (WW)

2 | English
Safety precautions
Notes
· The illustrations of the display and the panel
appearing in this manual are examples used to
explain more clearly how the controls are used.
Therefore, what appears on the display in the
illustrations may differ from what appears on
the display on the actual equipment, and some
of the illustrations on the display may represent
something impossible in actual operation.
Cleaning the Unit
If this unit is stained, wipe it with a dry soft cloth
such as a silicon cloth.
If this unit is stained badly, wipe the stain off with a
cloth moistened with neutral cleaner, then wipe it
again with a clean soft dry cloth.
¤
· Applying spray cleaner directly to the unit may affect
its mechanical parts. Wiping this unit with a hard cloth
or using a volatile liquid such as thinner or alcohol may
scratch the surface or erases characters.
Screen brightness during low
temperatures
When the temperature of the unit falls such as
during winter, the liquid crystal panel's screen will
become darker than usual. Normal brightness will
return after using the monitor for a while.
2 WARNING
To prevent injury or fire, take the
following precautions:
· To prevent a short circuit, never put or leave any
metallic objects (such as coins or metal tools)
inside the unit.
· Do not touch the liquid crystal fluid if the LCD
is damaged or broken due to shock. The liquid
crystal fluid may be dangerous to your health or
even fatal.
If the liquid crystal fluid from the LCD contacts
your body or clothing, wash it off with soap
immediately.
2 CAUTION
To prevent damage to the machine, take
the following precautions:
· Make sure to ground the unit to a negative 12V
DC power supply.
· Do not install the unit in a spot exposed to direct
sunlight or excessive heat or humidity. Also avoid
places with too much dust or the possibility of
water splashing.
· Do not use your own screws. Use only the screws
provided. If you use the wrong screws, you could
damage the unit.
· If smoke or abnormal odor is detected, turn off
the unit immediately and contact the dealer.
Using the unit continuously can result in fire or
other accidents.
· Be sure to have the unit repaired by the dealer.
If you repair the unit, fire or other accidents can
result.

English |
3
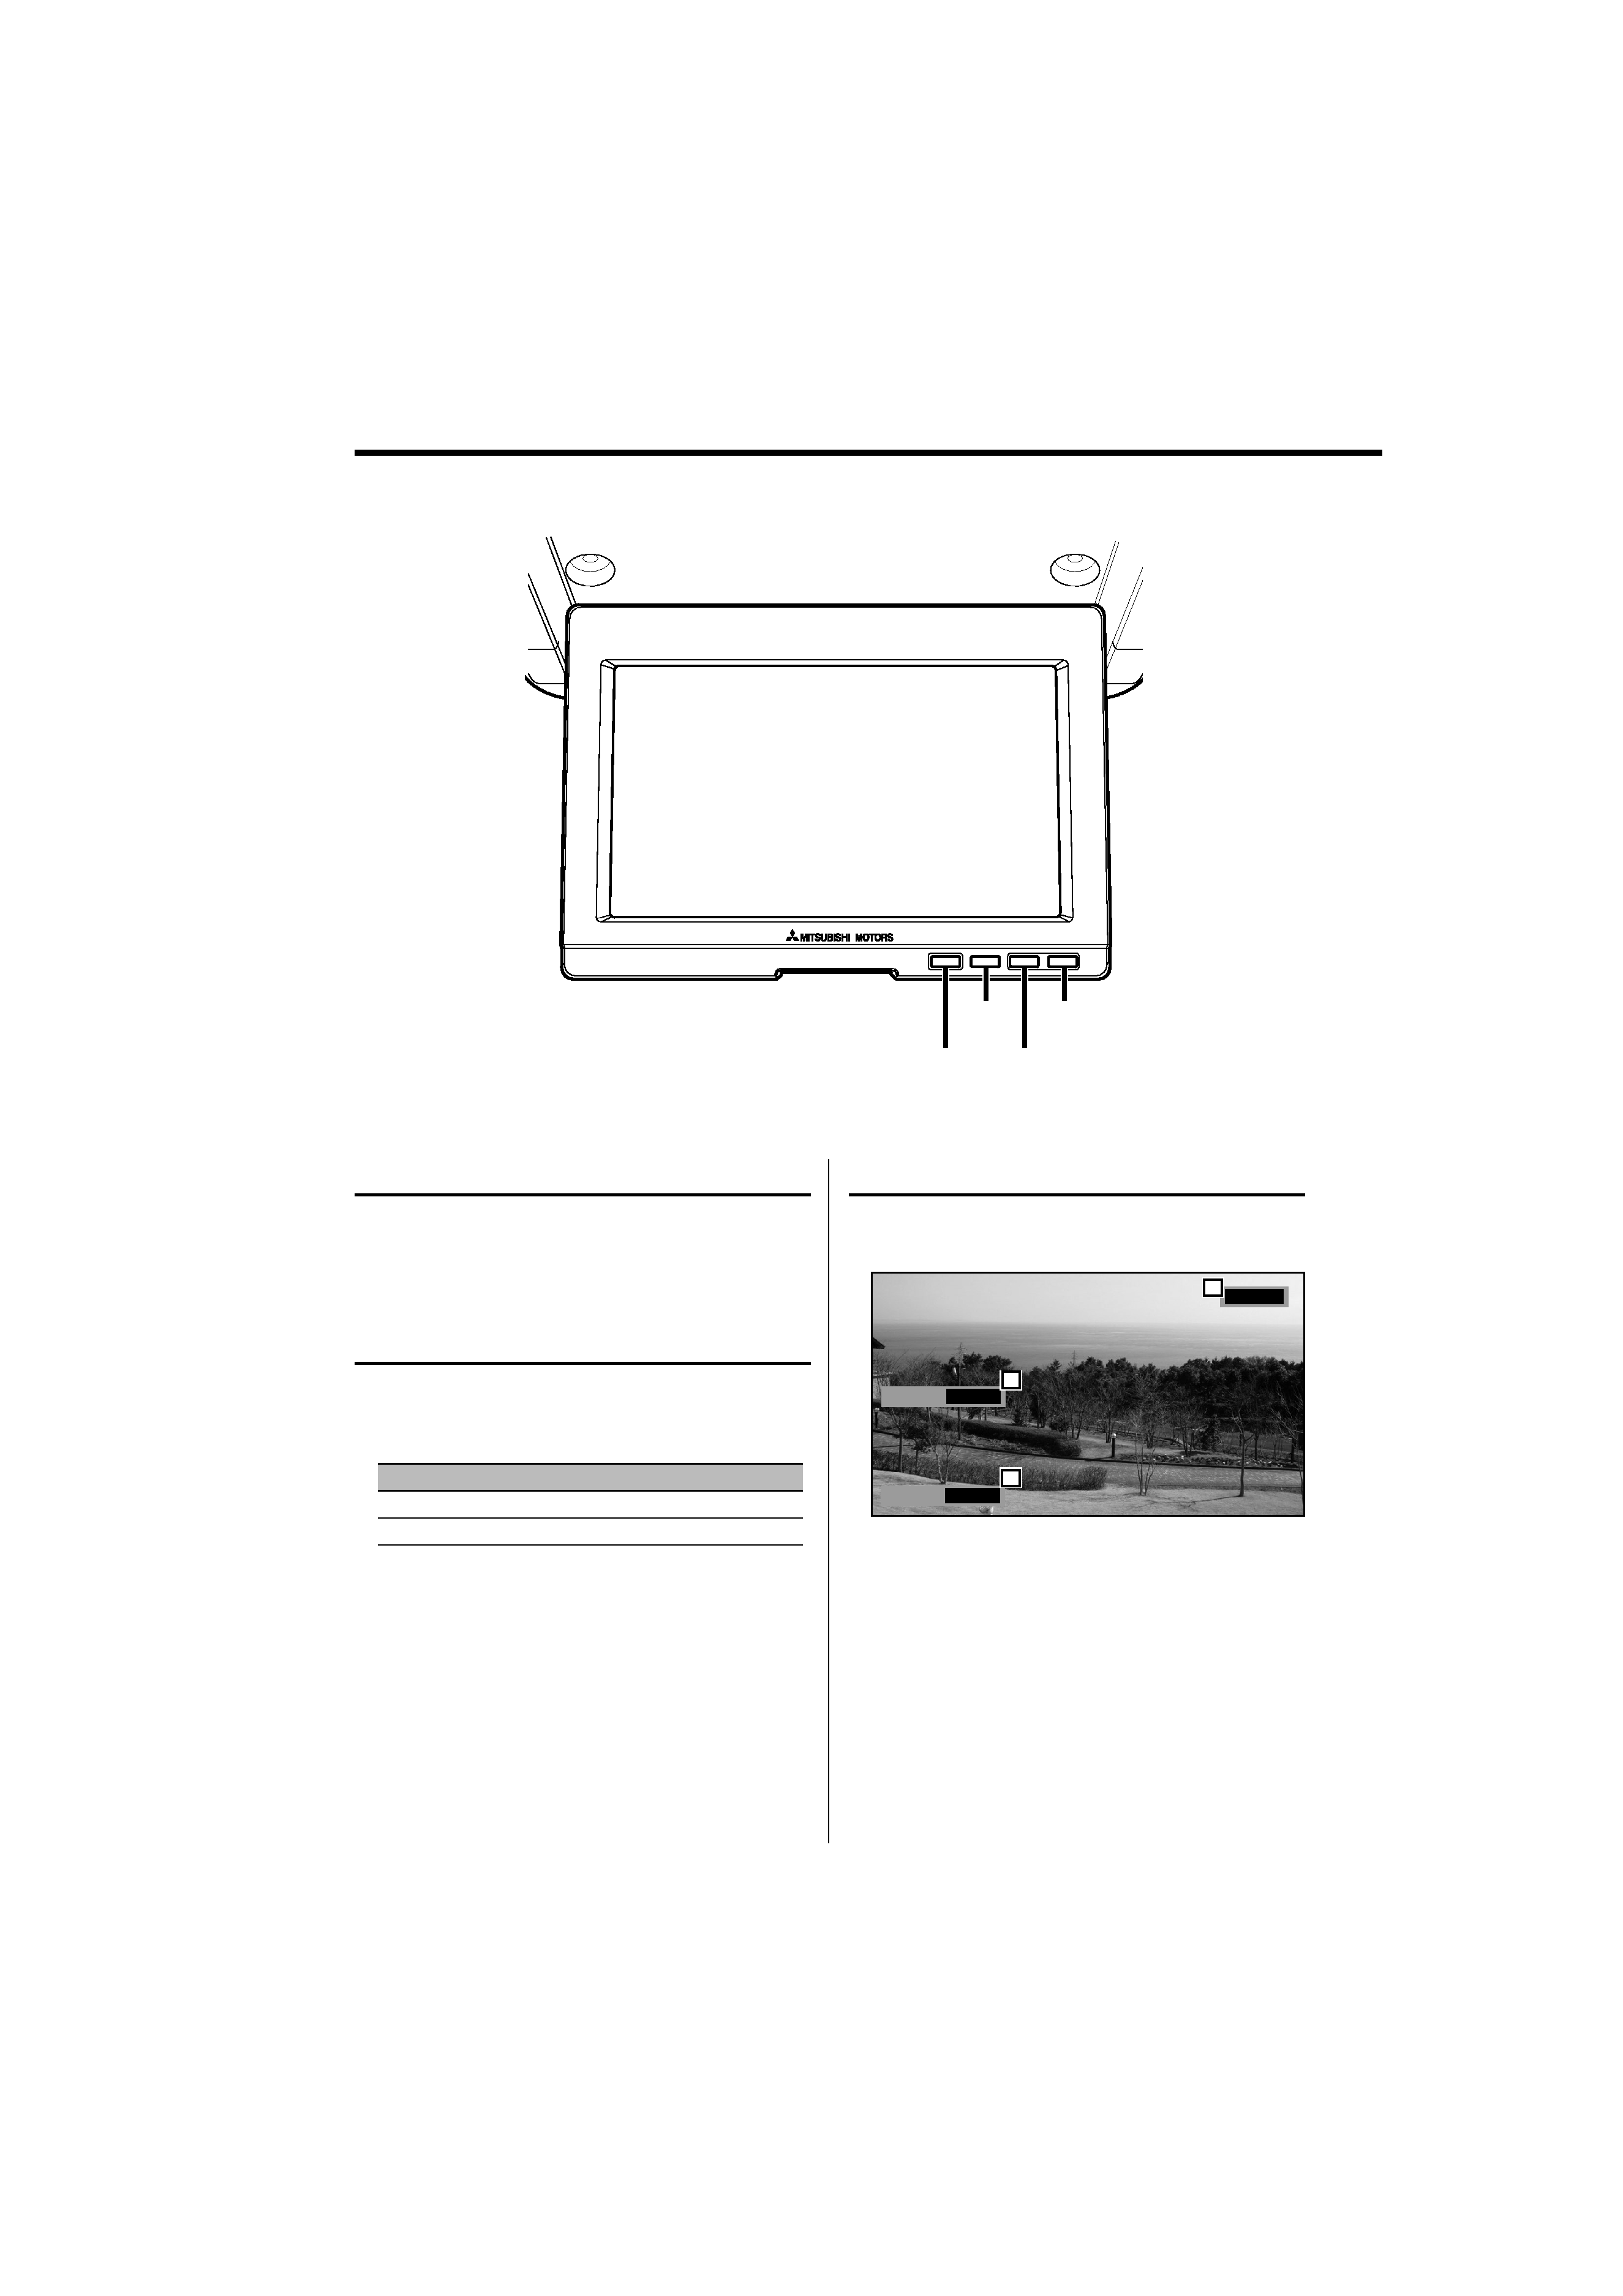
Components names and Functions
1
2
4
3
1 Monitor release knob
Unlock the motor.
2 Dome light switch
"ON": The light goes on.
"DOOR": The light does on/out with the
opening/closing of vehicle doors.
"OFF": The light goes out.
3 IR transmitter
4 Audio/ Visual input 2 terminal
· Visual input (Yellow)
· Audio left input (White)
· Audio right input (Red)
/
· The picture input to the Audio/Visual input 2 terminal
can be displayed by selecting "AV-IN2" as described in
<Video Source Selection> (page 4).
Open the monitor
Monitor release knob
1 Unlock the motor
Press the monitor release knob.
2 Open the monitor
Press the monitor dawnward.
/
· Do not press the LCD of the monitor when opening
the monitor. The LCD can damage.
· When closing the monitor, press its back until it locks.
If the monitor is not closed completely, the monitor is
held powered.
4 | English
Operations
POWER
INPUT
/MENU
SCRN/
DIM/
POWER
INPUT
SCRN
DIM
Video Source Selection
Press the [INPUT] button.
Each time the button is pressed, the video source
switches as follows:
Display
Setting
"AV-IN1"
Select the AV1 INPUT source.
"AV-IN2"
Select the AV2 INPUT source.
Power
Turns power ON or OFF
Press the [POWER] button.
Display information
When you press the [INPUT] button, the status of
the monitor is displayed.
Mode
Full
I
R
2 MHz
AV-IN2
1
3
2
1 Screen mode Display
2 IR headphones output frequency display
3 Video source Display
/
· The information display is cleared automatically after
approximately 5 seconds.
English |
5
/
· The "TIN" can be adjusted when NTSC video signal is
input.
· The screen select can be set for each source.
· If you make no operation for 15 seconds, this mode
is automatically canceled.
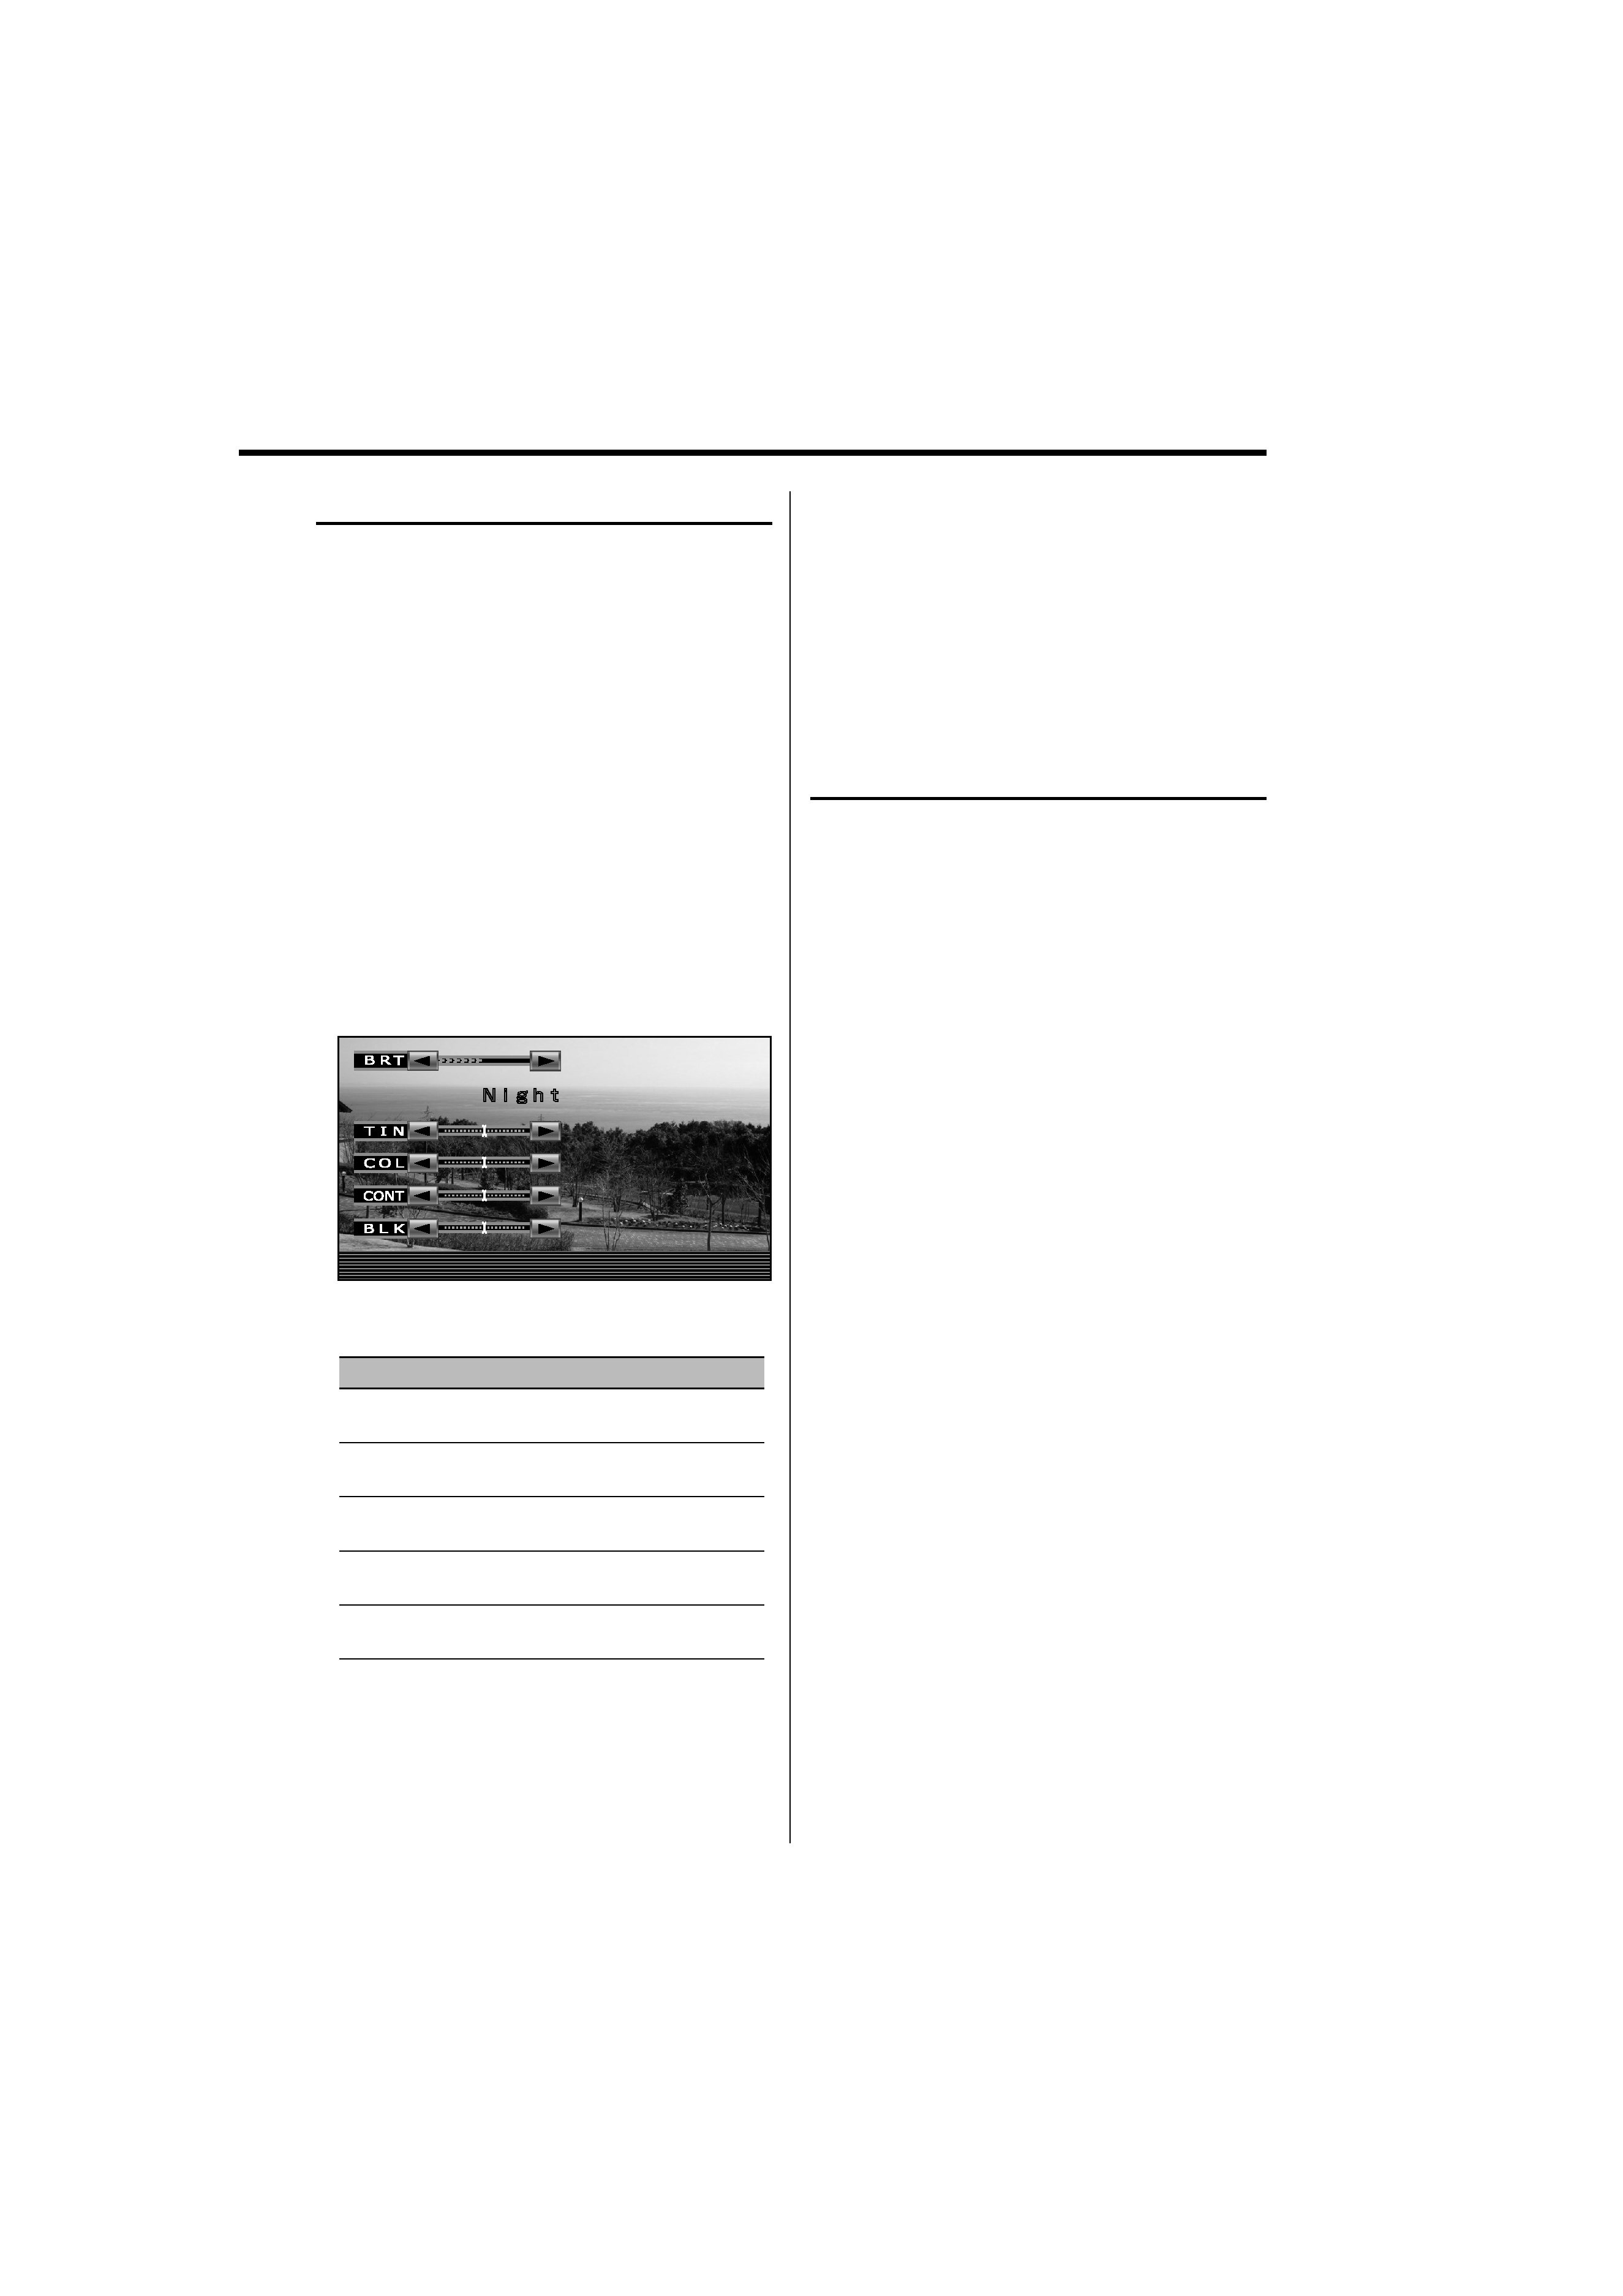
Picture Quality setting
You can adjust the picture quality control of the
monitor.
1 Enter Picture Quality setting mode
Press the [MENU] button for at least 2
seconds.
2 Select the screen for brightness ("BRT")
setting
Press the [SCRN] or [DIM] button for at least
2 seconds.
Pressing the button for at least 2 seconds
toggles between the "Day" screen (for daytime
brightness setting) and the "Night" screen (for
nighttime brightness setting).
3 Select the adjusting item
Press the [MENU] button.
Each time the button is pressed, the adjusting
item switches.
4 Adjust the item
Press the [
2] or [3] button.
Item
Button
Setting
"BRT"
[
3]
[
2]
Brighter screen
Darker screen
"TIN"
[
3]
[
2]
Stronger red level
Stronger green level
"COL"
[
3]
[
2]
Deeper color
Paler color
"CONT"
[
3]
[
2]
Stronger contrast
Less contrast
"BLK"
[
3]
[
2]
Less black level
Stronger black level
5 Exit Picture Quality setting mode
Press the [MENU] button for at least 2
seconds.
Selection of Screen Brightness
Setting
You can switch between the daytime screen
brightness and nighttime screen brightness
adjusted in the Picture Quality setting mode.
Press the [DIM] button.
Pressing the [DIM] button toggles between the
daytime screen brightness and nighttime screen
brightness adjusted in the Picture Quality setting
mode.