CD PLAYER
DP-J695
INSTRUCTION MANUAL
CORPORATION
This instruction manual is used for two models.
Model availabilityand features (functions)maydiffer depending on the country and sales area.
This unit is designed
for home use only.
If the unit is used in a locationotherthan at home, such as in a shop (for commercial
use), in a car or in a ship, etc., and is damaged,
a service
fee may be charged even
during the warranty
period.
For your records
Recordtheserial number, found on the back of the unit, in the spsces designated on the warranty
card.
and in :he space provided below. Refer to the model and serial numbers whenever you call upon your
dealer for information or service on this product.
Model
Serial Number
Unpacking
Unpack the unit carefully and make sure that all accessories are put aside so they will not be lost.
Examinethe unit for any possibility of shipping damage.
If your unit is damaged
or fails tooperate, notify
your dealer immediately.
If your unit was shipped to you directly, notify the shipping company without
delay. Only the consignee (the person
or company receiving the unit) can file a ciaim against the carrier
for shipping damage
We recommend that you retain the original carton and packing materials for use should you transport
or
ship the unit
in the future.
Accessories
Liner note file (1)
Audio
cord (1)
System control cord (1)
Remote control unit (1)
Batteries (R6/AA) (2)
AC plug adaptor (1)
Use to adapt the plug
on the power cord to the shape of the wall outlet
DIGITAL AUDIO
(Accessory only for regions where use IS necessary
)
860-2217-10
10987654321
1098
--
*#e:J3
Units
are designed
for operation as follows.
U.S.A.
and Canada
.......... ....
...........................
......AC 120 only
Australia
.........................
................................................... AC240 V only
Europe
and U.K.
V only
countries
V switchable
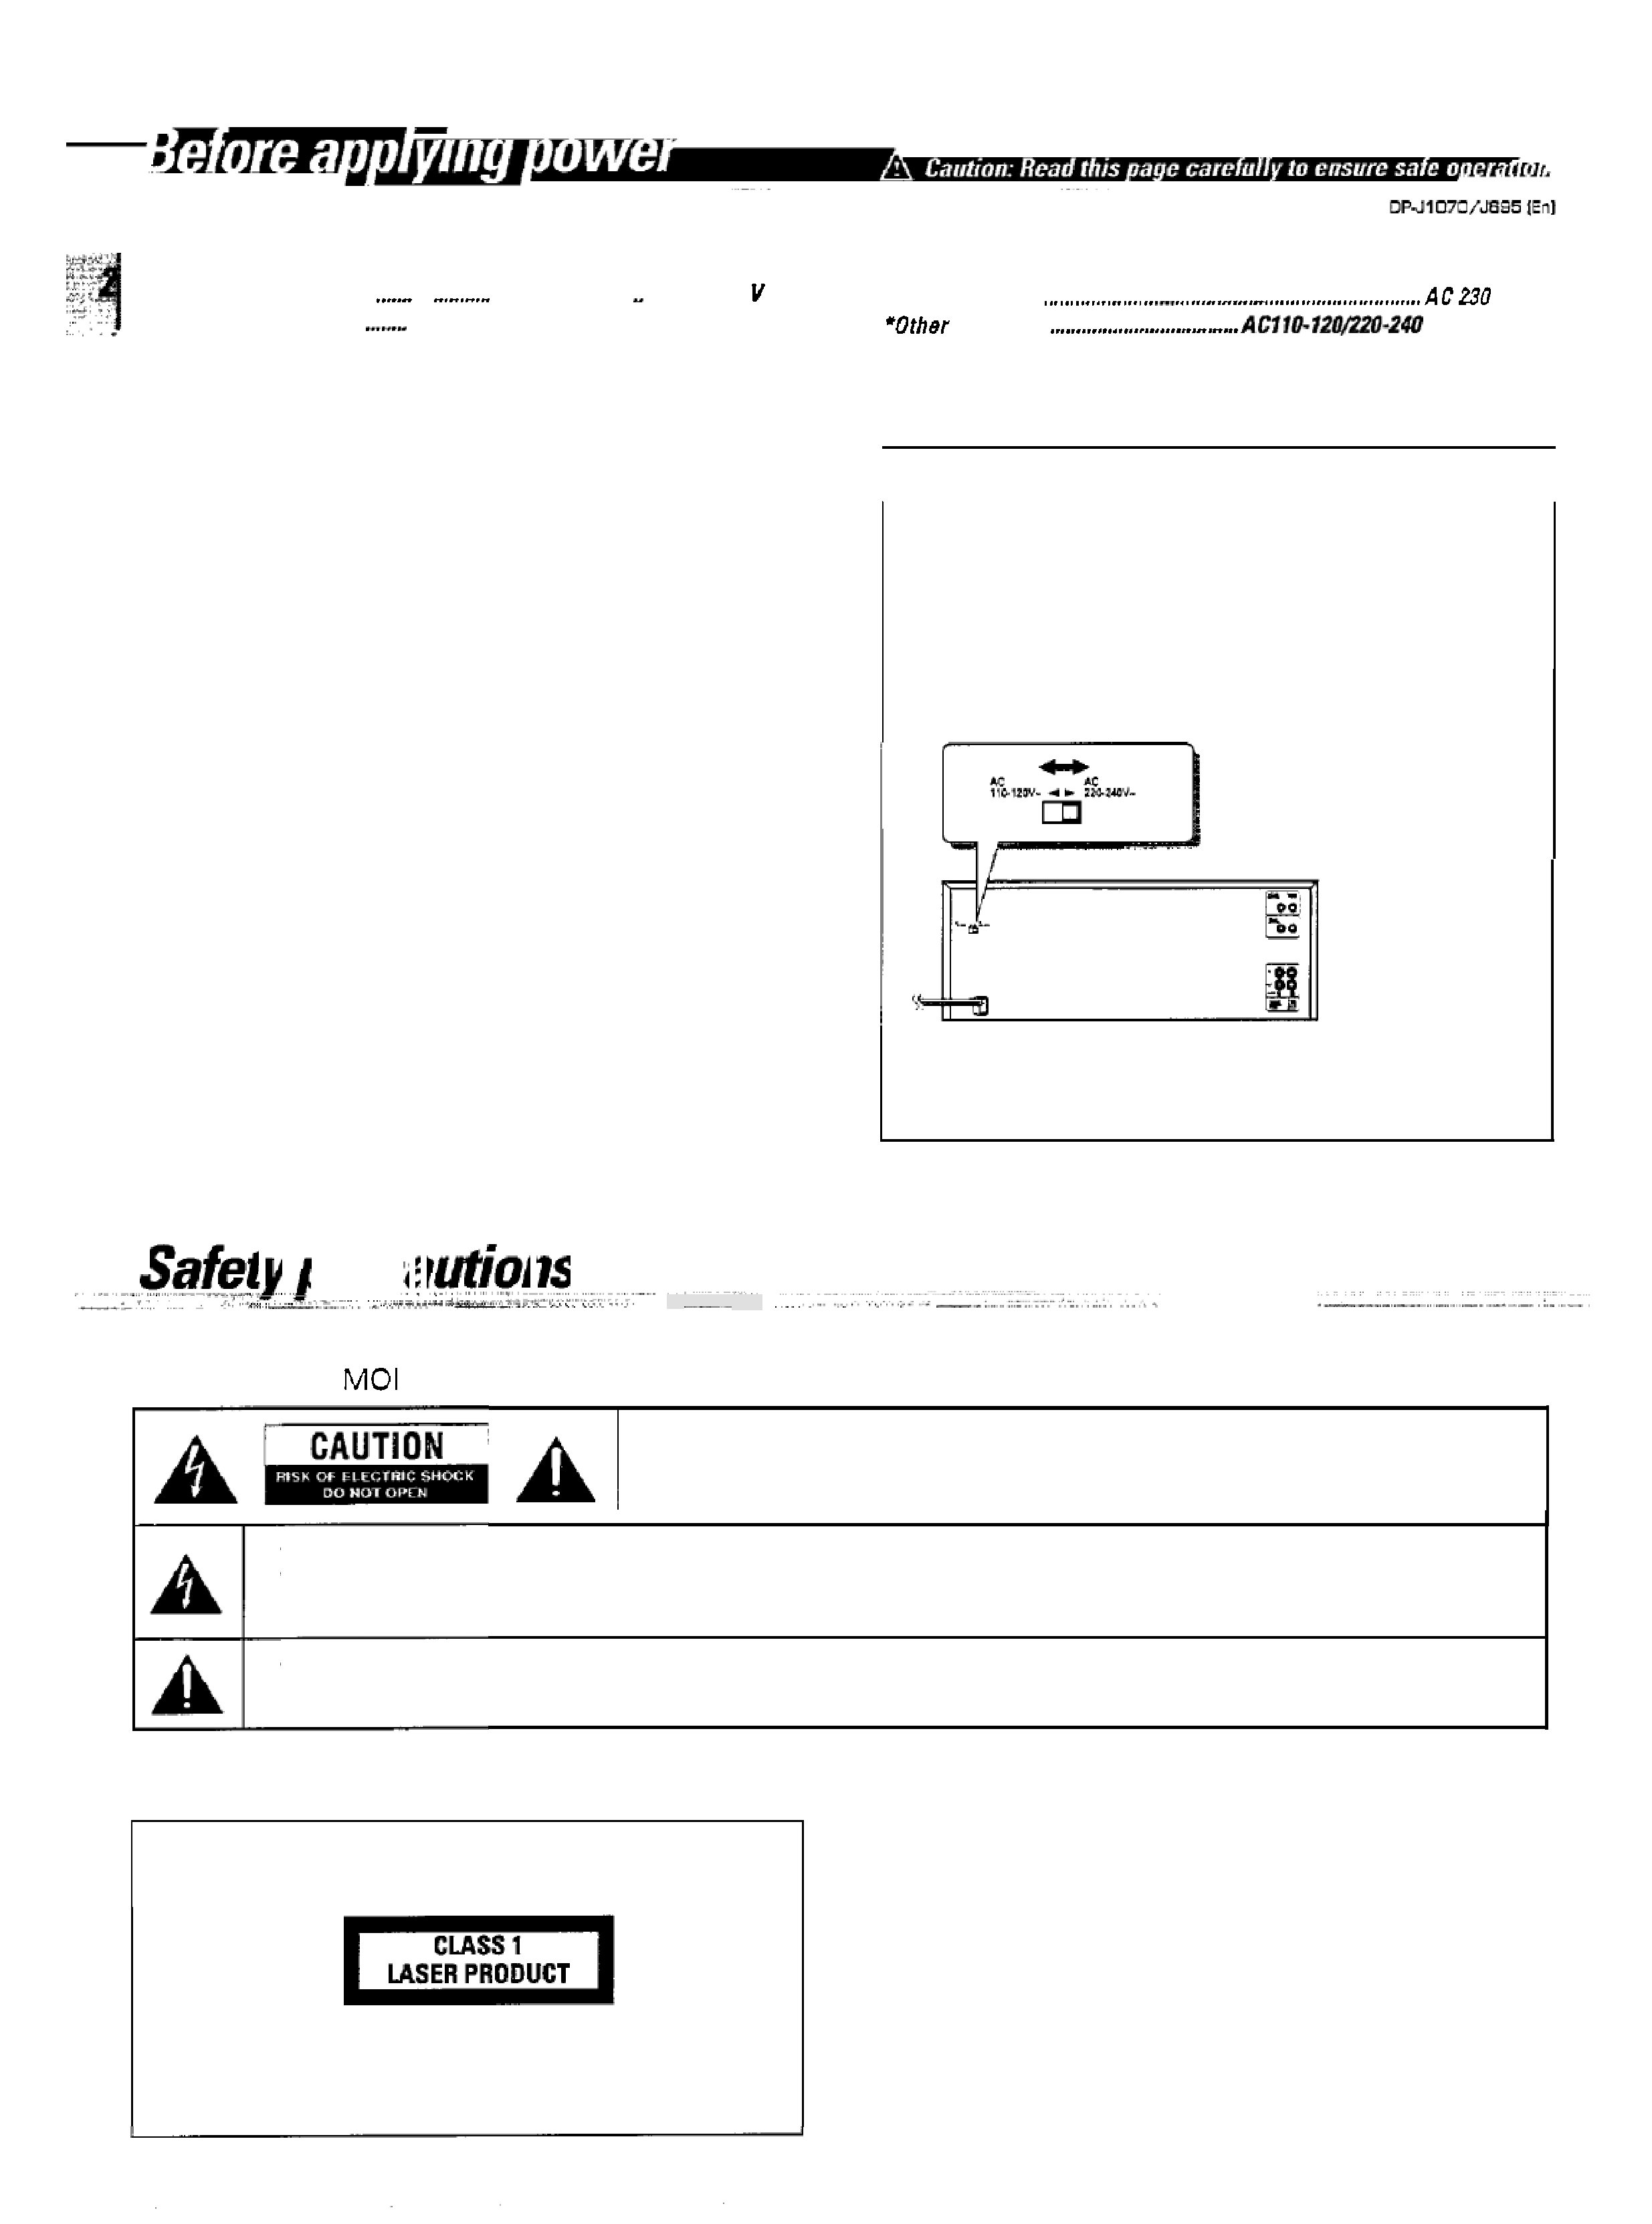
*AC
voltage selection
I
The AC
voltage selector switch on the rear panel is set to the
voltage that prevails in the area to which the unit
is shipped Before
connecting the power cord to your
AC outlet, make sure that the
setting position
of this switch matches your line voltage. If not, it
must be set to your voltage in accordance with the following
direction.
AC voltage selector switch
Movs switch lever to match your
line voltage
with a small screw
driver
or other pointed tool.
Note:
Our warranty does not cover damage caused by excessive line
voltage due to irnprooer setting of the AC voltage selector switch.
WARNING: TO PREVENT FIRE OR ELECTRIC SHOCK, DO NOT EXPOSE THIS APPLIANCE TO RAIN OR
STU
RE.
I
CAUTION: TO REDUCE THE RISK
OF ELECTRIC SHOCK, DO NOT REMOVE COVER (OR
PERSONNEL.
BACK). NO USER-SERVICEABLE PARTS INSIDE, REFER SERVICING TO QUALIFIED SERVICE
THE LIGHTNING FLASH WITH ARROWHEAD SYMBOL WITHIN AN EQUILATERALTRIANGLE, IS INTENDED TO ALERT THE USER TO
THE PRESENCE
OF UNINSULATED "DANGEROUSVOLTAGE" WITHIN THE PRODUCT'S ENCLOSURETHATMAY BE
OFSUFFICIENT
MAGNITUDE TO CONSTITUTE A RISK OF ELECTRIC SHOCK TO PERSONS.
THE EXCLAMATION POINT WITHIN AN EQUILATERAL TRIANGLE IS INTENDED
TO ALERT THE USER TO THE PRESENCE OF
IMPORTANT OPERATING AND MAINTENANCE (SERVICING)INSTRUCTIONS INTHE LITERATUREACCOMPANYING THE APPLIANCE.
The marking of products using lasers
(Except for some areas.)
The label is attached to the rear panel and says that the component
uses
laser beams that have been classified as Class 1. It means that
the unit is utilizing laser beams that are of a weaker class. There is
no danger of hazardous radiation outside the unit.
CD Player with 100-discchanger
Thisunitcan accommodateup to100 discs and can beusedlike
a homejukebox.
Programmed Playback
Desired tracks from up to
100
discs can be selected and
programmed in a desired order. (Maximum
32tracks)
Editing
Whenrecordinga disc on a
cassettetape, thetracks onthe disc
can be assigned properly t o the tape sides so that no tracks
is
interrupted in the middle.
When this unit is connected with
CD
player(s)
equipped with the relay control jacks or system control jacks
using mini-plug cord (s) (optional), continuous
playback between two
or three
CD players such as relay
playback is possible.
Continuous
relay playback
Before applyingpower
Safetyprecautions
Special features
Before operation
System
connections
Controlsand indicators
Operationof remote control
unit
Preparation
Operations
for Playback
Relay playback
Timer operation
Maintenance
In case of difficulty
Specifications
......
...
.............................................................................................
2
.................................................................................
.........................................................
2
..........................................................................................................................................
3
...............
.
.........................................................................................
4
......
................................................
5
.
.......................................................................................................
7
Remote control unit
.......................................................................................................
..........................................................................................................................................
Loading batteries
...............................................................................................................
9
Operation
................................................................
........................................
9
Loading discs in
disc racks
...............................................................
...............................................................................................
Playing a desired disc in order
from track No. 1
.12
Playback from desired track
Programming tracks in desired order
..............................................................................
Repeated playback
.........................................................................................................
18
Playback in
a
random order (Random
.....................
19
Editing
.............................................................................................................................
........................................................................................................................................
22
Possible connection systems and operations
.................................................................
22
Relay playback
.................................................................................................................
24
Relay random playback (System
A only )
.
..........................................................
24
........................................................................................................................................
27
.........................................................
.....
...................................................................
..................................
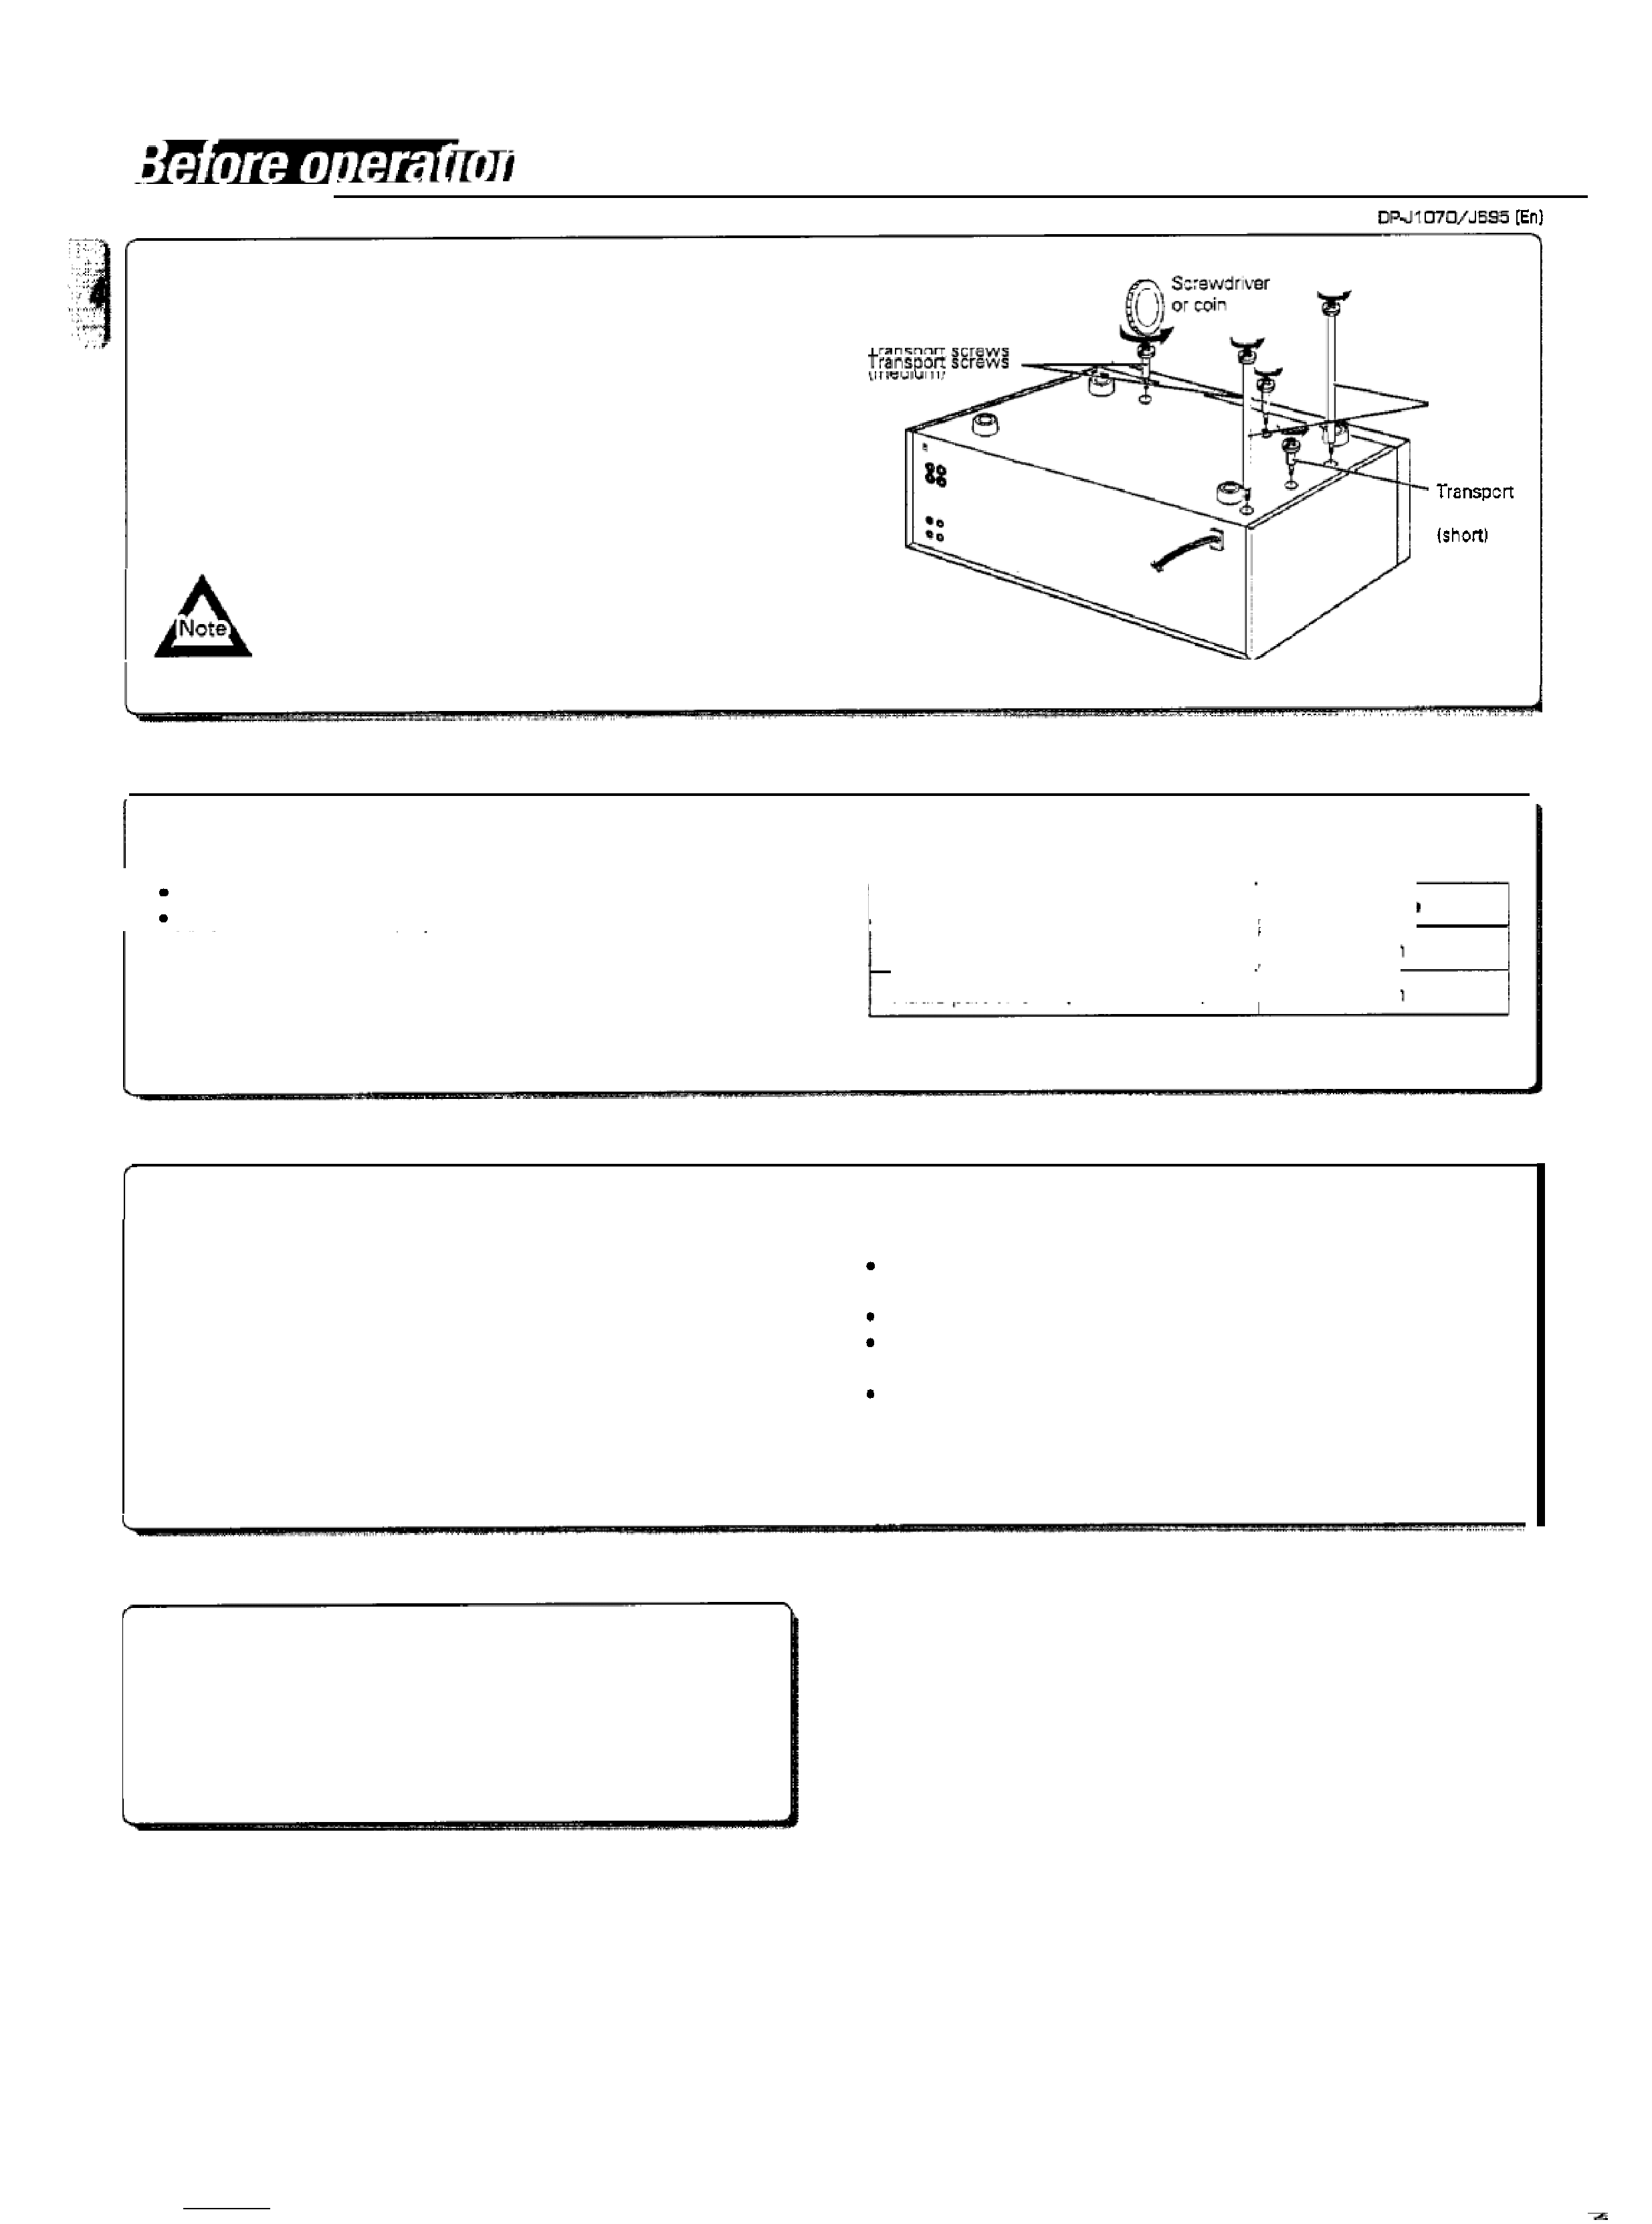
Removing
thetransportscrews
Before using the
unit, remove the 5 red transport screws
(longx 2,
medium x 2, short x1)on the rear panel.
The screws can be removed by rotating in the directions
of the arrows.
Aiter removing, be sureto retainthe screws in aplasticbag, etc. They will
be required the next time the unit is transported.
Before transporting theunitagain, remove all discs fromthe rack, switch
the power OFF and attach screws to their respective transport fixing
holes.
Transport
screws
(long)
screw
This unit incorporates precision mechanisms. Avoid
applyingshock to the unit after the transport screws have
beer, removed. Shock may cause malfunction of the
mechanisms.
Typesof discs playable
onthisunit
Disc Type
Disc
Size
With CDV, the time information is displayedonly
for the audio part.
An
8cm CD cannot be played back.
12 cm
12
cm
CD (ordinaryCompact Disc)
Audio part of
CDV (CD with video)
Beware of
condensation
When water vapor comes into contact with the surface
of cold
material, water drops are produced.
if condensation occurs, correct operation may not be possible or the
unit may not function correctly.
This is not a malfunction, however, and the unit should be dried.
(To do this, turn the POWER switch
ON and leavethe unit as it isfor
several hours.)
Be especially careful in the following conditions:
When the unit is brought from a cold place to warm place, and there
When a heater starts operating.
When the unit is brought from an air-conditioned place to a place of
high temperature with high humidity.
When there is a large difference between the internal temperature
of
the unit and the ambient temperature, or in conditions where
condensation
occurs easily.
is a large temperature difference.
Linernote file
The liner note file provided as accessory is convenient or storing the
liner notes or jackets of the CDs loaded in this
unit. Findingthe desired
disc will be easy if the liner notes are filed here in order of the disc
numbers when loading
CDs in this unit.
... .... . ....
.....
.................................................................................................
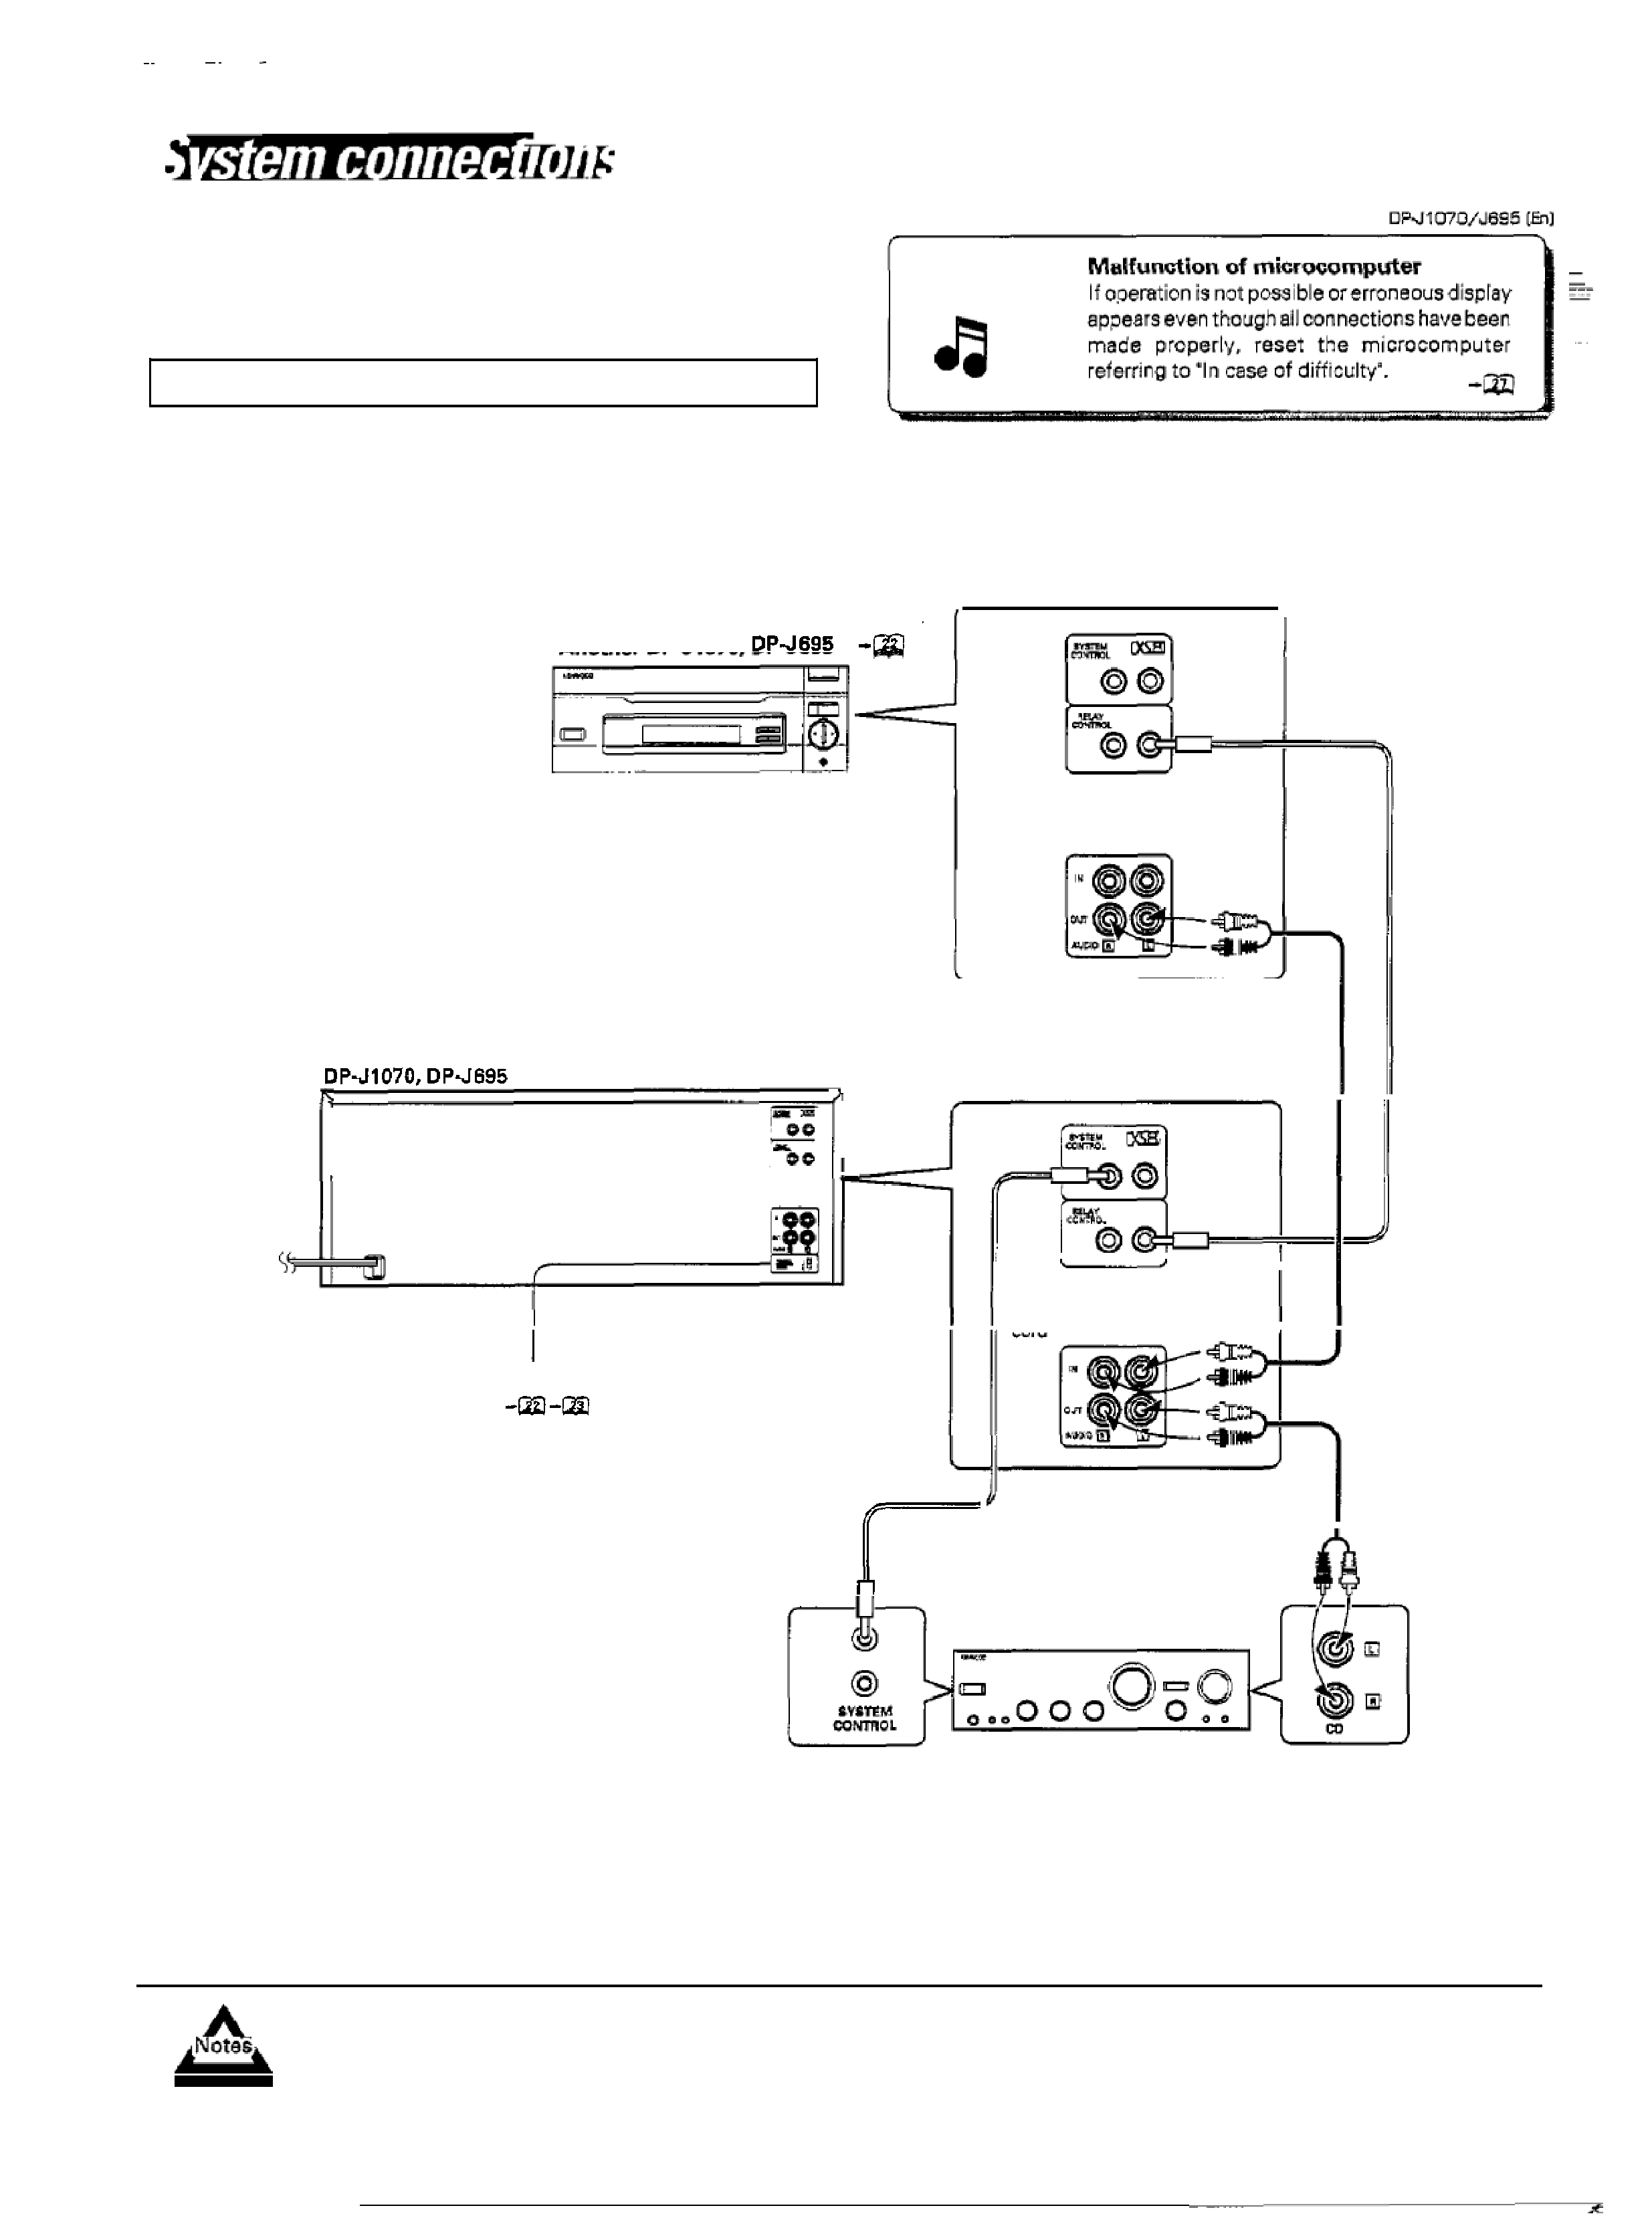
M a k e connections
as shown
below.
Whenconnecting
therelatedsystemcomponents,
referalsoto
the
instruction manuals of t h e related components.
Donot plugin
th epower lead until
all connections are completed.
Be
sure to use this unit placed on a level surface.
To AC outlet
Another DP-J1070,
I
Audio cord
REMOTE
CONTROL
MODE
switch
I
System
control
cord
I
Mini-plug cord
(optional)
Audio cord
Amplifier or receiver
1
Connect all cords firmly. If connections are
loose, there could be loss of sound or noise produced.
2
When plugging and unplugging connection cords, be sure to first remove the power cord from the AC outlet Plugging/unplugging
connection cords without removal of the power cord can cause malfunctions
or damage to the unit.