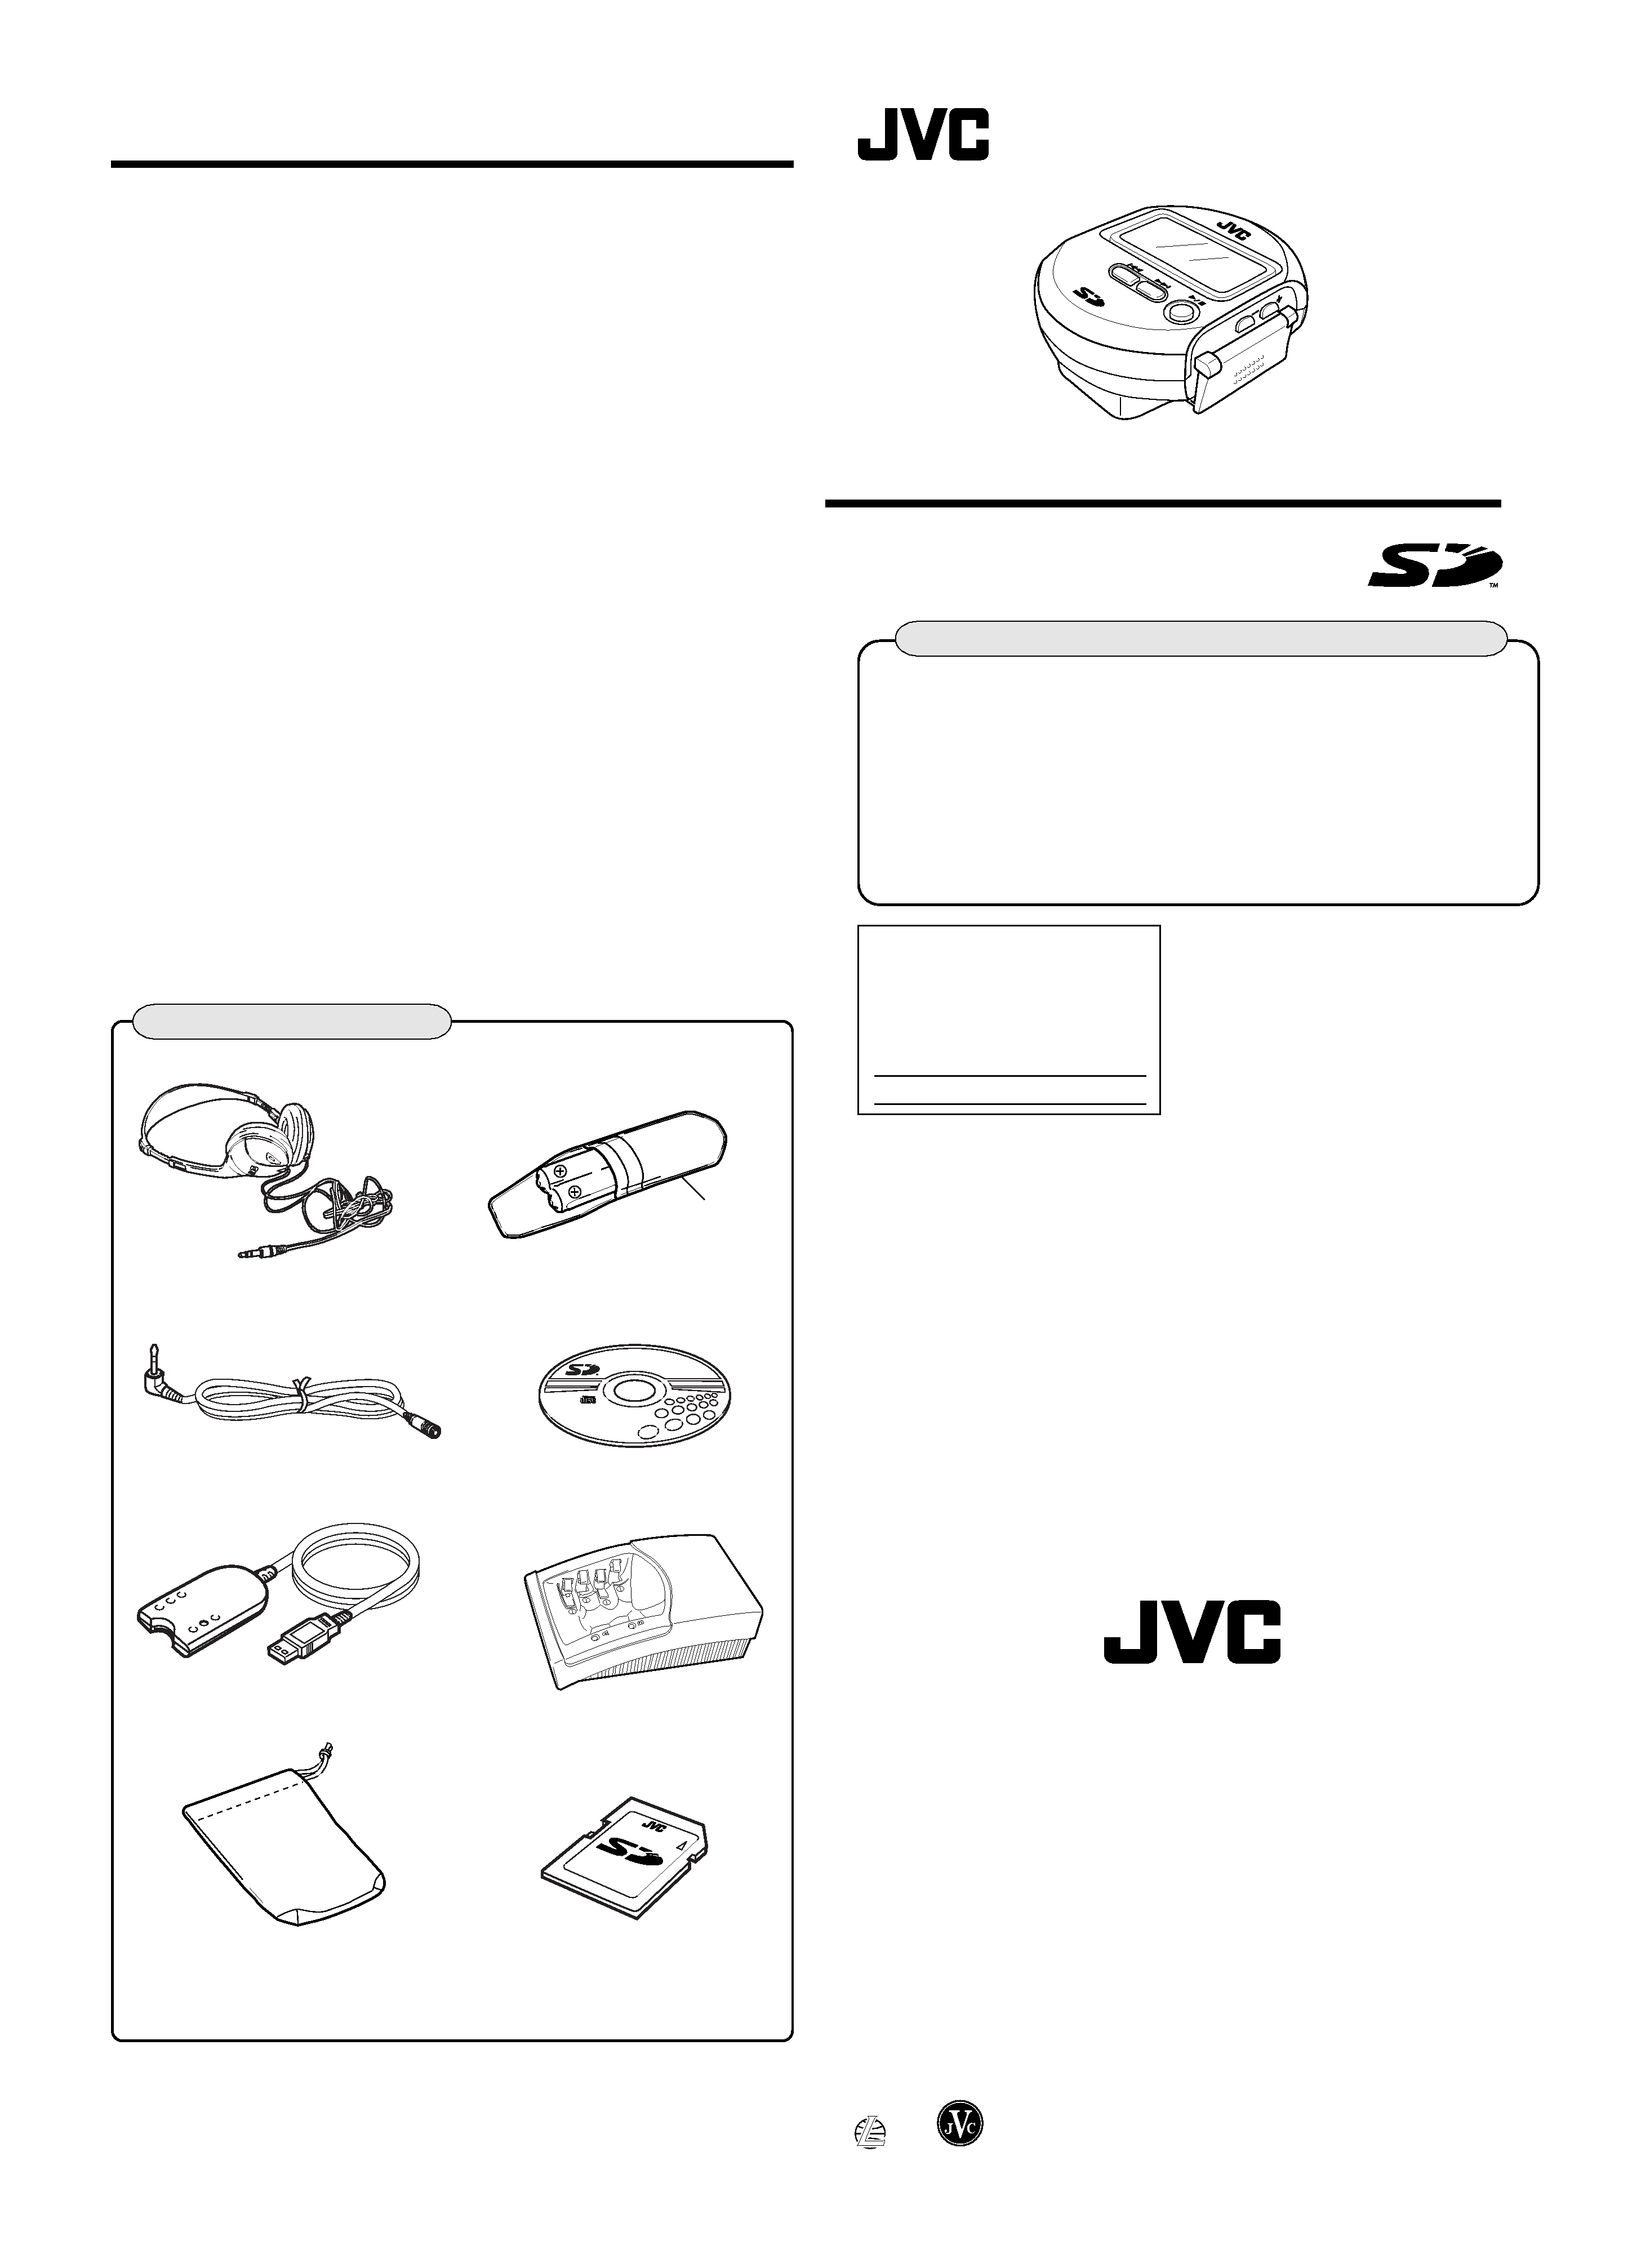
CD-ROM (Media Manager) 1 pc.
SD audio player
Type
: SD audio player
Sampling rate
: 32 kHz/44.1kHz/48kHz
Audio format
: AAC format/MP3 format
Number of channels
: 2 channels (stereo)
Frequency response
: 20 Hz to 20,000 Hz (+0dB, 6dB)
Maximum recording time (with a 64 MB SD memory card)
High-quality rec.
: Approx. 64 minutes (128 kbps)
Standard rec.
: Approx. 86 minutes (96 kbps)
Long-hour rec.
: Approx. 129 minutes (64 kbps)
Output
: Headphones (3.5 mm dia. stereo
× 1)
2.5 mW/ch (32 ohms)
matching impedance (16 ohms to 47 kohm)
Duration of battery
: Approx. 11 hours when using two fully
charged rechargeable batteries
Approx. 17 hours when using two alkaline
batteries (L30 (24A), AAA size)
Power requirements
: DC 1.2 V (rechargeable battery)
DC 1.5 V (AAA size battery)
Two batteries are used in parallel.
Dimensions (W
× H × D) : 21/8"× 13/16" × 29/16" (53.5 × 30.5 × 65 mm)
(Excluding buttons and controls)
Mass
: Approx. 0.172 lbs (78 g)
(without batteries)
Battery charger
Input power source
: AC 120 V, 60 Hz
Output voltage
: DC 1.7 V, 950 mA
* Design and specifications are subject to change without notice.
This main unit is resistant to spray.
INSTRUCTIONS
XA-SD1
LVT0718-002A [J]
Specifications
Headphones 1 pc.
Rechargeable battery (BN-R1213)
1 pack (2 pcs.)
USB reader/writer unit 1 pc.
Battery charger (AC-R129) 1 pc.
Carrying pouch 1 pc.
Supplied Accessories
SD memory card (64 MB) 1 pc.
Extension cord 1 pc.
After checking the accessories, perform check-out (recording) on
the SD memory card using the following procedure.
For more details, read the operating instructions of Media Manager
and the Online Help of RealJukebox®.
1 Install the USB reader/writer driver and installation
software (RealJukebox®) in the CD-ROM in your PC.
2 Connect the USB reader/writer to the PC.
3 Open RealJukebox® and perform check-out of the SD
memory card.
Be sure to read this before any other information
Battery case
SD
AUDIO
PLA
YER
XA-SD1
VO
LU
M
E
· SD logo is a trademark.
· Portions of this product are protected under copyright law and are
provided under license by ARIS/SOLANA/4C.
· RealJukebox® is a registered trademark of RealNetwork, Inc.
SD Audio Player
For Customer Use:
Enter below the Model No. and Serial
No. which are located either on the rear
of the cabinet or inside of the battery
compartment. Retain this information
for future reference.
Model No.
Serial No.
Thank you for purchasing this JVC
product. Please read these instructions
carefully before starting operation to be
sure to obtain optimum performance and
a longer service life from the unit.
Remove the rechargeable batteries from their case before use.
Use numbers indicated in parentheses when asking for replacement parts.
Check the packing carton for these accessories.
VICTOR COMPANY OF JAPAN, LIMITED
Printed in Japan
0601HMMWSTOZK
EN
1
#
Insert two rechargeable
batteries in the battery
charger.
1
· Insert them in the correct
ª
and
· polarity as indicated
inside the battery charger.
· The two batteries will be
recharged separately one after
another.
Recharging the Rechargeable Batteries
Notes on battery replacement
During recharging of the batteries, use two L30 (24A) alkaline batteries,
which is available in electric appliance stores. The built-in clock display
can be retained by changing the batteries within 30 seconds.
I Caution for use of dry cell batteries:
Be sure to use L30 (24A) alkaline batteries. Manganese batteries cannot be
used to power the unit.
I Remaining battery power display:
Use the remaining battery power indicator in the display panel as the
reference for identifying the available power.
2
· If two batteries are inserted in the battery charger that has already been
plugged into the power outlet, the first-inserted battery will be re-
charged first.
· Fast blinking refers to one blink per about 1 second, and slow blinking
refers to one blink per about 3 seconds.
Insert the power plug blades
into a household power outlet.
· Recharging begins with the
battery inserted in position A. The
recharging of two batteries will
complete in about 4-1/2 hours.
· It is possible to recharge about
300 times.
· After recharging completes,
remove the power plug blades
from the power outlet.
Insert batteries in the Main unit.
Insert batteries.
2
Open the battery compartment cover.
1
Close the battery compartment cover.
3
Hold mode
Charge indicator lamps
The hold mode protects the unit against accidental press of control buttons.
It prevents the following acci-
dents:
· Battery exhaustion by turning the
unit on without noticing it.
· Interruption of playback due to
accidental press of a button.
1
2
Rechargeable battery: (BN-R1213)
(supplied)
To a household
power outlet
Card cover
(Open it while pushing the
battery compartment cover.)
Battery
compartment
cover
Battery compartment
cover
Card cover
· Insert them in the correct
ª
and
· polarity as indicated
inside the battery compartment.
(You can use L30 (24A)
alkaline batteries or recharge-
able batteries only.)
Compartment A
Compartment B
Preparing the power supply Insert rechargeable nickel metal hydride batteries (BN-R1213, hereinafter referred to as rechargeable batteries) or L30 (24A) alkaline dry cell batteries.
Blinking
Recharge
(or replace).
High
Low
Compartment A
Compartment B
A charging state
B charging state
Completed
Charging
Finished
Finished
(Fast on-and-off)
(Continuous on)
(Continuous on)
(Continuous on)
(Fast on-and-off)
Charging
Finished
(Slow on-and-off)
MODE
NORM
HOLD
CARD
: PUSH
RELEASE
CARD
: PUSH
RELEASE
1
2
23
SD
AU
DIO
PL
AYE
R X
A-S
D1
MODE
HOLD
NOMR
CARD
: PUSH
RELEASE
VOLUME
2
3
MODE
NORM
HOLD
SD
AUDIO
PLA
YER
XA-SD1
MODE
HOLD
NOMR
CARD
: PUSH
RELEASE
1
SD
AUDIO
PLA
YER
XA-SD1
VOLUME
CAR
D :
PU
SH
RELEASE
Insert an SD memory card con-
taining data check-out (recording).
Playback
1
CA
RD
: P
US
H R
ELE
AS
E
Set to NORM.
Extension cord
(supplied)
Press
3/7.
The unit is turned on and playback starts.
Adjusting the volume
Press and hold to vary continuously.
Y Hold the SD memory card with the
label side up, then insert the card
from the side having cut corners.
~ Slide the card cover on the side of
the unit in the direction of the arrow
and open the card cover.
Open it while pushing the battery com-
partment cover.
! Insert the SD memory card by
pushing the center of its edge until
it locks, then close the card cover.
Connect headphones.
To use an extension cord, see below.
Note
Never insert the SD memory card upside
down. Otherwise, it will not be able to be
removed.
Immediately
after press
Approx. 2 sec.
later
Track No.
Elapsed play time
Track title
Volume level meter
Volume level (Adjustment range 0 to 25)
Insert the plug
firmly.
To
decrease
To
increase
Card cover
Stop playback
and turn the
unit off.
Press
3/7.
The unit is turned off automati-
cally in about 10 seconds.
I Resume
When
3/7 is pressed again after the unit has
been turned off, playback resumes from the
position at which the unit was turned off.
However, playback starts from the first track if
the SD memory card is changed or batteries are
removed and inserted again while the unit is off.
To remove
the SD
memory card
While playback is stopped, open the card
cover (operations ~ in step 3 above) and
unlock and remove the SD memory card by
pushing its center area.
Card cover
4
5
Using the convenient features
MODE
NORM
HOLD
MODE
NORM
HOLD
MODE
NORM
HOLD
Preparation
Set the MODE switch knob to "NORM".
Skipping tracks
Press
4/¢ during playback.
· When the all-track repeat mode (see below) is set, it is also possible to
skip from the final track to the first track.
· In the random play mode (see below), it is not permitted to skip to a
track which has already been played.
To skip backward To skip forward
Forward search/
Reverse search
Press and hold
4/¢ during playback.
· When the all-track repeat mode (see below) is set, it is also possible to
search the memory from the final track to the first track.
· In the random play mode (see below), it is not permitted to search disc
into a track which has already been played.
Selecting track
To skip
backward
To skip
forward
· If you hold the key depressed in step 2, the
track numbers can be varied in sequence.
· When the unit is left untouched for more
than about 10 seconds after playback is
stopped or a track is selected, the unit
will be turned off automatically.
Repeat playback
Random playback
Preparation
Set the MODE switch knob to "MODE".
Each press alternates:
Press VOLUME during playback.
Press VOLUME + during playback.
Each press alternates:
In the playlist play mode (see
below), repeat or random playback
plays only the tracks in the selected
playlist.
(To repeat a single track) (To repeat all tracks)
(To play all tracks in a
random order for once)
No display
(Cancel)
Selecting the
sound
(Extra bass)
(Easy for the ears, preventing
outside sound leak)
No display
(Cancel)
(VOLUME button)
(VOLUME button)
Playlist playback
RealJukebox® does
not support the
playlist playback.
After setting
Set the MODE switch knob to "NORM".
Forward search
Reverse search
67
1 Press
3/7 during
playback.
2 Press
4/¢ to
select a track.
3 Press
3/7 to play
the selected track.
Playback is stopped.
1 Press
¢ during playback.
2 Press
¢.
Number of playlists
Blink
3 Press VOLUME +/ to
select a playlist number.
Playlist No.
Total play time
Playlist
title
Total number
of tracks
Press
¢.
\
The clock/playlist
setting mode starts.
· If you selected a playlist in stop mode, press
3/7 to start playback.
· To return to all-track play mode, select "
" (default Playlist) in step 3.
· To cancel the above procedure in the middle, set the MODE switch knob to "NORM" any time you want.
Tracks in the
selected playlist
will be played
automatically.
Adjusting the clock
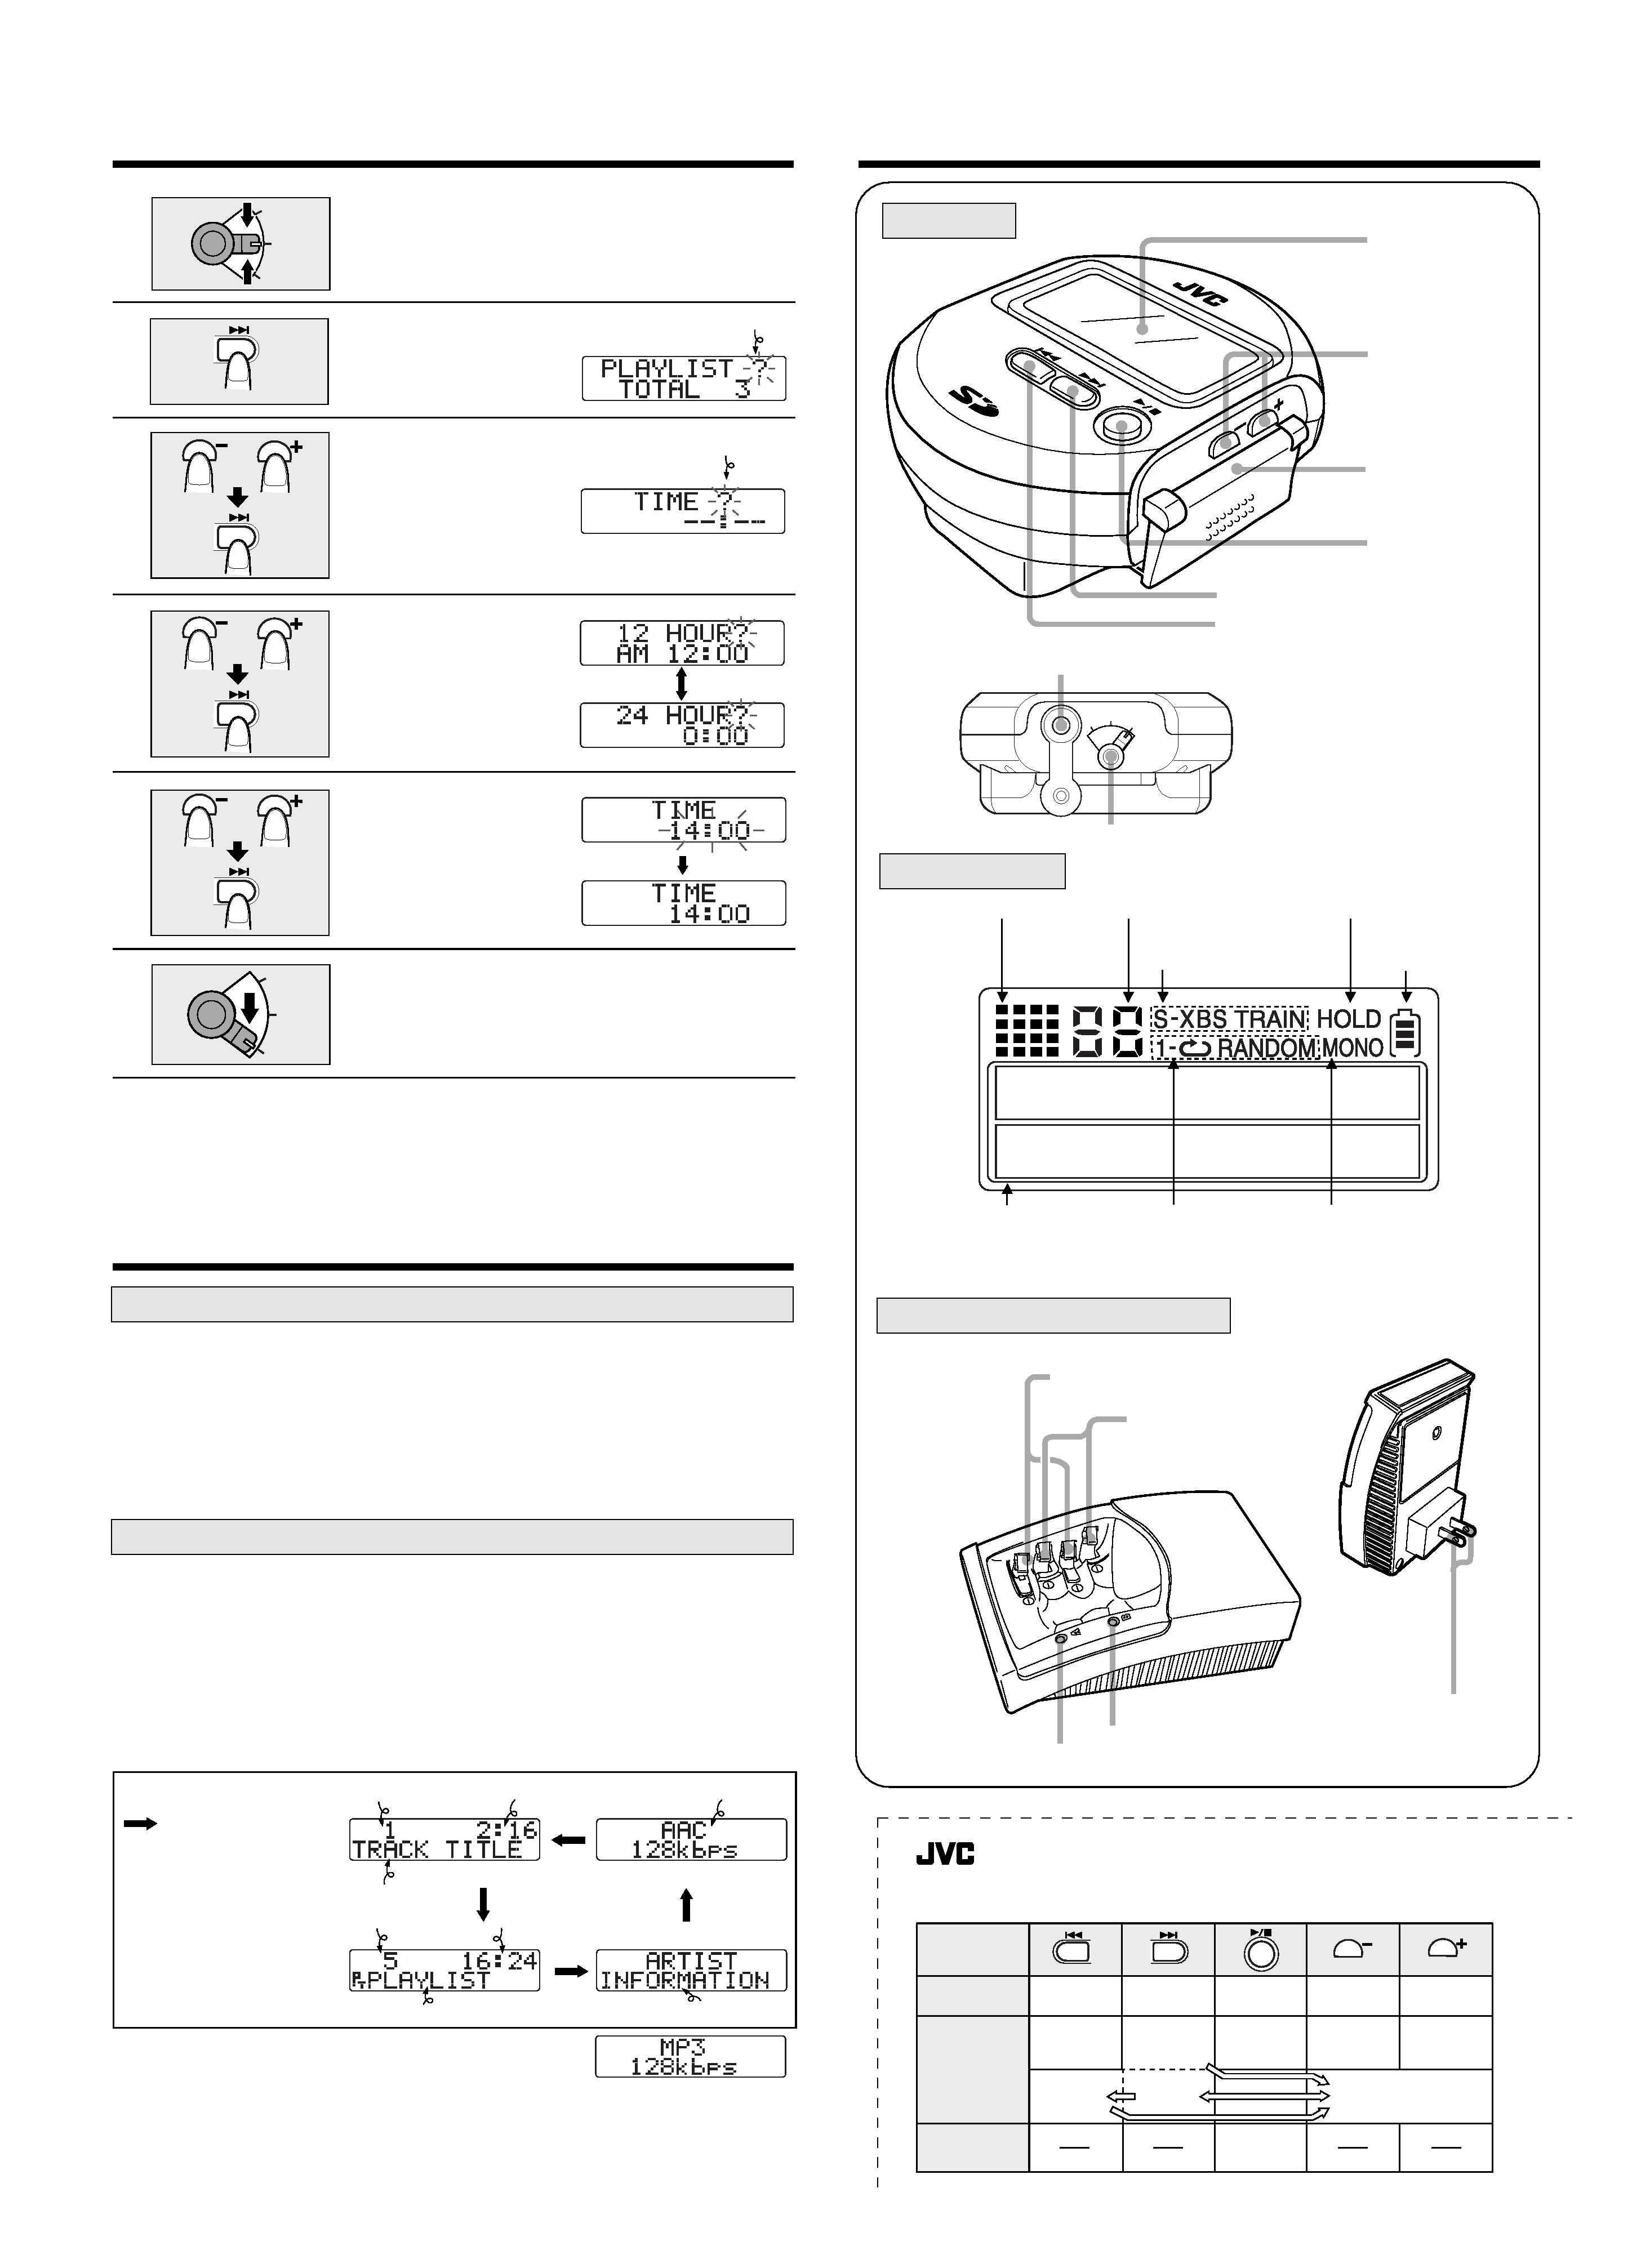
Controls
Adjustment and Switching of Display Panel
1
2
3
4
5
6
MODE
NORM
HOLD
MODE
NORM
HOLD
SD A
UDIO
PLA
YE
R X
A-S
D1
VO
LUME
MODE
NORM
HOLD
Adjusting the contrast
Main unit
The clock is displayed for about 2 seconds when either operation below is performed.
· When the MODE switch knob is set to "HOLD" during playback.
· When
3/7 is pressed while the unit is in the hold mode.
To maintain the accuracy of clock, it is recommended to adjust the time of
the day periodically.
· When a track title, playlist title or artist information is too long to be
displayed once, it is displayed by scrolling (moved toward the left).
· This unit may not be capable of displaying certain letters such as
Chinese characters.
* The above bit rate display is an example with a track
recorded in the AAC format. With the track recorded in the
MP3 format, the display becomes as shown on the right.
* The functions of the buttons
marked * vary depending on
the setting of the MODE
switch knob. For details, see
the quick operation reference
chart.
1
2
Set the MODE switch knob to "MODE" during playback.
Press
4 to switch information.
1
2
3
Set the MODE switch knob to "HOLD" during playback.
While holding
3/7 depressed, adjust contrast by
pressing VOLUME + (to brighten) or (to darken).
Set the MODE switch knob to "NORM".
3 Set the MODE switch knob to "NORM".
Switching the displayed information
(Side)
Display panel
Battery charger (AC-R129)
Set to "MODE" during playback.
To cancel the following procedure in the middle,
set the switch knob to "NORM" any time you
want.
Press
¢.
The unit enters the clock/
playlist setting mode.
blink
blink
Select "TIME?".
«
Press
¢.
The unit enters the clock
setting mode.
Select either
display mode.
12-hour or 24-hour?
«
Press
¢.
Adjust the time.
«
Press
¢.
Count of time starts.
Set to "NORM".
: Each press switches the
displayed information.
The displayed information returns
to the track title display after it
has been displayed for a few
seconds.
To keep information displayed,
continue holding the key.
Track title
Artist information
Bit rate display*
Elapsed play time
Track No.
Total number of tracks
Total play time
Playlist title
Display panel
+/ VOLUME
buttons*
SD memory card
insertion slot
3/7 (play/stop)
button*
¢ (Forward skip/search) button*
4 (Reverse skip/search) button*
MODE switch knob
(Headphones) jack
Operation indicators
Playlist No. display
Sound indicators
HOLD mode indicator
Remaining battery
power indicator
Character information/
play time display
Play mode
indicators
MONO indicator
(Indicates that the current
tracks has been recorded
in the monaural mode.)
LR03 battery
seats
LR6 battery seats
Power plug
Charge indicators B
Charge indicators A
MODE Control
Position
Skip/Fast
Reverse
NORM
Play/Stop
Volume Up
Volume Down
Cancel
selection
Enter
selection
MODE
HOLD
Skip/Fast
Forward
Display
change
Play/Stop
Clock
Clock/playlist
setting mode
Play mode
change
Sound
change
Selection in clock/
playlist setting mode
* If you cut out this sheet for use, it is
recommended to retain it between plastic
sheet holder and etc. to conserve the paper.
SD Audio Player XA-SD1
Quick Operation Reference
for Each Mode
Cut here
Cut
here
89