INSTRUCTIONS
For Customer Use:
Enter below the Model No. and Serial
No. which are located either on the rear,
bottom or side of the cabinet. Retain this
information for future reference.
Model No.
Serial No.
LVT0852-006A
[A]
RX-7022VSL
DVD
VCR
TV SOUND/DBS
ADJUST
RX-7022V
AUDIO/VIDEO CONTROL RECEIVER
SETTING
MASTER VOLUME
CONTROL
DOWN
UP
CD
TAPE/CDR
SOURCE NAME
BASS BOOST
INPUT
ANALOG/DIGITAL
SPEAKERS ON/OFF
SURROUND MODE
PHONES
SURROUND ON/OFF
FM/AM TUNING
STANDBY
STANDBY/ON
FM/AM PRESET
FM MODE
MEMORY
INPUT ATT
FM/AM
DVD MULTI
PHONO
SOURCE NAME
12
COMPULINK
Remote
CONTROL
+
-
+
-
+
-
23
1
56
4
89
7/P
0
+10
10
BASSBOOST EFFECT
MENU
ENTER
TEST
REAR·L +
DIMMER
SUBWOOFER+
REAR·R +
MUTING
CH
TV VOL
/REW
FF/
VOLUME
CATV/DBS
CONTROL
TV/VIDEO
REC
PAUSE
RETURN
FMMODE
100+
CONTROL
A/V CONTROL RECEIVER
RM-SRX7022U REMOTE CONTROL
CATV/DBS
VCR
TV
AUDIO
SURROUND
MODE
INPUT
ON/OFF
DVD MULTI
DVD
CD
TAPE/CDR
TREBLE
TV/DBS
VCR
PHONO
FM/AM
BASS
SURROUND
ANALOG/DIGITAL SLEEP
CENTER +
TUNING
+
-
+
+
-
-
SOUND
AUDIO/VIDEO CONTROL RECEIVER
RX-7020V[A]_COVER2
02.4.9, 3:46 PM
1
Warnings, Cautions and Others
Caution
switch!
Disconnect the mains plug to shut the power off completely. The
switch in any position does not disconnect the mains line. The power
can be remote controlled.
CAUTION
To reduce the risk of electrical shocks, fire, etc.:
1.
Do not remove screws, covers or cabinet.
2.
Do not expose this appliance to rain or moisture.
CAUTION
·
Do not block the ventilation openings or holes.
(If the ventilation openings or holes are blocked by a
newspaper or cloth, etc., the heat may not be able to
get out.)
·
Do not place any naked flame sources, such as
lighted candles, on the apparatus.
·
When discarding batteries, environmental problems
must be considered and local rules or laws governing
the disposal of these batteries must be followed strictly.
·
Do not expose this apparatus to rain, moisture,
dripping or splashing and that no objects filled with
liquids, such as vases, shall be placed on the
apparatus.
G-1
RX-7022V[A]_Safety
02.4.17, 5:14 PM
1
G-2
Wall or obstructions
RX-7022VSL
Floor
Spacing 15 cm or more
Front
Stand height 15 cm or more
Caution: Proper Ventilation
To avoid risk of electric shock and fire and to protect from damage.
Locate the apparatus as follows:
Front:
No obstructions open spacing.
Sides:
No obstructions in 10 cm from the sides.
Top:
No obstructions in 10 cm from the top.
Back:
No obstructions in 15 cm from the back.
Bottom:
No obstructions, place on the level surface.
In addition, maintain the best possible air circulation as illustrated.
RX-7022V[A]_Safety
02.4.17, 5:14 PM
2
1
Table of Contents
Parts Identification ...................................... 2
Getting Started ........................................... 3
Before Installation ...................................................................... 3
Checking the Supplied Accessories ........................................... 3
Putting Batteries in the Remote Control .................................... 3
Connecting the FM and AM Antennas ....................................... 4
Connecting the Speakers ............................................................ 5
Connecting Audio/Video Components ....................................... 6
Connecting the Power Cord ....................................................... 9
Basic Operations ....................................... 10
Turning On the Power .............................................................. 10
Selecting the Source to Play ..................................................... 10
Adjusting the Volume ............................................................... 11
Selecting the Front Speakers .................................................... 11
Listening Only with Headphones ............................................. 12
Turning Off the Sounds Temporarily--Muting ........................ 12
Changing the Display Brightness ............................................. 12
Turning Off the Power with the Sleep Timer ........................... 12
Basic Settings ........................................... 14
Setting the Digital Input (DIGITAL IN) Terminals ................. 14
Selecting the Analog or Digital Input Mode ............................ 15
Selecting the Video Input Terminal .......................................... 16
Setting the Speaker Information ............................................... 16
Sound Adjustments .................................... 19
Attenuating the Input Signal .................................................... 19
Adjusting the Front Speakers Output Balance ......................... 19
Adjusting the Tone ................................................................... 20
Adjusting the Subwoofer Output Level .................................... 20
Reinforcing the Bass ................................................................ 20
Tuner Operations ....................................... 21
Tuning in Stations Manually .................................................... 21
Using Preset Tuning ................................................................. 21
Selecting the FM Reception Mode ........................................... 22
Creating Realistic Sound Fields ................... 23
About Relations between Speaker Layouts and
Surround Modes ................................................................. 25
Using Dolby Pro Logic II, Dolby Digital
and DTS Digital Surround ................................................. 26
Using DAP Modes and All Channel Stereo ............................. 28
Using DVD MULTI Playback Mode ................ 30
Activating DVD MULTI Playback Mode ................................ 30
COMPU LINK Remote Control System ......... 31
AV COMPU LINK Remote Control System .... 32
Operating JVC's Audio/Video
Components .......................................... 34
Operating Audio Components .................................................. 34
Operating Video Components .................................................. 36
Operating Other Manufacturers' Video
Equipment ............................................ 37
Troubleshooting ......................................... 40
Specifications ............................................ 41
This mark indicates that the remote control CAN
ONLY be used for the operation explained.
Remote
NOT
This mark indicates that the remote control CANNOT
be used for the operation explained. Use buttons on
the front panel.
EN01-09.RX-7020V[A]3
02.4.17, 5:14 PM
1
2
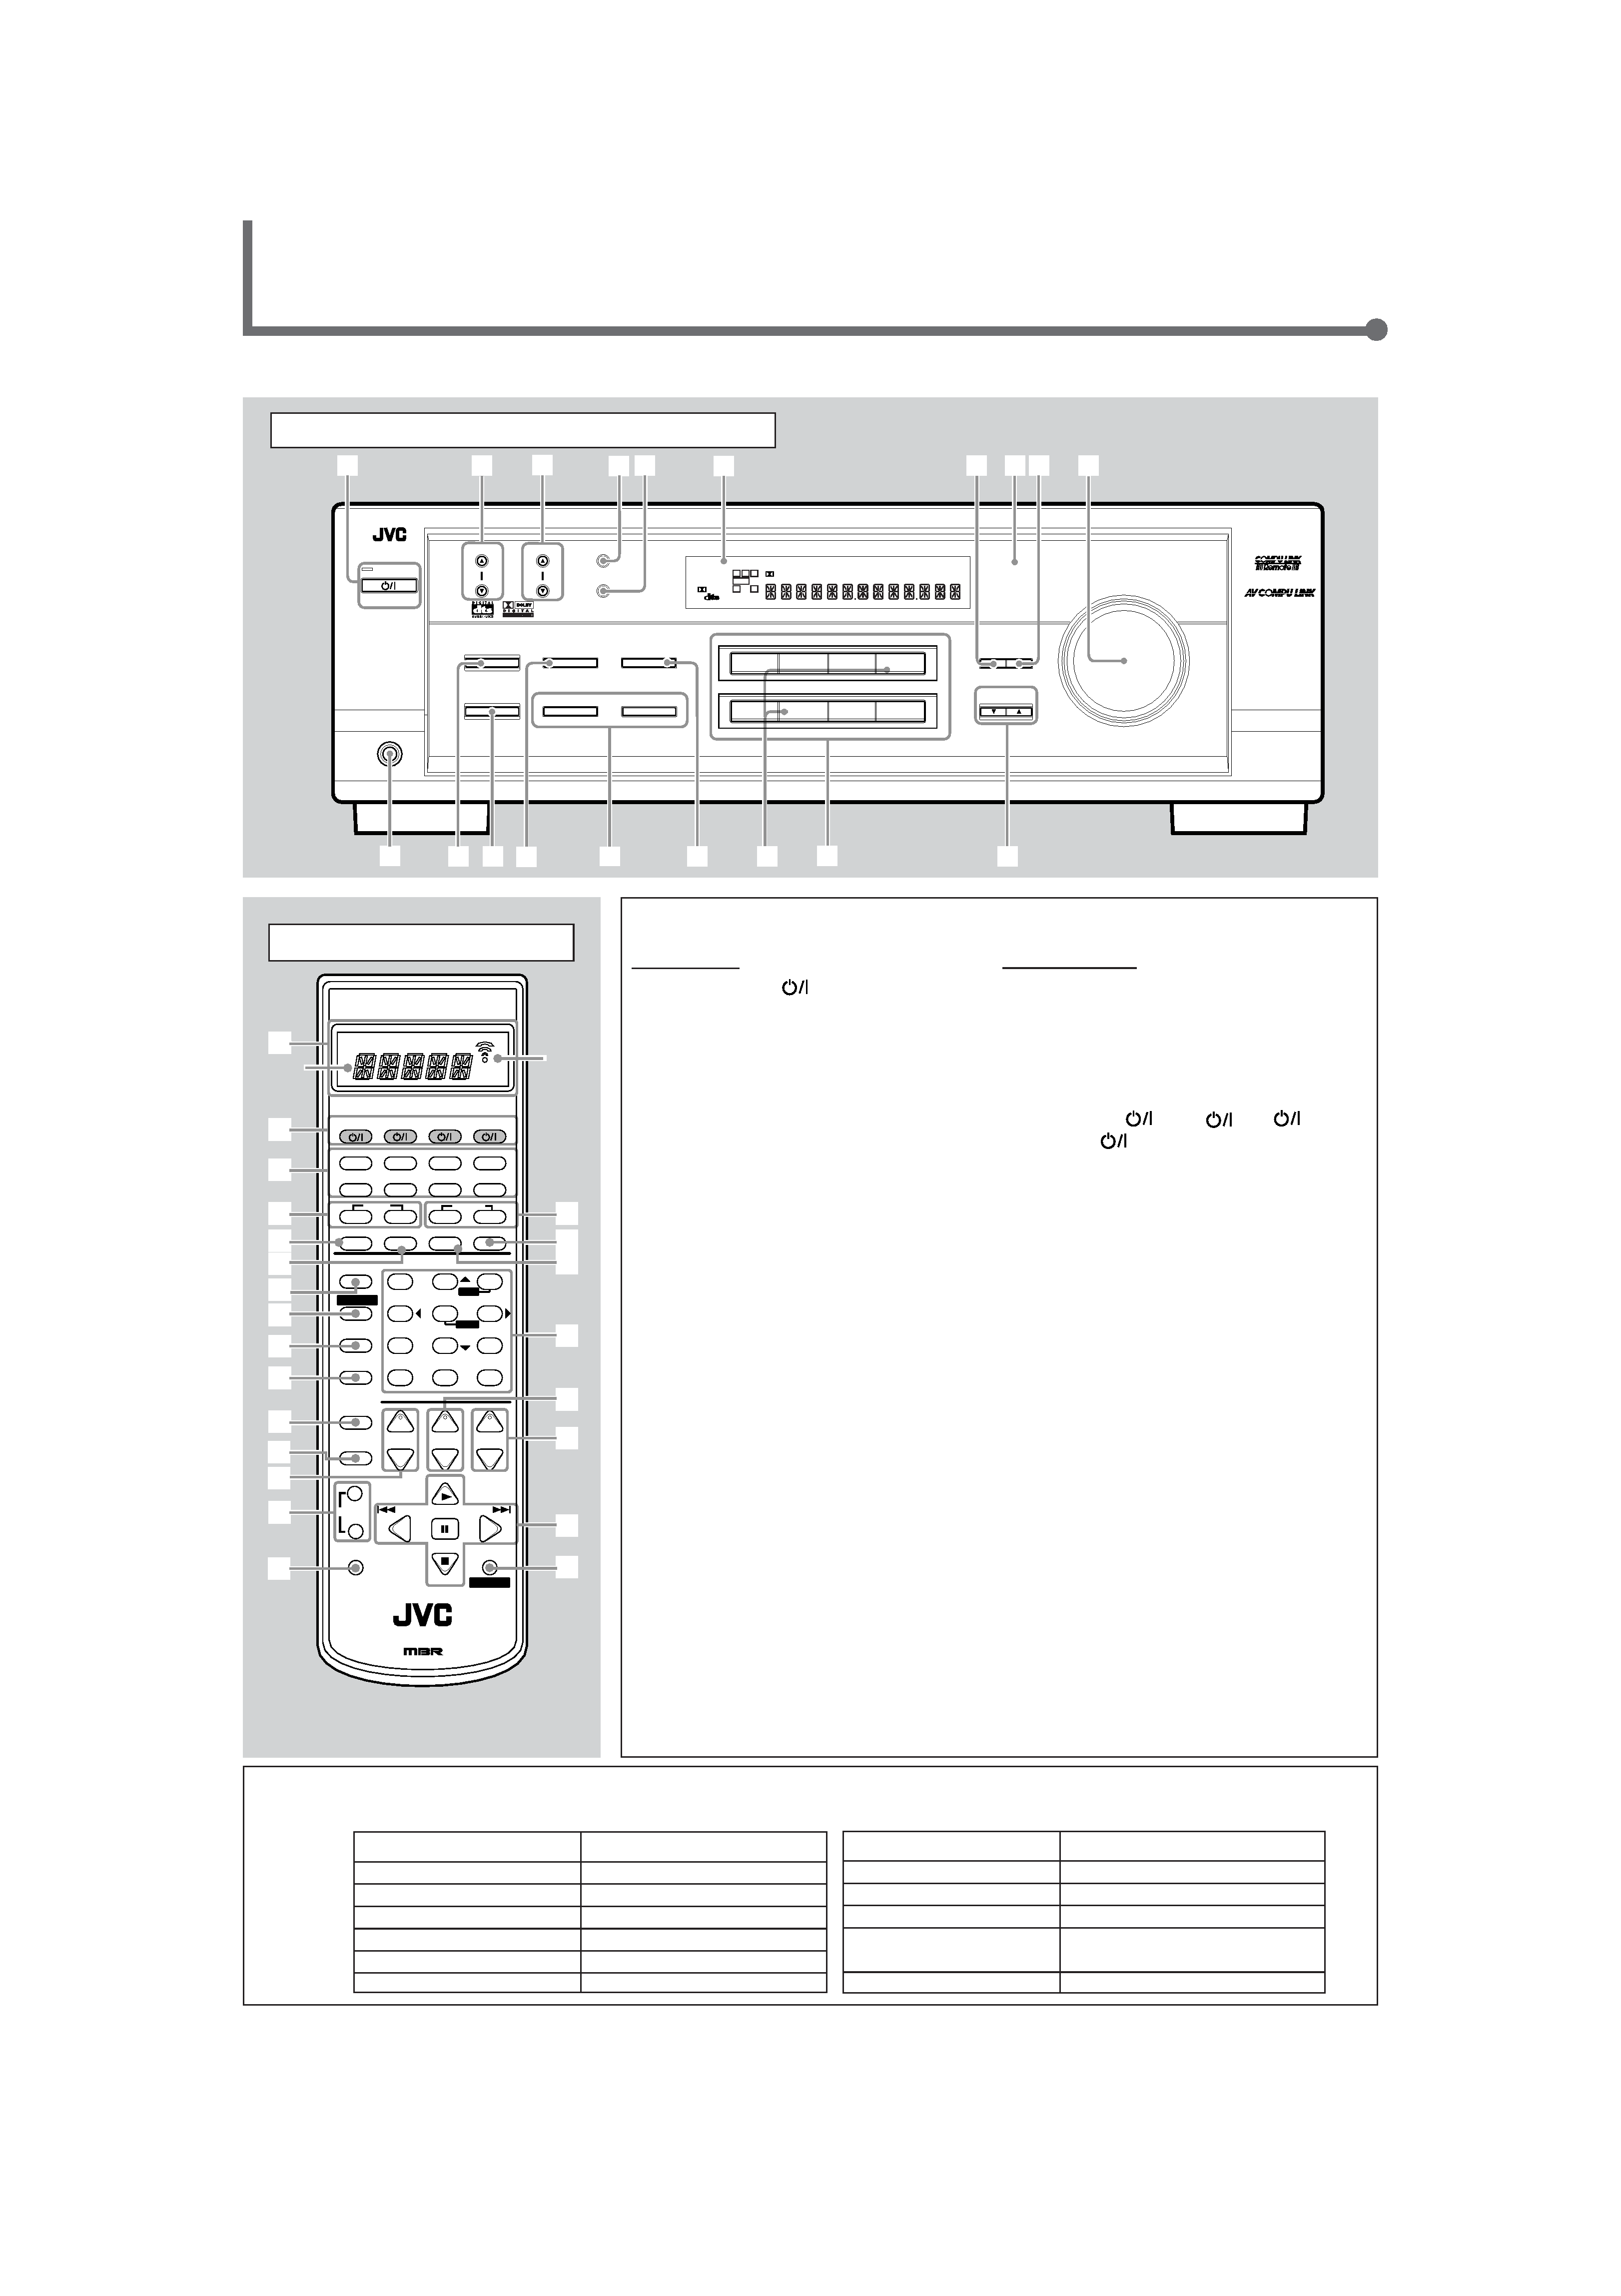
Parts Identification
Front Panel
Remote Control
Front Panel
1 STANDBY/ON
button and STANDBY
lamp (10)
2 FM/AM TUNING
5/ buttons (21)
3 FM/AM PRESET
5/ buttons (21, 22)
4 FM MODE button (22)
5 MEMORY button (21, 22)
6 Display (10)
7 ADJUST button (19, 20, 27 29, 30)
8 Remote sensor (3)
9 SETTING button (14, 16 18)
p MASTER VOLUME control (11)
q PHONES jack (12)
w SURROUND ON/OFF button (25, 27, 29)
e SURROUND MODE button (25, 27, 29)
r · INPUT ANALOG/DIGITAL button (15)
· INPUT ATT button (19)
t · SPEAKERS ON/OFF 1 button (11, 12)
· SPEAKERS ON/OFF 2 button (11, 12)
y BASS BOOST button (20)
u SOURCE NAME buttons (11)
i Source selecting buttons
(10, 11, 15, 21, 22, 30)
DVD MULTI, DVD, VCR,
TV SOUND/DBS, CD, TAPE/CDR,
PHONO, FM/AM
o CONTROL UP
5/DOWN buttons
(14, 16 20, 27 29, 30)
Buttons on the Remote Control
Remote Control Operation Mode
FM/AM
TUNER
CD
CD
PHONO
PHONO
TAPE/CDR
TAPE
DVD
DVD
DVD MULTI
DVD
* When you press one of these buttons, the remote control operation mode appears on
the display window.
Buttons on the Remote Control
Remote Control Operation Mode
TV/DBS
TV
VCR
VCR
CATV/DBS CONTROL
DBS
CONTROL
VCR or TAPE
or CDDSC
SOUND
SOUND
1
2
3
4
t
u
y
i
o
;
a
s
d
5
6
7
8
9
p
q
w
r
e
a
b
CONTROL
+
-
+
-
+
-
23
1
56
4
89
7/P
0
+10
10
BASSBOOST
EFFECT
MENU
ENTER
TEST
DIMMER
MUTING
CH
TV VOL
/REW
FF/
VOLUME
CATV/DBS
CONTROL
TV/VIDEO
REC
TUNING
PAUSE
RETURN
FMMODE
100+
CONTROL
A/V CONTROL RECEIVER
RM-SRX7022U REMOTE CONTROL
CATV/DBS
VCR
TV
AUDIO
SURROUND
MODE
INPUT
ON/OFF
DVD MULTI
DVD
CD
TAPE/CDR
TREBLE
TV/DBS
VCR
PHONO
FM/AM
BASS
SURROUND
ANALOG/DIGITAL
SLEEP
+
-
SUBWOOFER+
REAR· R+
REAR· L+
CENTER+
-
-
++
SOUND
Remote Control
1
Display window
a: Remote control operation mode indicator
b: Signal transmission indicator
Lights up when transmitting the remote
control signal
2 Power buttons (10, 36 39)
CATV/DBS
, VCR
, TV
,
AUDIO
3 Source selecting buttons
(10, 11, 15, 21, 22, 30, 34 39) *
DVD, DVD MULTI, CD, FM/AM, TV/DBS,
VCR, TAPE/CDR, PHONO
4 BASS +/ buttons (20)
5 SURROUND ON/OFF button (25, 26, 28)
6 SURROUND MODE button (25, 26, 28)
7 BASS BOOST button (20)
8 SOUND button (20, 27, 28, 30) *
9 DIMMER button (12)
p MUTING button (12)
q CATV/DBS CONTROL button (37) *
w TV/VIDEO button (36, 37)
e CH (channel) +/ buttons (36 38)
r TUNING +/ buttons (21)
t REC PAUSE button (35, 36, 38)
y TREBLE +/ buttons (20)
u SLEEP button (12)
i ANALOG/DIGITAL INPUT button (15)
o · 10 keys for selecting preset channels (22)
· 10 keys for adjusting sound (20, 27, 28, 30)
· 10 keys for operating audio/video components
(34 39)
; TV VOL (volume) +/ buttons (36, 37)
a VOLUME +/ buttons (11)
s Operating buttons for audio/video
components(35, 36, 38, 39)
d CONTROL button (34 36) *
ADJUST
RX-7022V AUDIO/VIDEO CONTROL RECEIVER
SETTING
MASTER VOLUME
CONTROL
DOWN
UP
SURROUND MODE
PHONES
SURROUND ON/OFF
FM/AM TUNING
STANDBY
FM/AM PRESET
FM MODE
MEMORY
1
2
5
4
8
79
p
q
w
t
u
io
6
3
STANDBY/ON
DVD
VCR
TV SOUND/DBS
CD
TAPE/CDR
SOURCE NAME
SOURCE NAME
FM/AM
DVD MULTI
PHONO
y
r
e
LC
S.WFR
LS
RS
CH-
S
LFE
SPK
PROLOGIC
DSP H.PHONE
AUTOMUTING
TUNED STEREO
VOLUME
BASS BOOST
INPUT ATT
SLEEP
DIGITAL AUTO
ANALOG
DIGITAL
LINEAR PCM
12
R
BASS BOOST
INPUT
ANALOG/DIGITAL
SPEAKERS ON/OFF
INPUT ATT
12
See pages in the parentheses for details.
EN01-09.RX-7020V[A]3
02.4.17, 5:14 PM
2