INSTRUCTIONS
LD-HD2KU/LD-HD2KE
®
DIGITAL VIDEO PROCESSOR
LD-HD2KU
For customer Use:
Serial No.
Model No.
Enter below the Serial No. which is located
on the side panel of the cabinet. Retain
this information for future reference.
OFF
VIDEO
S-VIDEO
PASS-T
MENU
RGB
YCrCb
BRIGHTNESS
CONTRAST
COLOR
DETAIL
ANAMORPHIC
TINT
4:3
LETTERBOX
PASS-TX
PROFILE
1
2
3
4
5
6
7
8
9
0
STORE
®
LCT1679-001A
This product (LD-HD2KU) is exclusively for the
above-mentioned model. The performance cannot
be guaranteed when using with other models.
This processor is used as a dedicated machine and
this manual (instruction manual) may contain de-
scription of features as well as specifications not
used by the processor.
This product (LD-HD2KE) is exclusively for the
above-mentioned model. The performance cannot
be guaranteed when using with other models.
This processor is used as a dedicated machine and
this manual (instruction manual) may contain de-
scription of features as well as specifications not
used by the processor.
Machine Models Compatible for Con-
nection with this Product
DLA-HD2KU
DLA-HD2KE

2
SAFETY PRECAUTIONS
IMPORTANT SAFEGUARDS
IMPROPER USE OFTHIS EQUIPMENT CAN RESULT
IN POTENTIAL ELECTRICAL SHOCK OR FIRE HAZ-
ARD.
In order not to defeat the safeguards incorporated into this
product, observe the following basic rules for its installation,
use and service.
All the safety and operating instructions should be read
before the product is operated.
The safety and operating instructions should be followed
and retained for future reference.
All warnings on the product and in the operating instruc-
tions should be adhered to.
Unplug this product from the wall outlet before cleaning.
Do not use liquid cleaners or aerosol cleaners. Use a damp
cloth for cleaning.
Do not use attachments not recommended by the product
manufacturer as they may be hazardous.
Do not use this product near water. Do not use immedi-
ately after moving from a low temperature to high tempera-
ture, as this causes condensation, which may result in fire,
electric shock, or other hazards.
Do not place this product on an unstable cart, stand, or
table. The product may fall, causing serious injury to a child
or adult, and serious damage to the product. The product
should be mounted according to the manufacturer's instruc-
tions, and should use a mount recommended by the manu-
facturer.
When the product is used on a cart, care should be taken
to avoid quick stops, excessive force, and uneven surfaces
which may cause the product and cart to overturn, damag-
ing equipment or causing possible injury to the operator.
Slots and openings in the cabinet are provided for ventila-
tion. These ensure reliable operation of the product and
protect it from overheating. These openings must not be
blocked or covered. (The openings should never be blocked
by placing the product on bed, sofa, rug, or similar surface.
It should not be placed in a built-in installation such as a
bookcase or rack unless proper ventilation is provided and
the manufacturer's instructions have been adhered to.)
This product should be operated only with the type of power
source indicated on the label. If you are not sure of the
type of power supply to your home, consult your product
dealer or local power company.
This product is equipped with a three-wire plug.
This plug will fit only into a grounded power outlet. If you
are unable to insert the plug into the outlet, contact your
electrician to install the proper outlet. Do not defeat the
safety purpose of the grounded plug.
Power-supply cords should be routed so that they are not
likely to be walked on or pinched by items placed upon or
against them. Pay particular attention to cords at doors,
plugs, receptacles, and the point where they exit from the
product.
For added protection of this product during a lightning storm,
or when it is left unattended and unused for long periods of
time, unplug it from the wall outlet and disconnect the cable
system.This will prevent damage to the product due to light-
ning and power line surges.
IMPORTANT INFORMATION
WARNING: TO PREVENT FIRE OR SHOCK HAZ-
ARDS, DO NOT EXPOSE THIS APPLIANCE TO RAIN
OR MOISTURE.
CAUTION:
To reduce the risk of electric shock, do not remove cover.
Refer servicing to qualified service personnel.
This product is equipped with a 3-blade grounding type plug
to satisfy UL, CUL, TUV, FCC rules.
If you are unable to insert the plug into the outlet, contact
your electrician.
FCC INFORMATION (U.S.A. ONLY)
CAUTION:
Changes or modifications not approved by JVC could void
the user's authority to operate the equipment.
Note: This equipment has been tested and found to comply
with the limits for a Class B digital devices, pursuant to Part
15 of the FCC Rules. These limits are designed to provide
reasonable protection against harmful interference in a resi-
dential installation. This equipment generates, uses, and can
radiate radio frequency energy and, if not installed and used
in accordance with the instructions, may cause harmful inter-
ference to radio communications.
However, there is no guarantee that interference will not oc-
cur in a particular installation. If this equipment does cause
harmful interference to radio or television reception, which
can be determined by turning the equipment off and on, the
user is encourage to try to correct the interference by one or
more of the following measures:
Reorient or relocate the receiving antenna.
Increase the separation between the equipment.
Connect the equipment into an outlet on a circuit different
from that to which the receiver is connected.
Consult the dealer or an experienced radio/TV technician
for help.
About the installation place
Do not install the processor in a place that cannot support its
weight securely, or that does not allow for proper heat venti-
lation.

3
Do not overload wall outlets, extension cords, or conve-
nience receptacles on other equipment as this can result
in a risk of fire or electric shock.
Never push objects of any kind into this product through
openings as they may touch dangerous voltage points or
short out parts that could result in a fire or electric shock.
Never spill liquid of any kind on the product.
Do not attempt to service this product yourself as opening
or removing covers may expose you to dangerous voltages
and other hazards. Refer all service to qualified service
personnel.
Unplug this product from the wall outlet and refer service
to qualified service personnel under the following condi-
tions:
a) When the power supply cord or plug is damaged.
b) If liquid has been spilled, or objects have fallen on the
product.
c) If the product has been exposed to rain or water.
d) If the product does not operate normally by following
the operating instructions. Adjust only those controls that
are covered by the Operation Manual, as an improper
adjustment of controls may result in damage and will
often require extensive work by a qualified technician to
restore the product to normal operation.
e) If the product has been dropped or damaged in any
way.
f ) When the product exhibits a distinct change in perfor-
mance this indicates a need for service.
When replacement parts are required, be sure the service
technician has used replacement parts specified by the
manufacturer or with same characteristics as the original
part. Unauthorized substitutions may result in fire, electric
shock, or other hazards.
Upon completion of any service or repairs to this product,
ask the service technician to perform safety checks to de-
termine that the product is in proper operating condition.
The product should be placed more than one foot away
from heat sources such as radiators, heat registers, stoves,
and other products (including amplifiers) that produce heat.
When connecting other products such as VCR's, and per-
sonal computers, you should turn off the power of this prod-
uct for protection against electric shock.
Use only the accessory cord designed for this product to
prevent shock.
The power supply voltage rating of this product is AC 120 V,
AC 100 V - AC 240 V, the power cord attached conforms to
the following power supply voltage. Use only the power cord
designated by our dealer to ensure Safety and EMC. When it
is used by other power supply voltage, power cable must be
changed.
Ensure that the power cable used for the projector is the cor-
rect type for the AC outlet in your country.
Consult your product dealer.
*DO NOT allow any unqualified person to install the
unit.
Be sure to ask your dealer to install the unit since special
technical knowledge and skills are required for installation
and connection to multiple devices.
If installation is performed by an unqualified person, it may
cause personal injury or electrical shock.
Precautions for using the screen terminal
Connect the cable to the screen before using the screen ter-
minal of this unit.
Signal with DC+12 V/100 mA max. is output from the screen
terminal of this unit.
Short-circuit will result in malfunction, fire and electric shock.
Leave the connection of the wires to the installation contrac-
tor.

4
SAFETY PRECAUTIONS ............................................................................................................................................... 2
QUICK START ................................................................................................................................................................ 5
INSTALLATION ............................................................................................................................................................... 6
SETUP ............................................................................................................................................................................ 8
IR REMOTE/OSD ......................................................................................................................................................... 10
RS232 ........................................................................................................................................................................... 13
HELP MENUS ............................................................................................................................................................... 16
SPECIFICATIONS ......................................................................................................................................................... 17
TABLE OF CONTENTS
5
QUICK START
Connection with Other Devices
Before connecting to other devices, ensure to turn off the power supply of the device to be connected with the digital video
processor.
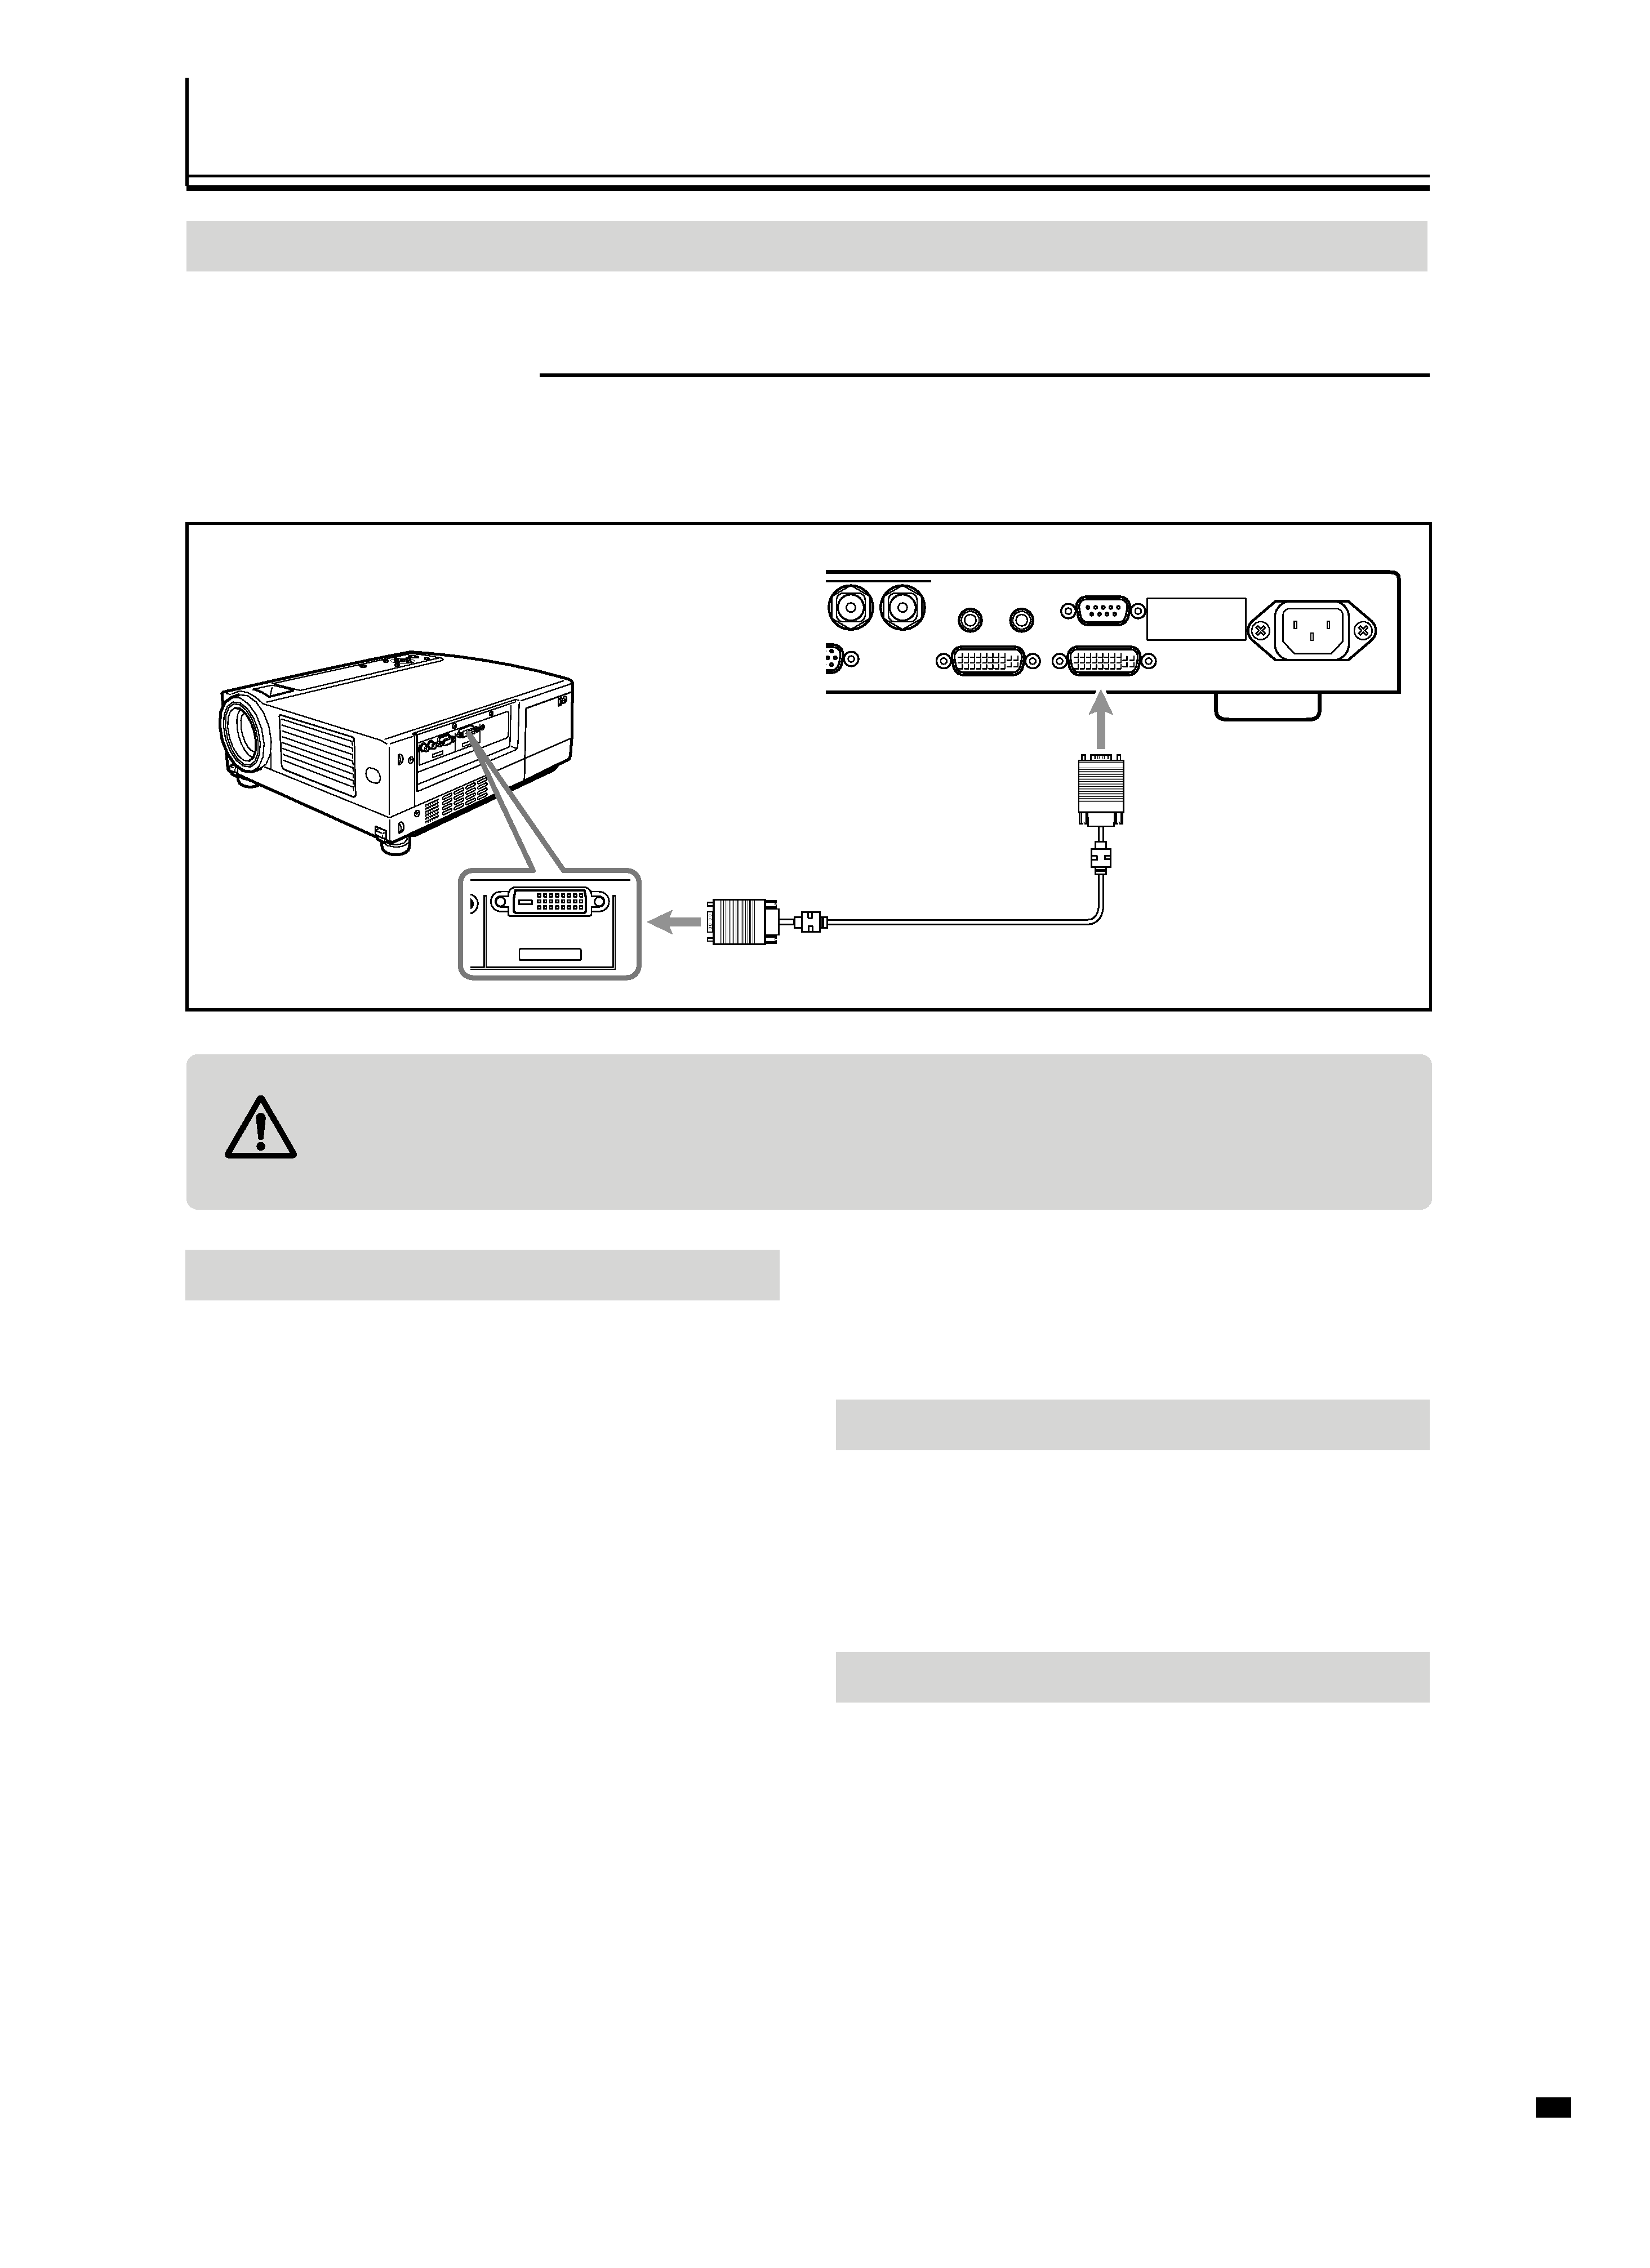
Connecting to a Projector
Read through the projector's instruction manual thoroughly.
Depending on the DVI cable used, signals may be attenuated and images may become unstable. Use high-quality DVI
cables that are 5 m or shorter. When a DVI cable longer than 5 m is used, make use of a distribution system or an optical
fiber cable.
Caution on Devices to be Connected
Please refer to the list of `Devices Compatible with this Product' on the front page for devices that can be
connected with this unit. Performance of this unit will not be guaranteed if it is connected with a device not
specified in the list.
DVI
VIDEO IN
H/C SYNC
V SYNC
RS-232
DVI INPUT
I/R REMOTE
UTPUT
DVI OUTPUT
100-240 VAC
50-60Hz 35 WATTS
SCREEN
DVI Connection Cable (sold separately)
Right End of this Unit
Setup of this Unit
1. Connect the supplied power cord to the power supply in-
put terminal on this unit. Connect the earth wire to the
equipped earth terminal in the building, followed by in-
serting the plug of the supplied power cord into the wall
outlet.
2. This unit will be initialized once the plug of the power cord
is inserted into the power outlet. Upon completion of ini-
tialization, this unit switches to the Standby mode (LED
turns red).
3. Press the Power/Standby button on this unit (or Power
button on the remote). Once the unit is turned on, the
LED turns green.
4. Press the Menu button on the remote for 5 seconds or
more to display the Setup Menu on this unit's display
panel. After the Setup Menu is displayed, use the Func-
tion Up/Down keys on the remote to select an adjustment.
Select the set values accordingly using the Value Left/
Right keys on the remote.
5. Select Set: SCANRATE and set the value to 1920 x 1080.
Press the STORE key on the remote. The message "Are
You Sure" is displayed on the display panel of this unit.
Press the STORE key on the remote again to set the scan
rate.
6. Select Set: Active Output and set the value to Digital.
7. Select Set: Screen Shape and set the value to Wide Screen.
8. Press the Menu button on the remote to exit the Setup
Menu.
Profile Setting
This unit can store up to 8 profiles. Each profile stores values
that have been set for this unit during each adjustment. Select
the profile number (1 - 8) at the OSD and press the STORE
key on the remote to save the current settings. For further
details, please refer to `OSD'. (
Page 10)
Video Image Adjustment
The following item can be adjusted according to the input
signals. Adjusted values can also be stored in the profile.
BRIGHTNESS ( Page 11)
CONTRAST ( Page 11)
COLOR ( Page 12)
TINT ( Page 12)
DETAIL ( Page 12)
ADVANCED COLOR SYSTEM ( Page 12)