GET0246-001A
[J]
INSTRUCTIONS
MANUAL DE INSTRUCCIONES
MANUEL D'INSTRUCTIONS
CD RECEIVER
KD-AR260/KD-G210
ENGLISH
ESP
A
Ñ
OL
FRAN
Ç
AIS
For installation and connections, refer to the separate manual.
Para la instalación y las conexiones, refiérase al manual separado.
Pour l'installation et les raccordements, se référer au manuel séparé.
RECEPTEUR CD
KD-AR260/KD-G210
RECEPTOR CON CD
KD-AR260/KD-G210
For customer Use:
Enter below the Model No. and
Serial No. which are located on
the top or bottom of the
cabinet. Retain this information
for future reference.
Model No.
Serial No.
· This unit is equipped with the display demonstration. To cancel it, see page 8.
· Esta unidad está equipada con demostración en la pantalla. Para cancelarla, consulte la página 8.
· Cet appareil est équipé d'une fonction de démonstration des affichages. Pour l'annuler, référez-
vous à la page 8.
SOUND
VOL
VOL
SOURCE
R
F
U
D
ATT
SOUND
VOL
VOL
SOURCE
R
F
U
D
ATT
Cover001AKD-AR260_G210.p65
9/20/04, 12:27 PM
3
2
ENGLISH
INFORMATION (For U.S.A.)
This equipment has been tested and found to comply with the limits for a Class B digital
device, pursuant to Part 15 of the FCC Rules. These limits are designed to provide reasonable
protection against harmful interference in a residential installation. This equipment generates,
uses, and can radiate radio frequency energy and, if not installed and used in accordance with
the instructions, may cause harmful interference to radio communications. However, there
is no guarantee that interference will not occur in a particular installation. If this equipment
does cause harmful interference to radio or television reception, which can be determined by
turning the equipment off and on, the user is encouraged to try to correct the interference by one
or more of the following measures:
Reorient or relocate the receiving antenna.
Increase the separation between the equipment and receiver.
Connect the equipment into an outlet on a circuit different from that to which the receiver is
connected.
Consult the dealer or an experienced radio/TV technician for help.
IMPORTANT FOR LASER PRODUCTS
1. CLASS 1 LASER PRODUCT
2. CAUTION: Do not open the top cover. There are no user serviceable parts inside the unit; leave all
servicing to qualified service personnel.
3. CAUTION: Visible and invisible laser radiation when open and interlock failed or defeated. Avoid
direct exposure to beam.
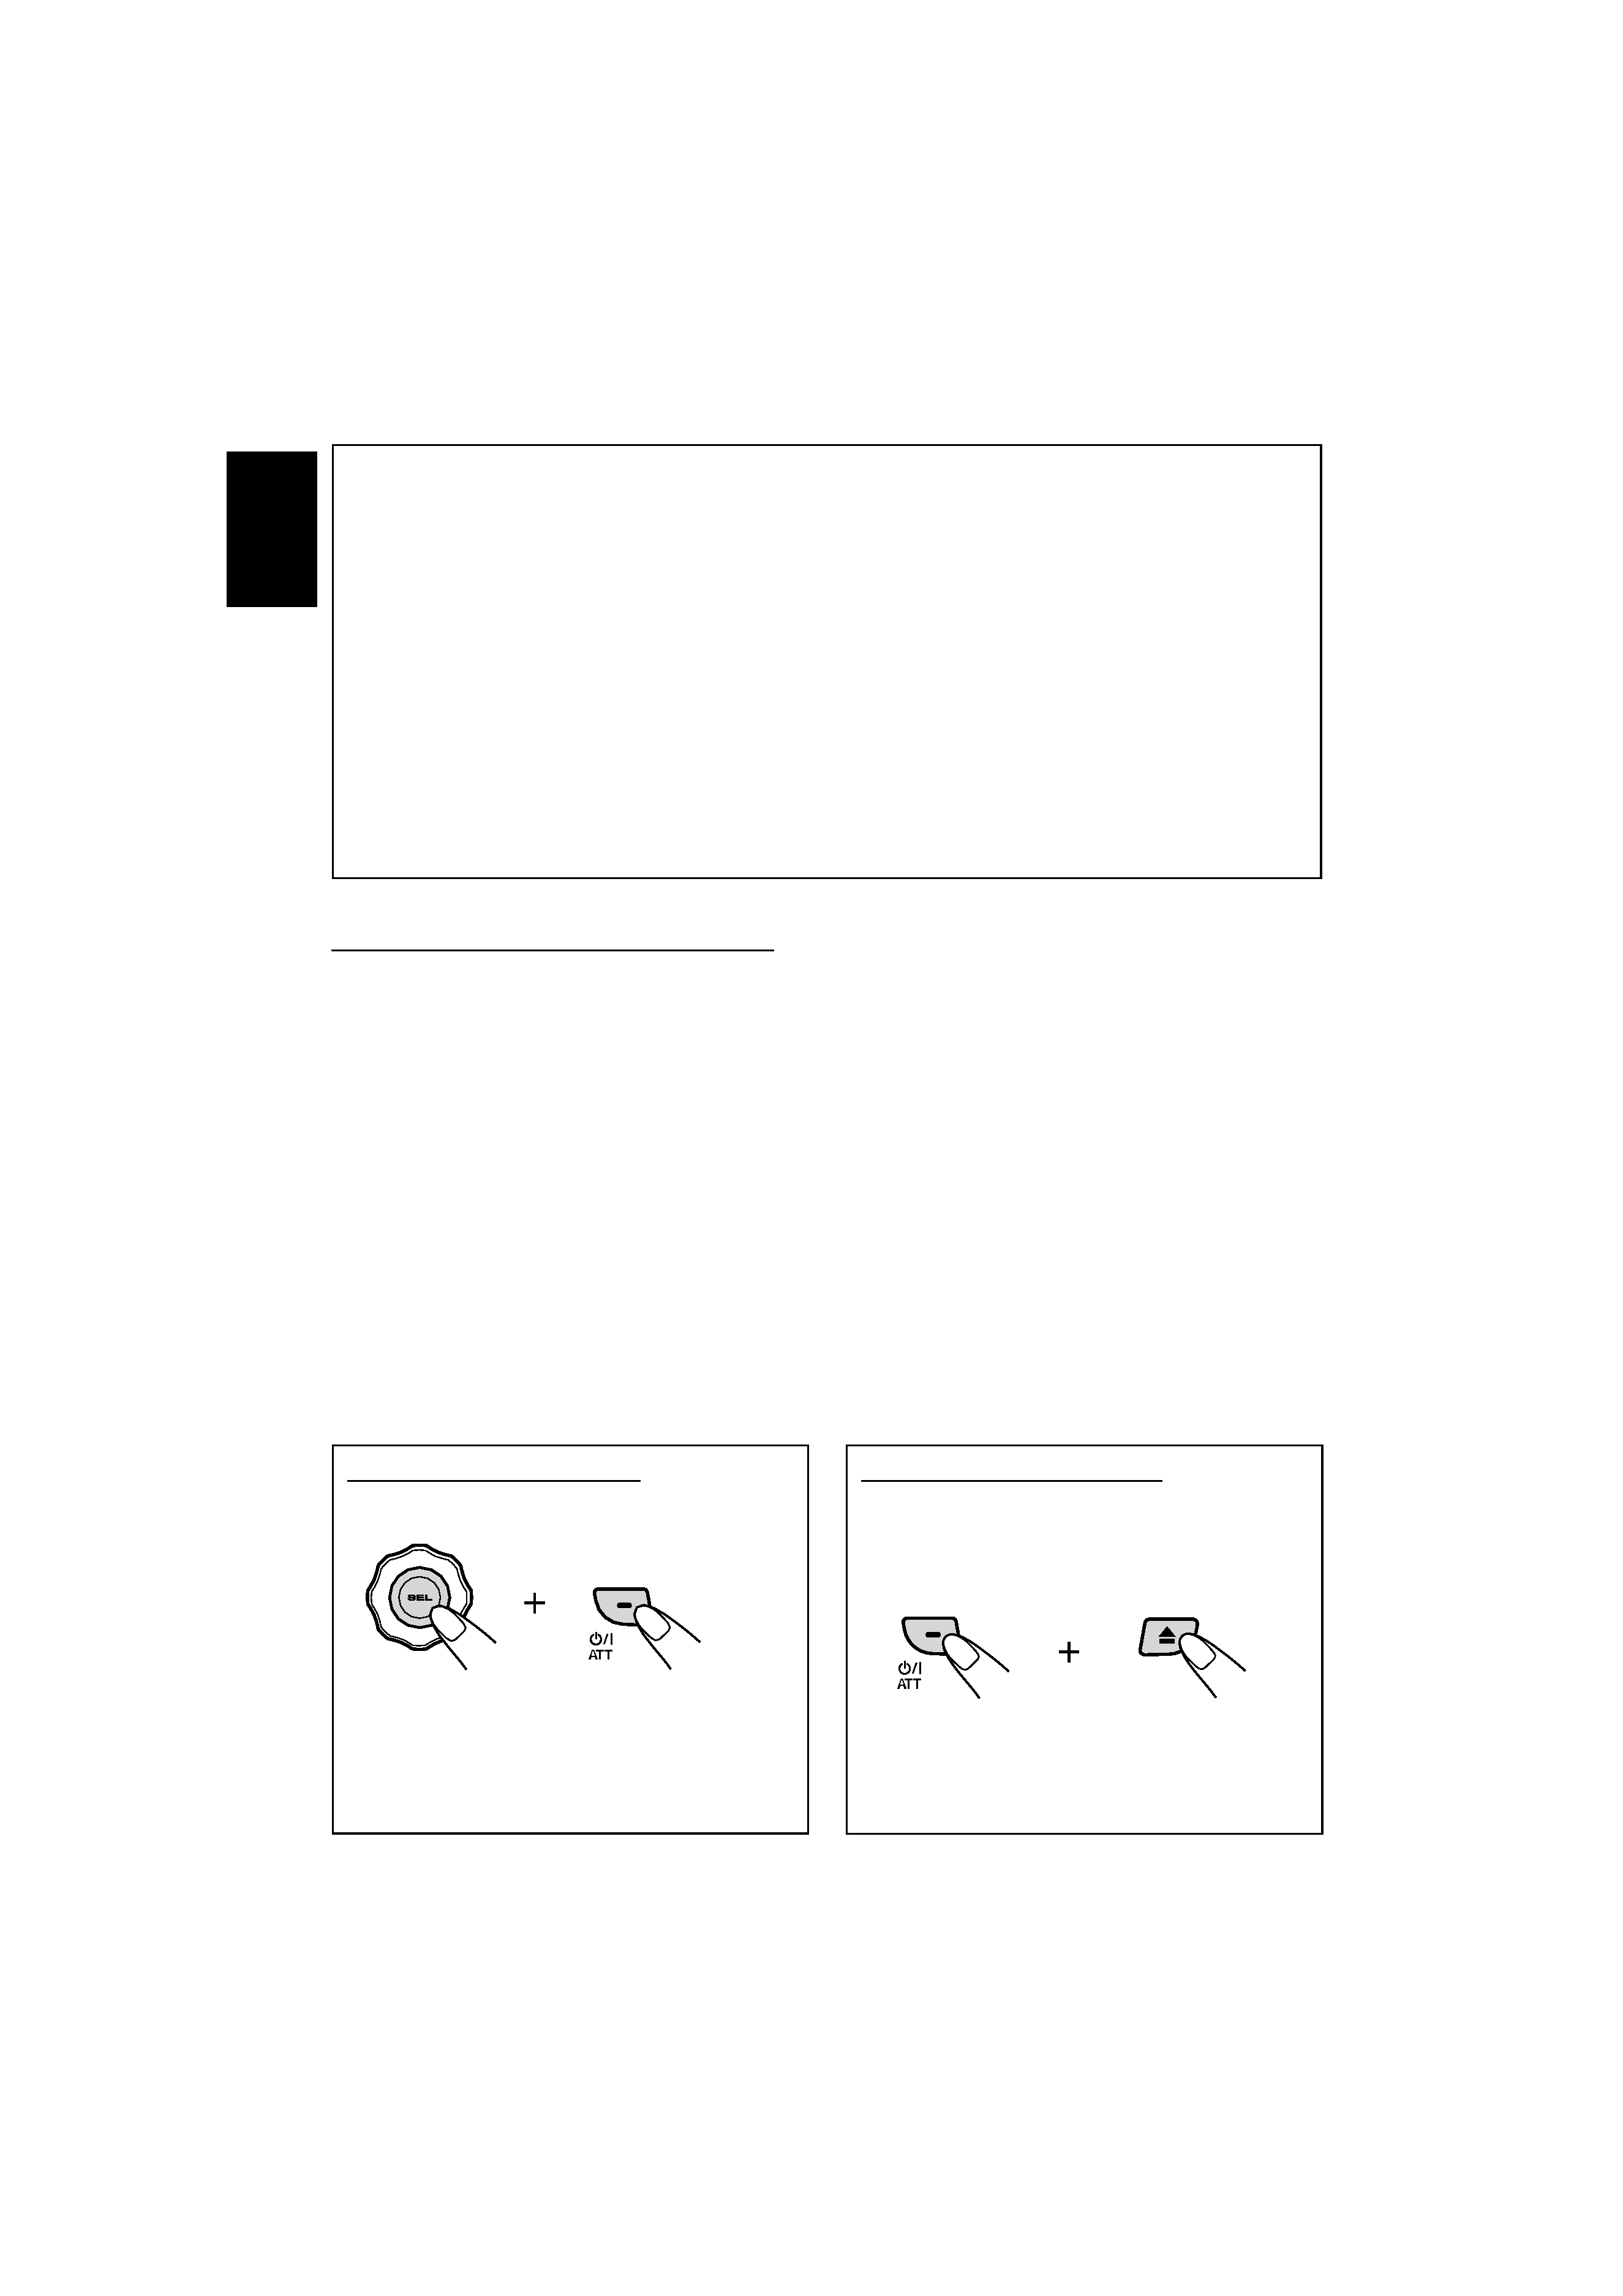
How to reset your receiver
Press and hold both buttons at the same time.
· This will reset the microcomputer. Your
preset adjustments will also be erased.
· If a disc is loaded, it will eject. Be careful not
to drop the disc.
How to forcibly eject a disc
If a disc cannot be recognized by the receiver
or cannot be ejected, ejects the disc as
follows.
Press and hold both buttons at the same time.
· If this does not work, try to reset your
receiver.
· Be careful not to drop the disc when it
ejects.
Warning:
If you need to operate the receiver while driving, be sure to look ahead carefully or you may be involved in a
traffic accident.
EN02-03KD-AR260_G210.p65
9/17/04, 6:04 PM
2
3
ENGLISH
CONTENTS
Thank you for purchasing a JVC product. Please read all instructions carefully before operation,
to ensure your complete understanding and to obtain the best possible performance from the unit.
How to reset your receiver ........................
2
How to forcibly eject a disc ........................
2
How to use the MODE button ...................
3
LOCATION OF THE BUTTONS ............
4
Control panel .............................................
4
Remote controller ......................................
5
Preparing the remote controller ................
6
BASIC OPERATIONS .......................
7
Turning on the power ................................
7
Canceling the display demonstration ........
8
Setting the clock ........................................
9
RADIO OPERATIONS ...................... 10
Listening to the radio ................................. 10
Storing stations in memory ....................... 12
Tuning in to a preset station ...................... 13
CD OPERATIONS ........................... 14
Playing a CD ............................................. 14
Locating a track or a particular portion
on a CD .................................................. 15
Selecting CD playback modes .................. 15
Prohibiting CD ejection ............................. 16
SOUND ADJUSTMENTS ................... 17
Selecting preset sound modes
(C-EQ: custom equalizer) ....................... 17
Adjusting the sound .................................. 18
OTHER MAIN FUNCTIONS ................ 19
Selecting the dimmer mode ...................... 19
Selecting the amplifier gain control ........... 19
Detaching the control panel ...................... 20
TROUBLESHOOTING ...................... 21
MAINTENANCE ............................. 22
Handling discs ........................................... 22
SPECIFICATIONS ........................... 23
BEFORE USE
*For safety....
· Do not raise the volume level too much, as this will
block outside sounds, making driving dangerous.
· Stop the car before performing any complicated
operations.
*Temperature inside the car....
If you have parked the car for a long time in hot or
cold weather, wait until the temperature in the car
becomes normal before operating the unit.
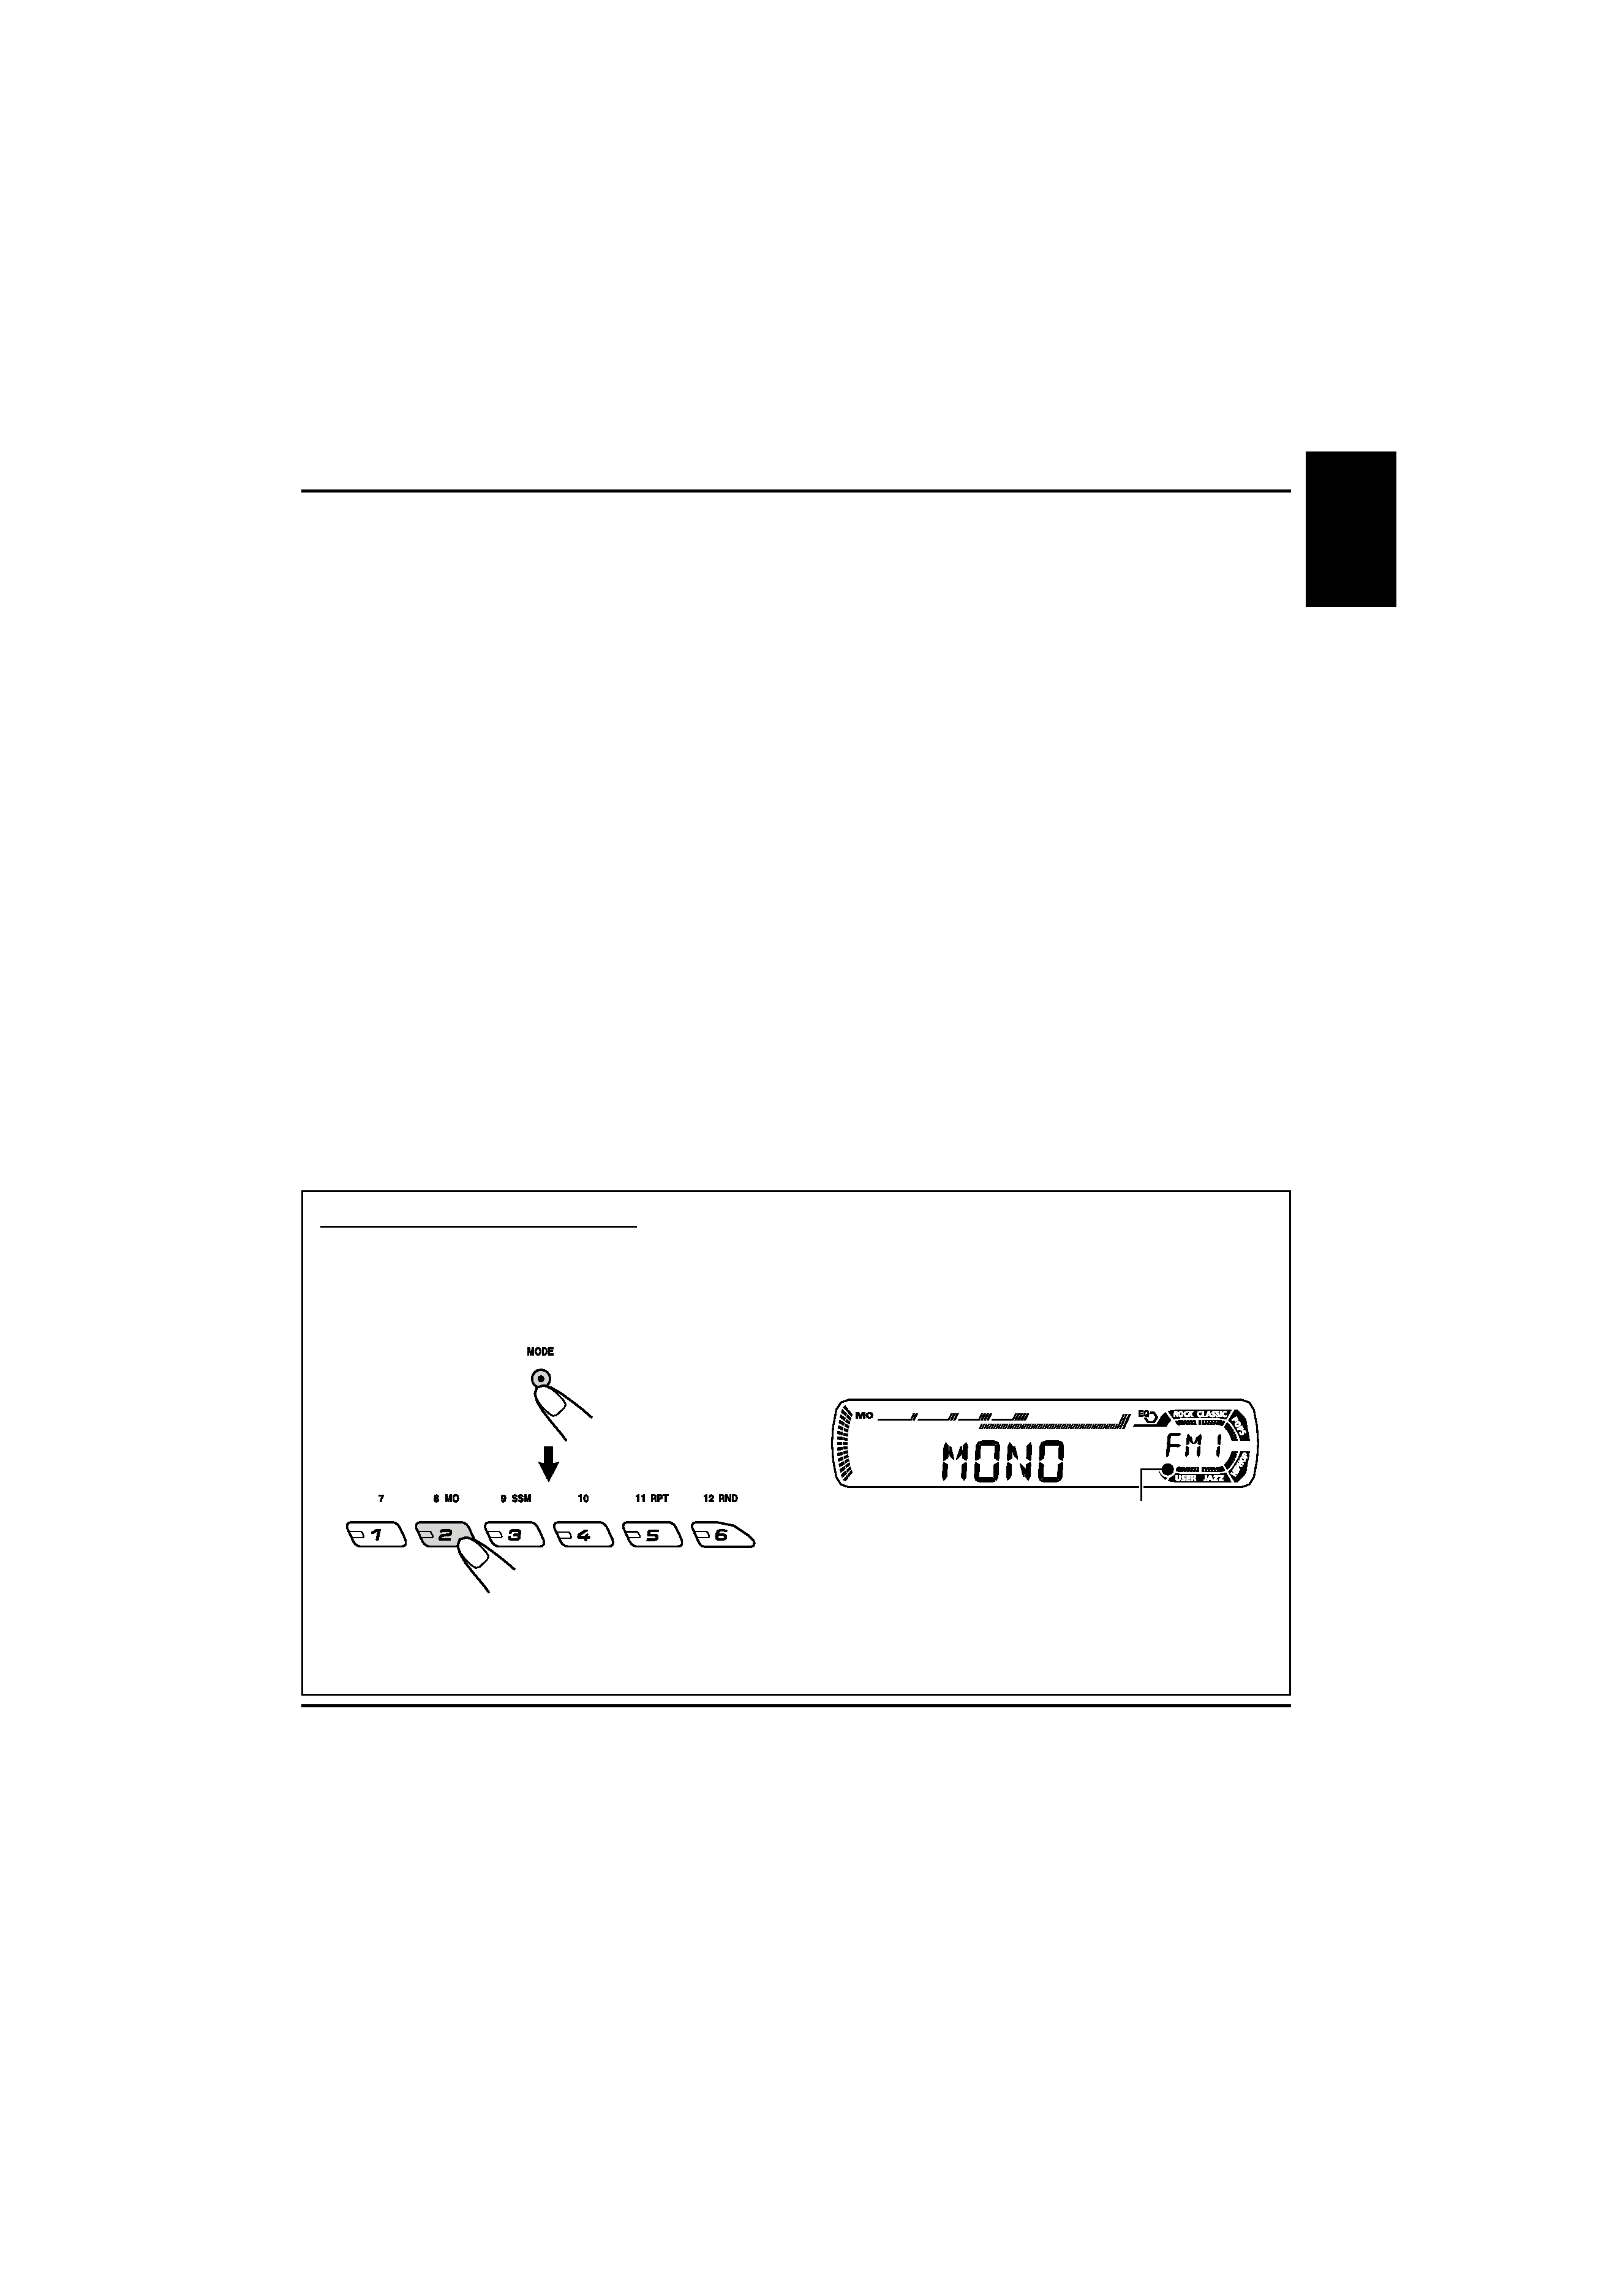
How to use the MODE button
If you press MODE, the unit goes into functions mode, then the number buttons work as different
function buttons.
Ex.: When number button 2 works as MO (monaural) button.
To use these buttons for original functions again after pressing MODE, wait for 5 seconds
without pressing any of these buttons until the functions mode is cleared.
· Pressing MODE again also clears the functions mode.
Time countdown indicator
EN02-03KD-AR260_G210.p65
9/8/04, 6:36 PM
3
4
ENGLISH
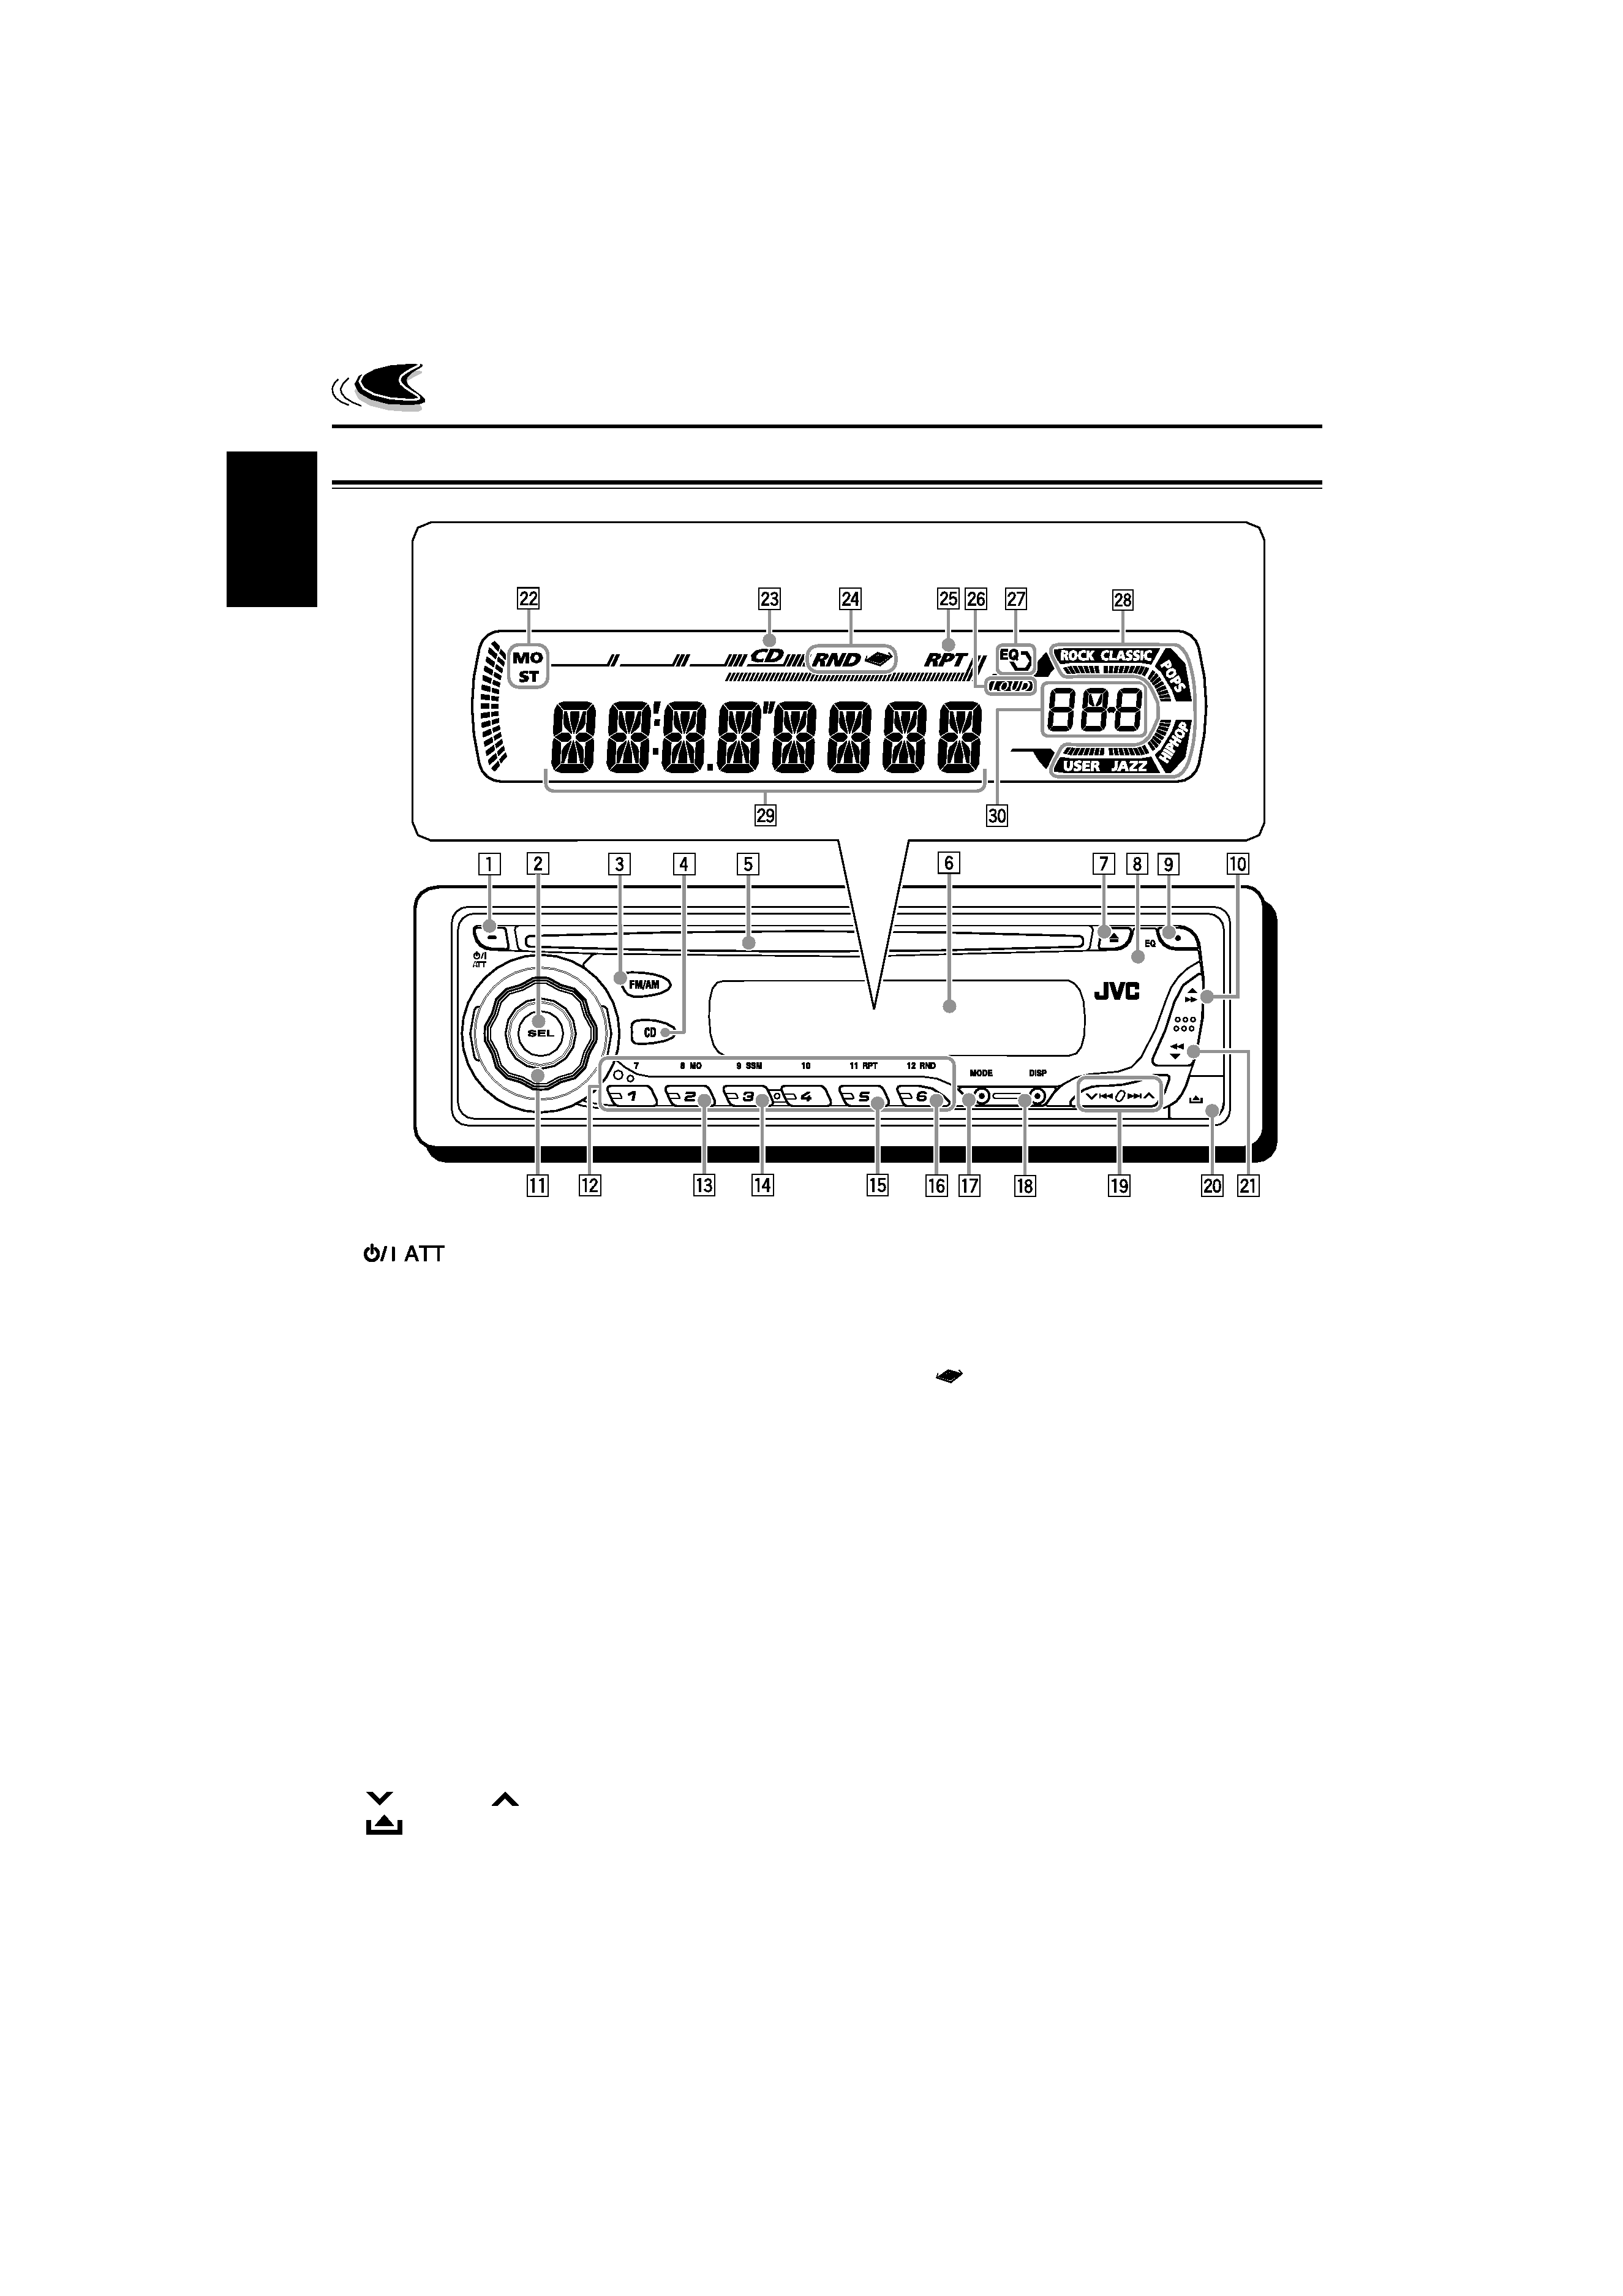
LOCATION OF THE BUTTONS
Control panel
1
(standby/on attenuator) button
2 SEL (select) button
3 FM/AM button
4 CD button
5 Loading slot
6 Display window
7
0 (eject) button
8 Remote sensor
9 EQ (equalizer) button
p
5 (up) button
¡ (fast-forward) button
q Control dial
w Number buttons
e MO (monaural) button
r SSM (Strong-station Sequential Memory)
button
t RPT (repeat) button
y RND (random) button
u MODE button
i DISP (display) button
o
4/¢
buttons
;
(control panel release) button
a
(down) button
1 (reverse) button
Display window
s Tuner reception indicators--MO (monaural),
ST (stereo)
d CD indicator
f RND
(random disc) indicator
g RPT (repeat) indicator
h LOUD (loudness) indicator
j EQ (equalizer) indicator
k Sound mode (C-EQ: custom equalizer)
indicators--ROCK, CLASSIC, POPS,
HIP HOP, JAZZ, USER
l Main display
/ Source display
Volume level indicator
Display window
EN04-06KD-AR260_G210.p65
8/19/04, 5:08 PM
4
5
ENGLISH
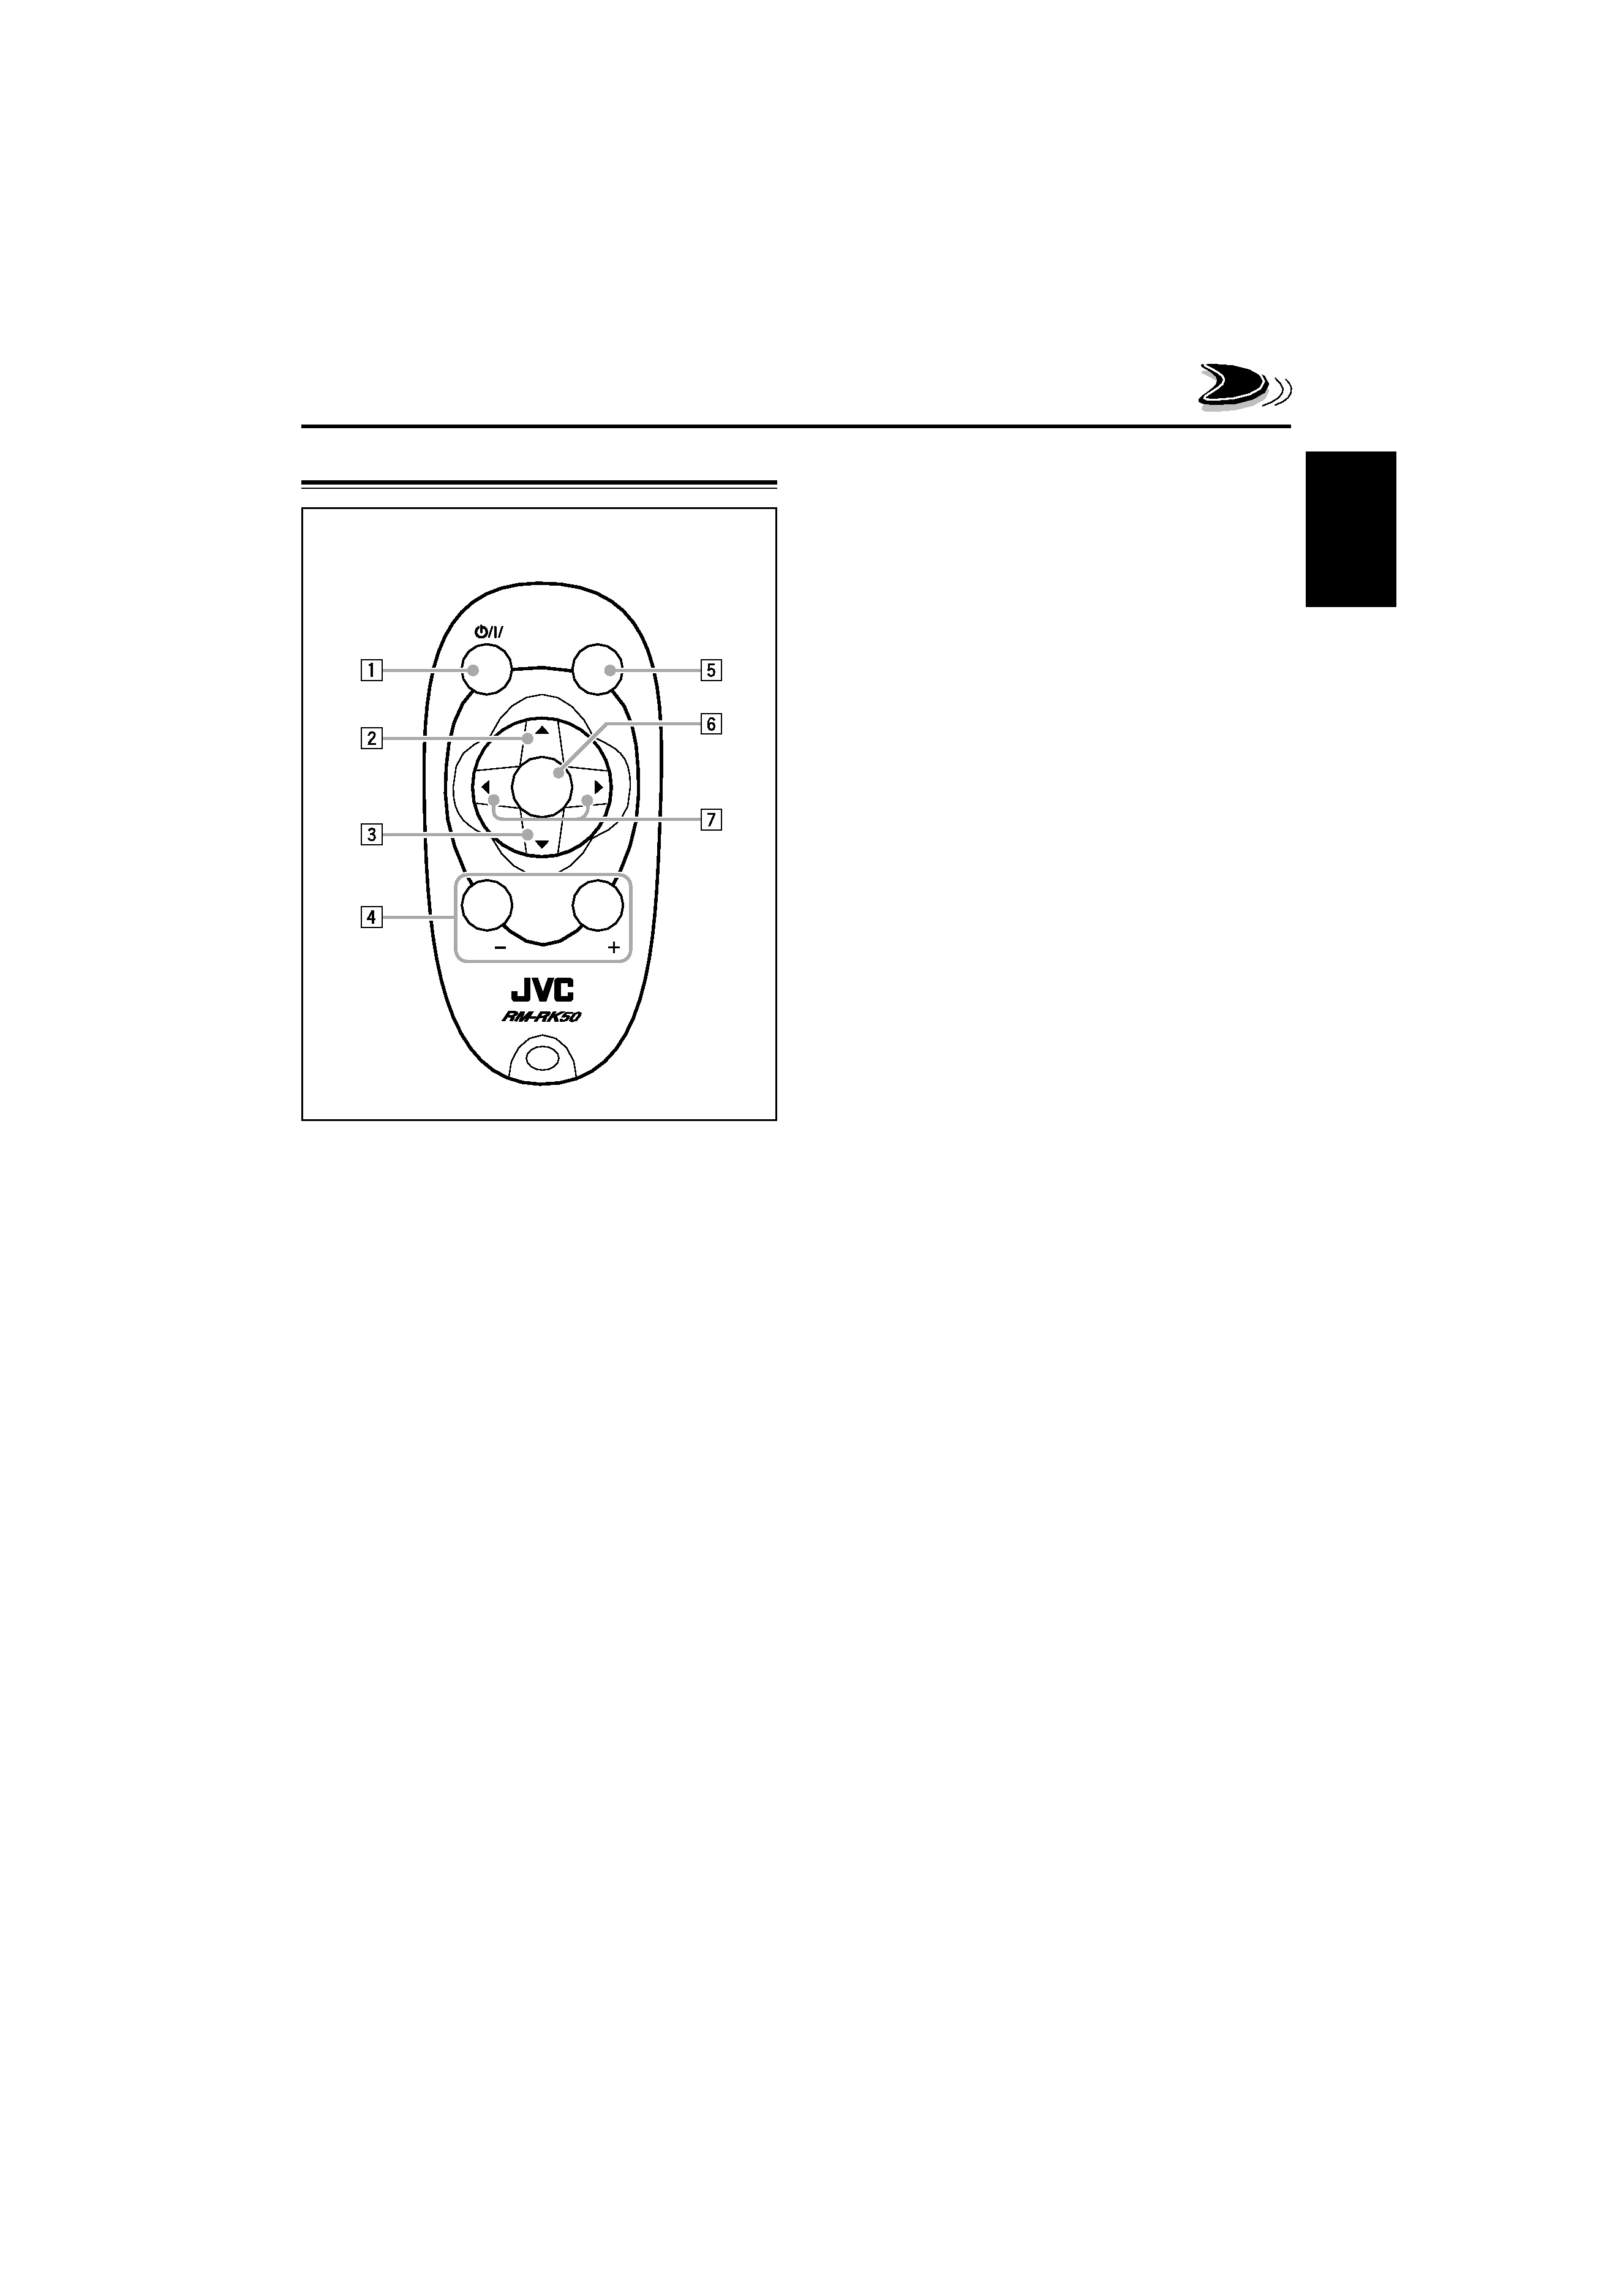
Remote controller
4 Functions the same as the control dial on the
main unit.
Note: These buttons are not used for adjusting
"DEMO", "CLOCK H", "CLOCK M",
"DIMMER", and "AMP GAIN" (see pages
8, 9 and 19).
5 Selects the sound mode (C-EQ: custom
equalizer).
Each time you press the button, the sound
mode (C-EQ) changes.
6 Selects the source.
Each time you press the button, the source
changes.
7 · Searches for stations while listening to the
radio.
· Fast-forwards or reverses the track if
pressed and held while listening to a CD.
· Skips to the beginning of the next track or
goes back to the beginning of the current (or
previous) tracks if pressed briefly while
listening to a CD.
1 · Turns on the unit if pressed when the unit is
turned off.
· Turns off the unit if pressed and held until
"SEE YOU" appears on the display.
· Drops the volume level in a moment if
pressed briefly.
Press again to resume the volume.
2 Selects the band while listening to the radio.
Each time you press the button, the band
changes.
3 Selects the preset stations while listening to
the radio.
Each time you press the button, the preset
station number increases, and the selected
station is tuned in.
SOUND
VOL
VOL
SOURCE
R
F
U
D
ATT
RM-RK50
EN04-06KD-AR260_G210.p65
7/22/04, 12:52 PM
5