
2 EN
Dear Customer,
Thank you for purchasing the JVC VHS video cassette recorder. Before use, please read the safety information and precautions
contained on this page to ensure safe use of your new VCR.
CAUTIONS
WARNING:
DANGEROUS VOLTAGE INSIDE
WARNING:
TO PREVENT FIRE OR SHOCK HAZARD, DO
NOT EXPOSE THIS UNIT TO RAIN OR
MOISTURE.
The POWER
button does not completely shut off mains
power from the unit, but switches operating current on and off.
" " shows electrical power standby and " " shows ON.
Cassettes marked "VHS" (or "S-VHS") can be used with this
video cassette recorder. However, only "VHS" recordings can
be played back in this model.
This model is equipped with SQPB (S-VHS QUASI PLAY-
BACK) that makes it possible to play back S-VHS recordings
with regular VHS resolution.
HQ VHS is compatible with existing VHS equipment.
Warning on lithium battery
The battery used in this device may present a fire or
chemical burn hazard if mistreated. Do not recharge,
disassemble, heat above 100°C or incinerate.
Replace battery with Panasonic (Matsushita Electric),
Sanyo, Sony or Maxell CR2025; use of another battery may
present a risk of fire or explosion.
Dispose of used battery promptly.
Keep away from children.
Do not disassemble and do not dispose of in fire.
HOW TO USE THIS INSTRUCTION
MANUAL
All major sections and subsections are listed in the Table
Of Contents on page 3. Use this when searching for
information on a specific procedure or feature.
The Index on pages 34 36 lists frequently-used terms,
and the number of the first page on which they are used
or explained in the manual. This section also illustrates
the controls and connections on the front and rear panel,
the front display panel and the remote control.
The
mark signals a reference to another page for
instructions or related information.
Operation buttons necessary for the various procedures
are clearly indicated through the use of illustrations at
the beginning of each major section.
BEFORE YOU INSTALL YOUR NEW
VCR . . .
. . . please read thoroughly the cautions on this page.
This unit is produced to comply with Standard IEC Publ. 65.
POWER SYSTEM:
This set operates on voltage of AC 110 220V`, 50/60 Hz
with automatic switching.
Use the conversion plug (provided) depending on the type
of your AC WALL outlet.
The rating plate and safety caution are on the rear of the
unit.
IMPORTANT:
It may be unlawful to record or play back copyrighted
material without the consent of the copyright owner.
CAUTION
When you are not using the VCR for a long period of
time, it is recommended that you disconnect the power
cord from the AC outlet.
Dangerous voltage inside. Refer internal servicing to
qualified service personnel. To prevent electric shock or fire
hazard, remove the power cord from the AC outlet prior to
connecting or disconnecting any signal lead or aerial.
Changes or modifications not approved by JVC could
void user's authority to operate the equipment.

EN
3
CONTENTS
TROUBLESHOOTING
31
Power ........................................................ 31
Tape Transport ............................................ 31
Playback .................................................... 31
Recording ................................................... 31
Timer Recording .......................................... 32
Other Problems .......................................... 32
QUESTIONS AND ANSWERS
33
Playback .................................................... 33
Recording ................................................... 33
Timer Recording .......................................... 33
INDEX
34
Front View .................................................. 34
Rear View .................................................. 35
Front Display Panel..................................... 35
Remote Control ........................................... 36
SPECIFICATIONS
37
INSTALLING YOUR NEW VCR
4
Basic Connections .................................. 4
INITIAL SETTINGS
6
Plug & Play .................................................. 6
Language ..................................................... 8
Clock ............................................................ 9
Tuner .......................................................... 10
Set Receivable Channels ..........................................10
Add Or Delete A Channel ........................................ 11
SIMPLE PLAYBACK AND
RECORDING
12
Simple Playback ......................................... 12
Simple Recording ........................................ 13
PLAYBACK AND RECORDING
FEATURES
14
Playback Features ...................................... 14
Still Picture/Frame-By-Frame Playback ..................... 14
Slow Motion/Reverse Slow Motion .......................... 14
Variable-Speed Search/Reverse Motion Playback ..... 14
High-Speed Search ..................................................15
Index Search ............................................................15
Manual Tracking ......................................................15
Video Stabilizer .......................................................16
Repeat Playback ......................................................17
Counter Reset ..........................................................17
Tape Position Indicator ............................................17
Next-Function Memory ............................................17
Superimpose ............................................................18
Select The Soundtrack (HR-J6005UM only) ............. 19
B.E.S.T. Picture System ................................ 20
Preparation ..............................................................20
Recording ................................................................21
Playback ..................................................................21
Recording Features ..................................... 22
Record One Program While
Watching Another ....................................................22
Display Elapsed Recording Time .............................. 22
Stereo And SAP (Second Audio Program)
(HR-J6005UM only) .................................................23
To Record SAP Programs (HR-J6005UM only) .......... 23
TIMER RECORDING
24
Express Timer Programming ....................... 24
Check, Cancel And Revise Programs ....................... 26
Auto SP
EP Timer ..................................................27
Auto Timer ...............................................................27
Instant Timer Recording (ITR) ....................... 28
EDITING
29
Edit To Another VCR .................................... 29
Edit From A Camcorder Or Another VCR ...... 30
ENGLISH
4 EN
ANT. IN
RF OUT
CH3
CH4
OUT
R
L
AUDIO
VIDEO
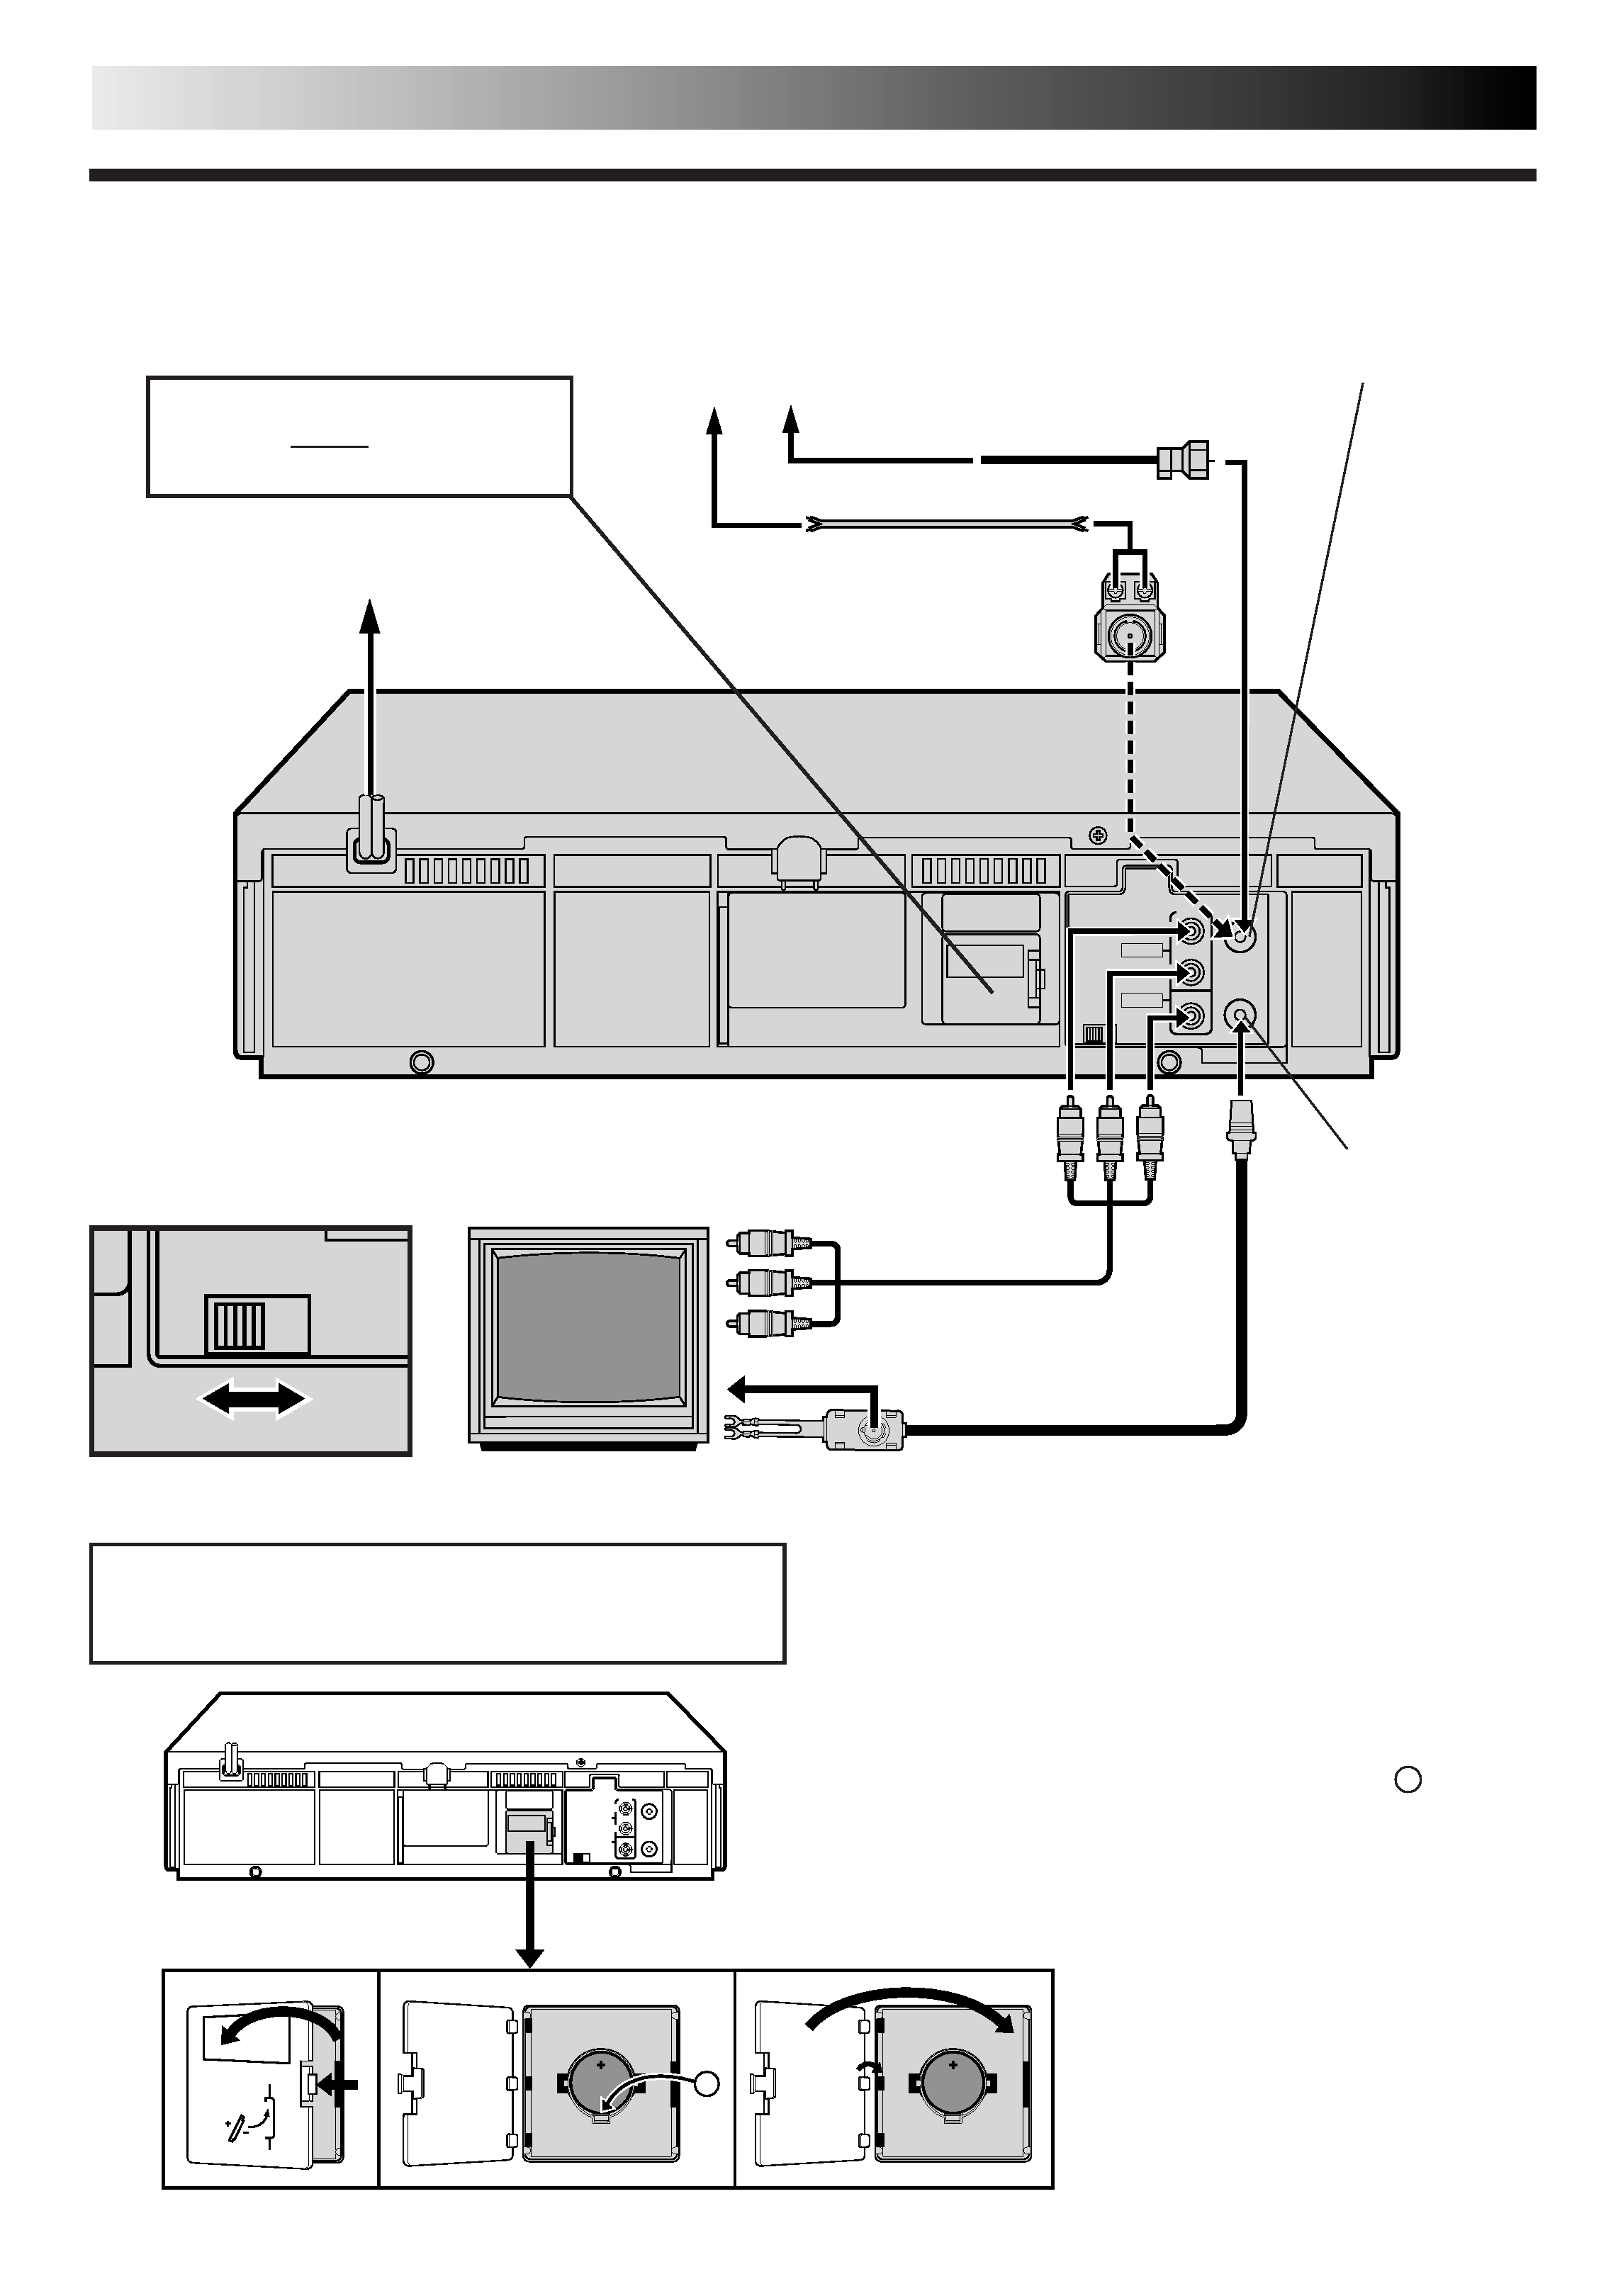
Basic Connections
INSTALLING YOUR NEW VCR
RF OUT
ANT. IN
(Antenna or Cable input)
Back of VCR
Antenna or Cable
Coaxial Cable
Flat Feeder
Matching Transformer
(not supplied)
AC Power Cord
Back of VCR
AC Outlet
RF Cable (supplied)
Audio/Video Cable
(not supplied)
TV
CH3
CH4
VIDE
Installing/Removing the lithium battery
1 Make sure that the power plug is connected to an AC outlet
and turn off the VCR power.
2 Open the battery cover while pressing the release tab as
illustrated.
3 Insert a lithium battery with the plus (+) side up and push it
in.
To remove the lithium battery, press the latch A down-
ward using a pointed non-metallic object, then pull out
the lithium battery.
4 Close the battery cover until it clicks in place.
Be sure to connect the power plug to an AC outlet first
before installing the lithium battery; otherwise, the
battery's service life will be drastically shortened.
A
300 ohm terminal
75 ohm terminal
Connect the power plug to an
AC outlet before installing the
lithium battery. (See below)

EN
5
CHECK CONTENTS
1 Makesurethepackagecontainsalloftheaccessories
listed in "SPECIFICATIONS" (
pg. 37).
SITUATE VCR
2 PlacetheVCRonastable,horizontalsurface.
CONNECT VCR TO TV
3 Theconnectionmethodyouusedependsonthetypeof
TV you have.
RF Connection
To Connect To A TV With NO AV Input Terminals . . .
a Disconnect the TV antenna from the TV.
b Connect the TV antenna cable to the ANT. IN jack
on the rear of the VCR.
c Connect the supplied RF cable between the RF
OUT jack on the rear of the VCR and the TV's
antenna terminal. Set TV on CH3 or CH4
corresponding to the CH3 CH4 switch setting on
the back of the VCR.
AV Connection
To Connect To A TV With AV Input Terminals . . .
a Connect the antenna, VCR and TV as shown in
the illustration.
b Connect an Audio/Video Cable between the AUDIO
OUT and VIDEO OUT jacks on the rear of the VCR
and the AV IN jacks on the TV. Set your TV in video
input mode or A/V input mode. Refer to the TV
Instruction Manual.
For HR-J4005UM Owners:
If your TV has AUDIO IN L and R connectors, connect
the VCR to the L connector.
CONNECT VCR TO
POWER SOURCE
4 ConnectthepowerplugtoanACoutlet.
FINAL PREPARATION FOR
USE
5 SelecttheVCRchannel(3or4)bysettingtheswitchon
the rear of the VCR as shown in the illustration.
Perform Plug & Play (
pg. 6 and 7).
NOTES:
The VCR channel is the channel on the TV which will display
the audio and video signals from the VCR. The VCR's CH3-
CH4 switch, on the back of the VCR, sets the VCR channel to
CH3 or CH4.
The CH3CH4 switch is preset to the CH3 position.
Set to CH4 if CH3 is used for broadcasting in your area and
set the channel on the TV to correspond to the VCR's CH3
CH4 switch setting.
If RF connection to TV is used, when switching from VCR to TV
mode and from TV to VCR it may be necessary to issue a CH UP
and then CH DOWN on TV to obtain a good quality picture.
Even if you are using AV cables to connect your VCR to your
TV, you must also connect it using the RF cable. This will
ensure that you can record one show while watching another
(
pg. 22).
For full identification of the VCR's rear panel, refer to the
Index (REAR VIEW
pg. 35).
6 EN
INITIAL SETTINGS
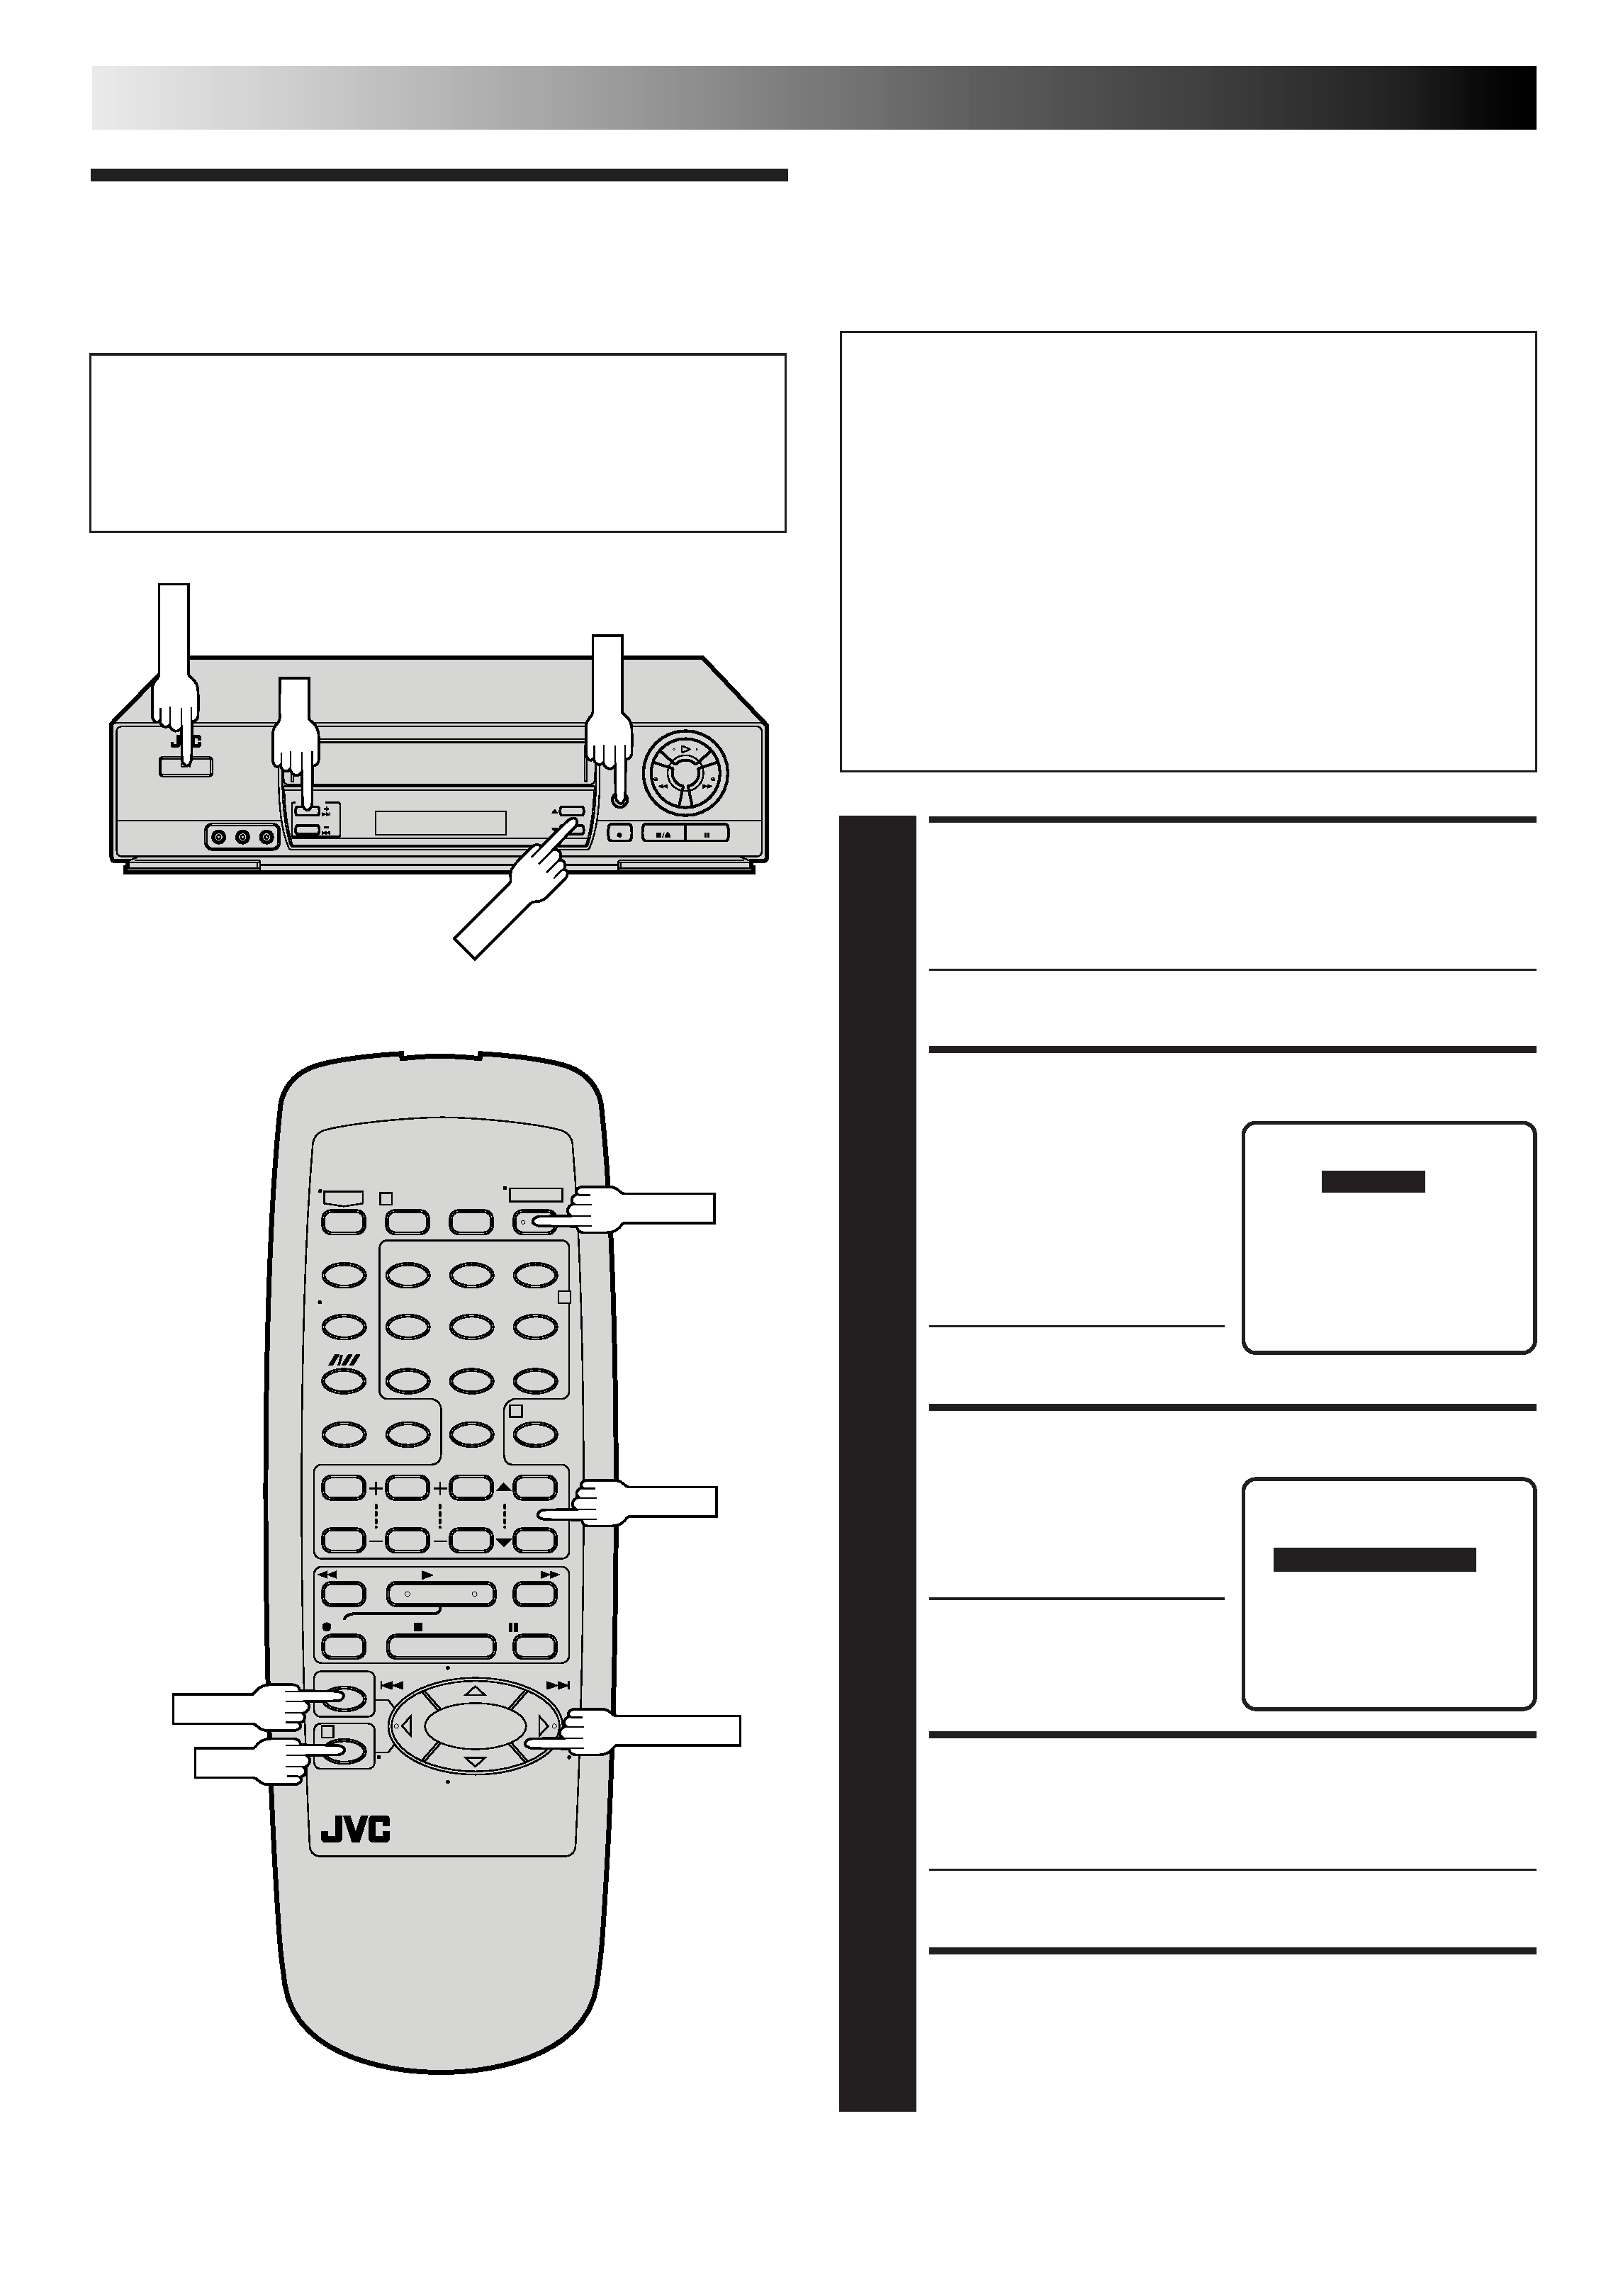
Plug & Play
The Plug & Play function simplifies installation by guiding you
through the procedures of setting the language, clock and tuner
channels -- simply follow the on-screen menus that appear
when the POWER button is first pressed to power on the VCR
after you connect the power plug to an AC outlet.
Before starting...
Connect the TV antenna cable to the ANT. IN jack on the
VCR and plug the power cord into the AC outlet.
Turn on the TV and select the VCR channel 3 or 4 (or AV
mode).
PERFORM PLUG & PLAY
SETUP
1 PressPOWER.
The Language Select screen appears.
SELECT LANGUAGE
2 PressCH5orPUSH
JOG
%fi to move the
highlight bar (arrow) to
your desired language
(ENGLISH or ESPAÑOL),
then press OK or PUSH
JOG
.
The Clock Set screen
appears.
SET TIME
3 PressCH5orPUSH
JOG
%fi to set the hour,
then press OK or PUSH
JOG
.
Press and hold either
button to delay or
advance the time by 30
minutes.
SET DATE
4 PressCH5orPUSHJOG%fitosetthedate,then
press OK or PUSH JOG
.
Press and hold either button to change the date by 15
days.
SET YEAR
5 PressCH5orPUSHJOG%fitosettheyear.
%
IMPORTANT
Don't press any buttons on the VCR or remote that are
not directly related to the step you are performing while
Plug & Play is in progress.
If you perform Plug & Play successfully during
installation, there's no need to separately perform the
Language Select, Clock Set or Channel Set procedures,
but if adjustments become necessary they can be
performed as follows:
To change the selected language
pg. 8
To reset or adjust the time
pg. 9
To add/delete channels manually
pg. 11
To reset the tuner after moving to a different location
pg. 10
%
%
12
3
45
0
6
78
9
··
··
1
2
4
3
POWER
MENU
POWER
MENU
OK
PUSH JOG
CH
5
OK
CH
5
LANGUAGE SELECT
=ENGLISH
ESPAÑOL
PRESS (
5,), THEN (OK)
PRESS (MENU) TO END
CLOCK SET
TIME
DATE YEAR
: AM
1/ 1
98
PRESS (
5,), THEN (OK)
PRESS (MENU) TO END