HR-J2010T
VIDEO CASSETTE RECORDER
INSTRUCTIONS
LPT0426-001A
VIDEO (MONO)L--AUDIO--R
OK
PR
SP
EP
VCR
+
¢
4
MENU
PUSH JOG
PUSH JOG
STANDBY / ON
G-CODE
MEN
U
123
45
6
7
89
0
1
OK
VCR
CABLE/
SAT/DVD
TV
2
4
EXPRESS
3
PROG
30 SEC
TV PR
TV PR +
+
TV
T
V
ENTER/EN
TREE
PR
DATE
STOP
FIN
START
DEBUT
0000
AUX
DAILY/QTDN.
VPS/PDC
WEEKLY/HEBDO
AUDIO
TV/VCR
2 EN
Cassettes marked "VHS" (or "S-VHS") can be used with this
video cassette recorder. However, S-VHS recording is not
possible with this model.
This model is equipped with SQPB (S-VHS QUASI PLAY-
BACK) that makes it possible to play back S-VHS recordings
with regular VHS resolution.
HQ VHS is compatible with existing VHS equipment.
Dear Customer,
Thank you for purchasing the JVC VHS video cassette recorder. Before use, please read the safety information and precautions
contained in the following pages to ensure safe use of your new VCR.
CAUTION
When you are not using the recorder for a long period of
time, it is recommended that you disconnect the power
cord from the mains outlet.
Dangerous voltage inside. Refer internal servicing to
qualified service personnel. To prevent electric shock or fire
hazard, remove the power cord from the mains outlet prior
to connecting or disconnecting any signal lead or aerial.
G-CODE is a registered trademark of Gemstar Development
Corporation.
The
G-CODE system is manufactured under license from Gemstar
Development Corporation.
Failure to heed the following precautions may result in
damage to the VCR, remote control or video cassette.
1. DO NOT place the VCR ...
...in an environment prone to extreme temperatures or
humidity.
...in direct sunlight.
...in a dusty environment.
...in an environment where strong magnetic fields are
generated.
...on a surface that is unstable or subject to vibration.
2. DO NOT block the VCR's ventilation openings.
3. DO NOT place heavy objects on the VCR or remote control.
4. DO NOT place anything which might spill on top of the
VCR or remote control.
5. AVOID violent shocks to the VCR during transport.
**MOISTURE CONDENSATION
Moisture in the air will condense on the VCR when you
move it from a cold place to a warm place, or under
extremely humid conditions--just as water droplets form on
the surface of a glass filled with cold liquid. Moisture
condensation on the head drum will cause damage to the
tape. In conditions where condensation may occur, keep the
VCR's power turned on for a few hours to let the moisture dry
before inserting a tape.
**ABOUT HEAD CLEANING
Accumulation of dirt and other particles on the video heads
may cause the playback picture to become blurred or
interrupted. Be sure to contact your nearest JVC dealer if such
troubles occur.
WARNING:
TO PREVENT FIRE OR SHOCK
HAZARD, DO NOT EXPOSE THIS
UNIT TO RAIN OR MOISTURE.
CAUTION:
This video cassette recorder should be used with AC
110V`, 60Hz only.
To prevent electric shocks and fire hazards, DO NOT use
any other power source.
IMPORTANT
Please read the various precautions on this page before
installing or operating the recorder.
It should be noted that it may be unlawful to re-record
pre-recorded tapes, records, or discs without the consent
of the owner of copyright in the sound or video
recording, broadcast or cable programme and in any
literary, dramatic, musical, or artistic work embodied
therein.
DSSTM is an official trademark of DIRECTV, Inc., a unit of GM
Hughes Electronics. PRIMESTAR is a registered service mark of
Primestar Partners, L.P.DISH NetworkTM is a trademark of
Echostar Communications Corporation.
The STANDBY/ON
button does not completely shut off
mains power from the unit, but switches operating current
on and off. " " shows electrical power standby and " "
shows ON.

EN
3
CONTENTS
TIMER RECORDING
21
G-CODER Timer Programing ......................... 21
G-CODER System Setup ................................ 23
Express Timer Programing .......................... 25
Checking program settings ....................................... 27
Canceling or changing program settings .................. 27
When programs overlap each other ......................... 28
OTHER USEFUL FUNCTIONS
29
Useful Function Settings .............................. 29
7 B.E.S.T. ................................................................30
7 PICTURE CONTROL............................................30
7 AUTO TIMER .......................................................30
7 SUPERIMPOSE.....................................................30
7 AUTO SP=EP TIMER ..........................................31
7 VIDEO STABILIZER ..............................................31
7 BLUE BACK .........................................................31
7 2ND AUDIO RECORD ........................................32
7 AUDIO MONITOR ..............................................32
EDITING
33
Edit To Or From Another VCR ...................... 33
Edit From Camcorder .................................. 34
MULTI-BRAND REMOTE CONTROL 36
TV Brand Setting ......................................... 36
Multi-Brand Setting ..................................... 37
Changing Remote Control Code ................... 39
TROUBLESHOOTING
40
Questions and answers ............................................42
INDEX
43
List of terms .............................................................43
Front panel ..............................................................44
Front display panel ..................................................44
Rear panel ...............................................................45
On-screen display ....................................................45
Remote ....................................................................46
SPECIFICATIONS
47
INSTALLING YOUR NEW VCR
4
Basic Connections .................................. 4
INITIAL SETTINGS
6
Plug & Play Setting ....................................... 6
Clock Setting ................................................. 8
Tuner Setting .............................................. 10
Setting channels automatically
-- Auto Channel Set .............................................10
Setting channels manually
-- Manual Channel Set ........................................ 11
BASIC PLAYBACK AND
RECORDING
12
Basic Playback ........................................... 12
Basic Playback Features ............................. 13
Changing display information .................................. 13
Checking tape position ............................................13
Playing back tape repeatedly
-- Repeat Play ......................................................13
Adjusting tracking condition
-- Tracking Adjustments ....................................... 14
Selecting monitor sound
-- Audio Monitor .................................................14
Automatic operations after rewinding
-- Next Function Memory .................................... 14
Locating beginning of recordings
-- Index Search ....................................................15
Locating beginning of timer recordings
-- Instant ReView .................................................15
Basic Recording .......................................... 16
Basic Recording Features ............................ 17
Changing display information .................................. 17
Specifying recording length
-- Instant Timer Recording (ITR) ........................... 17
Watching one program while recording another ...... 17
Showing on-screen display ...................................... 18
SPECIAL EFFECT PLAYBACK
19
Special Effect Playback ............................... 19
Locating particular scene rapidly
-- Picture Search ..................................................19
7 High-Speed Picture Search ...............................19
7 Variable-Speed Picture Search ..........................19
Viewing still picture
-- Still Picture Playback ....................................... 20
Skipping unwanted portions
-- Skip Search ......................................................20
Viewing still picture frame by frame
-- Frame-by-Frame Playback ............................... 20
Viewing slow motion picture
-- Slow Motion Playback ..................................... 20
4 EN
INSTALLING YOUR NEW VCR
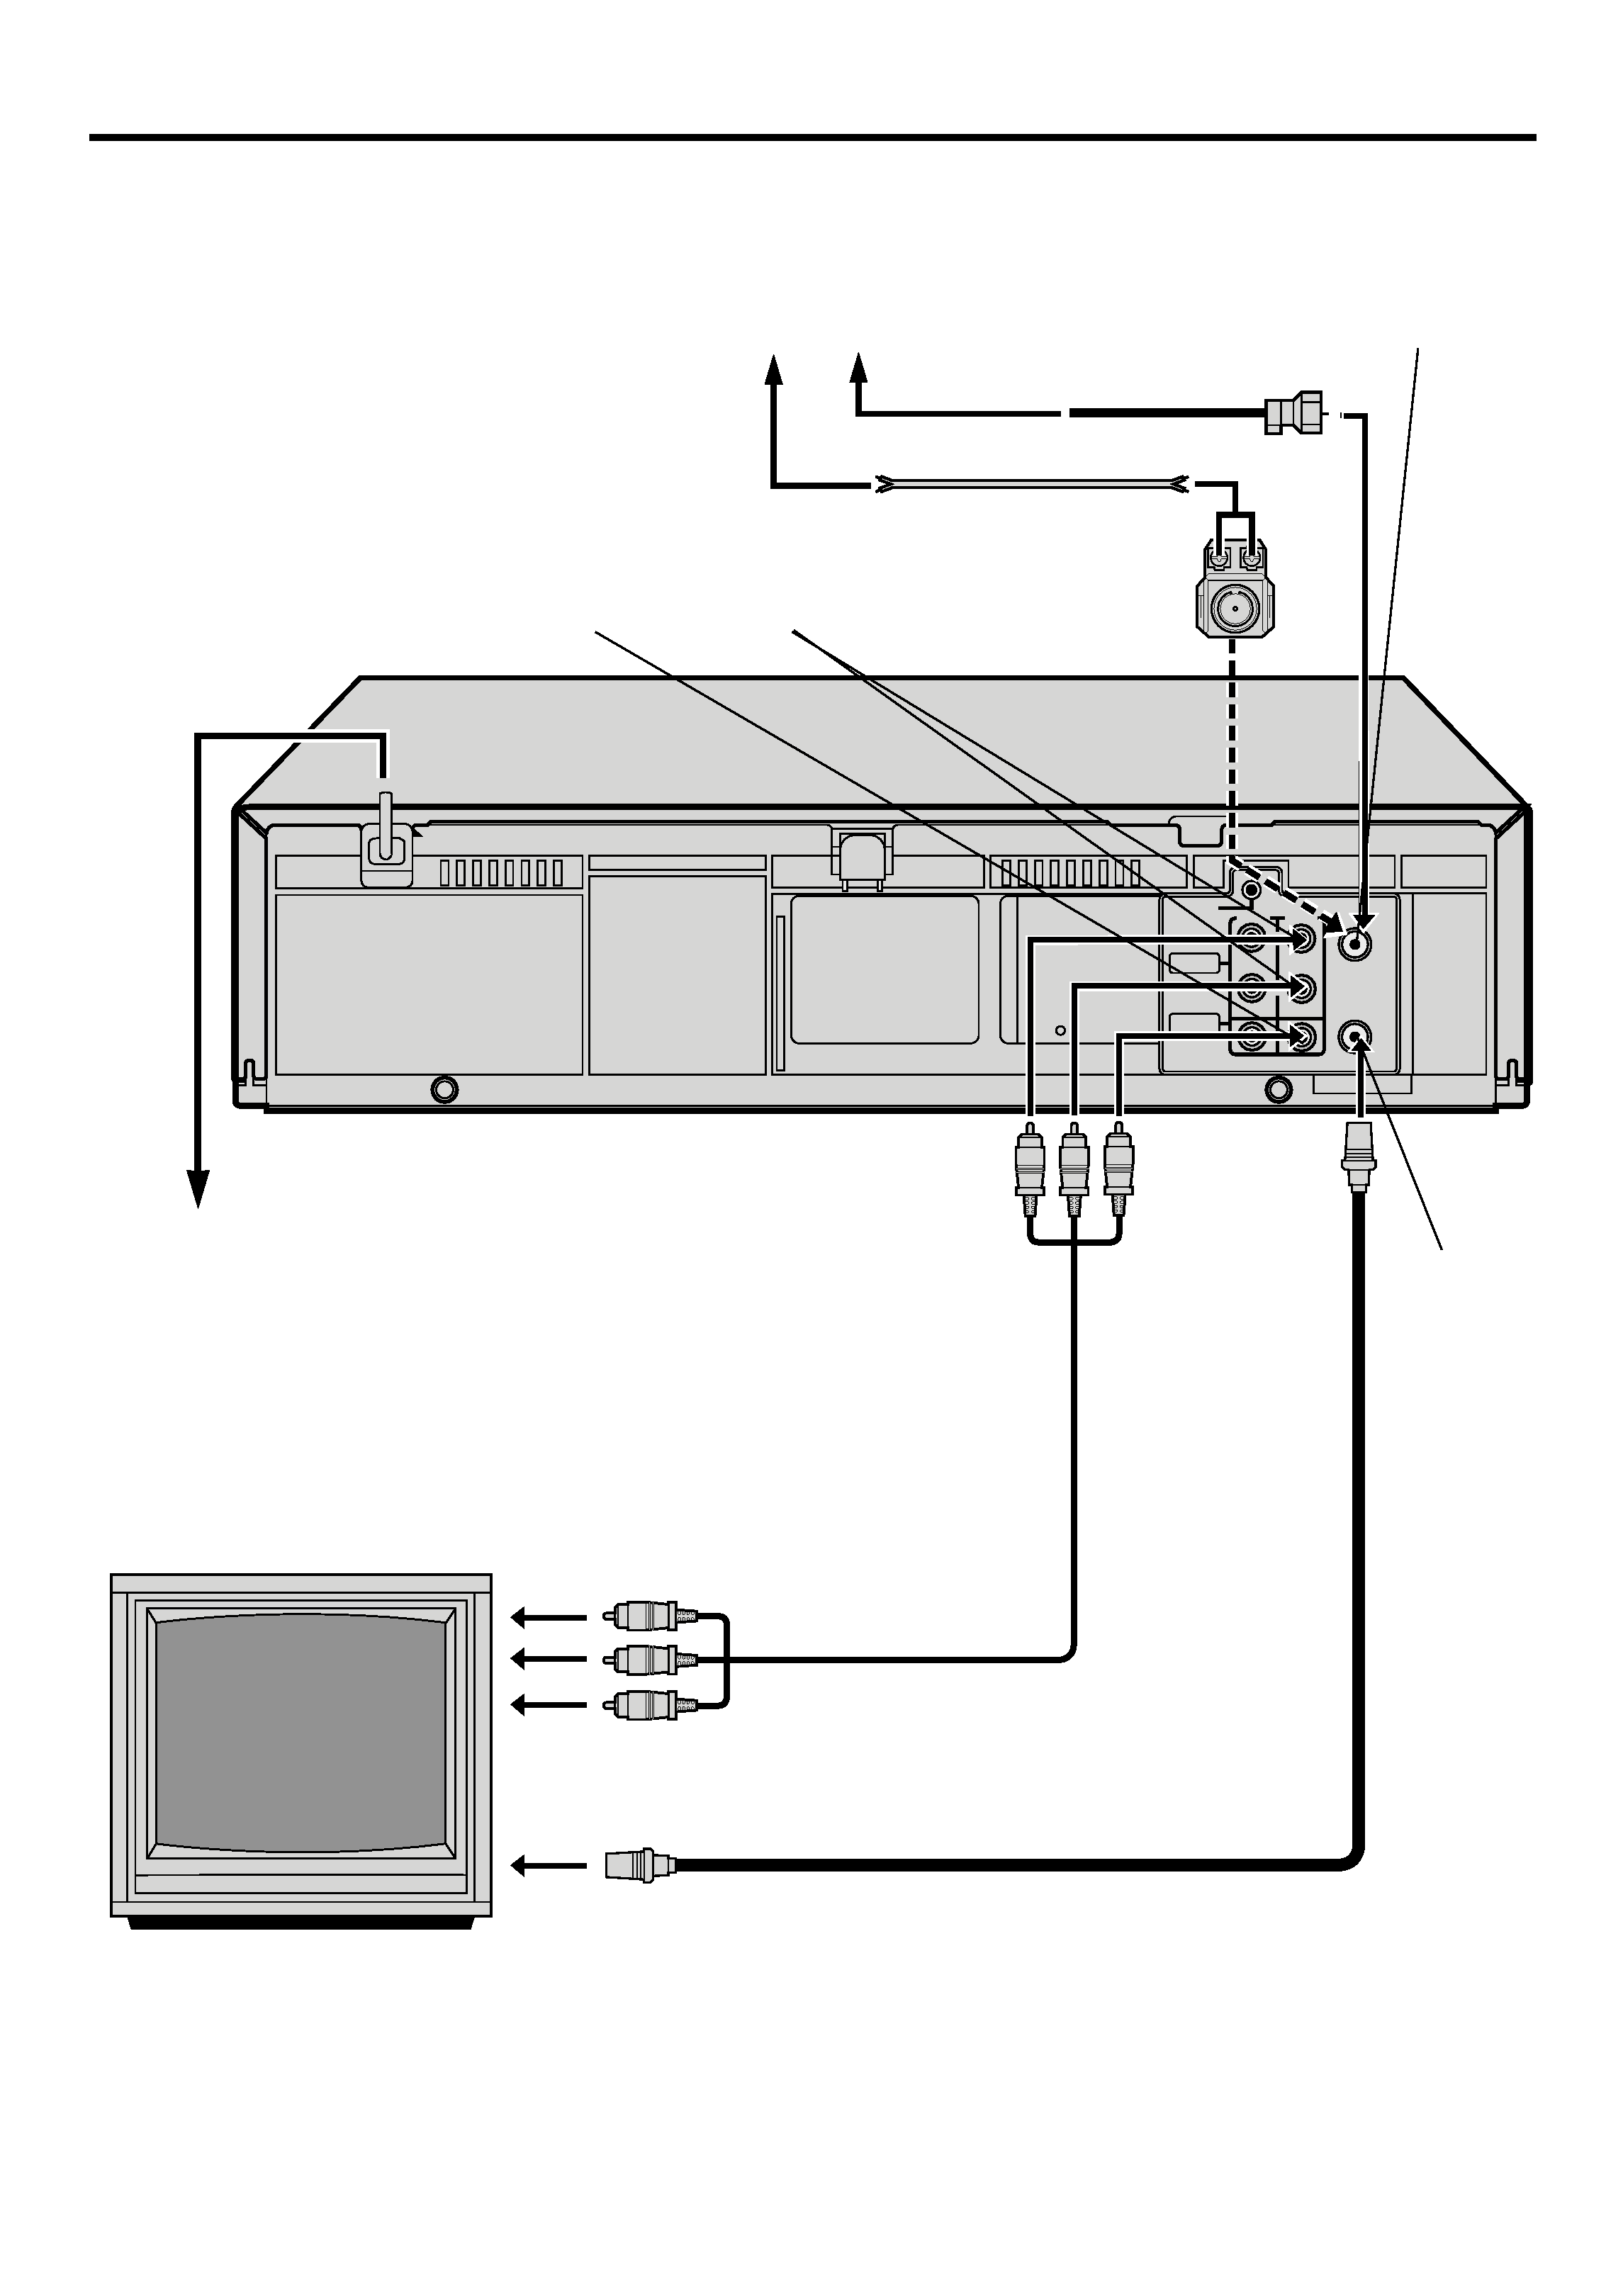
Basic Connections
IN
PAUSE
OUT
R
L
AUDIO
VIDEO
ANT.IN
RF OUT
RF OUT
ANT. IN
(Antenna or Cable input)
Antenna or Cable
Coaxial Cable
Flat Feeder
Matching Transformer
(not supplied)
AC Power Cord
Back of VCR
AC Outlet
Audio/Video Cable
(not supplied)
TV
To 75
terminal
RF Cable (supplied)
AUDIO OUT
VIDEO OUT
To Audio/video input
connectors

EN
5
1 Checkcontents
Make sure the package contains all of the
accessories listed in "SPECIFICATIONS"
(
pg. 47).
2 SituateVCR
Place the VCR on a stable, horizontal surface.
3 ConnectVCRtoTV
The following connections are required.
RF Connection
1 Disconnect the TV antenna from the TV.
2 Connect the TV antenna cable to the ANT. IN
terminal on the rear of the VCR.
3 Connect the supplied RF cable between the RF
OUT terminal on the rear of the VCR and the
TV's antenna input terminal.
AV Connection (improves picture quality during
tape playback.)
If your TV is equipped with audio/video input
connectors
1 Connect the antenna, VCR and TV as shown in
the illustration.
2 Connect an audio/video cable between the
AUDIO/VIDEO OUT connectors on the rear of
the VCR and the audio/video input connectors
on the TV.
4 ConnectVCRtopowersource
Connect the AC power plug to an AC outlet.
5 Finalpreparationforuse
You can now perform basic playback (
pg. 12) or
basic recording (
pg. 16).
NOTES:
The VCR channel is the channel on which you can watch the
picture from the VCR on the TV when only using the RF
connection.
Even if you are using audio/video cables to connect your VCR
to your TV, you must also connect it using the RF cable. This
will ensure that you can record one show while watching
another (
pg. 17).
For full identification of the VCR's rear panel, refer to the
Index (
pg. 45).