HR-DVS2EU
625
TM
TM
TV PR +
TV PR
T
V
TV
+
1
2
3
4
5
6
7
8
9
1
2
1
2
3
VHS
DV
TV
CABLE/SAT
TV/VCR
:
AUDIO
0000
START
DEBUT
STOP
FIN
DATE
PR
DAILY/QTDN.
VPS/PDC
AUX
WEEKLY/HEBDO
EXPRESS
LCD PROG
0
PROG
OK
3
4
4
MENU
30 SEC
ENTER/ENTREE
DV IN/OUT
ENTREE/SORTIE DV
VHS
DV
A.DUB
INSERT
PR
DUB
COPIE
DV
VHS
START
R.A.EDIT
IN/OUT
S-VHS ET
PULL-OPEN
EN
CONTENTS
SAFETY FIRST
2
Safety Precautions ................................... 2
INSTALLING YOUR NEW RECORDER
4
Basic Connection .................................... 4
S-VIDEO Connection .............................. 5
INITIAL SETTINGS
6
Auto Set Up ............................................ 6
Preset Download ..................................... 8
Language .............................................. 10
On-Screen Displays ............................... 11
Power Save Mode ................................. 12
SATELLITE RECEIVER CONTROL
13
Satellite Receiver Control Setting ........... 13
T-V LINK
16
T-V Link Functions ................................ 16
INFORMATION ON COLOUR SYSTEM
17
Colour System Set ................................. 17
PLAYBACK
18
Basic Playback ...................................... 18
Playback Features ................................. 19
RECORDING
26
Basic Recording .................................... 26
Recording Features ................................ 28
B.E.S.T. Picture System .......................... 32
TIMER RECORDING
34
G-CODETM/SHOWVIEWTM Timer Programming ... 34
Express Timer Programming .................. 36
SPECIAL FEATURES
42
Remote Control Functions ..................... 42
EDITING
45
Preparation For Editing .......................... 45
Tape Dubbing ....................................... 46
Normal Dubbing ................................... 47
Random Assemble Editing ..................... 48
Edit From A Camcorder ......................... 50
Edit To Or From Another Video
Recorder ............................................... 52
Audio Dubbing ..................................... 54
Insert Editing ......................................... 56
SYSTEM CONNECTIONS
60
Connection To A Satellite Receiver ........ 60
Connecting/Using A Decoder ................ 62
Connecting/Using A Stereo System ........ 63
Connecting To A Video Titler ................. 64
Connecting To A Printer ........................ 66
SUBSIDIARY SETTINGS
67
G-CODETM/SHOWVIEWTM System Setup .......... 67
Tuner Set ............................................... 68
Clock Set ............................................... 76
TROUBLESHOOTING
78
QUESTIONS AND ANSWERS
81
INDEX
82
SPECIFICATIONS
86
ENGLISH
Mini DV/S-VHS
VIDEO CASSETTE RECORDER
INSTRUCTIONS
LPT0528-001A
FIRST
SEE
AUTO SET-UP
ON BACK
2 EN
SAFETY FIRST
IMPORTANT
Please read the various precautions on page 2 and 3 before installing or operating the recorder.
It should be noted that it may be unlawful to re-record pre-recorded tapes, records, or discs without the consent
of the owner of copyright in the sound or video recording, broadcast or cable programme and in any literary,
dramatic, musical, or artistic work embodied therein.
Safety Precautions
Cassettes marked "S-VHS" and "VHS" can be used with this video cassette recorder. However, S-VHS recordings are possible only
with cassettes marked "S-VHS".
By using the S-VHS ET function, it is possible to record and play back with S-VHS picture quality on VHS cassettes with this
recorder.
Cassettes marked "Mini DV" can be used with the DV deck of this recorder. The DV deck can play back and record only PAL
signals.
G-CODE is a trademark of Gemstar Development Corporation and is registered in the following countries: Australia, China, Hong
Kong, Japan, South Korea, New Zealand and Taiwan.
SHOWVIEW is a trademark of Gemstar Development Corporation and is registered in the following countries: Austria, Belgium,
Czech Republic, Denmark, Finland, France, Germany, Greece, Hungary, Iceland, Italy, Luxembourg, Netherlands, Norway,
Poland, Portugal, Russia, Slovakia, South Africa, Spain, Sweden, and Switzerland. The G-CODE/SHOWVIEW system is manufactured
under license from Gemstar Development Corporation.
G-CODE and SHOWVIEW are different trademarks used to represent the same easy recording feature. However, for simplicity, only the
term SHOWVIEW will be used. If you use G-CODE system, follow the same steps listed for the SHOWVIEW system.
CAUTION
When you are not using the recorder for a long period of time, it is recommended that you disconnect the
power cord from the mains outlet.
Dangerous voltage inside. Refer internal servicing to qualified service personnel. To prevent electric shock or
fire hazard, remove the power cord from the mains outlet prior to connecting or disconnecting any signal lead
or aerial.
WARNING
There are two different types of SECAM colour systems: SECAM-L, used in FRANCE (also called SECAM-West),
and SECAM-B, used in Eastern European countries (also called SECAM-East).
1. This recorder can also receive SECAM-B colour television signals for recording and playback.
2. Recordings made of SECAM-B television signals produce monochrome pictures if played back on a video
recorder of SECAM-L standard, or do not produce normal colour pictures if played back on a PAL video
recorder with SECAM-B system incorporated (even if the TV set is SECAM-compatible).
3. SECAM-L prerecorded cassettes or recordings made with a SECAM-L video recorder produce monochrome
pictures when played back with this recorder.
4. This recorder cannot be used for the SECAM-L standard. Use a SECAM-L recorder to record SECAM-L signals.
The rating plate and the safety caution are on the rear of the unit.
WARNING: DANGEROUS VOLTAGE INSIDE
WARNING: TO PREVENT FIRE OR SHOCK HAZARD, DO NOT EXPOSE THIS UNIT TO RAIN OR
MOISTURE.
625
TM
TM

EN
3
When the equipment is installed in a cabinet or a shelf, make sure that it has sufficient space on all sides to allow for
ventilation (10 cm or more on both sides, on top and at the rear.)
When discarding batteries, environmental problems must be considered and the local rules or laws governing the
disposal of these batteries must be followed strictly.
Failure to heed the following precautions may result in damage to the recorder, remote control or video
cassette.
1. DO NOT place the recorder...
... in an environment prone to extreme temperatures or humidity.
... in direct sunlight.
... in a dusty environment.
... in an environment where strong magnetic fields are generated.
... on a surface that is unstable or subject to vibration.
2. DO NOT block the recorder's ventilation openings or holes.
(If the ventilation openings or holes are blocked by a newspaper or cloth, etc., the heat may not be able to get out.)
3. DO NOT place heavy objects on the recorder or remote control.
4. DO NOT place anything which might spill on top of the recorder or remote control.
(If water or liquid is allowed to enter this equipment, fire or electric shock may be caused.)
5. DO NOT expose the apparatus to dripping or splashing.
6. DO NOT use this equipment in a bathroom or places with water. Also DO NOT place any containers filled with
water or liquids (such as cosmetics or medicines, flower vases, potted plants, cups, etc.) on top of this unit.
7. DO NOT place any naked flame sources, such as lighted candles, on the apparatus.
8. AVOID violent shocks to the recorder during transport.
MOISTURE CONDENSATION
Moisture in the air will condense on the recorder when you move it from a cold place to a warm place, or under
extremely humid conditions--just as water droplets form in the surface of a glass filled with cold liquid. Moisture
condensation on the head drum will cause damage to the tape. In conditions where condensation may occur, keep the
recorder turned on for a few hours to let the moisture dry.
NOTE:
The fan on the rear panel may run although the recorder is turned off in the following cases, for example:
-- in timer standby mode, several hours before the VPS/PDC recording starts.
-- if you connect a decoder or satellite receiver to the AV2 (L-2) IN/DECODER connector and "L-2 SELECT" is set to
"DECODER" or "SAT".
-- if "JUST CLOCK" is set to "ON".
The STANDBY/ON
button does not completely shut off mains power from the unit, but switches operating
current on and off. "
" shows electrical power standby and " " shows ON.
Video tapes recorded with this video recorder in the LP/EP (Long Play/Extended Play) mode cannot be played
back on a single-speed video recorder.
4 EN
Basic
Connection
CHECK CONTENTS
1 Makesurethepackagecontainsalloftheaccessories
listed in "Specifications" (
pg. 86).
SITUATE RECORDER
2 Placetherecorderonastable,horizontalsurface.
CONNECT RECORDER TO
TV
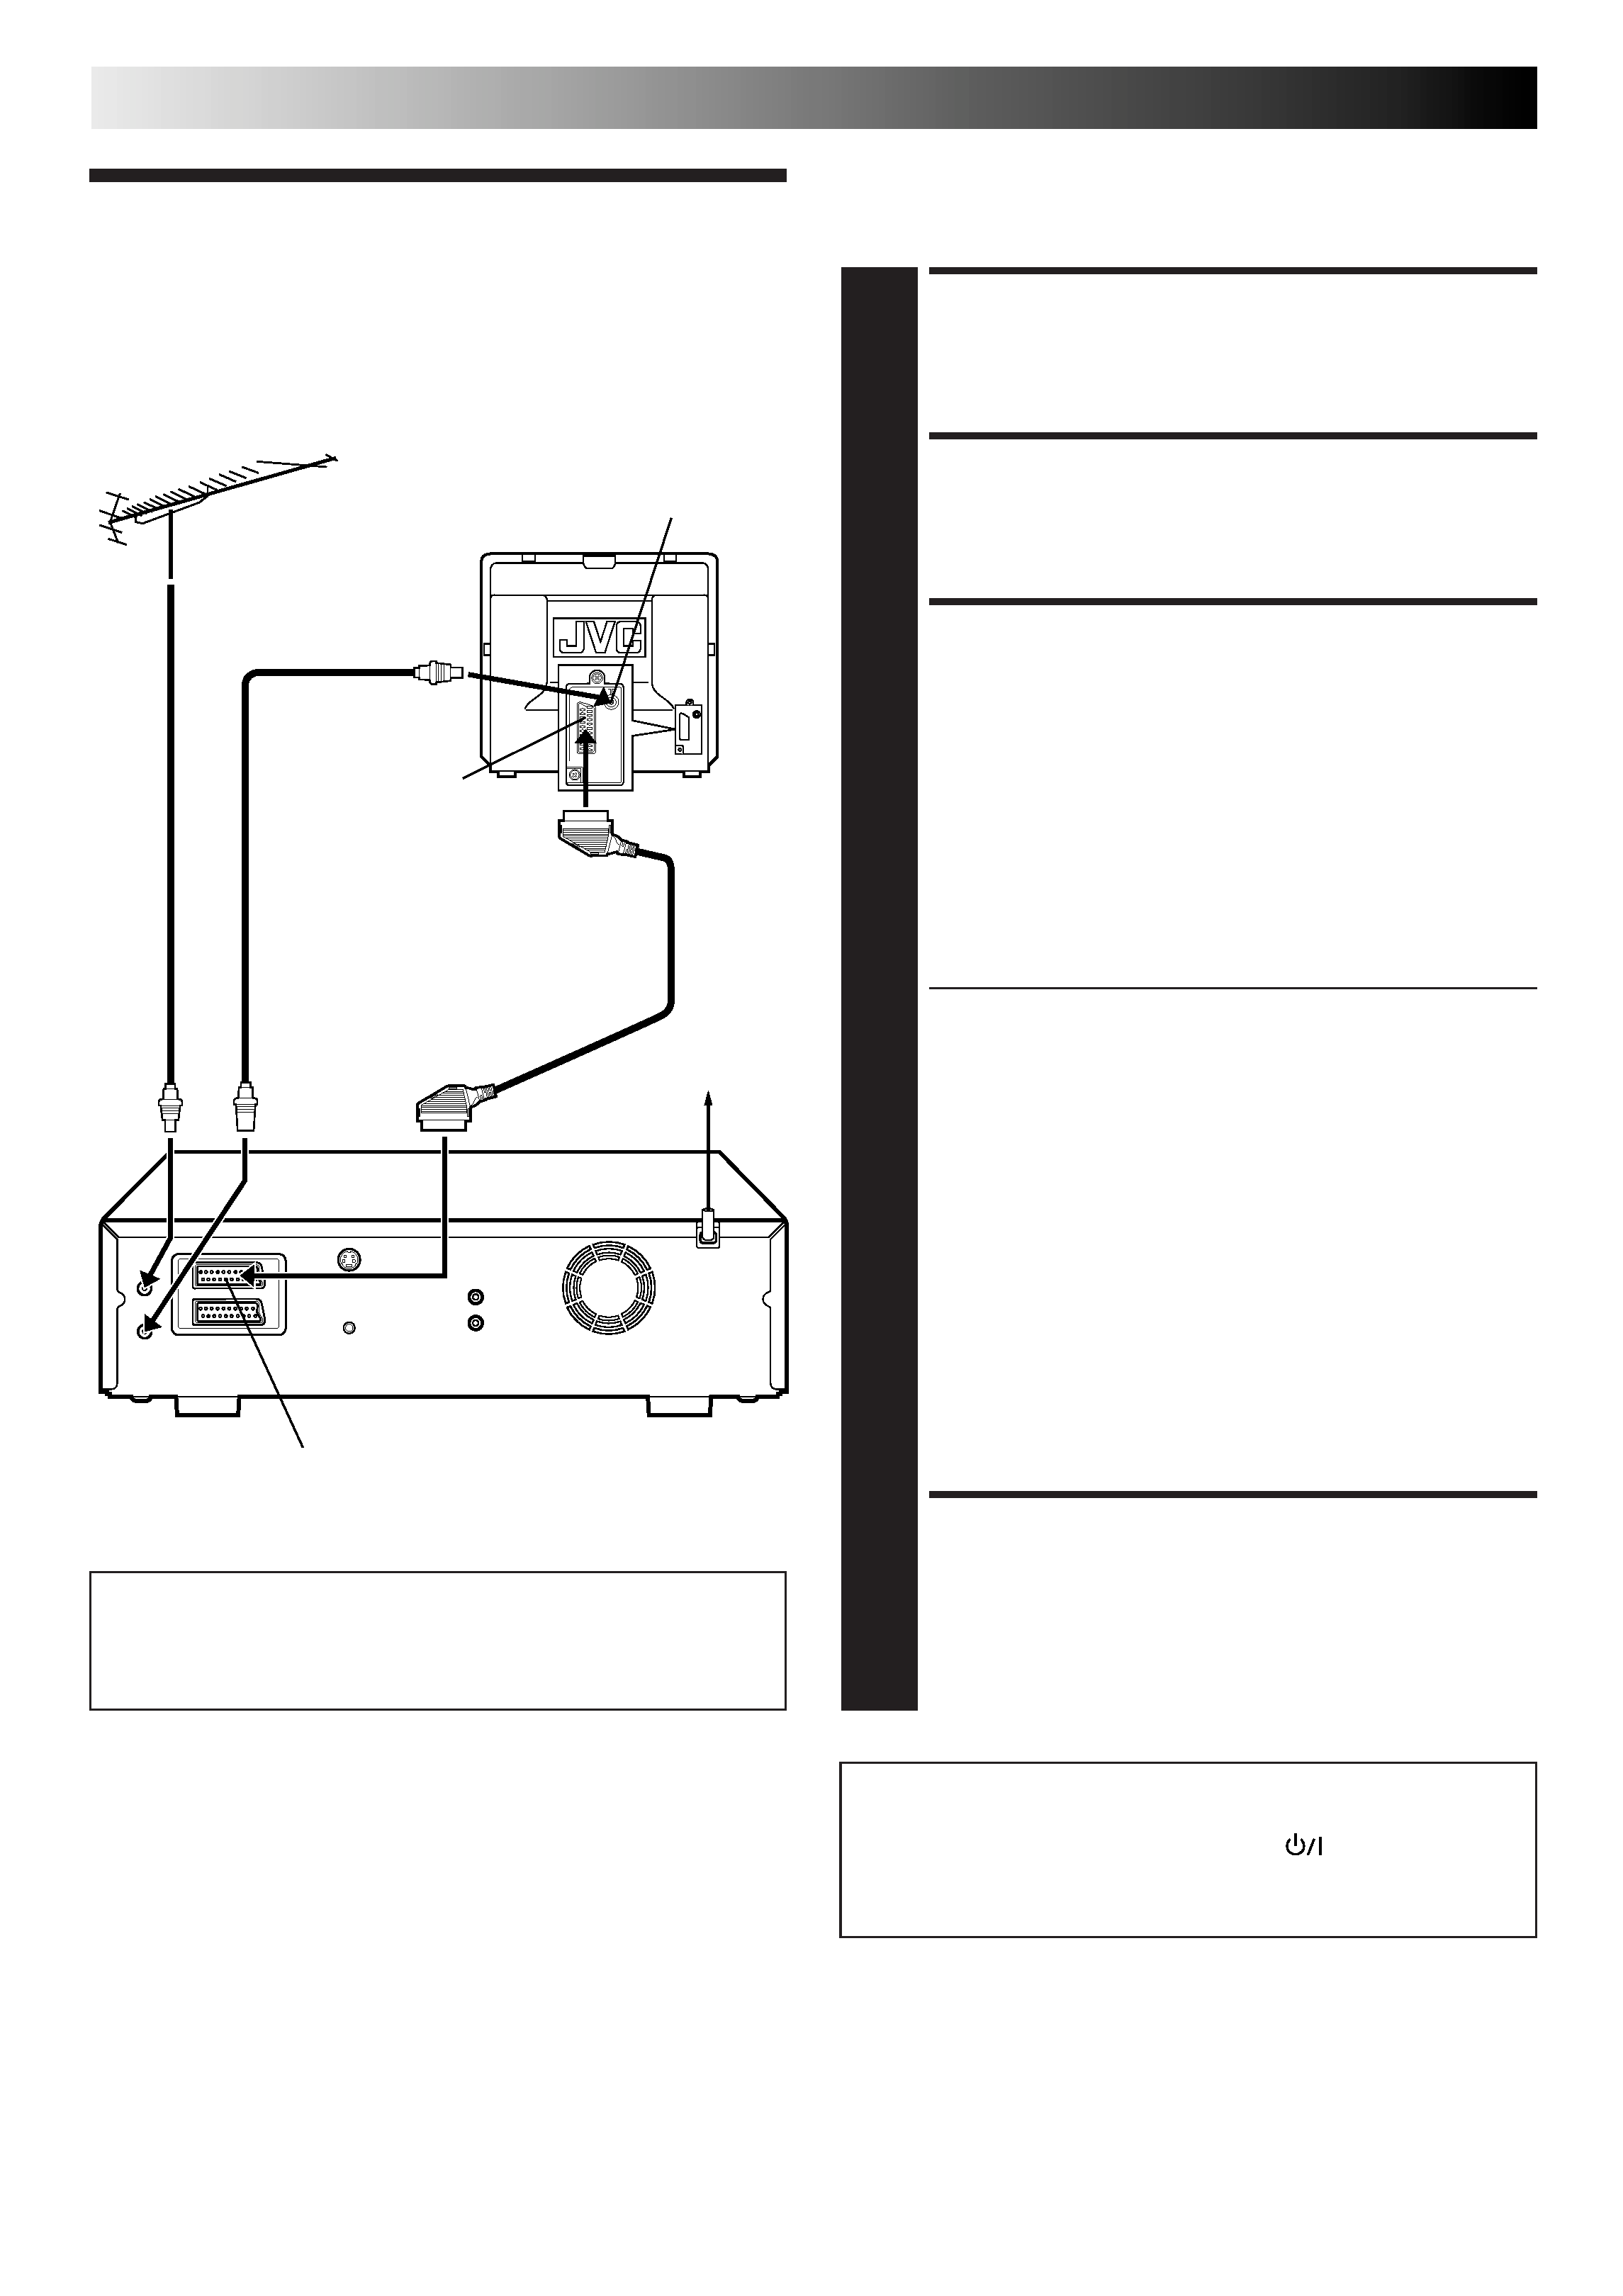
3 aDisconnecttheTVaerialcablefromtheTV.
b Connect the TV aerial cable to the ANTENNA IN
jack on the rear panel of the recorder.
c Connect the provided RF cable between the
ANTENNA OUT jack on the rear panel of the
recorder and the TV's aerial terminal.
d Connect the provided SCART cable between the
AV1 (L-1) IN/OUT socket on the rear panel of the
recorder and the TV's 21-pin SCART connector.
The AV1 (L-1) IN/OUT connector accepts and
delivers either a composite signal (regular video
signal) or a Y/C signal (a signal in which the lumi-
nance and chrominance signals are separated). If
your TV's 21-pin AV input connector (SCART) is
compatible with the Y/C signal, set "L-1 OUTPUT" to
"S-VIDEO" after the connection and the initial settings
are completed (
pg. 58). You can obtain high-
quality S-VHS pictures. (For connection, be sure to
use a 21-pin SCART cable that is compatible with the
Y/C signal.)
Set your TV to the VIDEO (or AV), Y/C, or RGB mode
according to the type of your TV's SCART connector.
For switching the TV's mode, refer to the instruction
manual of your television.
To obtain high-quality S-VHS pictures, you can also
use the S-VIDEO Connection described on page 5.
CONNECT RECORDER TO
MAINS
4 Connecttheprovidedmainspowercordbetweenthe
mains power inlet on the rear panel of the recorder and
a mains outlet.
It's essential that your video recorder be properly connected.
Follow these steps carefully. THESE STEPS MUST BE COMPLETED
BEFORE ANY VIDEO OPERATION CAN BE PERFORMED.
INSTALLING YOUR NEW RECORDER
21-pin SCART Cable
(provided)
21-pin SCART
connector
Back of TV
Aerial terminal
Rear view
Mains outlet
AV1 (L-1) IN/OUT
RF Cable
(provided)
TV Aerial
Cable
After you plug the mains power cord into a mains outlet, the
Country Set display appears on the TV screen and/or on the
recorder's front display panel when the
button on the
recorder/remote control is pressed for the first time to power
on the recorder; go to page 6 to perform Auto Set Up.
ATTENTION:
Your TV must have a 21-pin AV input connector (SCART) for
the connection to the recorder.
EN
5
S
OUT
SORTIE
(DV/VHS)
ANTENNA
ANTENNE
IN
ENTREE
OUT
SORTIE
AUDIO
(DV/VHS)
L
R
AV2 (L-2)
IN/DECODER
ENTREE/DECODEUR
AV1 (L-1) IN/OUT
ENTREE/SORTIE
SAT CONTROL
CONTROLEUR SAT
OUT
SORTIE
After you plug the mains power cord into a mains outlet, the Country Set display appears on the TV screen and/or on the recorder's
front display panel when the
button on the recorder/remote control is pressed for the first time to power on the recorder; go to
page 6 to perform Auto Set Up.
CONNECT RECORDER TO
TV
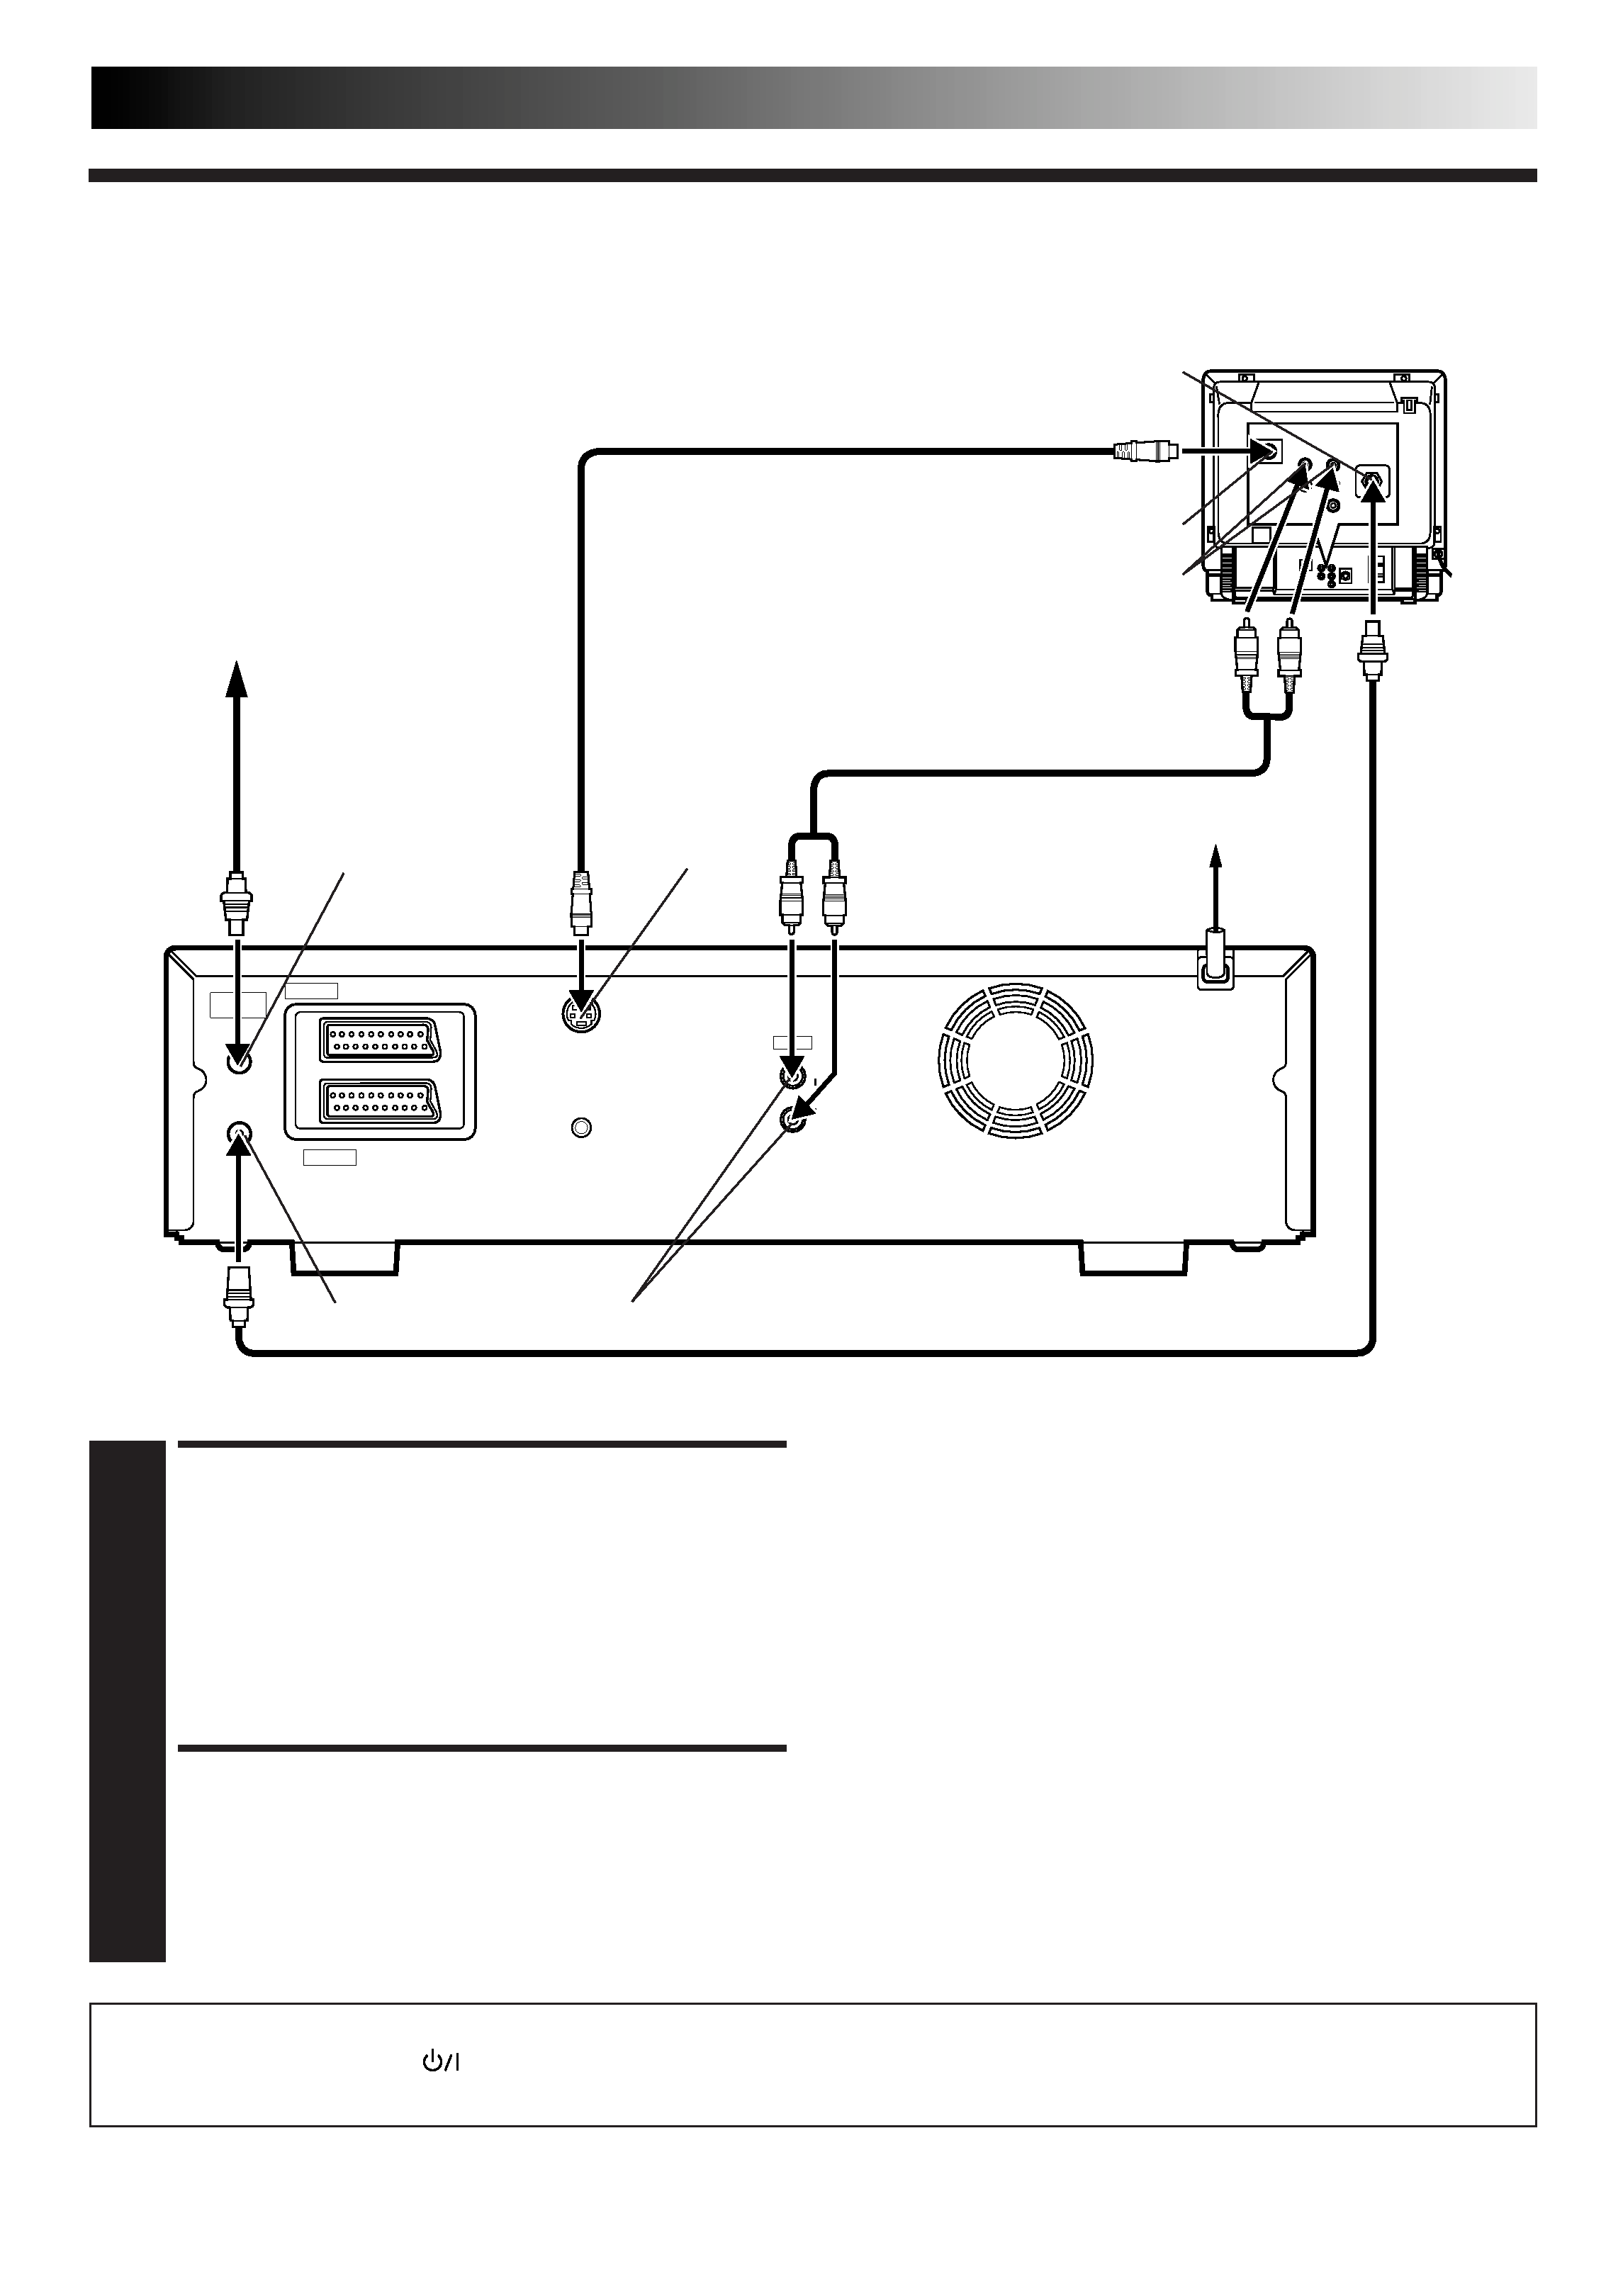
1 aConnecttheaerial,recorderandTVasper"Basic
Connection" (
pg. 4).
b Connect the recorder's S OUT connector to the TV's
S-VIDEO IN connector.
c Connect the recorder's AUDIO OUT connectors to
the TV's AUDIO IN connectors.
CONNECT RECORDER TO
MAINS
2 Connecttheprovidedmainspowercordbetweenthe
mains power inlet on the rear panel of the recorder and
a mains outlet.
To Connect to A TV With S-VIDEO/AUDIO IN Connectors . . .
S-VIDEO Connection
Mains outlet
AUDIO OUT
ANTENNA IN
Back of Recorder
ANTENNA OUT
Aerial or Cable
RF Cable (provided)
Back of TV
S-Video cable (not provided)
Audio cable (not provided)
S OUT
NOTES:
You can obtain high-quality S-VHS pictures.
If your television is not stereo-capable, use the recorder's
AUDIO OUT connectors to connect to an audio amplifier for
Hi-Fi stereo sound reproduction. (
pg. 63)
To operate the recorder with your TV using the S-VIDEO
connection, set your TV to the AV mode.
For switching the TV's mode, refer to the instruction manual
of your television.
AUDIO IN connectors
S-VIDEO IN connector
Aerial terminal