1 INSTRUCTIONS
GD-V500PZU
PLASMA
DISPLA
Y
MONIT
OR
For
customer
Use:
Enter
below
the
Model
No.
and
the
Serial
No.
which
is
located
on
the
rear
panel
of
the
cabinet.
Retain
this
information
for
future
reference.
Model
No.
Serial
No.
INSTRUCTIONS
PO
WER
/
R
-
ST
ANDBY
G
PO
WER
ON
INPUT
VO
L
+
2
W
ARNING:
T
o
reduce
the
risk
of
electric
shoc
k
do
not
remo
ve
co
ver
or
bac
k.
No
user-serviceable
parts
inside.
Refer
servicing
to
qualified
service
personnel.
W
ARNING
RISK
OF
ELECTRIC
SHOCK
DO
NOT
OPEN
The
lightning
flash
with
arrow-head
within
a
triangle
is
intended
to
tell
the
user
that
parts
inside
the
product
are
a
risk
of
electric
shock
to
persons.
The
exclamation
point
within
a
triangle
is
intended
to
tell
the
user
that
important
operating
and
servicing
instructions
are
in
the
papers
with
the
appliance.
W
ARNING:
1)
T
o
pre
v
ent
electr
ic
shoc
k,
do
not
remo
v
e
co
v
e
r.No
user
ser
viceab
le
par
ts
inside
.Ref
er
ser
vicing
to
qualified
service
personnel.
2)
Do
not
remo
v
e
the
g
rounding
pin
on
the
po
w
er
plug.
This
apparatus
is
equipped
with
a
three
pin
g
rounding-type
po
wer
plug.
This
plug
will
only
fit
a
g
rounding-type
po
w
er
outlet.
This
is
a
saf
ety
feature.
If
you
are
unable
to
insert
the
plug
into
the
outlet,
contact
an
electrician.
Do
not
def
eat
the
pur
pose
of
the
g
rounding
plug.
W
ARNING:
T
o
pre
vent
dama
g
e
whic
h
ma
y
result
in
fire
or
shoc
k
hazar
d,
do
not
e
xpose
this
appliance
to
rain
or
moisture
.
Do
not
place
container
s
with
water
(flo
wer
v
ase
,cups,
cosmetics,
etc.)
abo
ve
the
set.
(inc
luding
on
shelves
abo
ve,
etc.)
4
GD-V500PZU
3
1)
Read
these
instr
uctions
.
All
the
saf
ety
and
oper
ating
instr
uctions
should
be
read
bef
ore
the
appliance
is
oper
ated.
2)
K
eep
these
instr
uctions
.
The
saf
ety
and
oper
ating
instr
uctions
should
be
retained
f
or
future
ref
erence
.
3)
Heed
all
w
a
rnings
.
All
w
a
rnings
on
the
appliance
and
in
the
oper
ating
instr
uctions
should
be
adhered
to
.
4)
F
ollo
w
all
instr
uctions
.
All
oper
ating
and
use
instr
uctions
should
be
f
ollo
wed.
5)
Do
not
use
this
appar
atus
near
w
ater
.
F
or
e
xample
,near
a
bathtub
,w
ash
bo
wl,
kitchen
sink,
or
laundr
y
tube
,in
a
w
et
basement,
or
near
a
s
wimming
pool,
and
the
lik
e
.
6)
Clean
only
with
dr
y
cloth.
Do
not
use
liquid
cleaners
or
aerosol
cleaners
.Use
a
dr
y
cloth
f
or
cleaning.
7
)
Do
not
b
loc
k
an
y
v
entilation
openings
.Install
in
accordance
with
the
man
uf
acture
's
instr
uctions
.
Slots
and
Openings
in
the
cabinet
are
pro
vided
f
or
v
entilation
and
to
ensure
reliab
le
oper
ation
of
the
product
and
to
protect
it
from
o
v
erheating.
The
openings
should
ne
v
er
be
b
loc
k
ed
b
y
placing
the
product
on
a
bed,
sof
a,
r
ug,
or
other
similar
surf
ace
.
8
)Do
not
install
near
an
y
heat
sources
such
as
r
adiators
,heat
registers
,sto
v
e
s
,or
other
appar
atus
(including
amplifiers)
that
produce
heat.
This
product
should
not
be
placed
in
a
b
uilt-in
installation
such
as
a
bookcase
or
r
a
c
k
unless
proper
v
entilation
is
pro
vided
or
the
man
uf
acturer
's
instr
uctions
ha
v
e
been
adhered
to
.
9
)
Do
not
def
eat
the
saf
ety
pur
pose
of
the
polar
iz
ed
or
g
rounding-
type
plug.
A
polar
iz
ed
plug
has
tw
o
b
lades
with
one
wider
than
the
other
.A
g
rounding
type
plug
has
tw
o
b
lades
and
a
third
grounding
prong.
The
wide
b
lade
or
the
third
prong
are
pro
vided
f
or
y
our
saf
ety
.If
the
pro
vided
plug
does
not
fit
into
y
our
outlet,
consult
an
electr
ician
f
or
replacement
of
the
obsolete
outlet.
10)
Protect
the
po
w
er
cord
from
being
w
alk
ed
on
or
pinched
par
ticular
ly
at
plugs
,con
v
enience
receptacles
,and
the
point
where
the
y
e
xit
from
the
appar
atus
.
11)
Only
use
attachments
/
accessor
ies
specified
b
y
the
Man
uf
acturer
.
12)
Use
only
with
the
car
t,
stand,
tr
ipod,
br
ac
k
et,
or
tab
le
specified
b
y
the
manuf
acturer
,or
sold
with
the
appar
atus
.When
a
car
tis
used,
use
caution
when
mo
ving
the
car
t/
appar
atus
combination
to
a
v
oid
injur
y
from
tip-o
v
e
r.
Quic
k
stops
,e
xcessiv
e
f
orce
,and
une
v
en
surf
aces
ma
y
cause
the
appliance
and
car
tcombination
to
o
v
er
tur
n.
13)
Unplug
this
appar
atus
dur
ing
lightning
stor
ms
or
when
un
used
f
or
long
per
iods
of
time
.
This
will
pre
v
ent
damage
to
the
product
due
to
Lightning
and
po
w
er-line
surges
.
14)
Ref
er
all
ser
vicing
to
qualified
ser
vice
personnel.
Ser
vicing
is
required
when
the
apparatus
has
been
damaged
in
an
y
w
a
y,
such
as
po
w
er-supply
cord
or
plug
is
damaged,
liquid
has
been
spilled
or
objects
ha
v
e
f
allen
into
the
appar
atus
,
the
appar
atus
has
been
e
xposed
to
r
ain
or
moisture
,does
not
oper
ate
nor
mally
.or
has
been
dropped.
Impor
tant
Saf
ety
Instructions
4
Dear
JVC
Customer
W
elcome
to
the
JVC
family
of
customer
s.
W
e
hope
that
you
will
have
many
year
sof
enjoyment
fr
om
your
ne
w
Plasma
Display
Monitor
.
T
o
obtain
maximum
benef
it
fr
om
your
set,
please
r
ead
these
Instructions
befor
e
making
any
adjustments,
and
r
etain
them
for
futur
e
r
efer
ence
.
Retain
your
pur
chase
r
eceipt
also,
and
note
down
the
model
number
and
serial
number
of
your
set
in
the
space
pr
o
vided
on
the
r
ear
cover
of
these
instructions.
T
rademark
Credits
·
VGA
is
a
trademark
of
International
Business
Machines
Corporation.
·
Macintosh
is
a
registered
tr
ademar
k
of
Apple
Computer
,USA.
·
S-V
GA
is
a
registered
tr
ademar
k
of
the
Video
Electronics
Standard
Association.
Even
if
no
special
notation
has
been
made
of
company
or
product
trademarks,
these
trademarks
have
been
fully
respected.
5
GD-V500PZU
5
T
a
b
le
of
Contents
Important
Safety
Instructions
.......................................
3
FCC
ST
A
TEMENT
...........................................................
6
Safety
Precautions
.........................................................
7
Accessories
....................................................................
9
Accessories
Supplied
....................................................
9
Optional
Accessor
ies
....................................................
9
Remote
Control
Batteries
............................................
10
Basic
Controls
..............................................................
1
1
Connections
.................................................................
12
How
to
connect
the
speakers
......................................
13
Ho
w
to
connect
the
A
V
Input
T
e
rm
inals
.......................
13
Ho
w
to
connect
the
COMPONENT/RGB
Input
Te
rminals
....
15
Ho
w
to
connect
the
PC
Input
T
e
rminals
......................
16
Ho
w
to
connect
the
SERIAL
T
e
rminals
.......................
17
Power
ON/OFF
and
Input
Signal
Selection
................
18
Power
ON/OFF
...........................................................
18
Select
the
Input
Signal
................................................
19
On-Screen
Menu
Display
from
Remote
Control
........
20
Selecting
the
On-Screen
Menu
Language
..................
21
ASPECT
Controls
.........................................................
22
Adjusting
PICTURE
POS./SIZE
...................................
24
SOUND
Adjustment
.....................................................
26
Mute
............................................................................
26
SURROUND
Controls
..................................................
27
PICTURE
Adjustments
.................................................
28
AD
V
ANCED
SETTINGS
..............................................
29
SET
UP
for
Input
Signals
.............................................
30
COMPONENT/RGB
IN
SELECT
................................
30
Adjusting
unnatural
video
images
(3D
Y/C
FIL
TER)
................................................
30
COLOR
SYSTEM
/
A
U
T
O
...........................................
31
[SYNC]
........................................................................
32
[PULL
IN
RANGE]
.......................................................
32
[CLAMP
POSITION]
...................................................
32
[H-FREQ.
(kHz)
/V
-FREQ.
(Hz)]
.................................
32
T
roub
leshooting
...........................................................
33
Specifications
...............................................................
34
6
FCC
ST
A
TEMENT
FCC
ST
A
TEMENT
This
equipment
has
been
tested
and
f
ound
to
comply
with
the
limits
f
or
a
Class
A
digital
de
vice
,pursuant
to
par
t15
of
the
FCC
Rules
.These
limits
are
designed
to
pro
vide
reasonab
le
protection
against
har
mful
interf
erence
when
the
equipment
is
oper
ated
in
a
commercial
en
vironment.
This
equipment
gener
ates
,uses
,and
can
r
adiate
r
adio
frequency
energy
and,
if
not
installed
an
used
in
accordance
with
the
instr
uction
man
ual,
ma
y
cause
har
mful
interf
erence
to
r
adio
comm
unications
.Operation
of
this
equipment
in
a
residential
area
is
lik
ely
to
cause
har
mful
interf
erence
in
which
case
the
user
will
be
required
to
correct
the
interf
erence
at
his
o
wn
e
xpense
.
FCC
CA
UTION:
Pursuant
to
47CFR,
Part
15.21
of
the
FCC
rules,
any
changes
or
modifications
to
this
monitor
not
expressly
appr
o
ved
b
y
JVC
could
cause
harmful
interf
erence
and
w
ould
v
oid
the
user'
s
authority
to
operate
this
de
vice
.
CANADIAN
NO
TICE:
This
Class
A
digital
appar
atus
complies
with
Canadian
ICES-003.
6
GD-V500PZU

7
Safety
Precautions
W
ARNING
Set
up
Do
not
place
the
Plasma
Display
Monitor
on
sloped
or
unstable
surfaces.
·
The
Plasma
Displa
y
Monitor
ma
y
f
all
off
or
tip
o
v
er
.
Do
not
place
an
y
objects
on
top
of
the
Plasma
Displa
y
Monitor
y
.
·
If
water
spills
onto
the
Plasma
Display
Monitor
or
foreign
objects
get
inside
it,
a
short-circuit
may
occur
which
could
result
in
fire
or
electr
ic
shoc
k.
If
an
y
f
oreign
objects
get
inside
the
Plasma
Displa
y
Monitor
,please
consult
an
A
uthor
iz
ed
Ser
vice
Center
.
Do
not
cover
the
ventilation
holes.
·
Doing
so
may
cause
the
Plasma
Display
Monitor
to
overheat,
which
can
cause
fire
or
damage
to
the
Plasma
Displa
y
Monitor
.
If
using
the
pedestal
(optional
accessory),
leave
a
space
of
3
15
/
16
"
(10
cm)
or
more
at
the
top,
left
and
right,
2
3/
8"
(6
cm)
or
more
at
the
bottom,
and
2
3/
4"
(7
cm)
or
more
at
the
rear
.If
using
some
other
setting-up
method,
lea
ve
a
space
of
3
15
/
16
"(10
cm)
or
more
at
the
top,
bottom,
left
and
right,
and
3/
4"
(1.9
cm)
or
more
at
the
rear
.
AC
Power
Supply
Cord
The
Plasma
Displa
y
Monitor
is
designed
to
operate
on
120
V
A
C
,50/60
Hz.
Securely
insert
the
power
cord
plug
as
far
as
it
will
go.
·
If
the
plug
is
not
fully
inserted,
heat
may
be
generated
which
could
cause
fire.
If
the
plug
is
damaged
or
the
wall
socket
plate
is
loose,
they
should
not
be
used.
Do
not
handle
the
power
cord
plug
with
wet
hands.
·
Doing
so
may
cause
electric
shocks.
Do
not
do
anything
that
might
damage
the
power
cable.
When
disconnecting
the
power
cable,
hold
the
plug,
not
the
cable.
·
Do
not
make
any
modifications,
place
heavy
objects
on,
place
near
hot
objects,
heat,
bend,
twist
or
forcefully
pull
the
power
cable.
Doing
so
may
cause
damages
to
the
power
cable
which
can
cause
fire
or
electric
shock.
If
damage
to
the
cab
le
is
suspected,
ha
v
e
it
repaired
at
an
A
uthor
iz
ed
Ser
vice
Center
.
If
the
Plasma
Display
Monitor
is
not
in
use
for
a
long
period
of
time,
unplug
the
power
cord
from
the
wall
outlet.
If
problems
occur
during
use
If
a
problem
occurs
(such
as
no
picture
or
no
sound),
or
if
smoke
or
an
abnormal
odor
is
detected
from
the
Plasma
Displa
y
Monitor
,unplug
the
po
wer
cor
d
immediatel
y
.
·
Continuous
use
of
the
Display
under
these
conditions
might
cause
fire
or
permanent
damage
to
the
unit.
Have
the
Displa
y
e
v
aluated
at
an
A
uthor
iz
ed
Ser
vice
Center
.Ser
vices
to
the
Displa
y
b
y
an
y
unauthor
iz
ed
personnel
are
strongly
discouraged
due
to
its
high
voltage
dangerous
nature.
If
water
or
f
oreign
objects
g
et
inside
the
Plasma
Displa
y
Monitor
,if
the
Plasma
Displa
y
Monitor
is
dr
opped,
or
if
the
cabinet
becomes
dama
g
ed,
disconnect
the
po
wer
cor
d
plug
immediatel
y
.
·
A
shor
tma
y
occur
,which
could
cause
fire
.Contact
an
A
uthor
iz
ed
Ser
vice
Center
f
or
an
y
repairs
that
need
to
be
made
.
8
CAUTION
This
Plasma
Display
Monitor
is
for
use
only
with
the
following
optional
accessories.
Use
with
any
other
type
of
optional
accessories
ma
y
cause
instability
whic
h
could
result
in
the
possibility
of
injury
.
(All
of
the
following
accessories
are
manufactured
by
JVC)
·
Speakers
...................................................
TS-C5000SPG
·
Stand
Unit
.................................................
TS-C50P1G
·
W
all
Mounting
Unit
....................................
TS-C50P6G
·
W
all
Mounting
Unit
(angled)
......................
TS-C50P2G
·
Ceiling
Suspension
Unit
............................
TS-C50P3G
Alw
a
ys
be
sure
to
ask
a
qualified
technician
to
carr
y
out
set-up
.
When
using
the
Plasma
Display
Monitor
Do
not
bring
y
our
hands,
face
or
objects
c
lose
to
the
ventilation
holes
of
the
Plasma
Displa
y
Monitor
.
·
T
op
of
Plasma
Displa
y
Monitor
is
usually
v
e
ry
hot
due
to
the
high
temper
ature
of
e
xhaust
air
being
released
through
the
ventilation
holes.
Burns
or
personal
injuries
can
happen
if
any
body
parts
are
brought
too
close.
Placing
any
object
near
the
top
of
the
display
could
also
result
in
heat
damages
to
the
object
as
well
as
to
the
Display
if
its
ventilation
holes
are
blocked.
Be
sure
to
disconnect
all
cab
les
bef
ore
mo
ving
the
Plasma
Displa
y
Monitor
.
·
Moving
the
Display
with
its
cables
attached
might
damage
the
cables
which,
in
turn,
can
cause
fire
or
electric
shock.
Disconnect
the
power
plug
from
the
wall
outlet
as
a
safety
precaution
before
carrying
out
any
cleaning.
·
Electric
shocks
can
result
if
this
is
not
done.
Clean
the
po
wer
cab
le
regularl
y
to
pre
vent
it
fr
om
becoming
dusty
.
·
Built-up
dust
on
the
power
cord
plug
can
increase
humidity
which
might
damage
the
insulation
and
cause
fire.
Unplug
the
cord
from
the
wall
outlet
and
clean
it
with
a
dry
cloth.
Cleaning
and
maintenance
The
fr
ont
of
the
displa
y
panel
has
been
speciall
y
treated.
Wipe
the
panel
surface
gentl
y
using
onl
y
a
c
leaning
cloth
or
a
soft,
lint-free
cloth.
·
If
the
surf
ace
is
par
ticular
ly
dir
ty
,soak
a
soft,
lint-free
cloth
in
a
w
eak
detergent
solution
and
then
wr
ing
the
cloth
to
remove
excess
liquid.
Use
this
cloth
to
wipe
the
surface
of
the
display
panel,
then
wipe
it
evenly
with
a
dry
cloth,
of
the
same
type
,until
the
surf
ace
is
dr
y.
·
Do
not
scratch
or
hit
the
surface
of
the
panel
with
fingernails
or
other
hard
objects.
Furthermore,
avoid
contact
with
v
olatile
substances
such
as
insect
spr
a
y
s
,solv
ents
and
thinner
,otherwise
the
quality
of
the
surf
ace
ma
y
be
adv
ersely
aff
ected.
If
the
cabinet
becomes
dir
ty
,wipe
it
with
a
soft,
dr
y
c
loth.
·
If
the
cabinet
is
par
ticular
ly
dir
ty
,soak
the
cloth
in
a
weak
detergent
solution
and
then
wr
ing
the
cloth
dr
y.Use
this
cloth
to
wipe
the
cabinet,
and
then
wipe
it
dry
with
a
dry
cloth.
·
Do
not
allo
w
an
y
detergent
to
come
into
direct
contact
with
the
surf
ace
of
the
Plasma
Displa
y
Monitor
.If
w
ater
droplets
get
inside
the
unit,
operating
problems
may
result.
·
A
v
oid
contact
with
v
olatile
substances
such
as
insect
spr
a
y
s
,solv
ents
and
thinner
,otherwise
the
quality
of
the
cabinet
surf
ace
ma
y
be
adv
ersely
aff
ected
or
the
coating
ma
y
peel
off
.Fur
ther
more,
do
not
lea
v
e
it
f
or
long
per
iods
in
contact
with
articles
made
from
rubber
or
PVC.
Note:
Do
not
allow
a
still
picture
to
be
displayed
for
an
extended
period,
as
this
can
cause
a
permanent
after-image
to
remain
on
the
Plasma
Displa
y
Monitor
.
Examples
of
still
pictures
include
logos,
video
games,
computer
images,
teletext
and
images
displayed
in
4:3
mode.
Safety
Precautions
7
GD-V500PZU
9
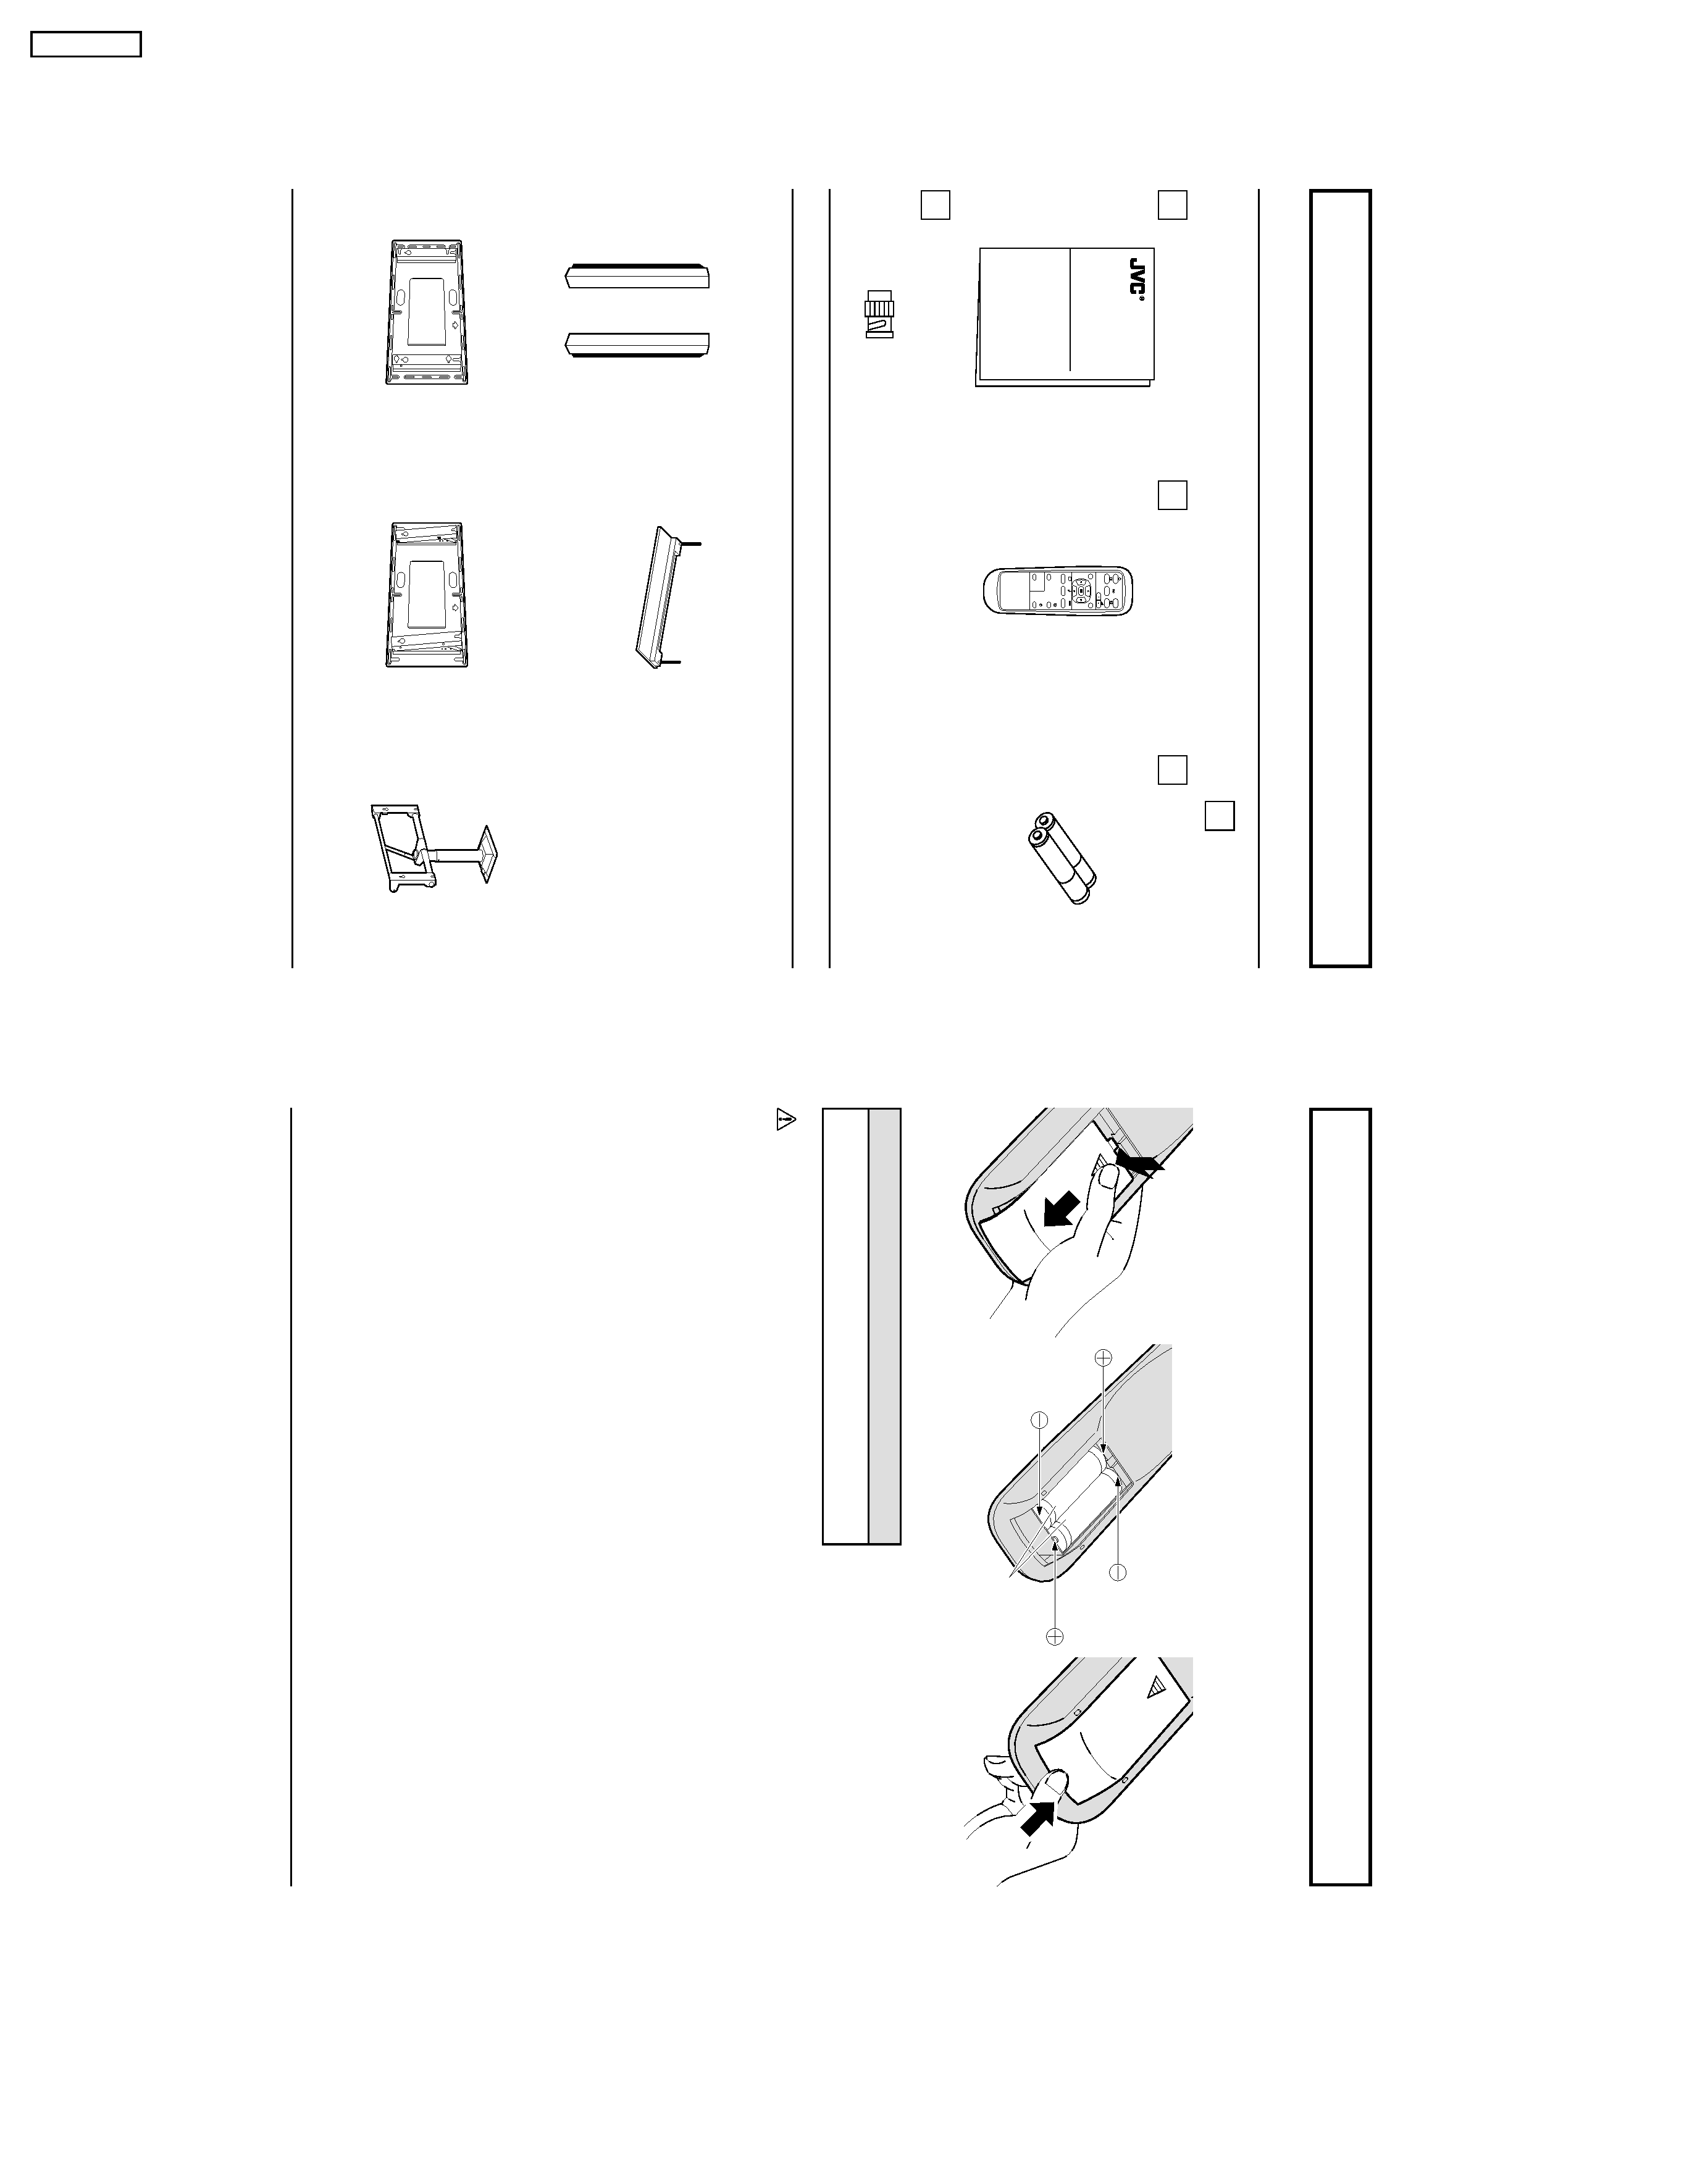
Accessories
Accessories
Supplied
Optional
Accessories
PLASMA
DISPLA
Y
INPUT
SURR
OUND
VO
L
NR
PICTURE
SOUND
SET
UP
ASPECT
PICTURE
POS
./SIZE
OFF
TIMER
PC
GD-V500PZU
Operating
Instruction
book
Remote
Control
T
ransmitter
EUR646526
Batteries
for
the
Remote
Control
T
ransmitter
(AA(R6)
Battery
×
2)
·
Speakers
TS-C5000SPG
·
Stand
Unit
TS-C50P1G
·
W
all
Mounting
Unit
TS-C50P6G
·
W
all
Mounting
Unit
(angled)
TS-C50P2G
·
Ceiling
Suspension
Unit
TS-C50P3G
RCA/BNC
Adapter
Plug
For
assemb
ling
Full
instr
uctions
are
supplied
with
each
optional
accessor
ies
f
or
use
with
this
Plasma
Displa
y
Monitor
.
10
Remote
Control
Batteries
Requires
tw
o
AA
batteries.
1.
T
u
rn
the
tr
ansmitter
f
ace
do
wn.
Press
and
slide
off
the
batter
y
co
v
e
r.
2.
Install
the
batteries
as
shown
in
the
battery
compartment.
(Polarity
+
or
must
match
the
markings
in
the
compartment).
T
wo
"AA"
size
Helpful
Hint:
For
frequent
remote
control
users,
replace
old
batteries
with
Alkaline
batteries
for
longer
life.
Precaution
on
battery
use
Incorrect
installation
can
cause
batter
y
leakage
and
corrosion
that
will
damage
the
remote
control
tr
ansmitter
.
Observe
the
following
precautions:
1.
Batter
ies
should
alw
a
ys
be
replaced
as
a
pair
.Alw
a
ys
use
ne
w
batter
ies
when
replacing
the
old
set.
2.
Do
not
combine
a
used
battery
with
a
new
one.
3.
Do
not
mix
battery
types
(example:
"Zinc
Carbon
"with
"Alkaline
").
4.
Do
not
attempt
to
charge,
short-circuit,
disassemble,
heat
or
burn
used
batteries.
5.
Batter
y
replacement
is
necessar
y
when
the
remote
control
acts
spor
adically
or
stops
oper
ating
the
Plasma
Displa
y.
3.
Replace
the
cove
and
slide
in
reverse
until
the
lock
snaps.
8
GD-V500PZU