
1
Projector
CP-SX1350
CP-SX1350
User's Manual - Operating Guide
User's Manual - Operating Guide
Thank you for purchasing this projector.
TRADEMARK ACKNOWLEDGMENT :
· VGA and XGA are registered trademarks of International Business Machines Corporation.
· Apple and Mac are registered trademarks of Apple Computer, Inc.
· VESA and SVGA are trademarks of Video Electronics Standard Association.
· Windows is a registered trademark of Microsoft Corporation.
· Internet Explorer is a trademark of Microsoft Corporation.
All other trademarks are the property of their respective owners.
WARNING
Before using the product, please read the "User's Manual -
Safety Guide" and related manuals to ensure the proper use of this product.
After reading them, store them in a safe place for future reference.
IN
TE
R
IN
PU
T
M1-D
RGB
BNG
S-VIDEO
ST
ANDBY/O
N
TE
MP
VIDEO
COMPO
NE
NT
LA
MP
KEYSTO
NE
SEARCH
RE
SE
T
MEN
U
FOCUS
LEN
SSHIF
T
ZO
OM
· The information in this manual is subject to change without notice.
· The manufacturer assumes no responsibility for any errors that may appear in this manual.
· The reproduction, transfer or copy of all or any part of this document is not permitted without
express written consent.
NOTE

2
Projector Features
Projector Features
Preparation
Preparation
Ultra High Brightness
Crisp, ultra-bright presentations is achieved by using a UHB (ultra high brightness) lamp and a highly
efficient optical system.
Whisper Mode Equipped
Special mode is available for reducing projector noise to achieve quieter operation.
User Memory Function
This projector can memorize 4 settings by MY MEMORY function.
Partial Magnification Function
Interesting parts of images can be magnified for closer viewing.
Keystone Distortion Correction
Quick correction of distorted images electrically.
Optical Lens Shift
The lens of this projector can be shifted vertically. When you want to finely adjust the picture position,
use the LENS SHIFT buttons.
This multimedia projector is used to project various computer signals as well as
NTSC/PAL/SECAM video signals onto a screen. Little space is required for
installation and large images can easily be realized.
Please see the "Contents Of Package" of the "User's Manual Quick Guide".
Your projector should come with the items shown there. Contact immediately
your dealer if anything is missing.
· Keep the original packing materials for future reshipment. For moving the projector, be
sure to use the original packing materials. Use special caution for the lens part.
NOTE

3
Content
Content
Projector Features
2
Preparation
2
Part Names
4
Projector
4
Control Buttons
5
Remote control
5
Setting Up
6
Arrangement
6
Adjusting The Projector's
Elevator
7
Using The Lens shift Buttons
7
Connecting Your Devices
8
Connecting The Power Supply
11
Remote Control
12
About The Laser Pointer
12
Loading Batteries
12
Operating The
Remote Control
13
Using The Remote
ID Feature
13
Using The Mouse/Keyboard
Control Function
14
Power ON/OFF
15
Turning On The Power
15
Turning Off The Power
15
Operating
16
Selecting An Input Signal
16
Selecting The Aspect Ratio
17
Using The Automatic
Adjustment Feature
17
Adjusting The Picture Position
18
Correcting The Keystone
Distortion
18
Adjusting The Volume
19
Muting The Sound
19
Temporarily Blanking
The Screen
19
Freezing The Screen
20
Using The Magnify Feature
20
Displaying The Child Window
21
Selecting An Audio Input
21
Multifunctional Settings
22
Using The Menu Functions
22
MAIN Menu
23
PICTURE-1 Menu
24
PICTURE-2 Menu
26
INPUT Menu
27
AUTO Menu
29
SCREEN Menu
31
OPTION Menu
33
NETWORK Menu
35
Network Setting Up
36
Lamp
37
Replacing The Lamp
38
Air Filter
39
Caring For The Air Filter
39
Other Care
40
Caring For The Inside Of
The Projector
40
Caring For The Lens
40
Caring For The Cabinet And
Remote Control
40
Troubleshooting
41
Related Messages
41
Regarding The Indicator
Lamps
43
Phenomena That May Easily Be
Mistaken For Machine Defects
45
Warranty And After-Service
47
Specifications
47
TECHNICAL
4
Part Names
Part Names
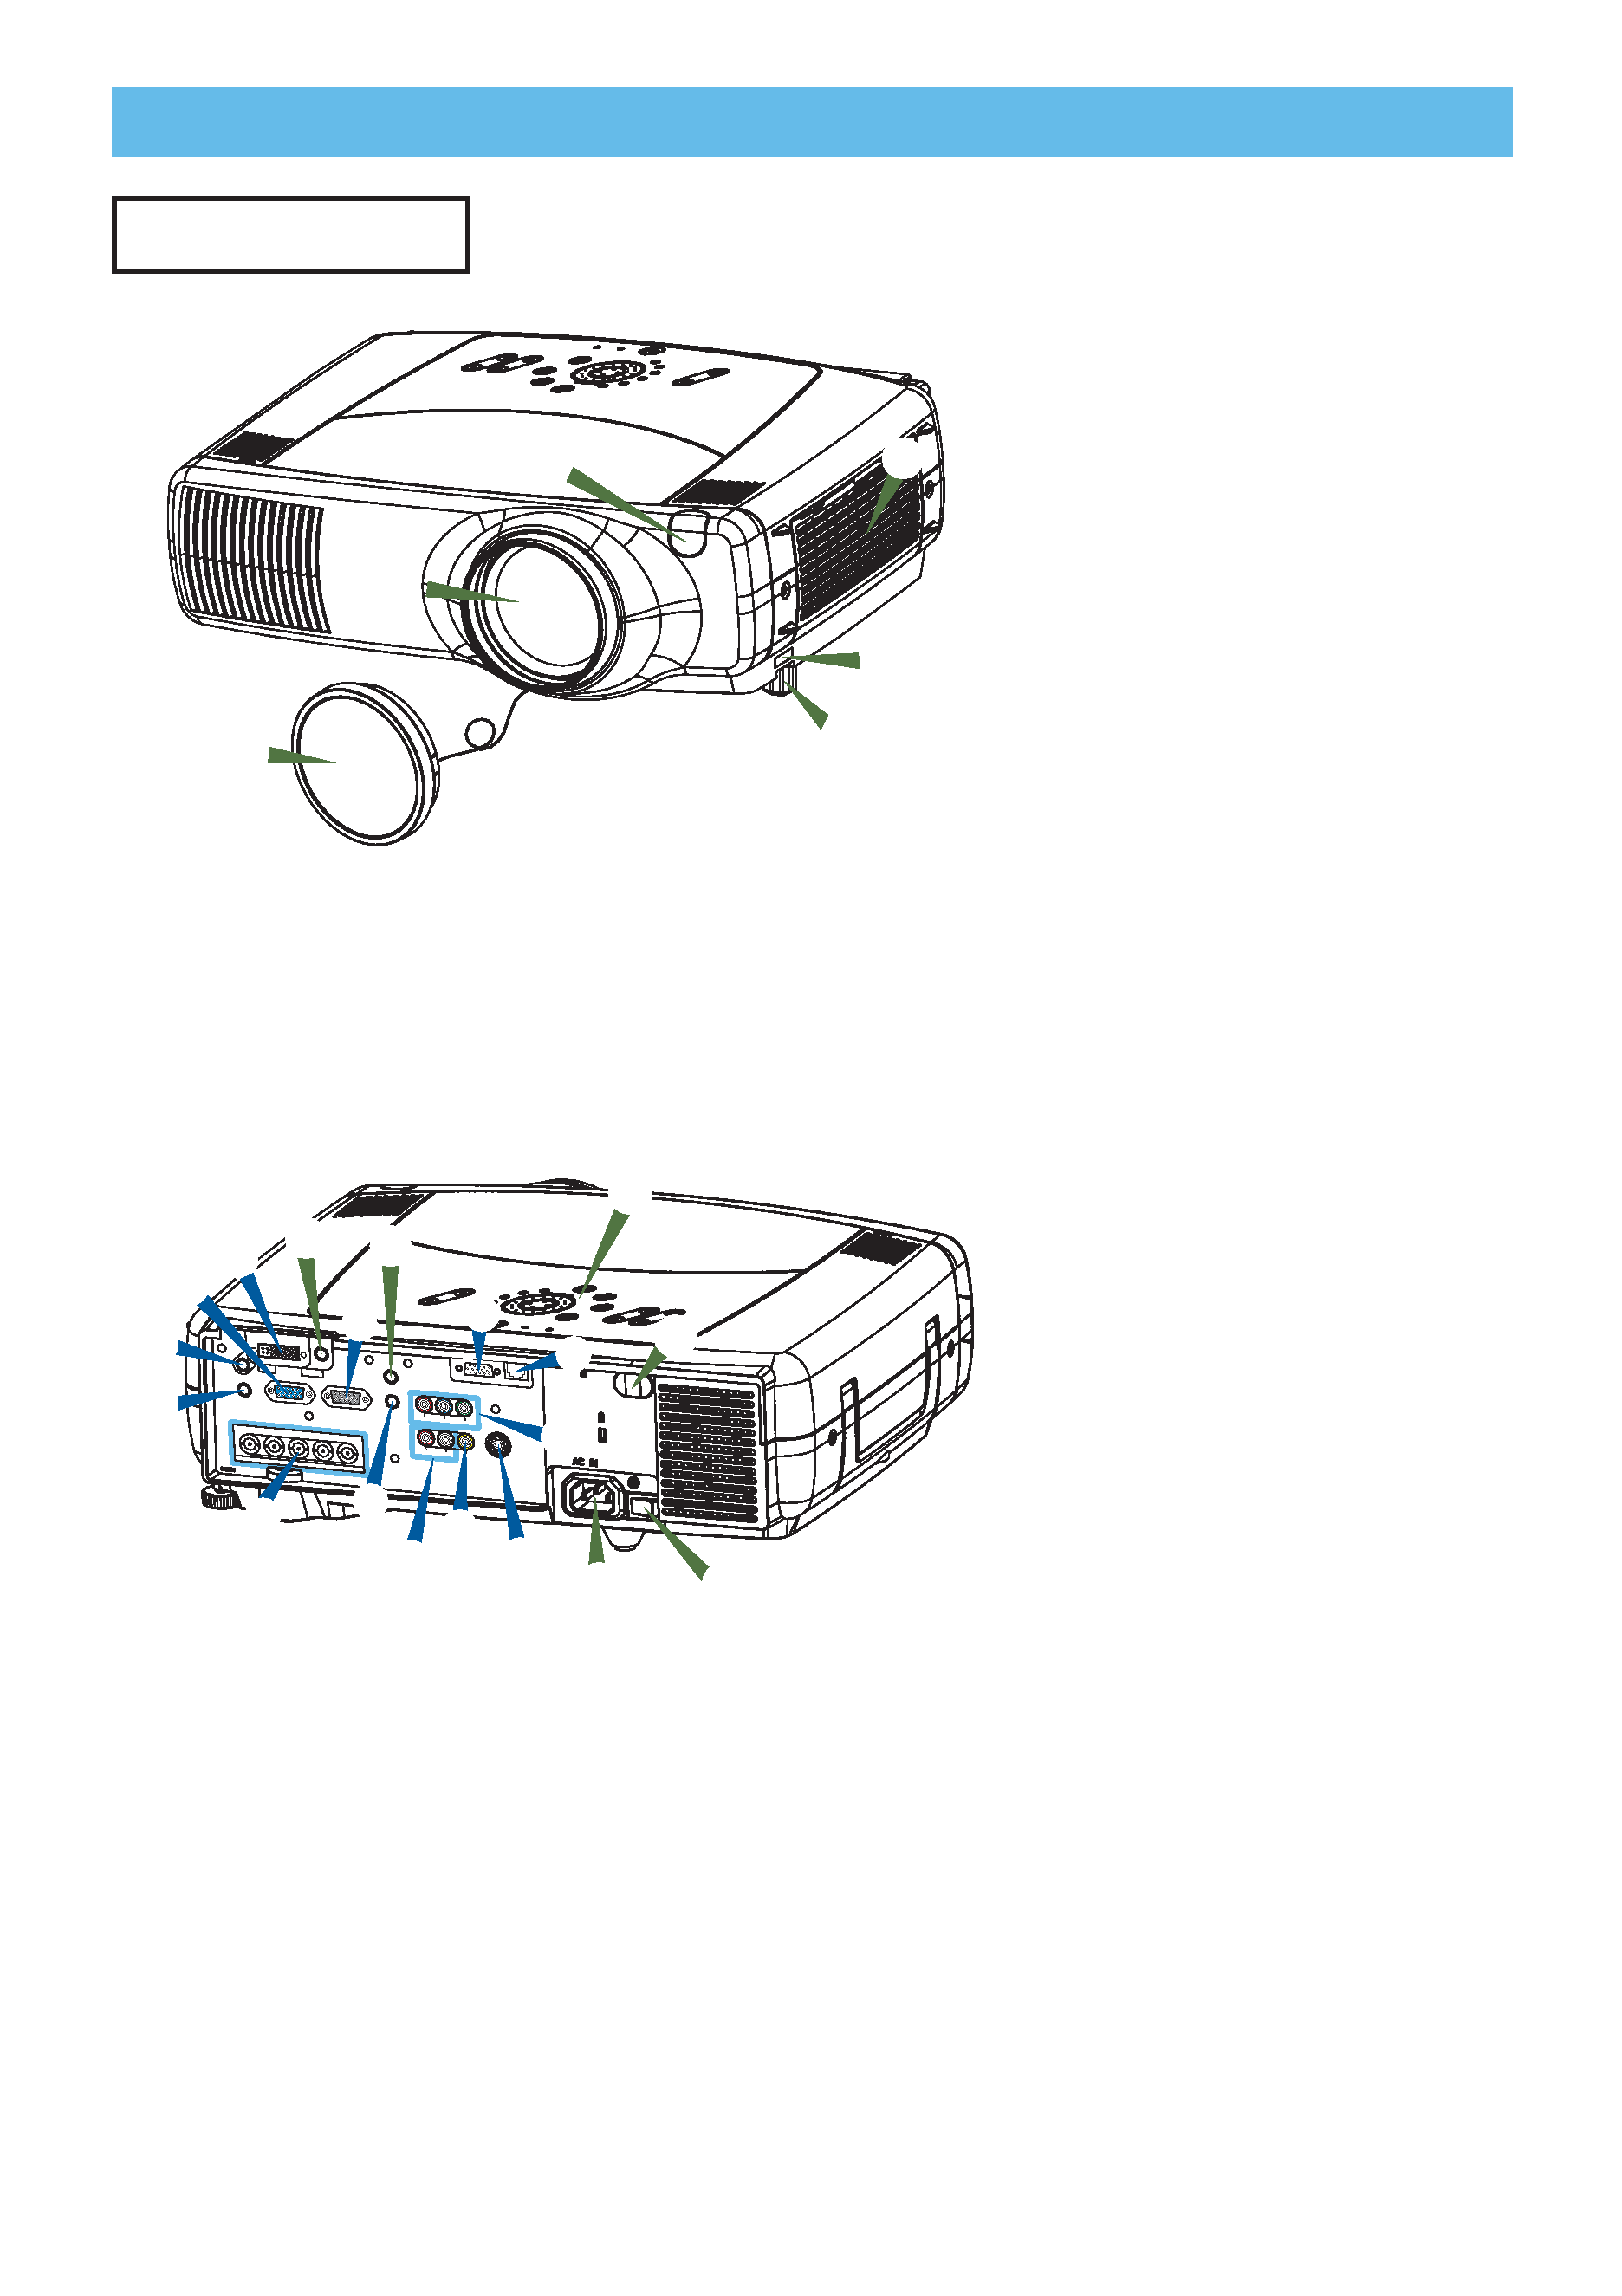
Projector
1 Elevator button
2 Elevator foot
3 Remote sensor
4 Lens cap
5 Lens
The picture is projected from
here.
6 Filter cover
An air filter is inside.
A RGB port
B M1-D port
C BNC port
D AUDIO IN 1 port
E AUDIO IN 2 port
F CONTROL port
G NETWORK port
H AUDIO IN R/L port
I VIDEO IN port
J S-VIDEO port
K COMPONENT port
L RGB OUT port
M AUDIO OUT port
7 REMOTE CONTROL port
8 DC OUT port
9 AC Inlet
0 Power switch
- Control buttons
See the following page.
Projector (Front/Right)
Projector (Rear/Left)
INTER
INPUT
M1-D
RGB
BNG
S-VIDEO
ST A
NDBY/ON
TEMP
VIDEO
COMPON
ENT
LAMP
KEYSTON
E
SEARCH
RE
SET
MEN
U
FOCUS
LE
NS
SHIFT
ZO
OM
1
2
3
5
4
6
INTER
INPUT
M1-D
RGB
BNG
S-VIDEO
STANDBY/ON
TEMP
VIDEO
COMPON
ENT
LAMP
KEYSTONE
SEARCH
RESET
MENU
FOCUS
LENS SHIFT
ZOOM
VIDEO
R-AUDIO IN-L
S-VIDEO
BNC
RGB
AUDIO IN1
AUDIO IN2
RGB OUT
AUDIO OUT
REMOTE CONTR
OL
R/CR/PR
G/Y
B/CB/PB
H
V
Y
CONTROL
NETWORK
CR/PR Ca/Pa
7
8
-
L
F
A
D
E
C
M
H
I
J
K
G
3
0
9
B
IN
TE
R
INP
UT
M1
-D
RG
B
BNG
S-V
IDEO
ST ANDB
Y/ON
TE
MP
VIDE
O
COMP
ONE
NT
LA
MP
KEYS
TO
NE
SE
AR
CH
RE
SE
T
ME
NU
FOCUS
LEN
SS
HIFT
ZO
OM
STANDBY/ON
VIDEO
LASER INDICATOR
ESC
MENU
POSITION
RESET
AUTO
KEYSTONE
1 2 3
ID CHANGE
SEARCH
ON
OFF
FREEZE
MUTE
MAGNFY
PinP
VOLUME
RGB
BLANK
PREVIOUS
NEXT
ASPECT
MOUSE
LASER
LENS SHIFT
+
++
FOCUS
ZOOM
1
4
w
u
r
s
f
h
j
k
e
q
i
o
p
[
\
]
d
t
g
l
;
6
a
'
5
Part Names (continued)
Part Names (continued)
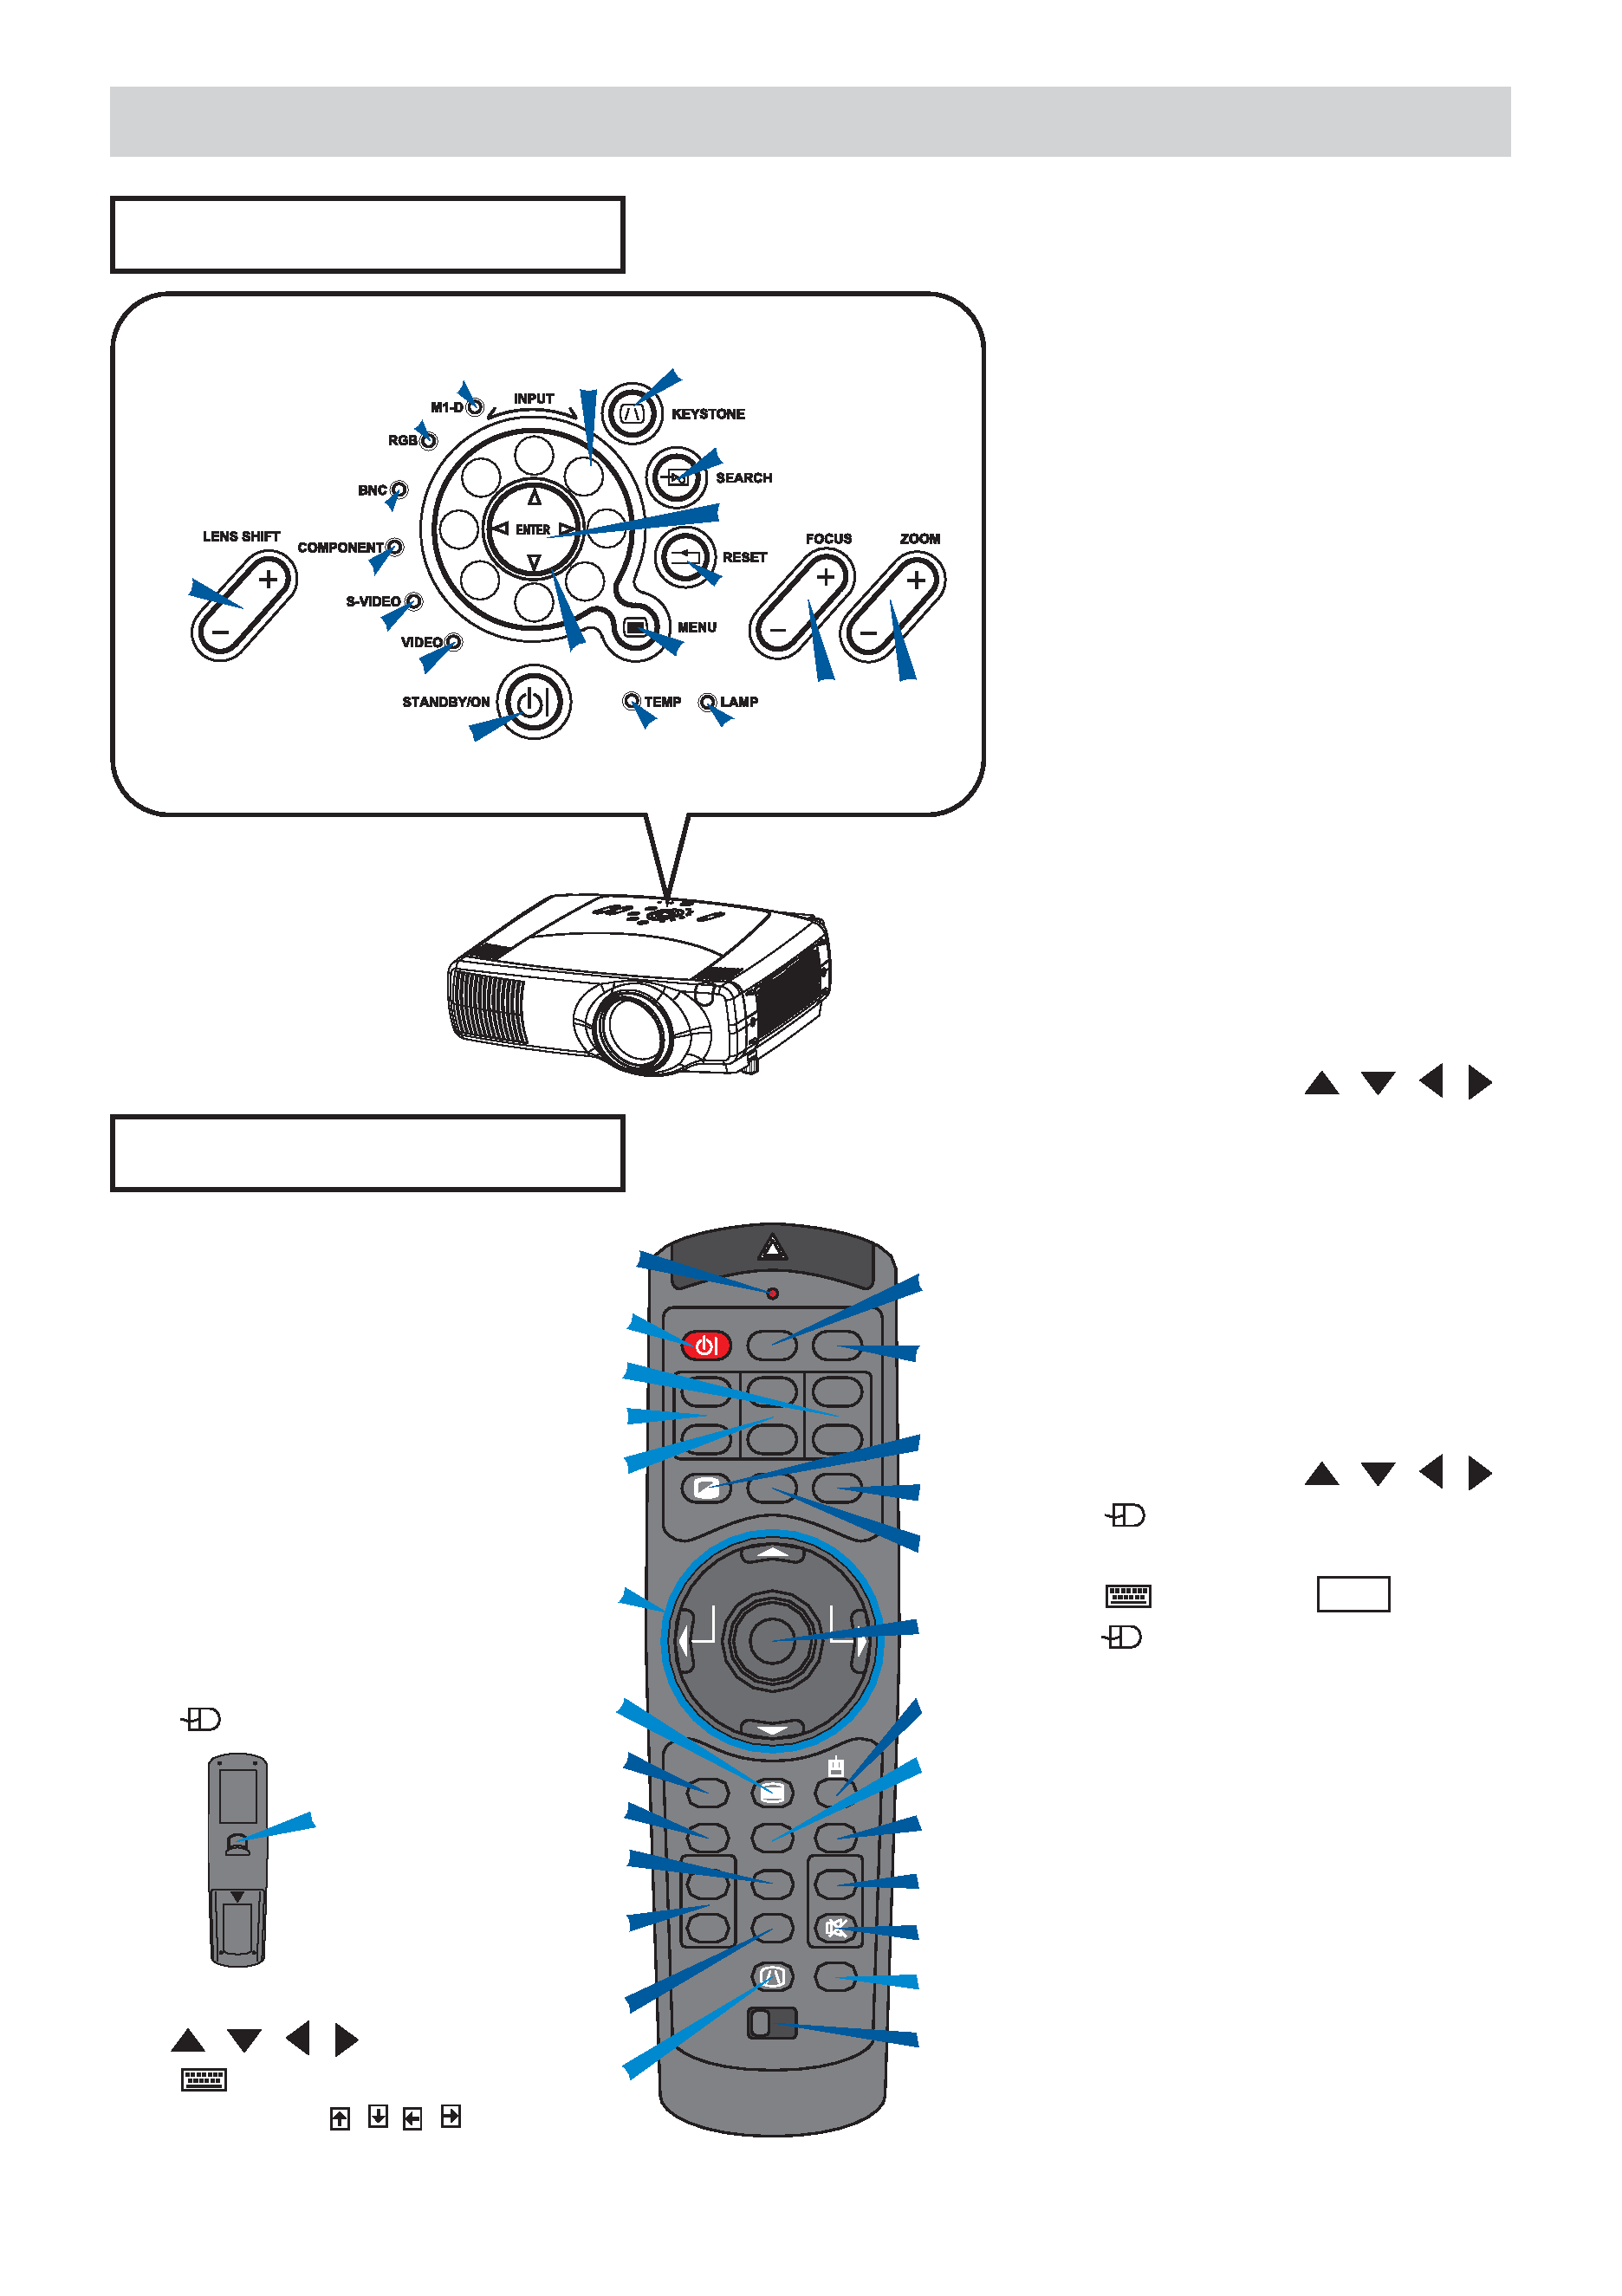
Remote Control
Control Buttons
1
e
w q
4
7
8
9
0
-
=
2
5
6
t
y
u
3
r
1 STANDBY/ON button
and STANDBY/ON indicator
2 TEMP indicator
3 LAMP indicator
4 LENS SHIFT buttons
5 INPUT dial
6 SEARCH button
7 M1-D indicator
8 RGB indicator
9 BNC indicator
0 COMPONENT indicator
- S-VIDEO indicator
= VIDEO indicator
q ZOOM buttons
w FOCUS buttons
e KEYSTONE button
r MENU button
t RESET button
y ENTER button
u Cursor buttons
/
/
/
Control Panel
on the Projector
Remote Control
i LASER INDICATOR
o VIDEO button
p RGB button
[ BLANK button
] ASPECT button
\ LASER button
a Cursor buttons
/
/
/
(
Mouse move pointer)
s ESC button
(
Keyboard ESC key)
d (
Mouse right button)
f POSITION button
g AUTO button
h PinP button
j MAGNIFY buttons
k FREEZE button
l VOLUME button
; MUTE button
' ID CHANGE switch
1 STANDBY/ON button
4 LENS SHIFT buttons
6 SEARCH button
q ZOOM buttons
w FOCUS buttons
e KEYSTONE button
r MENU button
t RESET button
y ENTER button
(
Mouse left button)
u Cursor buttons
//
/
(
Keyboard
Arrow keys
/ / / )
y
(Rear)