
ENGLISH
Liquid Crystal Projector
CP-S220W
USER'S MANUAL
1-1
Thank you for purchasing this HITACHI liquid crystal projector.
Please read the accompanying manual "SAFETY INSTRUCTIONS" and this "USER'S
MANUAL" thoroughly to ensure correct usage through understanding. After reading,
store this instruction manual in a safe place for future reference.
CONTENTS
FEATURES
BEFORE USE
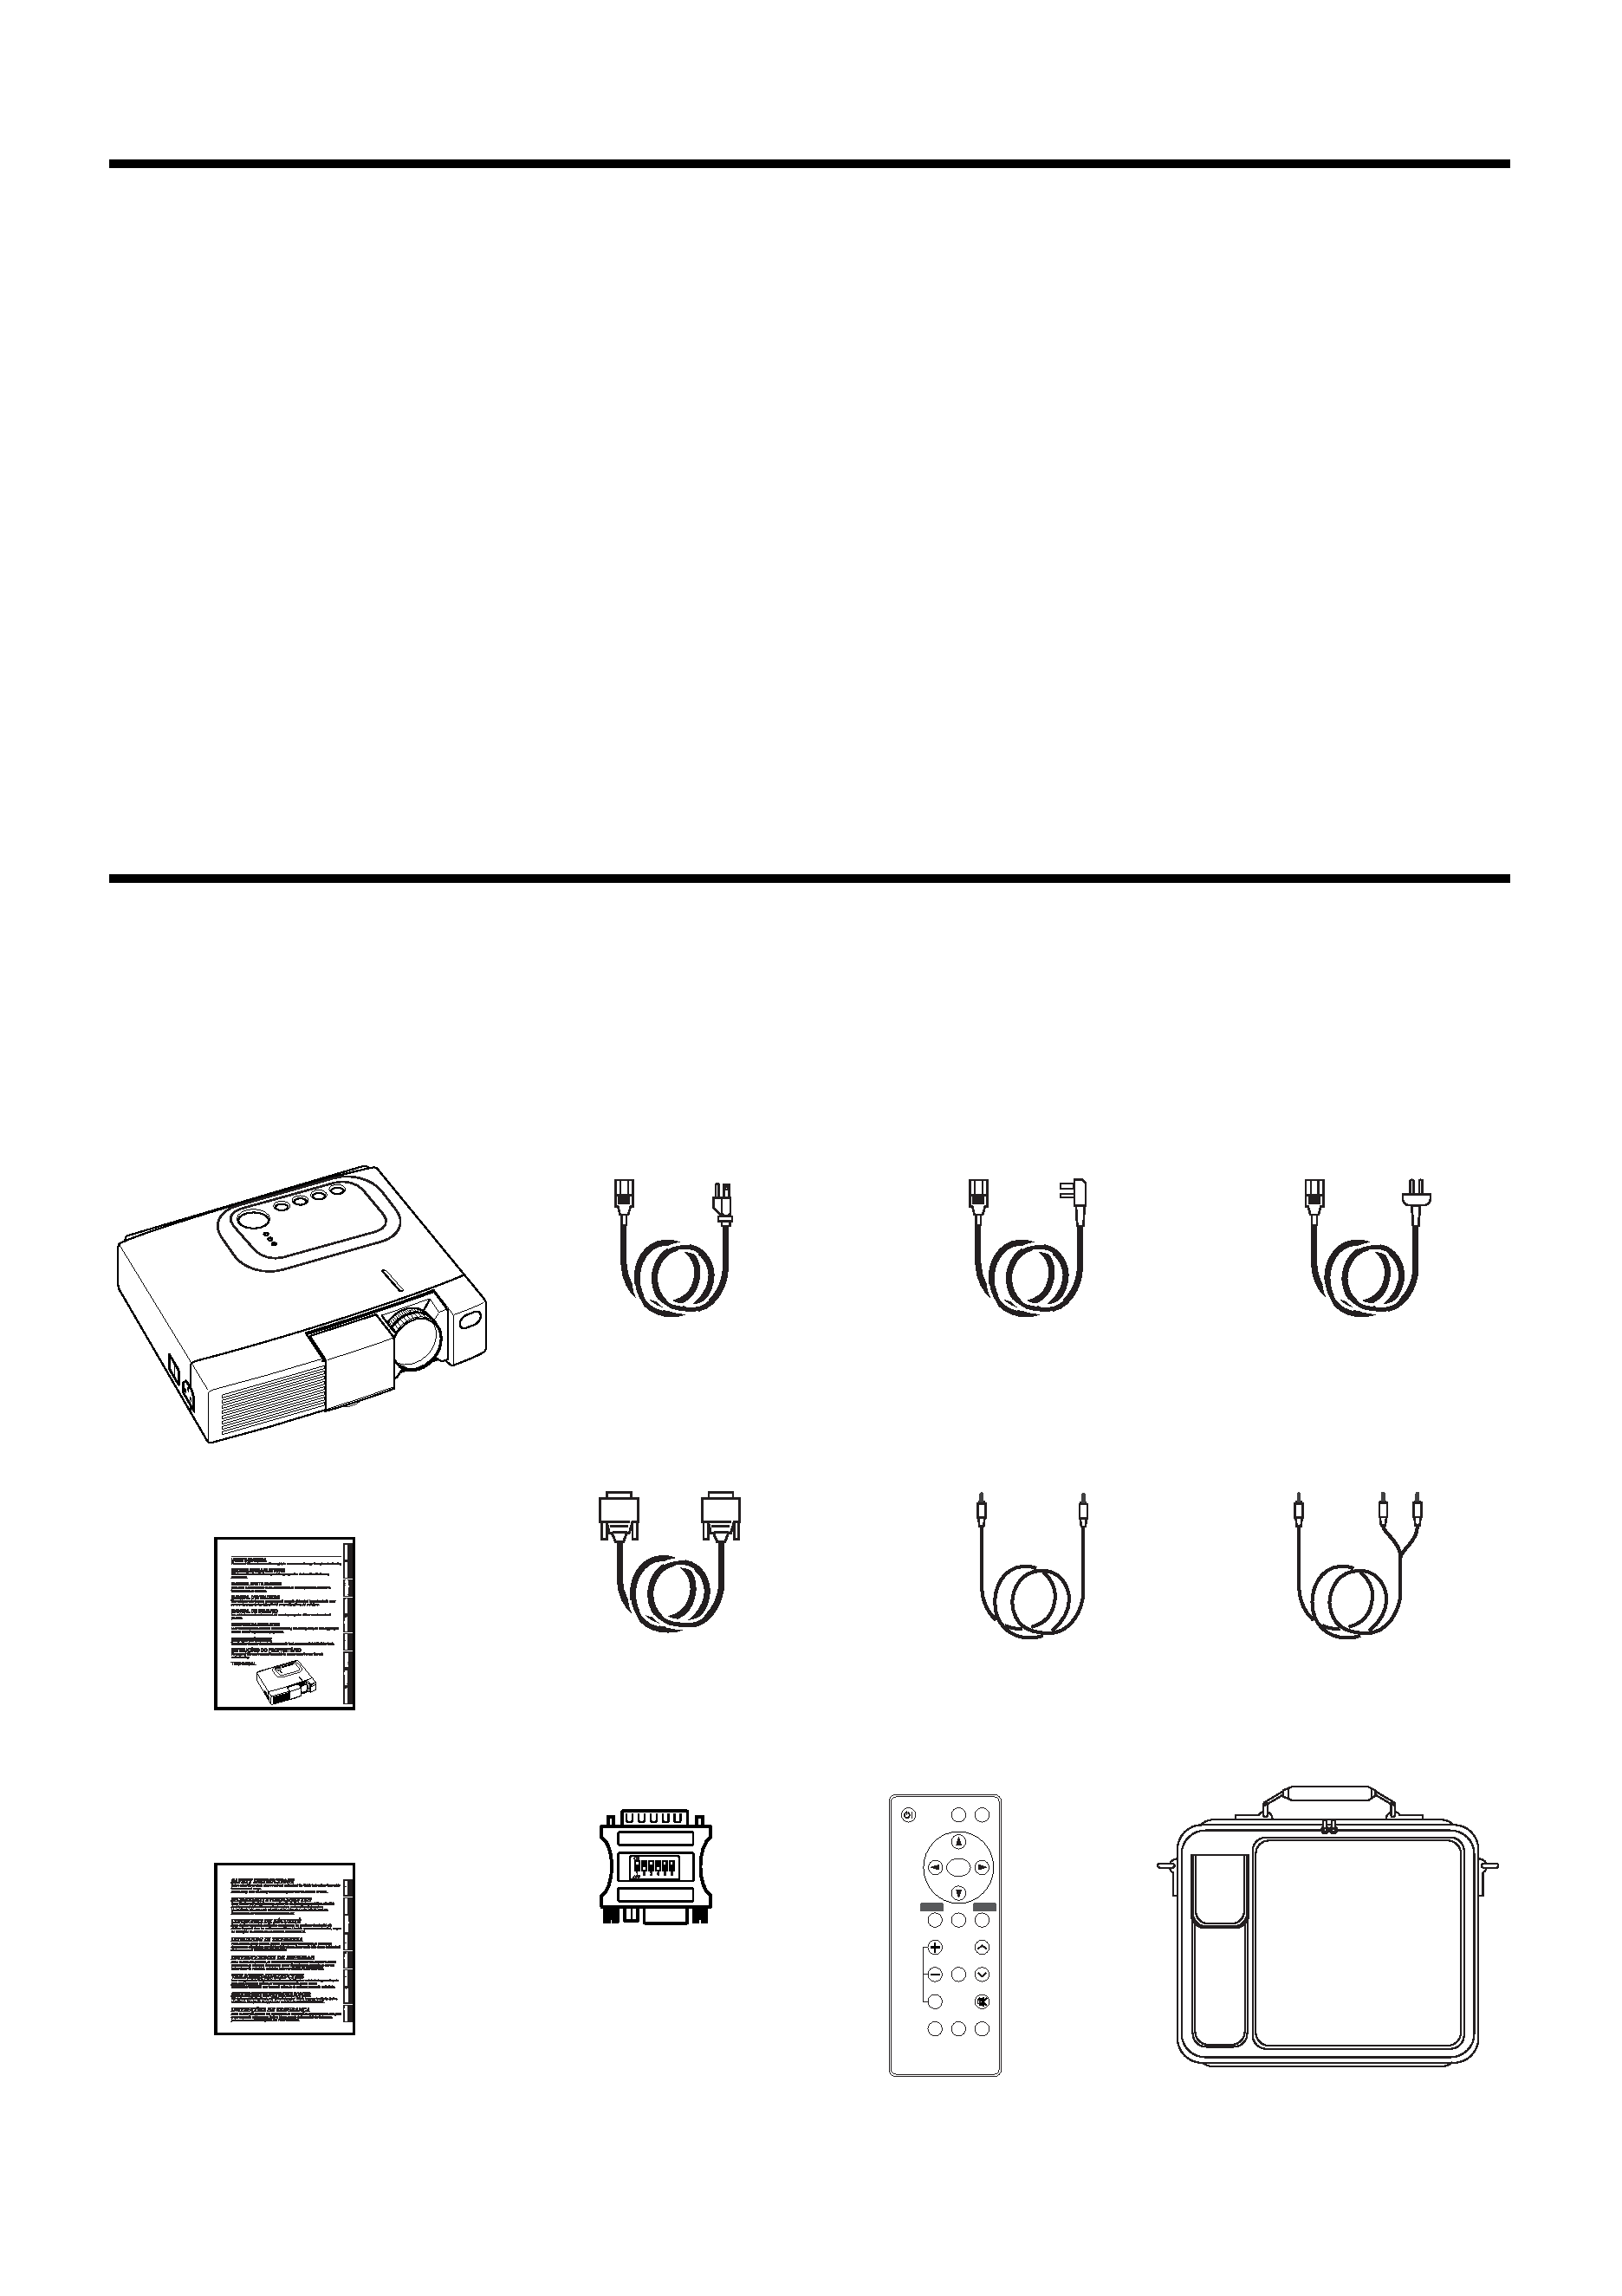
Contents of Package
Part Names
Loading the Battery
INSTALLATION
Installation of the projector and Screen
Angle Adjustment
Cabling
Power Connection
Example of System Setup
Plug & Play
OPERATIONS
Power On/Off
Basic Operation
Menu Functions
MAINTENANCE
Cleaning
Lamp
TROUBLESHOOTING
OSD Message
Indicators Message
Symptom
Warranty and After-service
SPECIFICATIONS
Tables:
Table 1-1. Installation Reference
Table 1-2. Basic Operations
Table 1-3. Menu Functions
Table 1-4. OSD Message
Table 1-5. Indicator Message
Table 1-6. Symptom
Table 1-7. Specifications
Table 1-8. Example of Compatible Signal
NOTE:
* The information in this manual is subject to change without notice.
* The manufacturer assumes no responsibility for any errors that may appear in this manual
* The reproduction, transmission or use of this documents or contents is not permitted without
express written authority.
TRADEMARK ACKNOWLEDGMENT:
* PS/2, VGA and XGA are registered trademark of International Business Machines Corporation.
* Apple, Macintosh, Mac and ADB are registered trademarks of Apple Computer, Inc.
* VESA and SVGA are trademarks of the Video Electronics Standard Association.
* Windows is registered trademarks of Microsoft Corporation.
* Carefully observe the trademarks and registered trademarks of all companies, even when not
mentioned.
1-2
FEATURES
This liquid crystal projector is used to project various computer signals as well as NTSC / PAL /
SECAM video signals onto a screen. Little space is required for installation and large images can
easily be realized.
· Outstanding brightness
The UHB lamp and high-efficiency optical system assure a high level of brightness.
· Partial magnification function
Interesting parts of images can be magnified for closer viewing.
· Distortion correction function
Distortion-free images are quickly available.
BEFORE USE
Contents of package
Make sure all of the following items are included in the package. If anything is missing, please
contact your dealer.
NOTE: Keep the original packing material for future reshipment.
Projector
User's Manual
(this manual)
Safety Instructions
Power Cord
US Type
Power Cord
UK Type
Power Cord
Europe Type
RGB Cable
Video Cable
Audio Cable
(Stereo Mini)
Mac Adapter
VIDEO
STANDBY/ON
POSITION
FREEZE
MAGNIFY
VOLUME
AUTO
OFF
TIMER
BLANK
MENU
SELECT
RGB
MUTE
MENU
RESET
Remote Controller
containing Battery
Carrying Bag
1-3
B
BE
EF
FO
OR
RE
E U
US
SE
E ((cco
on
nttiin
nu
ueed
d))
ENGLISH
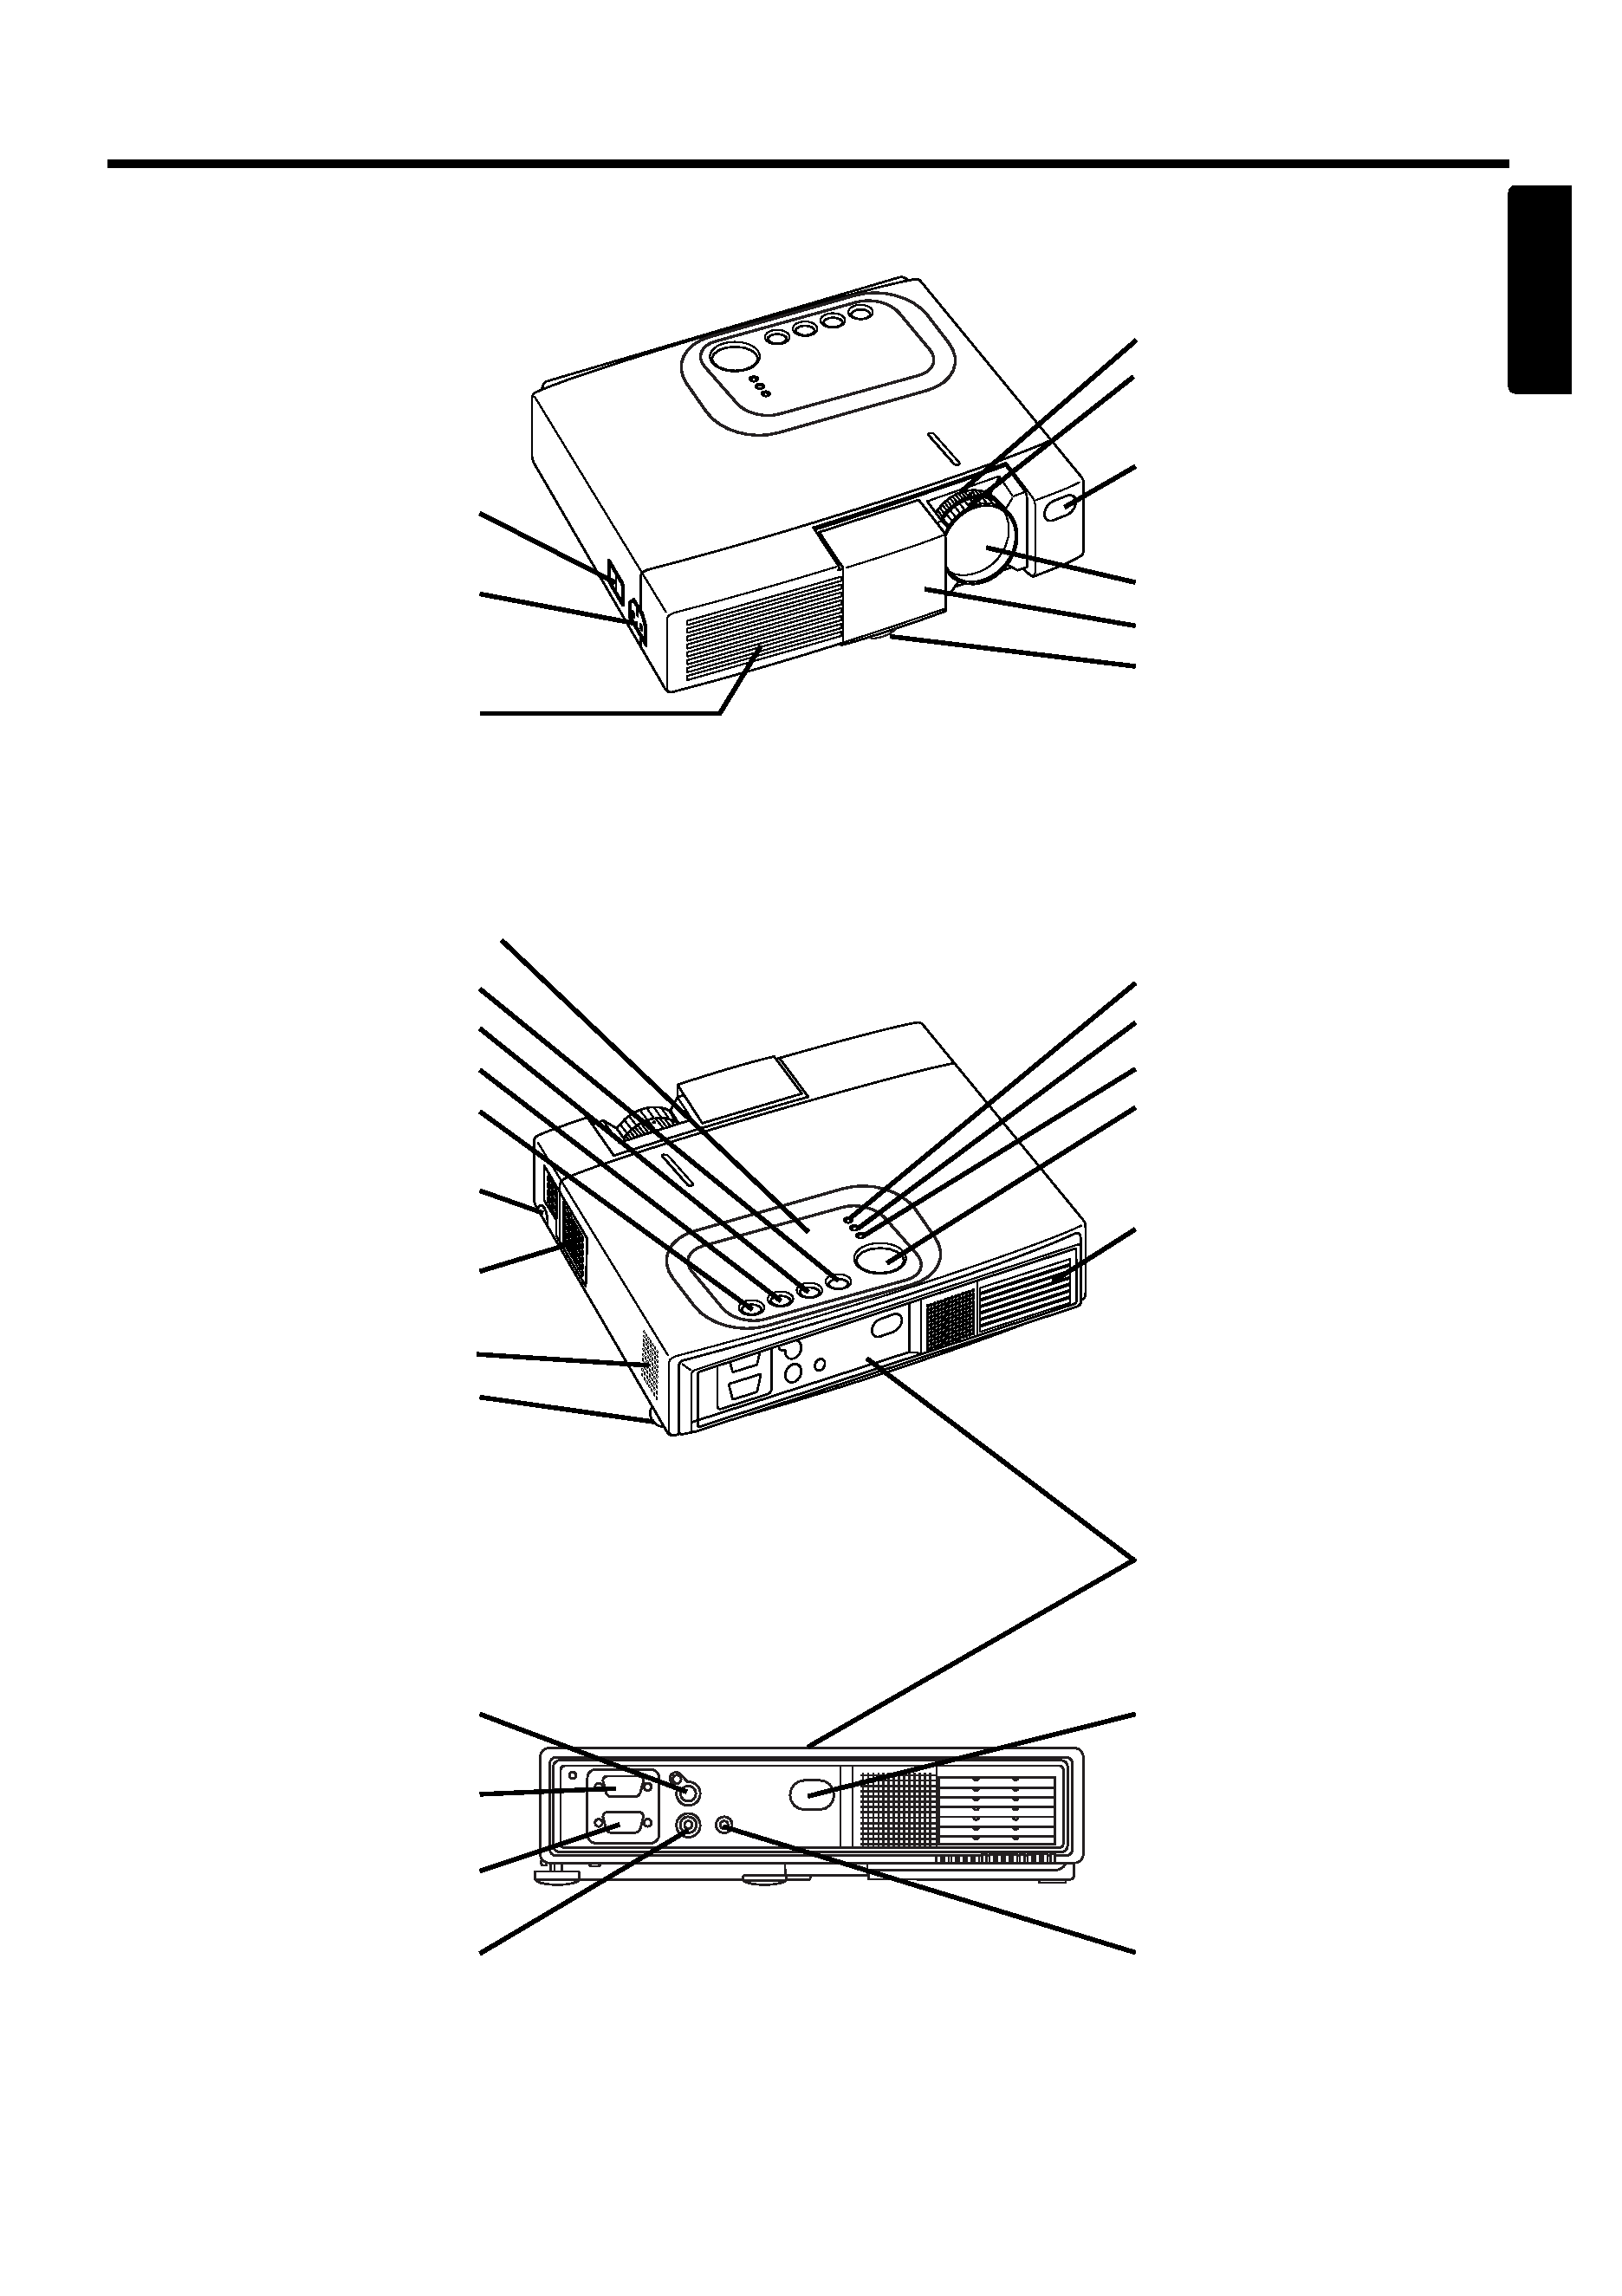
Part Names
Power Switch
AC Inlet
(to the Power Cord)
Ventilation Openings
(Intake)
ZOOM knob
FOCUS ring
Remote Control Sensor
Lens
Slide Lens door
Foot Adjuster
FRONT/LEFT VIEW OF
THE PROJECTOR
RESET Button
MUTE Button
INPUT Button
STANDBY/ON Button
Foot Adjuster Button
Air Filter and Intake
(for the Cooling Fan)
Speaker
Foot Adjuster
LAMP Indicator
TEMP Indicator
POWER Indicator
MENU Button
Ventilation Openings
(exhaust)
REAR/RIGHT VIEW OF
THE PROJECTOR
Terminal Panel
(Refer below)
S-VIDEO Terminal
RGB IN Terminal
CONTROL Terminal
VIDEO Terminal
Remote Control Sensor
AUDIO IN Terminal
TERMINAL PANEL
Control Panel (Refer to the section "OPERATIONS" for details)
1-4
B
BE
EF
FO
OR
RE
E U
US
SE
E ((cco
on
nttiin
nu
ueed
d))
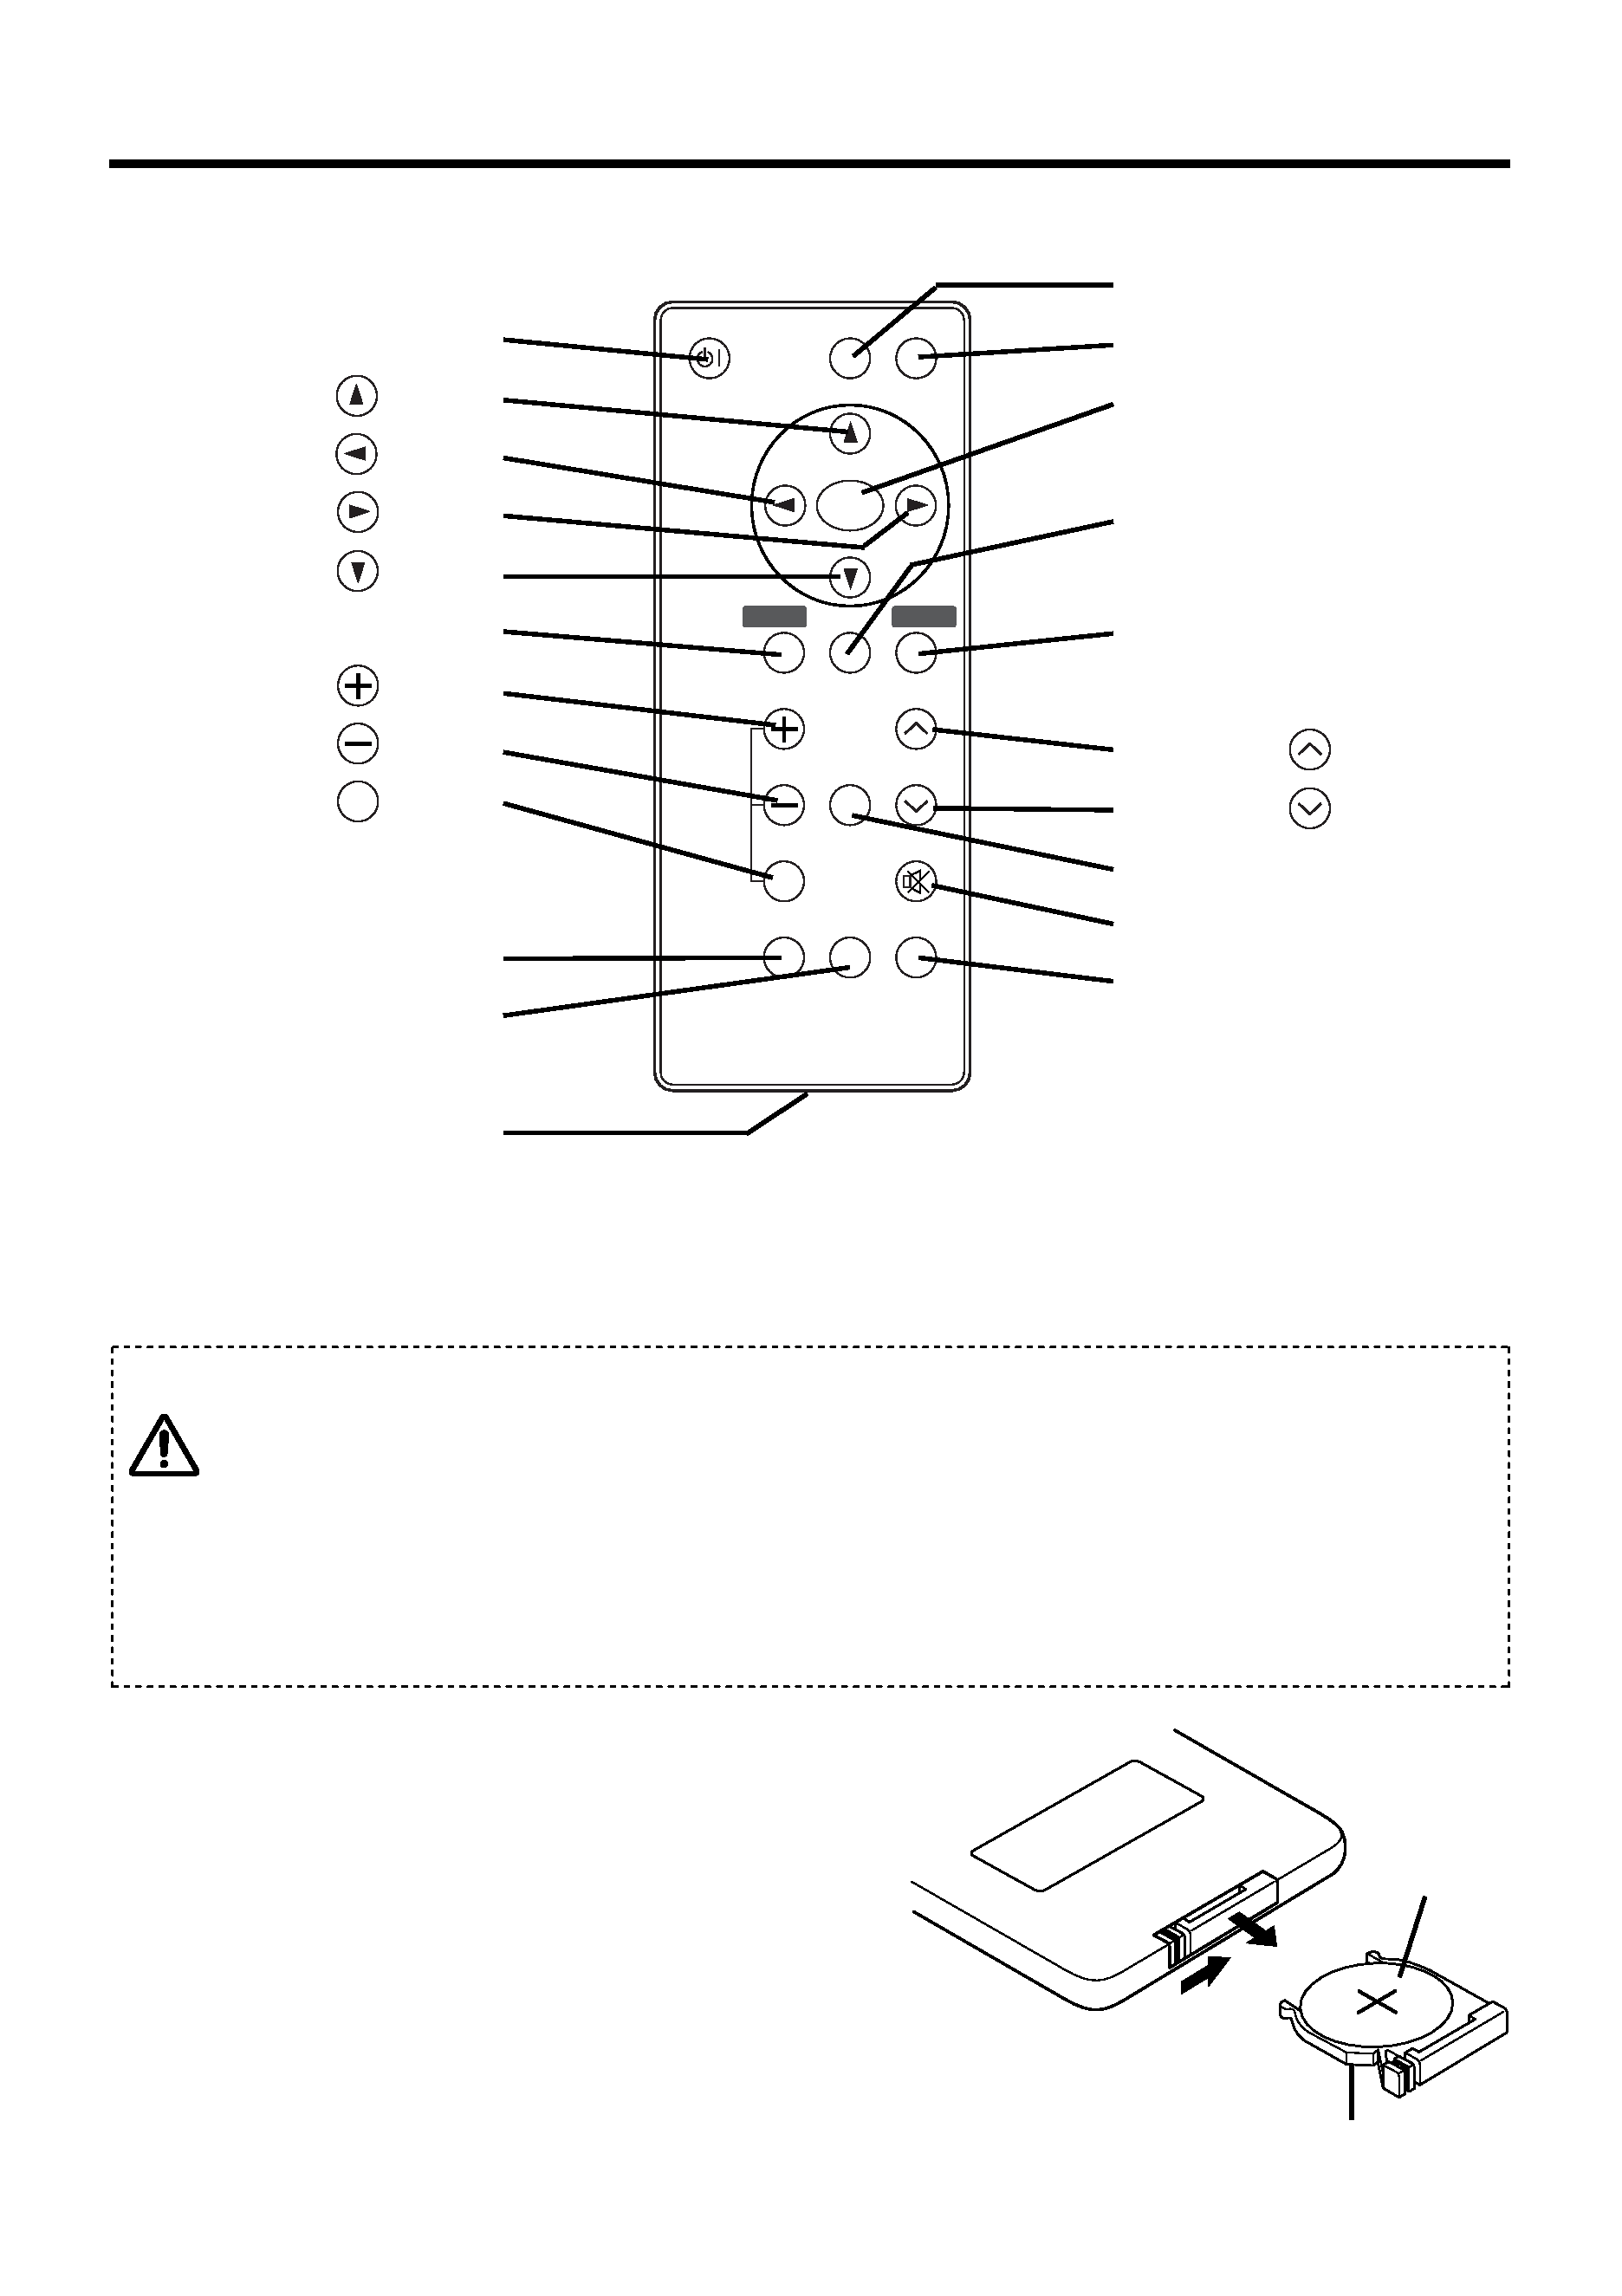
Part Names (continued)
VIDEO
STANDBY/ON
POSITION
FREEZE
MAGNIFY
VOLUME
AUTO
OFF
TIMER
BLANK
MENU
SELECT
RGB
MUTE
MENU
RESET
STANDBY/ON Button
Button
Button
Button
Button
MENU Button
MAGNIFY
Button
MAGNIFY
Button
MAGNIFY
Button
AUTO Button
TIMER Button
Battery Holder
OFF
VIDEO Button
RGB Button
MENU SELECT Button
POSITION Button
RESET Button
VOLUME
Button
VOLUME
Button
FREEZE Button
MUTE Button
BLANK Button
REMOTE CONTROLLER
Loading the Battery
First Loading:
In original packing, the battery is installed in the battery
holder of the remote controller with protection film. Pull
out the protection film to load the battery.
Replacing:
1. See the reverse side of the remote controller.
2. Pinch the groove and pull out battery holder as the
drawing right.
3. Remove the worn battery.
4. Install the new battery with "+" side facing.
5. Push in and click the battery holder.
Pull out
"+" side
Battery Holder
(Refer to the section "OPERATIONS" for details)
CAUTION
Danger of explosion if battery is incorrectly replaced.
Be careful in handling the battery according to instructions of the accompanying manual
"SAFETY INSTRUCTIONS" and this manual.
Replace only with the same or equivalent type recommended by the manufacturer.
Use the 3V micro lithium battery Type no. CR2025 only.
When you dispose the battery, you must obey the law in the relative area or country.
Keep the battery away from children and pets.
1-5
INSTALLATION
Installation of the Projector and Screen
Install the projector in a suitable environment according to instructions of the
accompanying manual "SAFETY INSTRUCTIONS" and this manual.
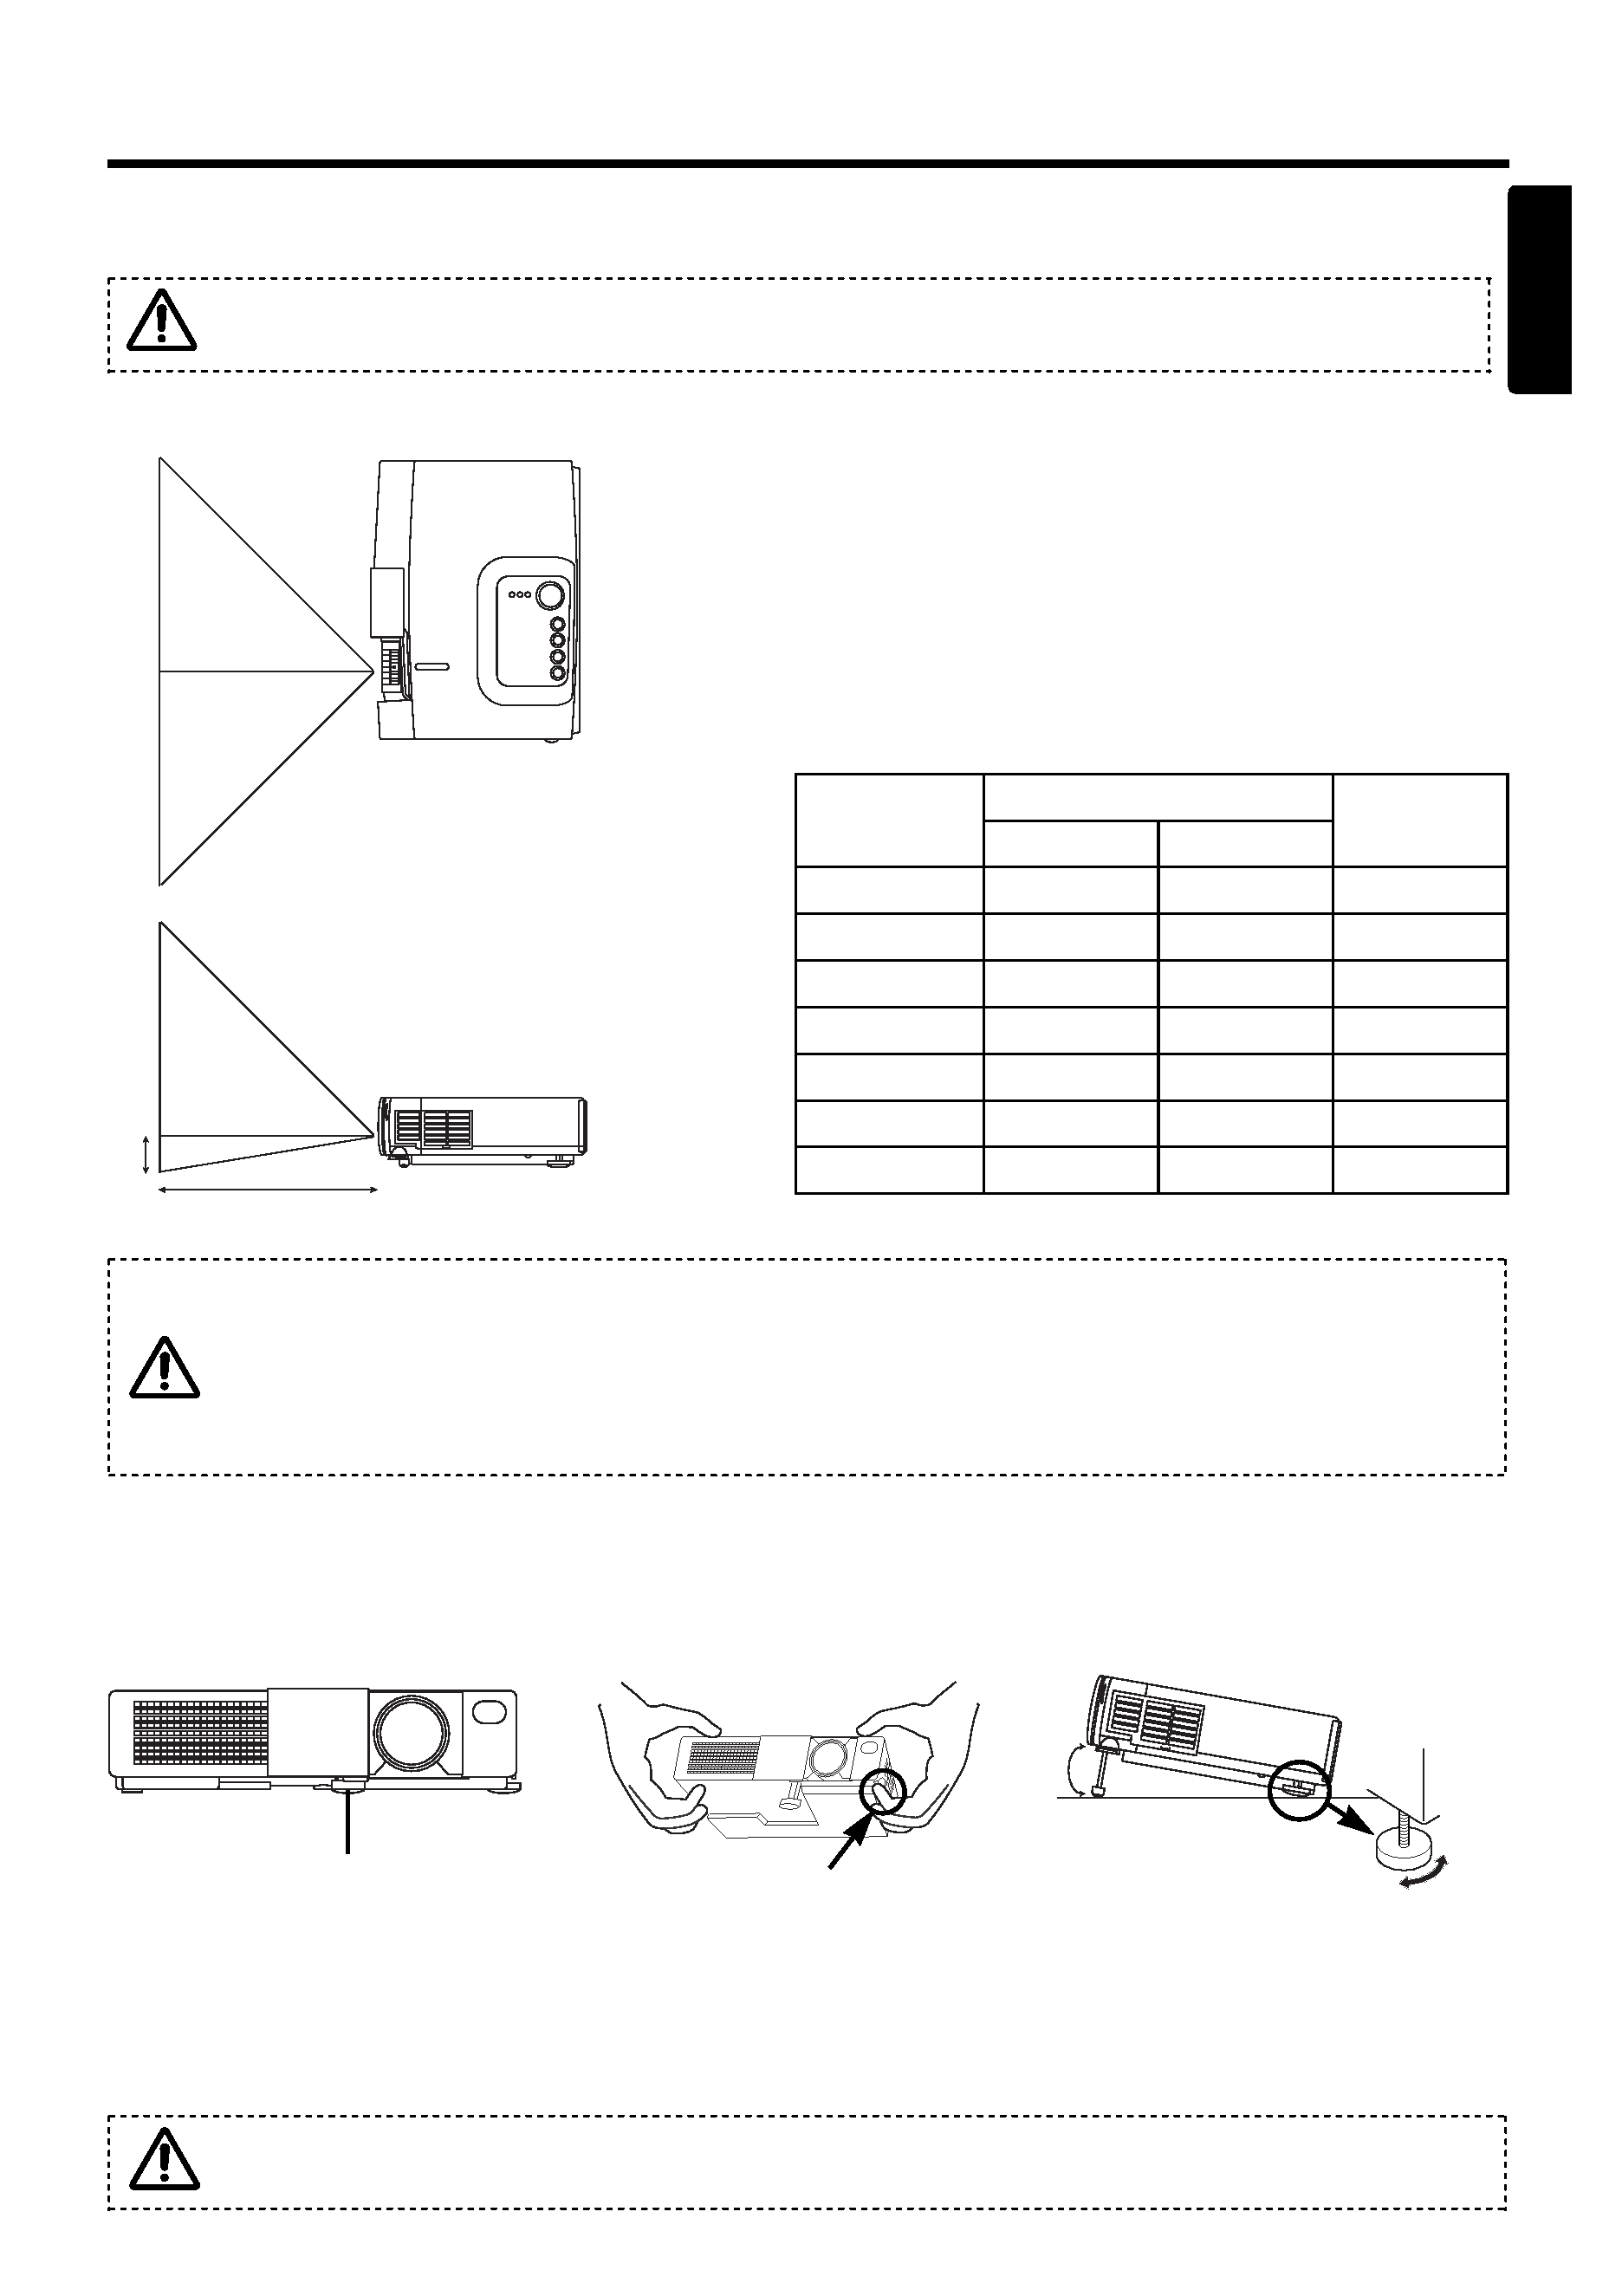
Refer to the drawing and table below for determining of the screen size and projection distance.
TOP VIEW
SIDE VIEW
a: Distance from the LCD projector to the screen.
The projection distance shown in the table below
are for full size (800 x 600 dots).
b: Distance from the lens center to the bottom of the
screen (a, b: +/-10%)
Table 1-1. Installation Reference
Screen size
(inches)
a (inches)
b (inches)
Min.
Max.
40
37
46
3
60
57
69
5
80
77
93
7
100
96
116
9
120
116
139
10
150
145
174
13
200
194
233
17
a
b
Angle Adjustment
Use the foot adjuster on the bottom of the projector to adjust the projection angle. It is variable
within 0° to 10° approximately.
1. Lift up the front side of the projector.
2. Pressing the foot adjuster button, adjust the projection angle.
3. Release the button to lock at the angle to be fixed.
Do not release the foot adjuster button unless the projector is being held; otherwise, the
projector could overturn or the fingers could get caught and cause personal injury.
10
°
Foot Adjuster
ENGLISH
Press the foot adjuster button
Horizontal inclination may
be adjusted using the
adjuster at the rear.
Installation of liquid crystal projector
Please basically use liquid crystal projector at the horizontal position.
If you use liquid crystal projector by the lens up position, the lens down position and the side up
position, this may cause the heat inside to build up and become the cause of damage.
Be especially careful not to install it with ventilation holes blocked.
