
To obtain optimum performance from your Footcontroller, please read this guide before its use.
www.crateamps.com
©2000 SLM Electronics, Inc. · A Division of St. Louis Music, Inc.
1400 Ferguson Avenue · St. Louis, MO 63133
47-063-01
03/00
Specifications:
Communication
MIDI, Midi channel 0 (default)
Presets
10
Selector Switches
Five
DisplayIndicator LEDs for preset display
and tap tempo
Expression Pedal
Passive volume control type,
50k 1M ohm impedance
Power Requirements
Supplied via MIDI cable when used
with Crate DX amplifiers
Dimensions
2.25"H x 15"W x 4"D
Weight
2.7 lbs
· Specifications and information subject to change without notice ·
Additional Technical Information:
The DXJFC communicates to the DX amplifier via MIDI (Musical Instrument
Digital Interface). Communication is on MIDI channel 0 by default, since the DX
amplifier operates in "omni/poly" mode.
Presets are changed by standard MIDI program change messages. The MIDI
message value can range from 0 to 9.
The Tap function defaults to MIDI controller #80. Value decimal 127 (hex 7F)
is sent when the tap is pressed, zero is sent when it is released.
The expression pedal defaults to controller #11 using single byte controller val-
ues. Pedal assignments are communicated to the DX amplifier via a MIDI "sys-
tem exclusive" (aka sysex) message. The following chart shows the sysex mes-
sage format (in hexidecimal) after the System Exclusive status byte.
00, 01, 28 SLME sysex ID code
00, kk knob ID (2 bytes) "kk" = knob ID
04
SLME packet type
00, 01 action ID (2 bytes)
00
packet number (zero)
cc
checksum "cc" = calculated checksum
06
packet data byte count
F7
end of sysex
00, 01
DXJFC product ID
About the DXJFC:
What it is and what it does:
The Crate DXJFC MIDI Footcontroller is a foot-operated "remote control" designed to work with your Crate DX
amplifier. Using the DXJFC, you can:
· Access up to 10 factory or user-defined presets
· Change presets "on the fly"
· Set the "tap tempo" for an effect
· Adjust selected amplifier controls (when used with an expression pedal)
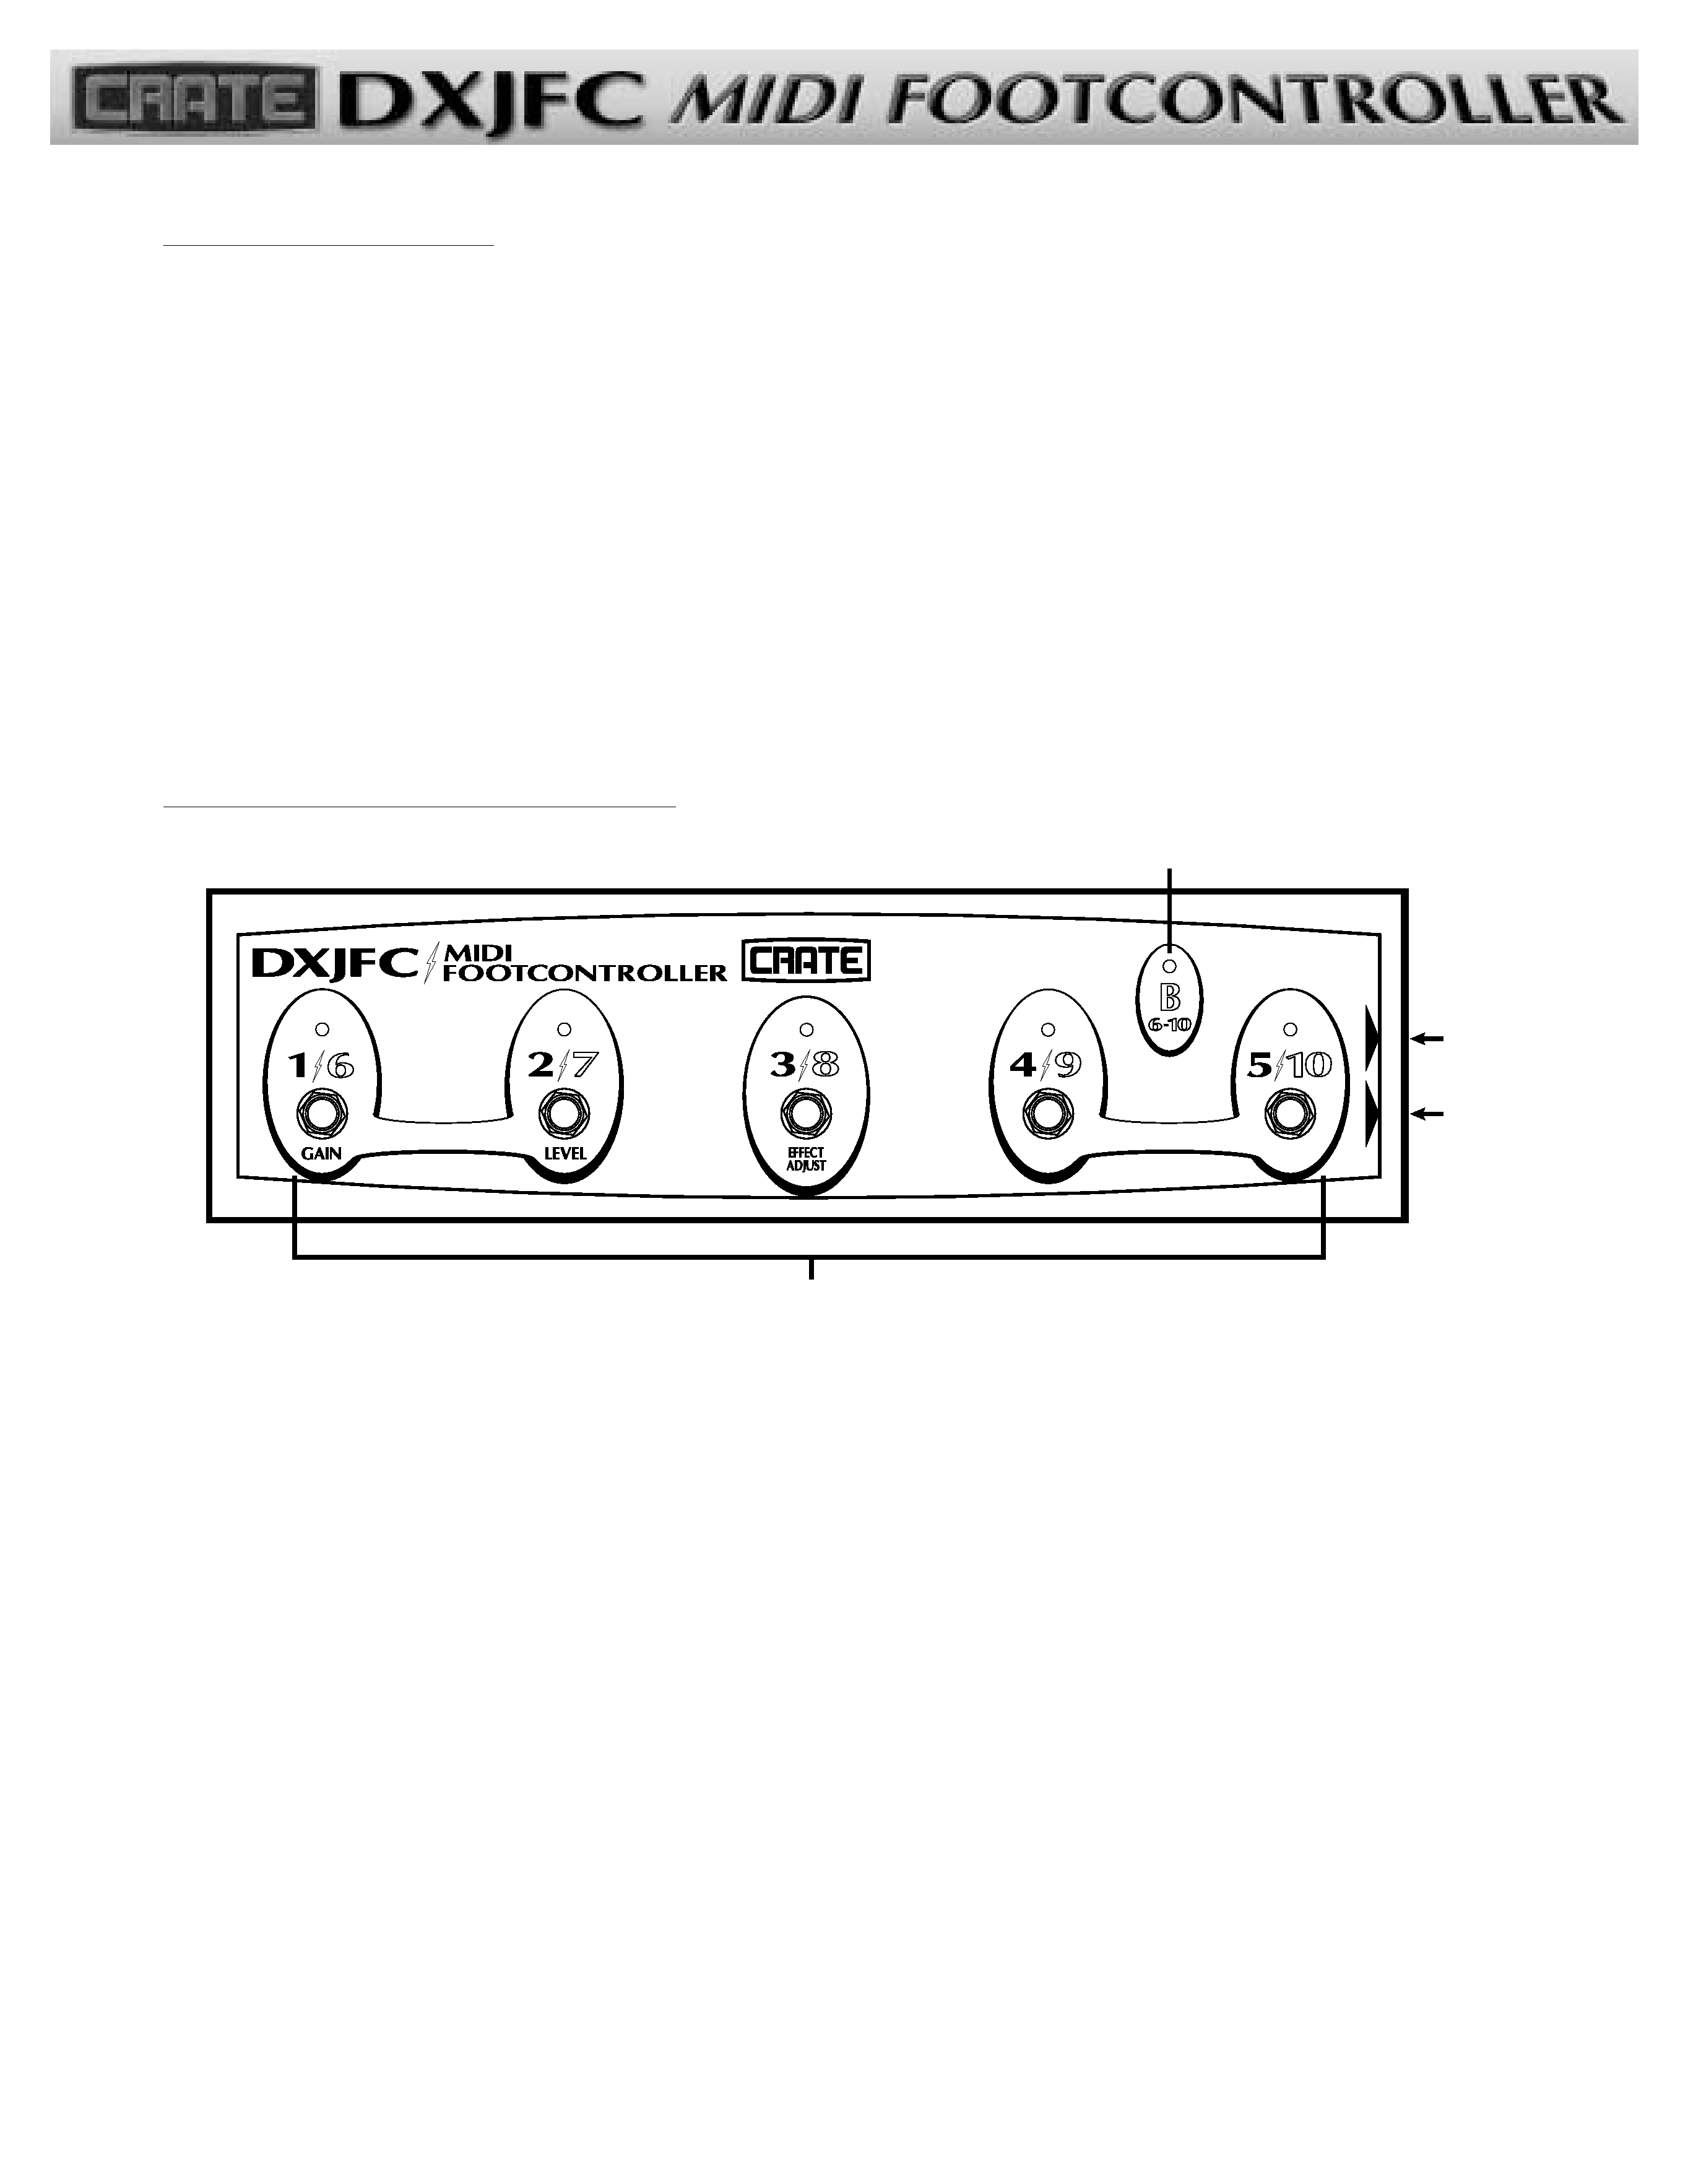
The Front Panel/Side Jacks:
ASSIGN
PRESS BOTH SWITCHES
EXPRESSION
INPUT
MIDI
OUTPUT
PRESS BOTH SWITCHES
BANK
REVERB
DEPTH
REVERB
LEVEL
1
2
4
3
1
1)) SSe
elle
ecctto
orr b
buutttto
onnss:: Use these buttons to:
A) Select the desired preset,
B) Set the tap tempo for the selected preset,
C) Assign an expression pedal to a DX ampli-
fier control knob (#1/6 and 2/7 pressed
simultaneously),
D) Change banks (#4/9 and 5/10 pressed
simultaneously)
A
A:: To select a preset, step on the numbered button
which corresponds to the desired preset.
B
B:: To set the delay times or modulation speeds (tap
tempo) of the effects, step three times on the button
of the selected preset in time with the desired tempo.
(The DX amplifier manual lists specifically what the Tap
button controls for each of its effects.)
C
C:: To assign an expression pedal to a control knob, see
"Assignment of a DX Control Knob" on page 3.
D
D:: To change banks, see the section "Selecting a
Preset" on page 2.
2
2)) B
Baannkk B
B IInnd
diiccaatto
orr:: This LED illuminates when the "B"
bank (presets 6-10) is selected. See "Selecting a Preset"
on page 2
3
3)) M
MIID
DII O
Ouutt jjaacckk:: Use this jack to connect the DXJFC
to your DX amplifier using a standard MIDI 5-wire inter-
connecting cable.
4
4)) EExxp
prre
essssiio
onn IInnp
puutt jjaacckk:: Use this jack to connect the
optional expression pedal to the DXJFC for remote
control of a DX amplifier control knob.
-1-

CONNECTING THE DXJFC: Use a standard 5-wire MIDI interconnecting cable* to connect the DXJFC's MIDI Out jack to the MIDI In
jack of your DX amplifier or other MIDI-controllable device.
If you are using an expression pedal, use a standard instrument signal cable to connect the pedal's output jack to the DXJFC's
Expression Input jack.
NOTE: When using the DXJFC with the Crate DX amplifier, you MUST DEPRESS THE "CRATE FOOT CONTROLLER" SWITCH ON
THE BACK OF THE DX AMPLIFIER! The switch is located next to the amp's MIDI Thru/Out jack. If you don't, the DXJFC doesn't
get its power and it won't work. (To avoid damage when using any MIDI device other than a Crate footcontroller with a DX ampli-
fier, make sure this switch is set to the "STANDARD MIDI" position.)
SELECTING A PRESET: The DXJFC lets you access the 10 presets in groups (or "banks") of five 1-5 (bank A) and 6-10 (bank B). To
access bank B, step on the "4/9" and "5/10" buttons simultaneously. The Bank B indicator LED illuminates, and the buttons will access
the second number (for example, the "2/7" button will access preset 7 when the Bank B indicator is illuminated).
NOTE: There will be no preset display LED illuminated until another preset is chosen after you change banks.
Each Selector button has two numbers which of those two numbers is the "active" number depends on the setting of the
bank. Remember: the presets work in banks of five. You have to get to the correct bank to access the preset within that bank. The
chart below will help clarify this:
T
Too aacccceessss
G
Goo ttoo
SStteepp oonn
T
Too aacccceessss
G
Goo ttoo
SStteepp oonn
PPrreesseett::
BBaannkk::
SSeelleeccttoorr bbuuttttoonn::
PPrreesseett::
BBaannkk::
SSeelleeccttoorr bbuuttttoonn::
01
A
11/6
06
B
1/66
02
"
22/7
07
"
2/77
03
"
33/8
08
"
3/88
04
"
44/9
09
"
4/99
05
"
55/10
10
"
5/1100
Using the DXJFC:
DEPRESS THIS
SWITCH!
(OPTIONAL
EXPRESSION PEDAL)
(SECOND DX
AMPLIFIER
OR OTHER
MIDI DEVICE)
ASSIGN
PRESS BOTH SWITCHES
EXPRESSION
INPUT
MIDI
OUTPUT
PRESS BOTH SWITCHES
BANK
REVERB
DEPTH
REVERB
LEVEL
STANDARD
MIDI
CRATE
FOOT
CONTROLLER
STEREO
LINE
IN
MIDI
THRU/
OUT
MIDI IN/
FOOT
SWITCH
*NOTE: You must use a 5-wire MIDI cable
when connecting the DXJFC to the DX amplifier
or no power will be sent to the footcontroller!
-2-
USING AN EXPRESSION PEDAL: By using an external pedal, you can remotely adjust several of the controls (gain, level, effect adjust,
reverb level, and reverb depth) on the DX amplifier through the DXJFC.
Here are some things you need to know about the expression pedal:
· The pedal must be a passive, unpowered type, such as the SLM OmniFex volume pedal VP-200, or the Dunlop
HighGain GCB-80 with a "blank" 1/4" plug (as explained later on).
· After connecting the pedal, it must be calibrated to the DXJFC simply adjust the pedal to its minimum output posi-
tion, then to its maximum output position. This tells the DXJFC what kind of pedal you are using. If you forget to cali-
brate the pedal, the DXJFC will do it for you the first time you use the pedal through its full range. The pedal's effect on
the DX amplifier control knob may change after calibration.
NOTE: If the pedal doesn't seem to give you full range of control after calibration, unplug the pedal from the DXJFC,
wait five seconds, plug the pedal back in, and adjust it to its minimum then maximum output positions.
· Some pedals may require a "blank" 1/4" plug (just a plain plug, no wires) to be plugged into the input jack to activate
them if your pedal doesn't work with the DXJFC, try using the pedal with such a plug in its input jack.
· If the expression pedal is unplugged from the DXJFC, the DXJFC will stop sending expression messages the DX ampli-
fier will revert to the knob setting stored in its current preset.
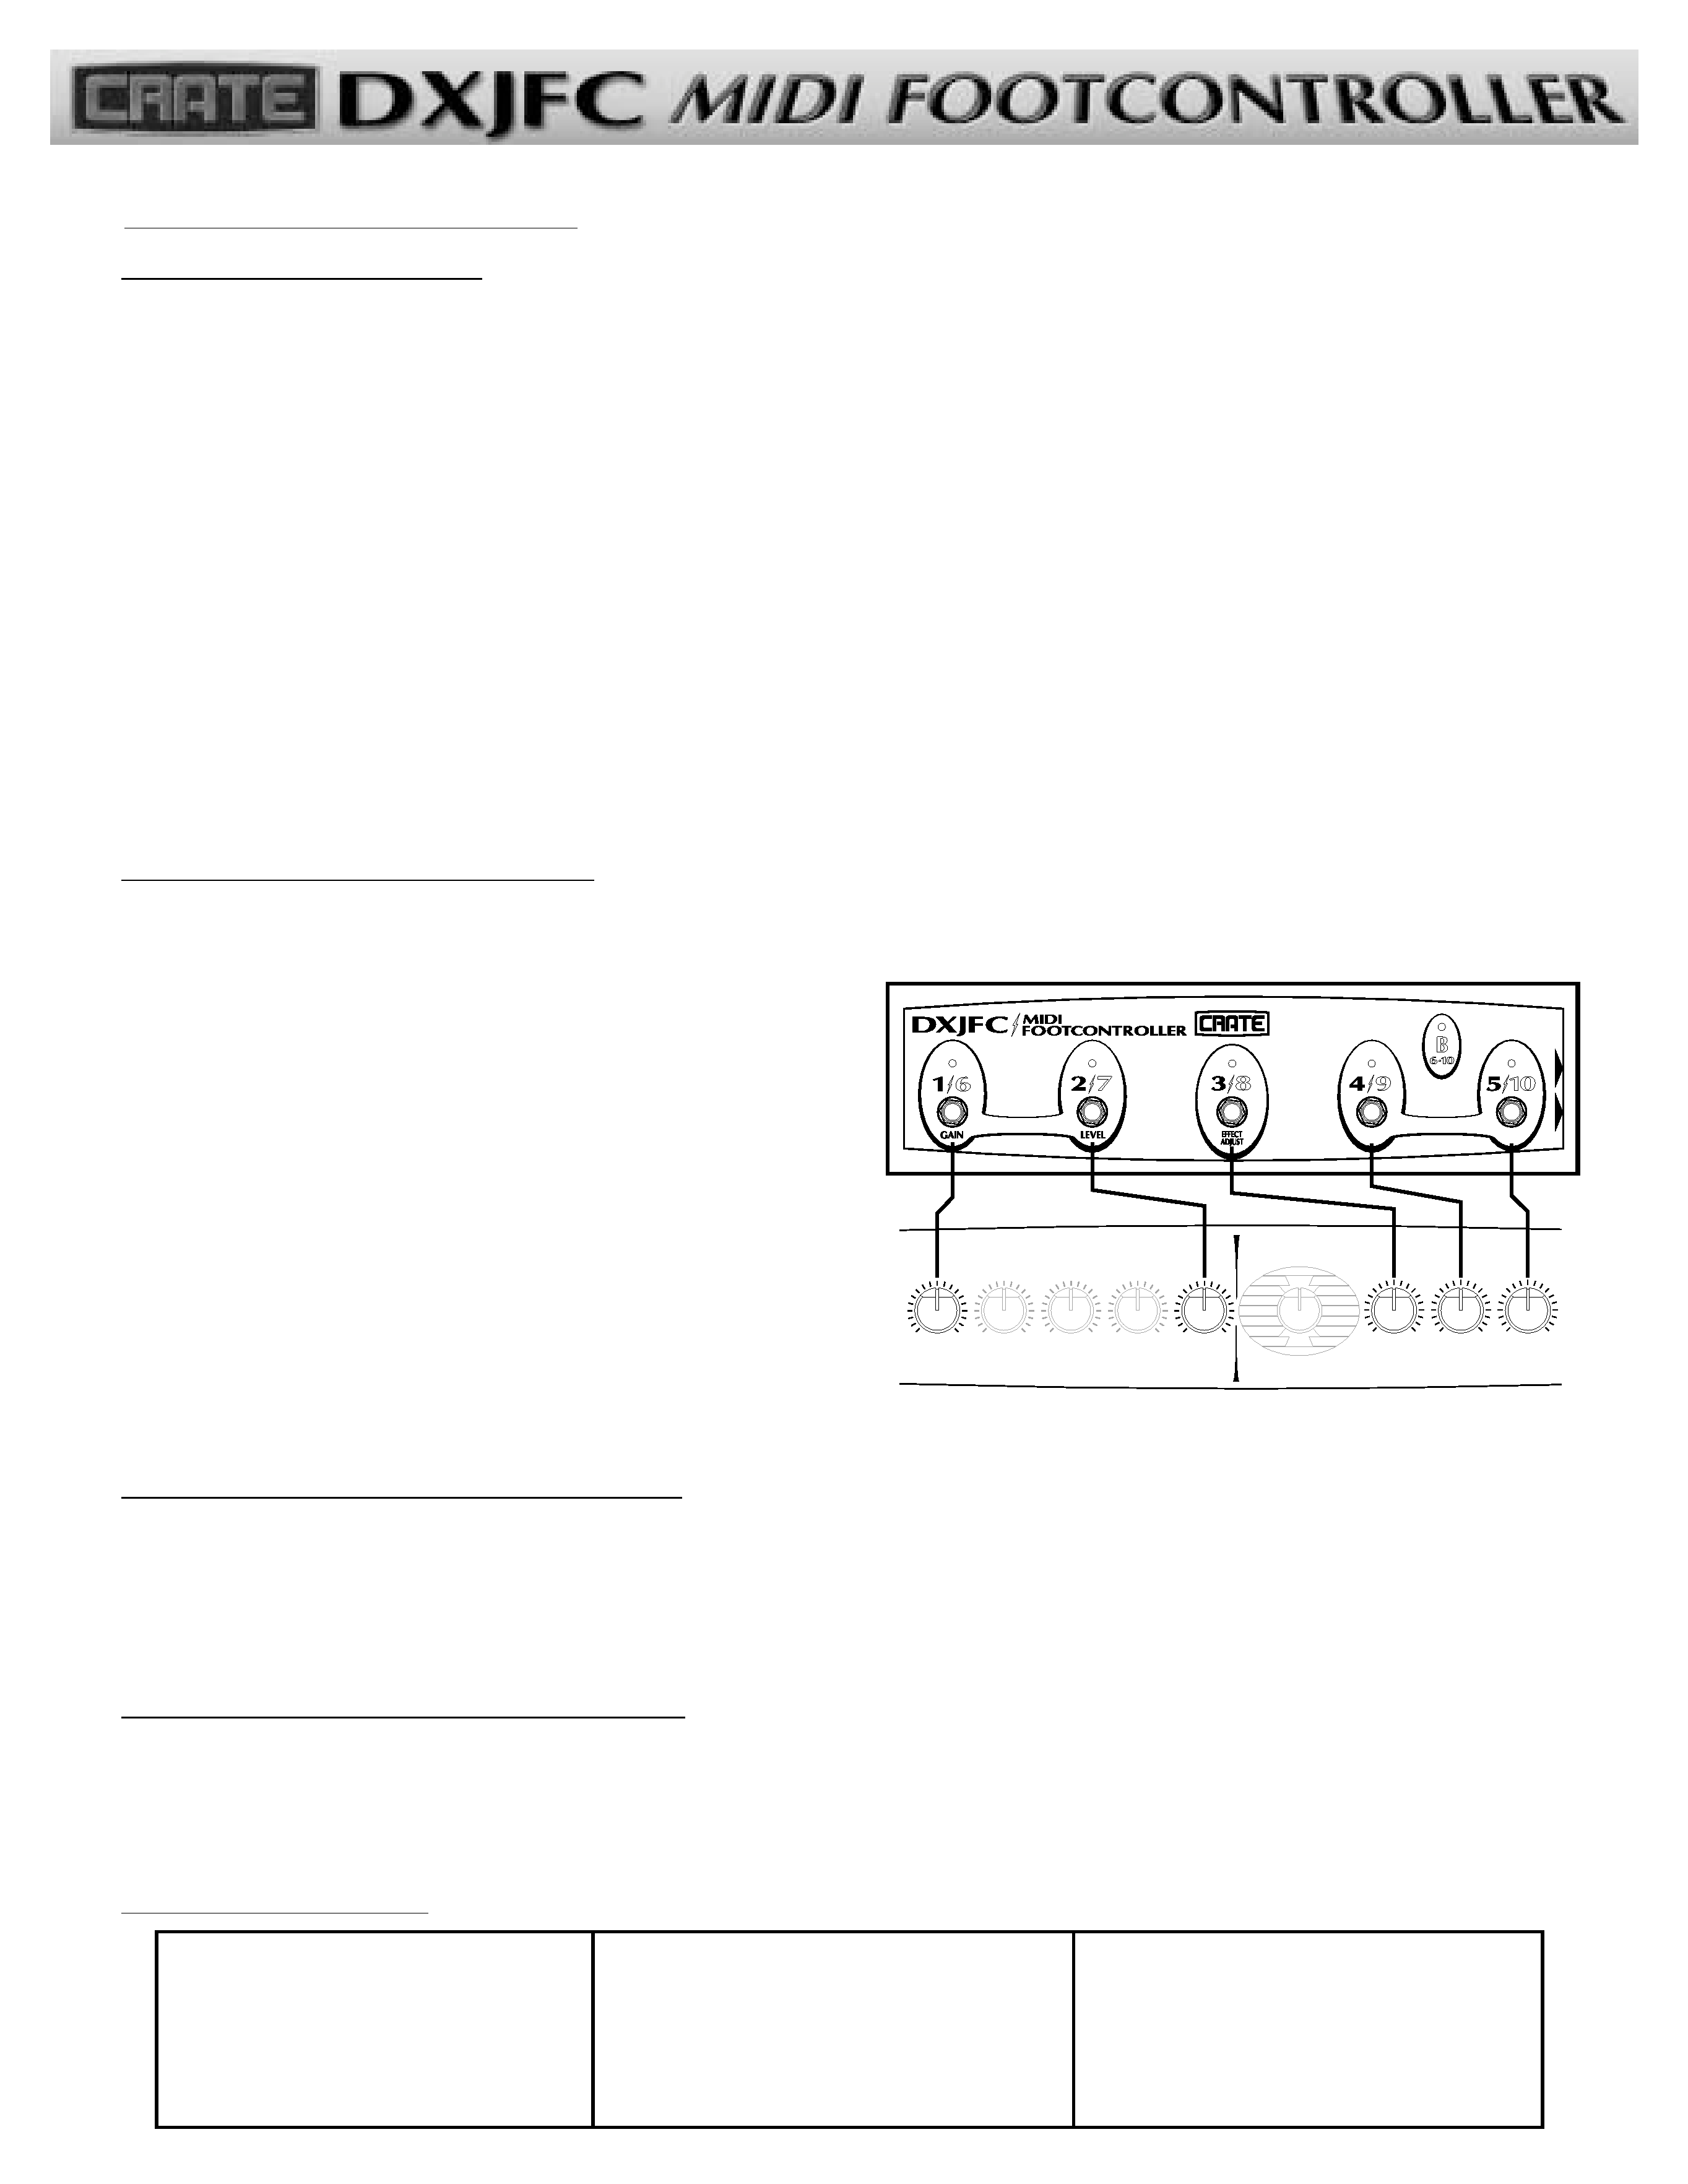
ASSIGNMENT OF A DX CONTROL KNOB: The default assignment for the expression pedal is the effect adjust control. To assign a
different DX control knob to the expression pedal, follow these steps:
· Step on BOTH the "1/6" and "2/7" buttons simultaneously (the "1/6" and "2/7" LEDs will flash rapidly to indicate the
footcontroller is in the "assign" mode.)
· Choose which DX control knob to assign to the pedal by
stepping on one of the selector buttons the buttons are
labeled to correspond to the DX amplifier, as shown >
11//66 = G
Gaaiinn
44//99 = RReevveerrbb LLeevveell
22//77 = LLeevveell
55//1100 = RReevveerrbb D
Deepptthh
33//88 = EEffffeecctt A
Addjjuusstt
· That's it the pedal is assigned moving the pedal up and
down now acts the same as reaching over to the amplifier
and turning the assigned control (without actually having to
reach over to the amp!)
(You can reassign the expression pedal at any time by repeating the above steps.)
STORING AN EXPRESSION PEDAL ASSIGNMENT: The DXJFC has no internal memory, so any assignments made must be stored in
the amplifier's preset memory or they will be lost when the amplifier is turned off or when a different preset is selected. Follow the
instructions in your amplifier's owners manual for saving/storing presets, and save the pedal assignment before turning off the power.
When you store the preset, the DXJFC assignment is stored with that preset and will remain there until you store the preset with a
different assignment or store it with no assignment (cleared).
CLEARING AN EXPRESSION PEDAL ASSIGNMENT:
· Step on BOTH "1/6" and "2/7" buttons simultaneously
· Step on BOTH "1/6" and "2/7" buttons again the expression pedal is no longer assigned to any of the DX controls
for the current preset
Troubleshooting:
Using the DXJFC (con't):
PRESET PARAMETERS
EFFECTS
GAIN
BASS
MID
TREBLE
CHANNEL
LEVEL
EFFECT
ADJUST
REVERB
LEVEL
REVERB
DEPTH
Touch Wah
Rotating Spkr
Cmp/Cho/Echo
Cmp/Vib/Echo
Cmp/Flg/Echo
Flange/Echo
Chor/Echo
Comp/Chorus
Comp/Echo
Compressor
Tremolo
Chorus
Vibrato
Delay
Flanger
Echo
ASSIGN
PRESS BOTH SWITCHES
EXPRESSION
INPUT
MIDI
OUTPUT
PRESS BOTH SWITCHES
BANK
REVERB
DEPTH
REVERB
LEVEL
Pedal doesn't control setting
· Pedal plugged in?
· MIDI cable connected?
· "Blank" plug needed by pedal?
· Pedal assigned to correct control?
No lights on DXJFC
· Standard 5-wire MIDI cable used?
· MIDI cable connected?
· Power button depressed on DX amp?
· DX amp turned on?
Pedal control range inaccurate
· Pedal calibrated? (unplug pedal, wait five
seconds, plug back in adjust pedal to its
minimum then maximum output positions)
· Pedal impedance too low? (compatible
impedance: 50k ohms to 1M ohm )
-3-