2220-1
Module No. 2220
GETTING ACQUAINTED
Congratulations upon your selection of the CASIO Wrist Camera (this watch).
To get the most out of your purchase, be sure to read this manual carefully
and keep the manual and everything contained in the packages.
About This Manual
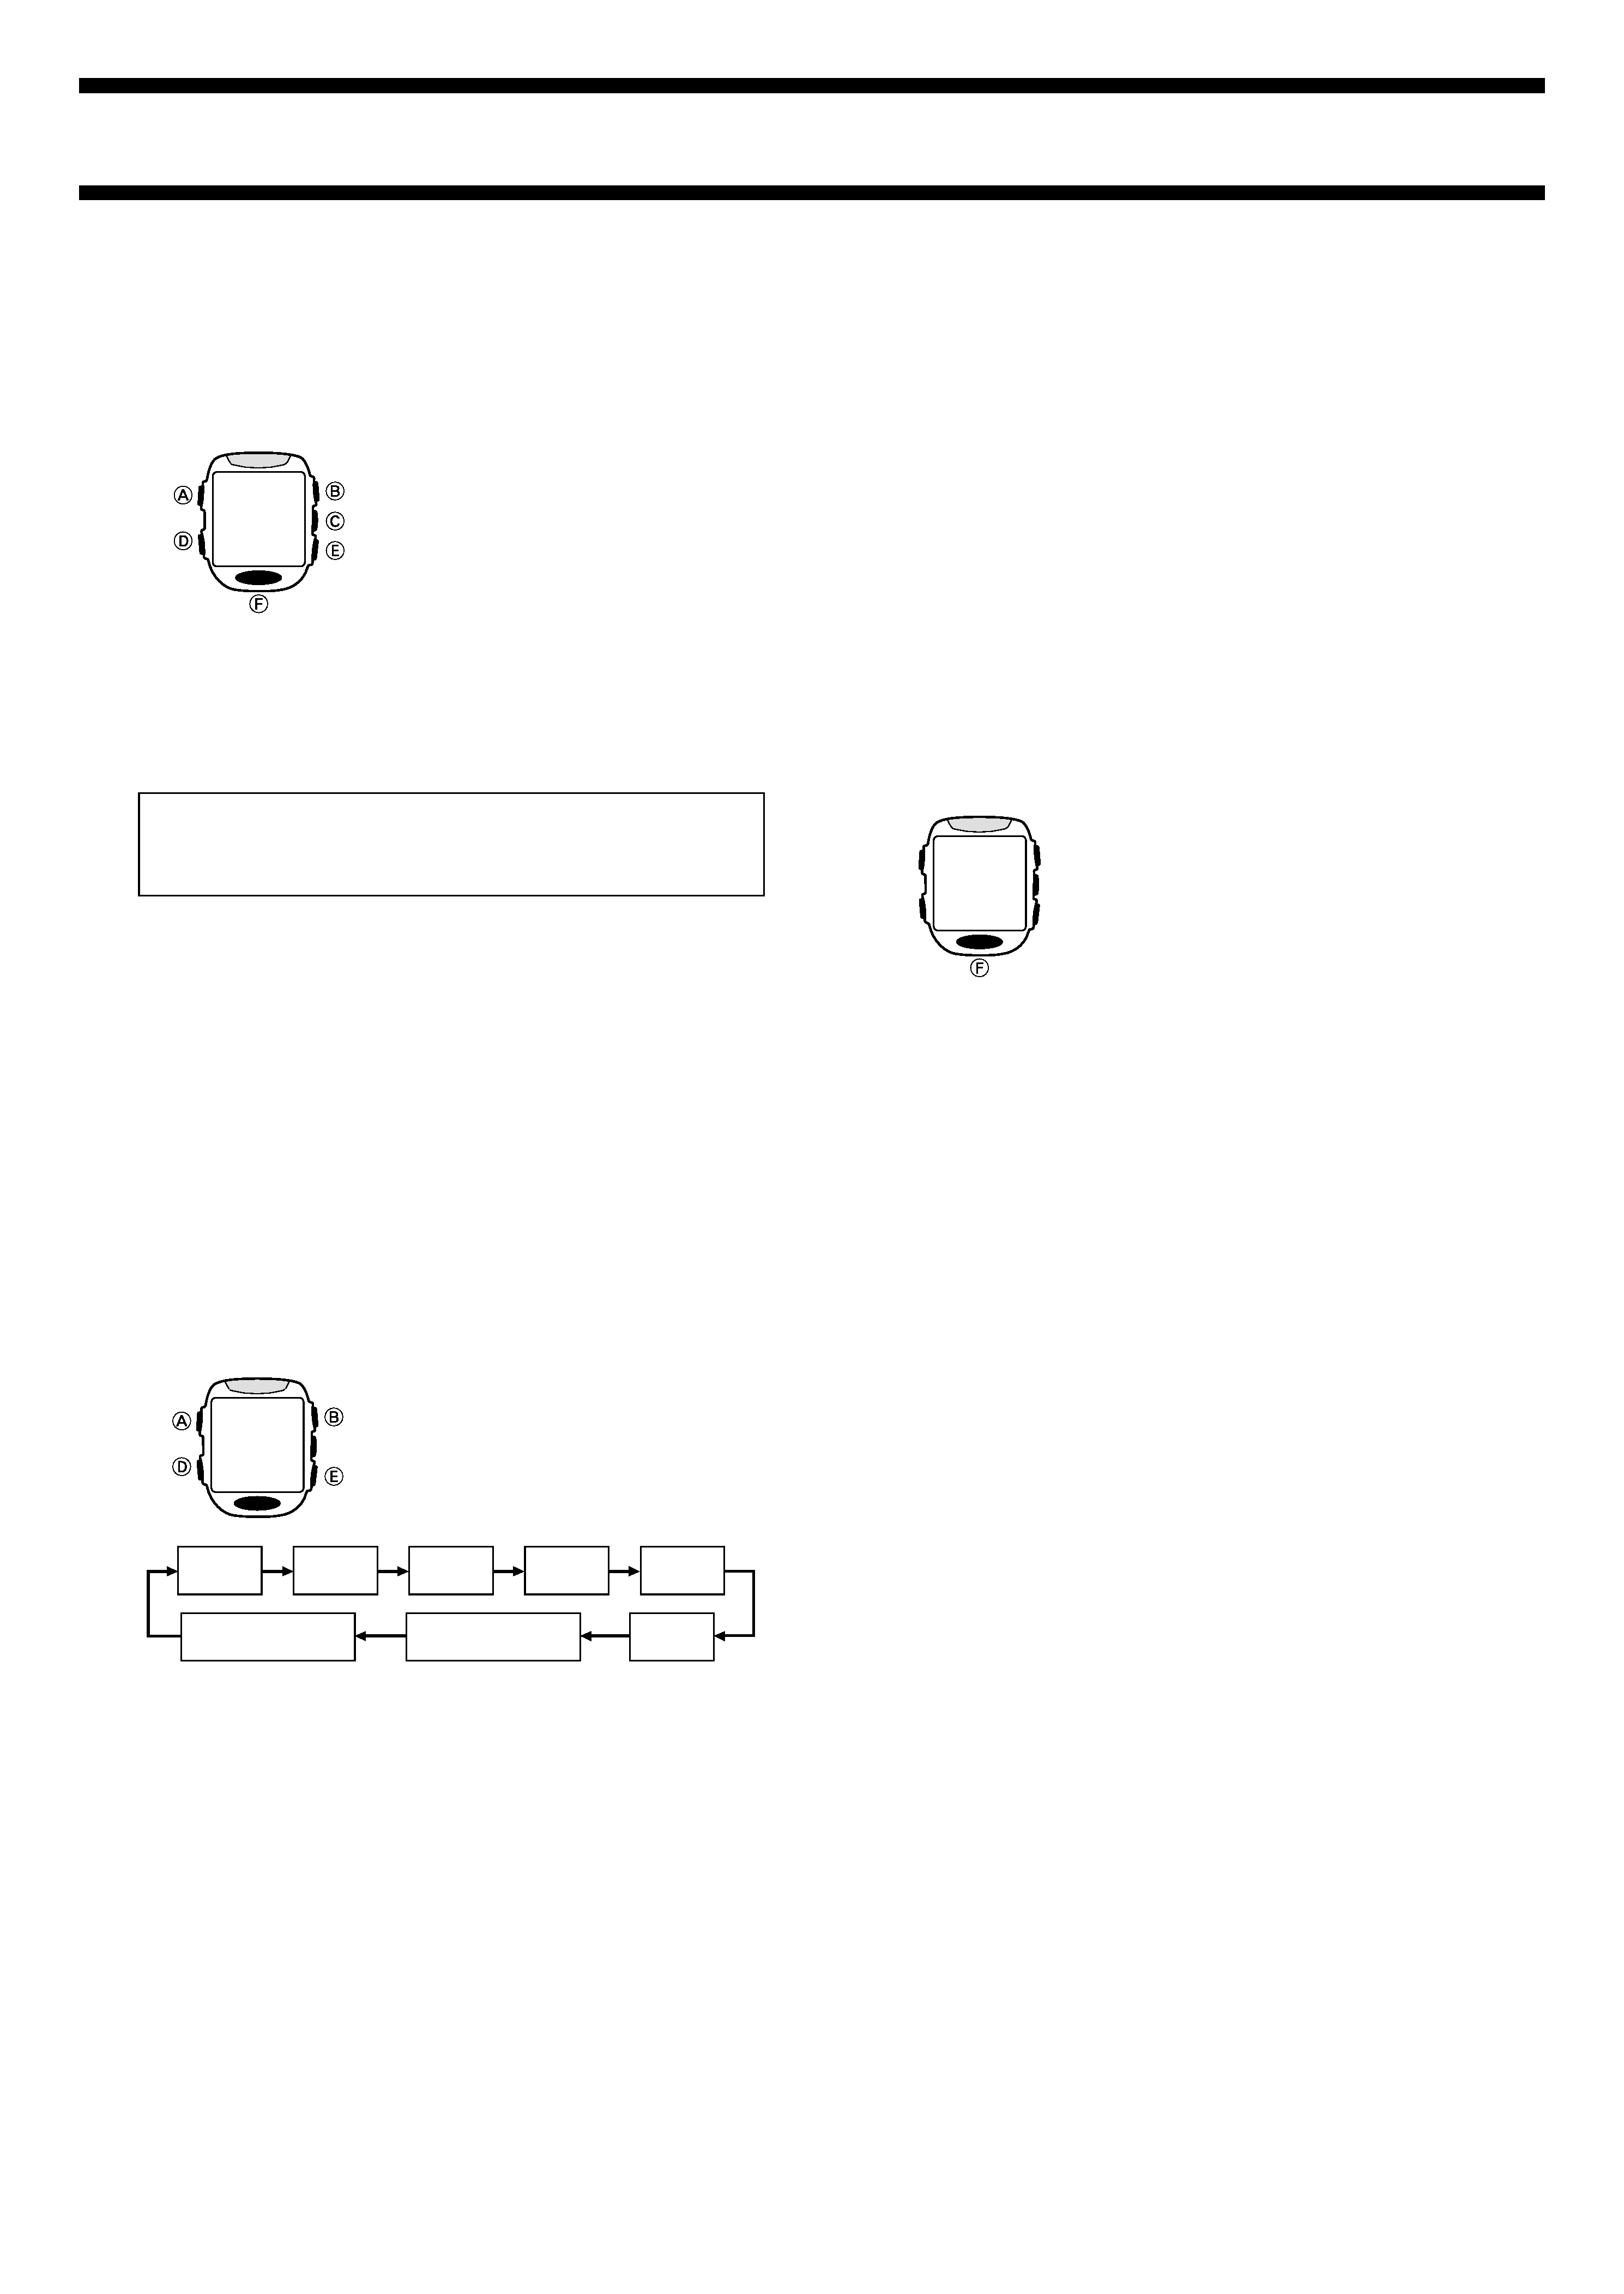
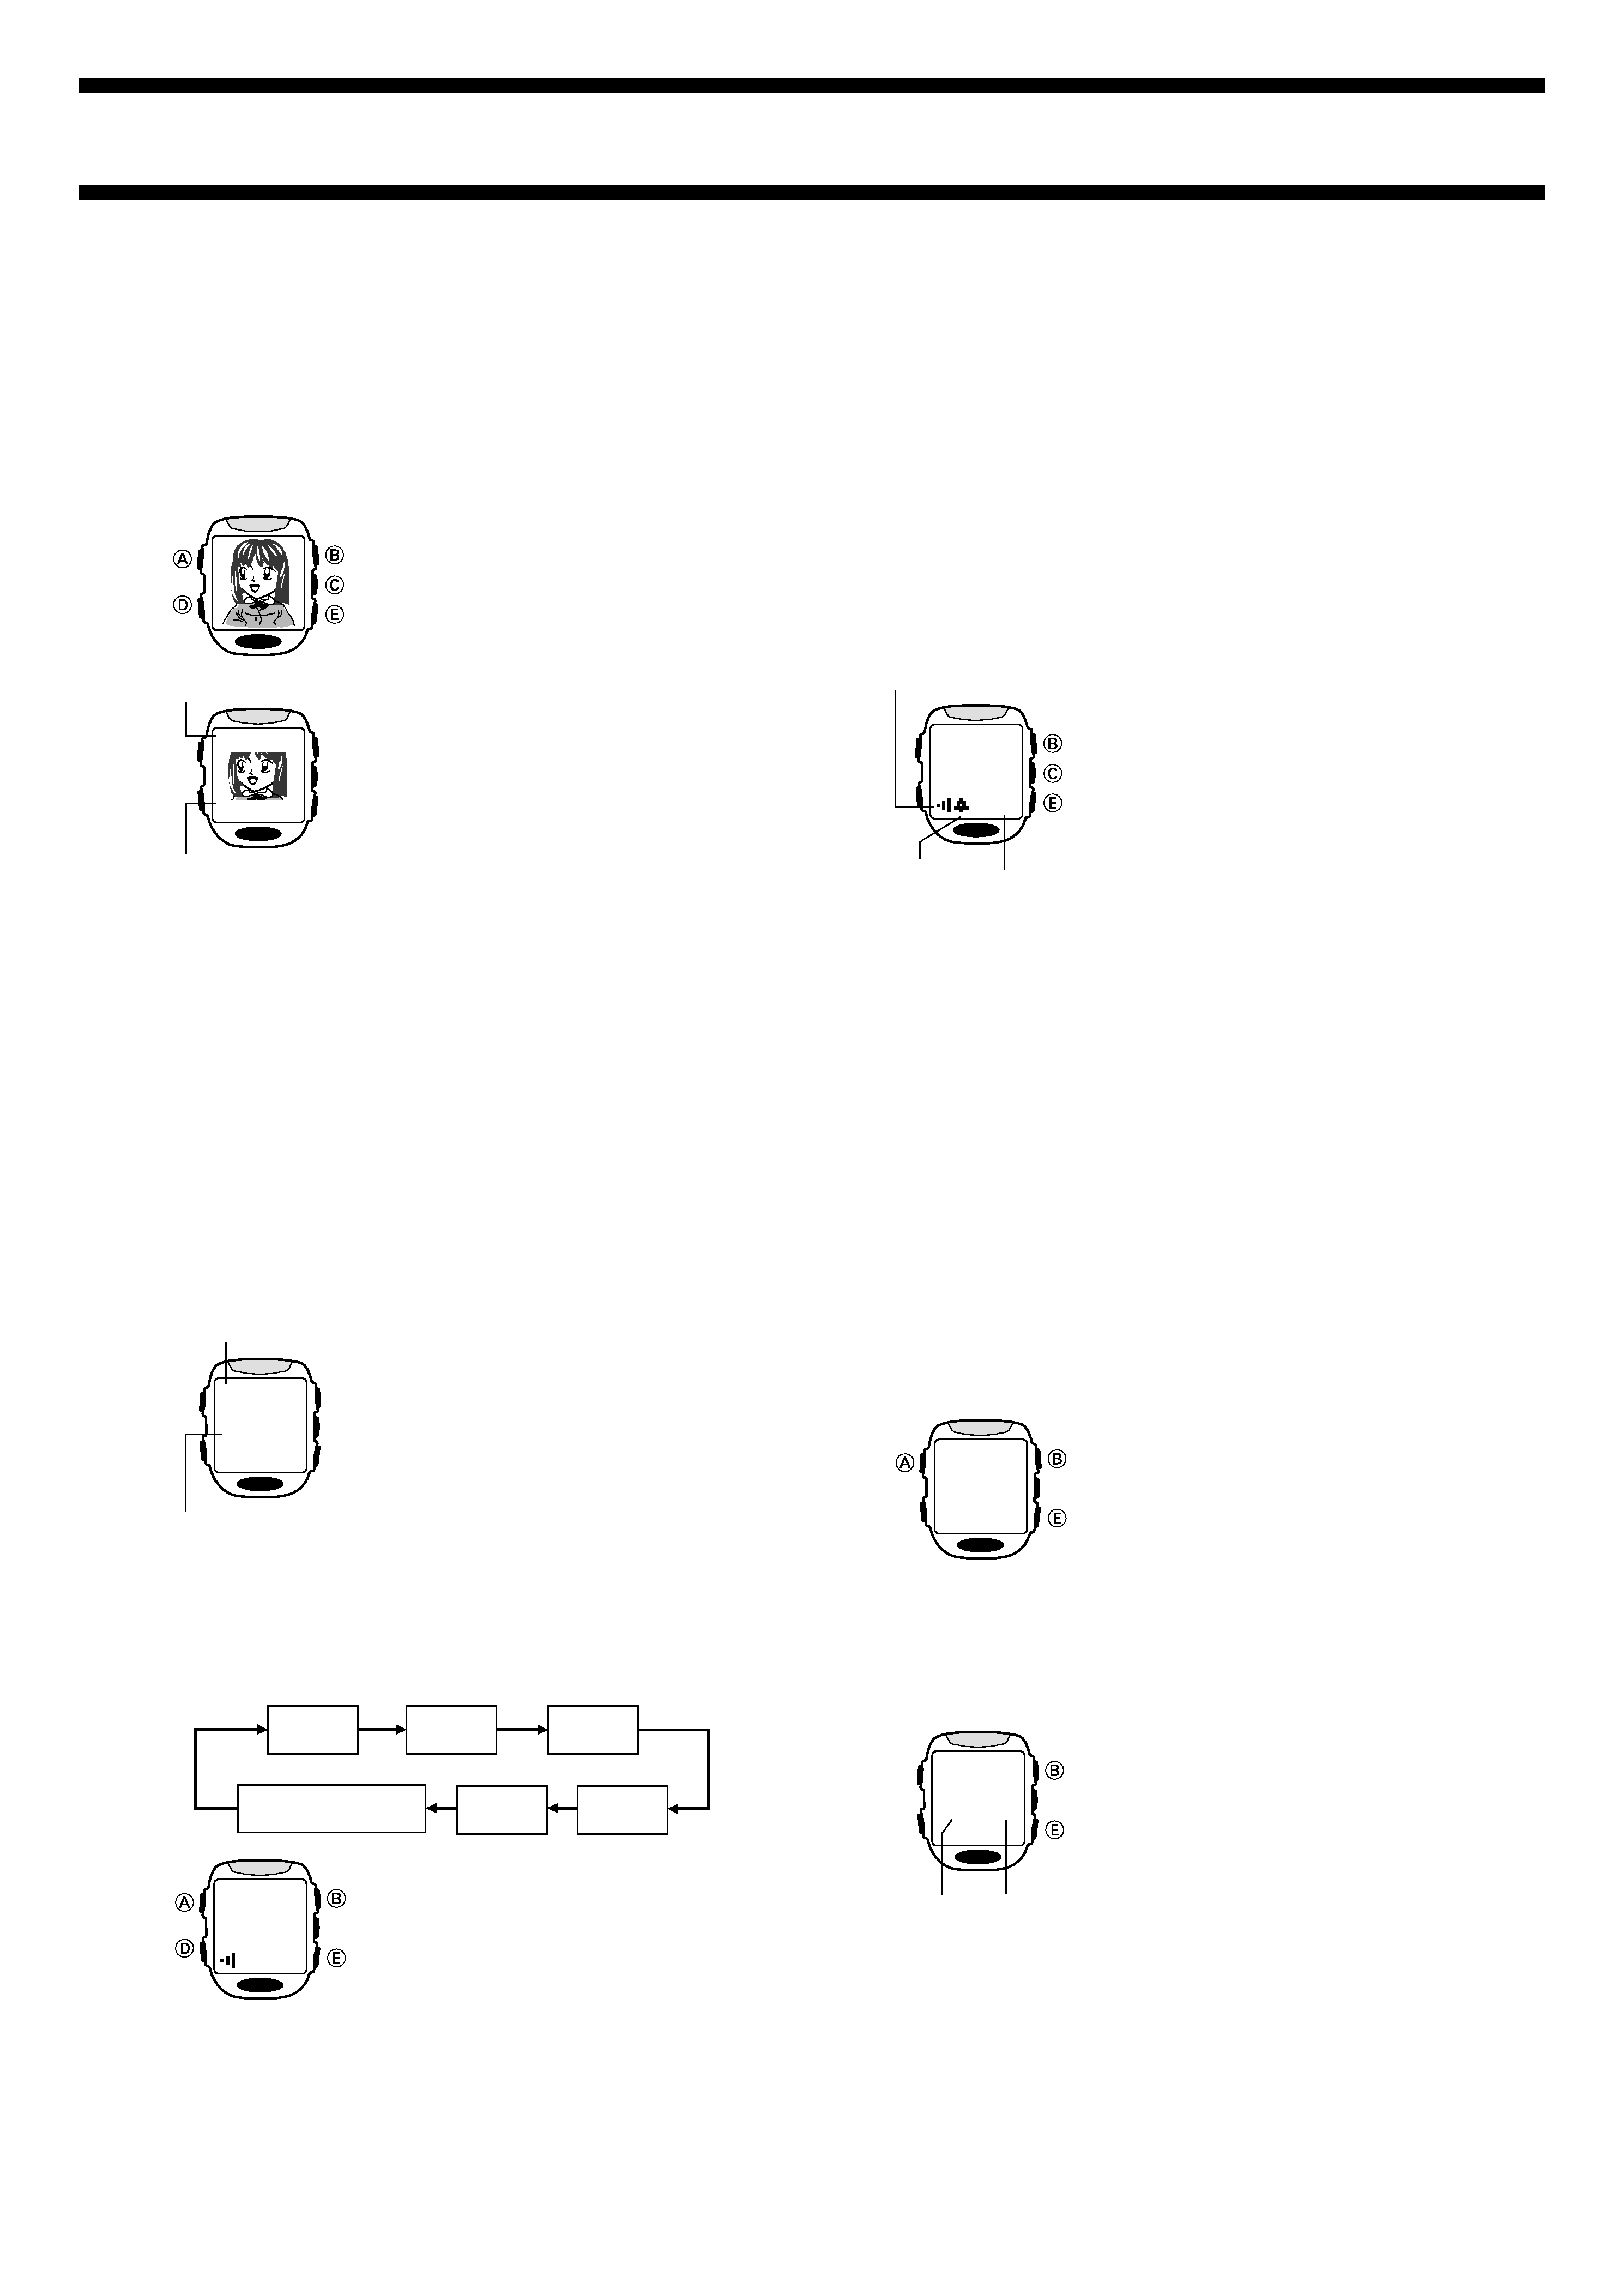
· Button operations are indicated using the
letters shown in the illustration.
· The sizes and positions of the characters
shown on the sample displays in this
manual may differ slightly from those that
actually appear on the display of your
watch.
· Each section of this manual provides you
with the information you need to perform
operations in each mode.
· When performing operations with this
watch, you must first enter the correct mode
(Camera Mode, Timekeeping Mode, etc.)
See "GENERAL GUIDE" for information
about maneuvering between modes.
· VISUAL DATABANK is a trademark of CASIO COMPUTER CO., LTD.
· CASIO COMPUTER CO., LTD. assumes no responsibility for any loss,
or any claims by third parties that may arise through the use of this
watch.
FRI 3
P
1:58
35
12-hour/24-hour Timekeeping
Pressing D while the day is flashing on the setting screen causes the
indicator for the current timekeeping format (12H or 24H) to flash on the
display. Each press of E at this time toggles between 12-hour (12H) and
24-hour (24H) timekeeping.
· The timekeeping format you select is applied in all modes.
· With the 12-hour format, the P (PM) indicator appears to the left of the hour
digits for times in the range of noon to 11:59 p.m. The A (AM) indicator
appears to the left of the hour digits for times in the range of midnight to
11:59 a.m.
· With the 24-hour format, times are indicated in the range of 0:00 to 23:59,
without any indicator.
Contrast Adjustment
Pressing of D while the timekeeping format indicator (12H or 24H) is flashing
causes the current contrast setting (example: CNT3 = Level 3) to appear on
the display, with the level value flashing. Use B (darker) and E (lighter) to
adjust the contrast to any one of the seven available levels.
Note
· The contrast setting described above does not affect the display of images.
Image contrast can be adjusted using a separate procedure (See "To
adjust image contrast").
Auto Display Off
The watch automatically turns off its display
screen if it is not moved for about 60 minutes.
This not only conserves battery power, it also
protects against "burn in" of display images.
To turn the display back on, press F.
This displays the Timekeeping Mode screen.
BEFORE USING THE WATCH...
Warning!
· Make sure you are in a safe place before operating the watch.
Do not try to record images, perform complex watch operations, or look at the
display of the watch while operating an automobile, motorcycle, or any other
vehicle. Doing so creates the risk of causing a serious traffic accident. When
you use the watch while walking, always keep aware of other people,
vehicular traffic, and surface conditions around you in order to prevent
accidents.
· Do not use the watch inside of an aircraft.
Never use the watch inside of an aircraft or in any other area where the use
of such devices is prohibited. Doing so creates the risk of accident.
· Always back up important data.
Rough handling of or damage to the watch can accidentally delete image
data in watch memory. Because of this, you should always keep back up
copies of your images on computer disk.
To set the time and date
1. In the Timekeeping Mode, hold down A
for about one second until the seconds
digits start to flash on the display. This
indicates the setting screen.
· Each press of D moves the flashing around
the setting screen in the sequence shown
below.
Seconds
Hour
Minutes
Year
Month
12/24-hour Selection
Contrast Setting
Day
2. While a setting is flashing, use E (+) and B () to change it.
3. When everything is the way you want it, press A to exit the setting
screen.
· The watch's built-in full automatic calendar makes allowances for different
month lengths and leap years.
· The watch automatically exits the setting screen if you do not perform any
operation for about two minutes.
· The year can be set in the range of 2000 to 2039.
FRI 3
P
1:58
35
FRI 3
P
1:58
35
2220-2
Timekeeping Mode
· Pressing B or E while in the Timekeeping Mode displays the Viewer
Screen, which you can use to view images stored in watch memory.
Press D to return from the Viewer Screen to the Timekeeping Mode.
· Each press of C while in the Timekeeping Mode toggles between the
Day of the Week Screen and the Month Screen.
Camera Mode
· Pressing F in any mode besides the IR Mode enters the
Camera Mode.
· Pressing D while in the Camera Mode enters the VISUAL
DATABANK Mode so you can view images you have just
recorded.
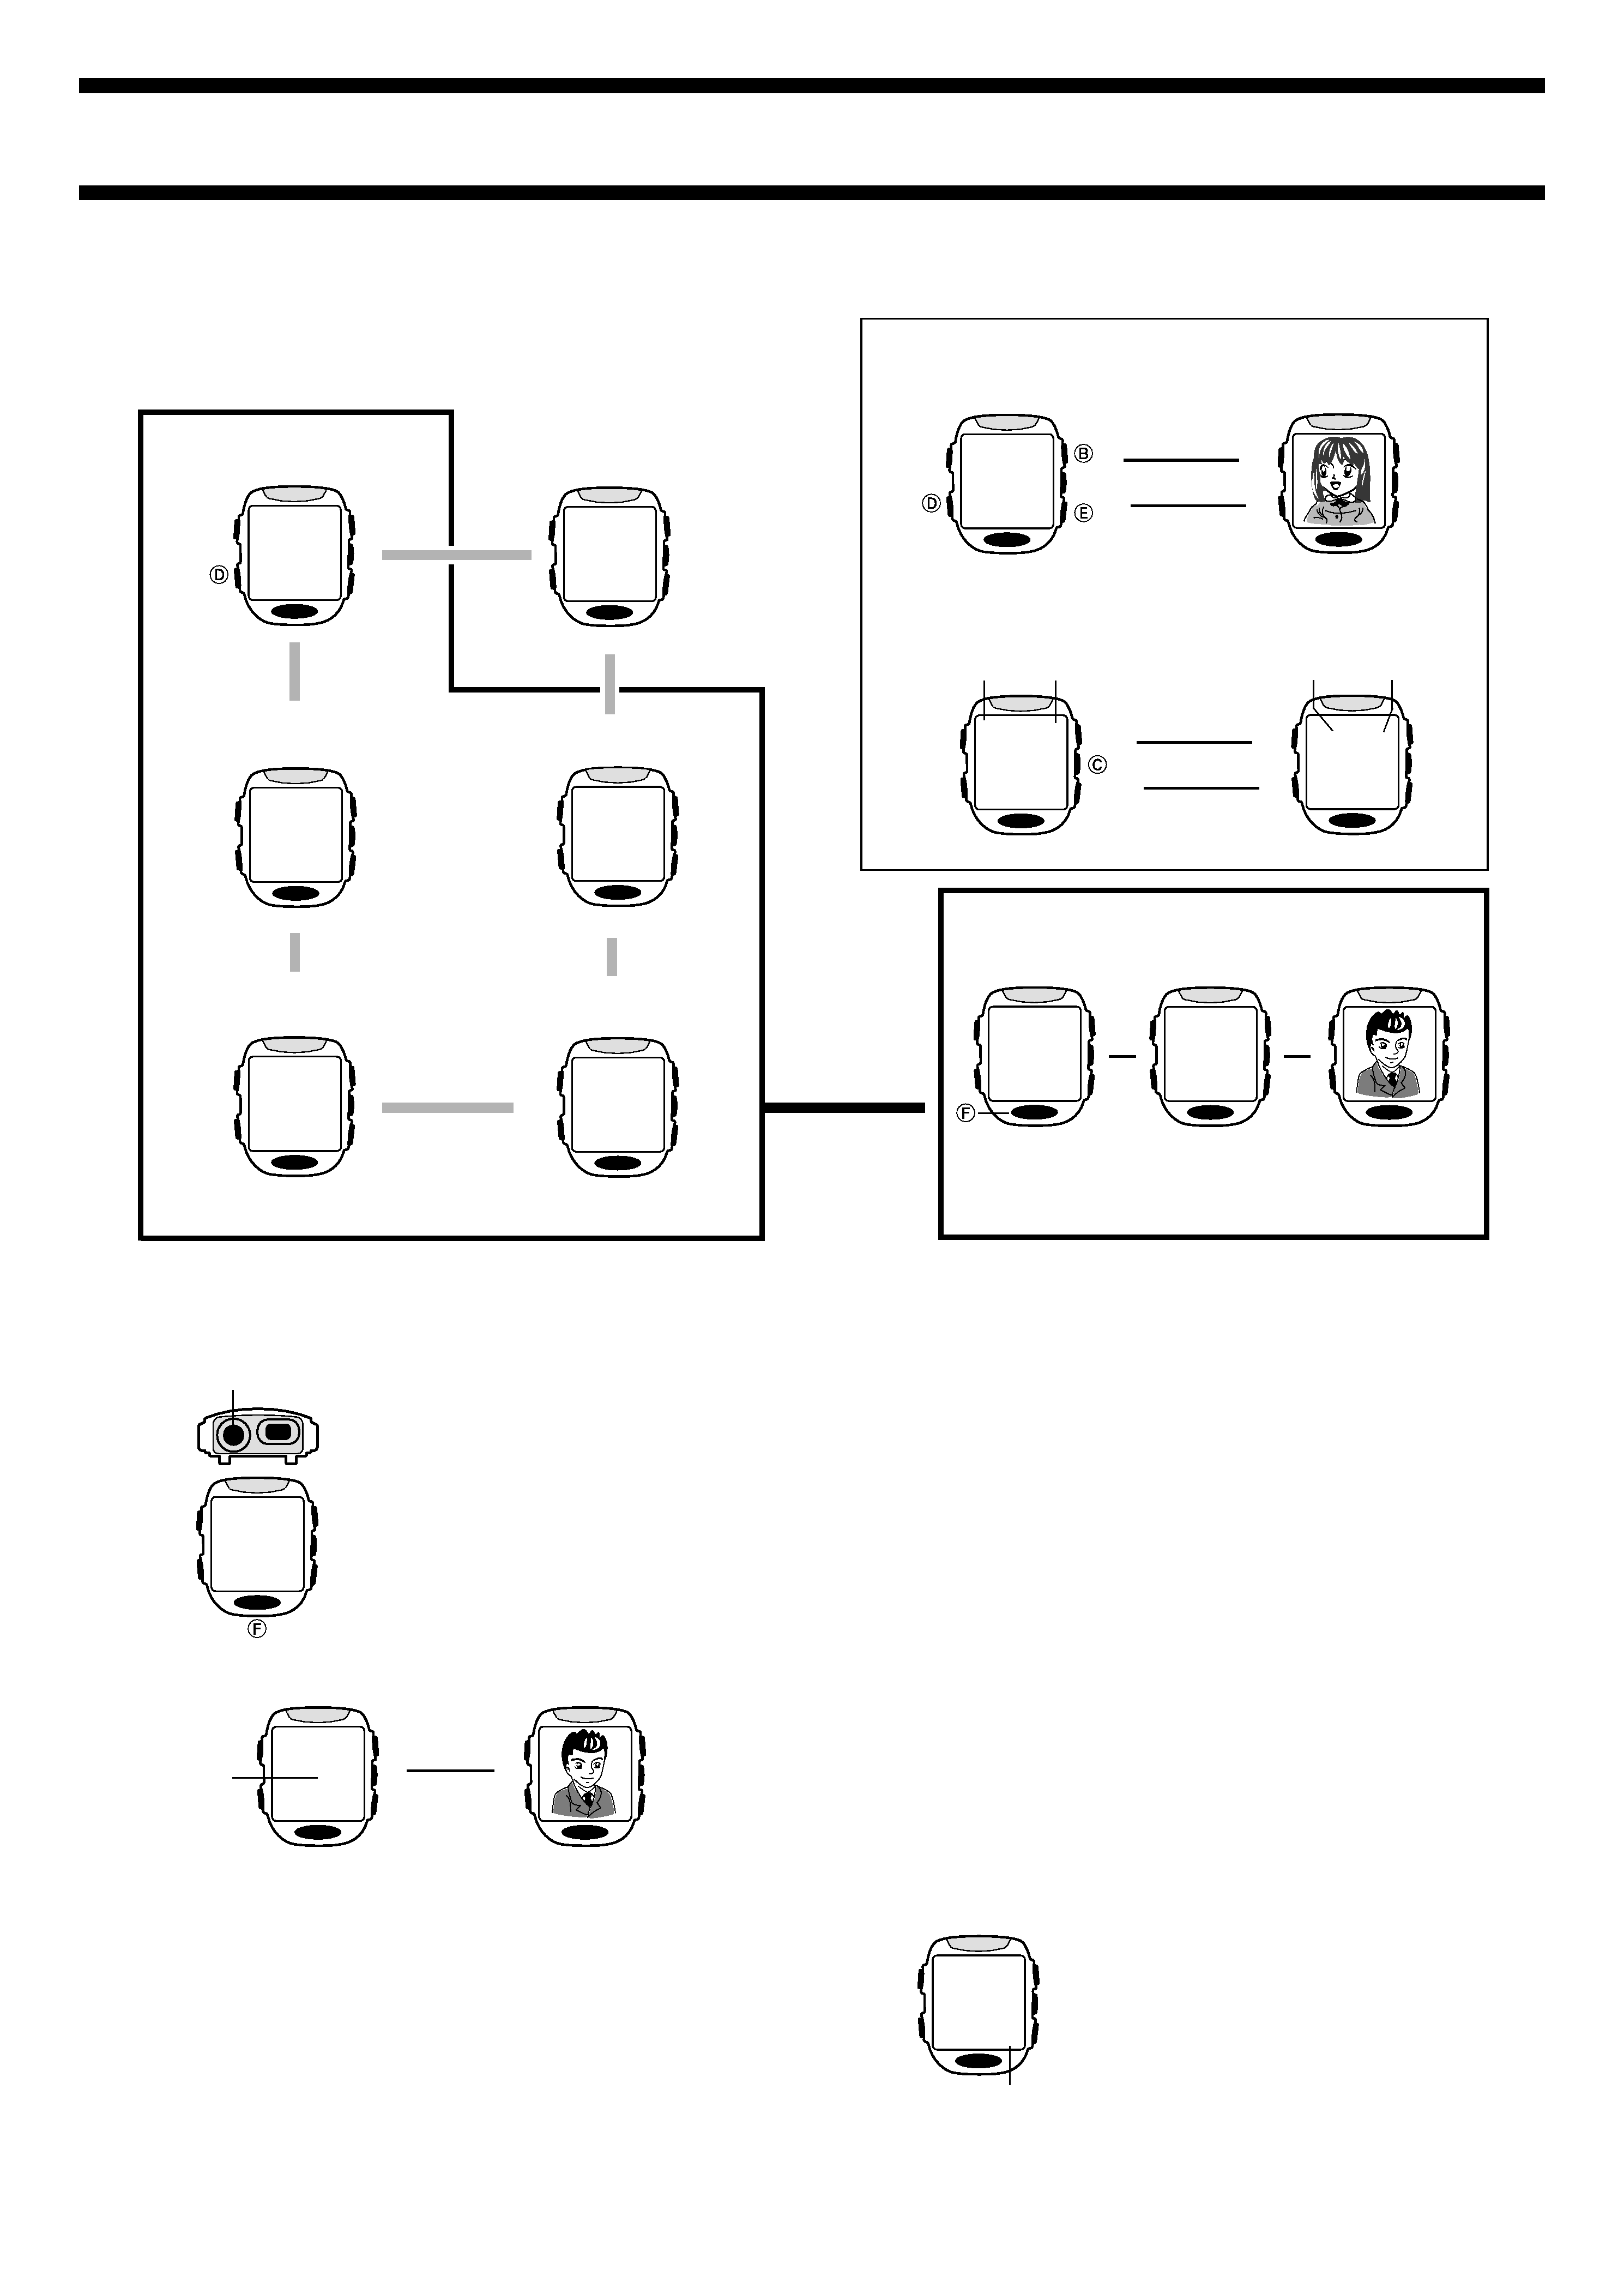
GENERAL GUIDE
Press D to change from mode to mode.
Timekeeping Mode
FRI 3
P
1:58
35
L
IR Mode
IR
COM
Stopwatch Mode
Countdown Alarm Mode
VISUAL DATABANK Mode
Alarm Mode
Press D.
PLAY
3
AL1
A
12:
OFF
TMR
3'
STW
H
'
00
L
L
L
L
Press
F.
Use this mode to
view images in
watch memory,
to delete images,
to attach text to
images, etc.
L
FRI 3
P
1:58
35
L
L
Press B or E.
Press D.
FRI 3
P
1:58
35
6
-
3
P
1:58
35
L
L
Press C.
Press C.
Day of the week
Day
Month
Day
FRI 3
P
1:58
35
REC
7
L
L
L
CAMERA MODE
Use the Camera Mode to record images. The
lens for image recording is located on the top
edge of the watch.
To record an image
1. Press F to enter the Camera Mode.
· Note that you cannot enter the Camera
Mode from the IR Mode.
· The Camera Mode screen first shows remaining memory capacity for
about one second, followed by the image being picked up by the lens.
2. While viewing the image on the display, point the lens of the watch at the
subject whose image you want to record.
3. Press F to release the shutter and record the image.
· This records the image currently on the display and stores it into memory.
The image remains on the display for about two seconds as the record
operation is being performed.
FRI 3
P
1:58
35
Lens
REC
7
L
Remaining
memory
capacity
(number of
images)
Note
· All watch button operations are disabled while the record operation is in
progress.
· The watch stays in the Camera Mode for about one minute after you
enter it. Then it automatically enters the VISUAL DATABANK Mode
and displays the last image recorded. See "Camera Rest Interval" for
more information.
· The message FULL appears on the display to indicate that memory is full.
You will not be able to enter the Camera Mode while this message is
displayed. If this happens, delete images you no longer need to make
room for more images.
Camera Mode Precautions
General
· Never touch the surface of the lens with your fingers.
· Take care that you do not accidentally move the watch when you press F
to release the shutter.
· Insufficient lighting can result in poor images. Shoot in daylight whenever
possible. At night, shoot indoors in a well-lit area.
Camera Rest Interval
Camera Mode operations consume considerable battery power. To protect
against premature rundown of its battery, the watch automatically goes into a
rest interval, during which you will be unable to re-enter the Camera Mode
after you exit it. The length of the rest interval is equal to the amount of time
you spent in the Camera Mode before you exited it. This means that if you
exit the Camera Mode after being in it for 20 seconds, you will be unable to
re-enter the Camera Mode for about 20 seconds.
If you try to enter the Camera Mode during a
rest interval, the message WAIT appears on
the display, along with a countdown of the
remaining rest interval time.
· The maximum rest interval is 60 seconds.
Alarm, Hourly Time Signal, Countdown Alarm Sounds
The watch does not emit any alarm, Hourly Time Signal, or Countdown Alarm
sound while it is in the Camera Mode.
REC
WAIT
18
Remaining rest
interval time
2220-3
OUT
DOOR
IN
DOOR
5 HZ
IN
DOOR
6 HZ
60Hz Indoor
Outdoor
50Hz Indoor
Controlling the Camera Mode Image
You can use the following procedures to adjust the brightness and to specify
the type of lighting present when recording an image.
Adjusting the Image Brightness
The watch automatically sets the brightness of the image when you record it.
You can also change the brightness level manually when you want to
compensate for backlighting of the subject, very dark backgrounds, etc.
To adjust image brightness
When composing an image on the display, use
B (darker) and E (lighter) to adjust its
brightness.
· You can set brightness to one of 15 levels.
The initial default level is 8.
· It may take some time after you press B or
E before the change in brightness is
reflected on the displayed image.
· A brightness setting you make remains in
effect until you change it or exit the Camera
Mode. Automatic brightness adjustment is
the initial default whenever you enter the
Camera Mode.
Important!
· Even with manual brightness adjustment, you may not be able to obtain an
acceptable image when recording images under very bright or very dark
lighting conditions.
Specifying the Lighting Type
The type of lighting present when recording, greatly affects the resulting
image. Besides the difference between outdoor and indoor lighting, there is
also a difference between indoor lighting types.
Though you cannot see it, light produced by indoor lighting fixtures actually
flickers at a fixed rate, which is the same as the cycle of the lighting fixture's
AC power (50Hz or 60Hz). You can use the following procedure to tell the
watch the type of lighting you are using, so it can make necessary
adjustments that ensure best results.
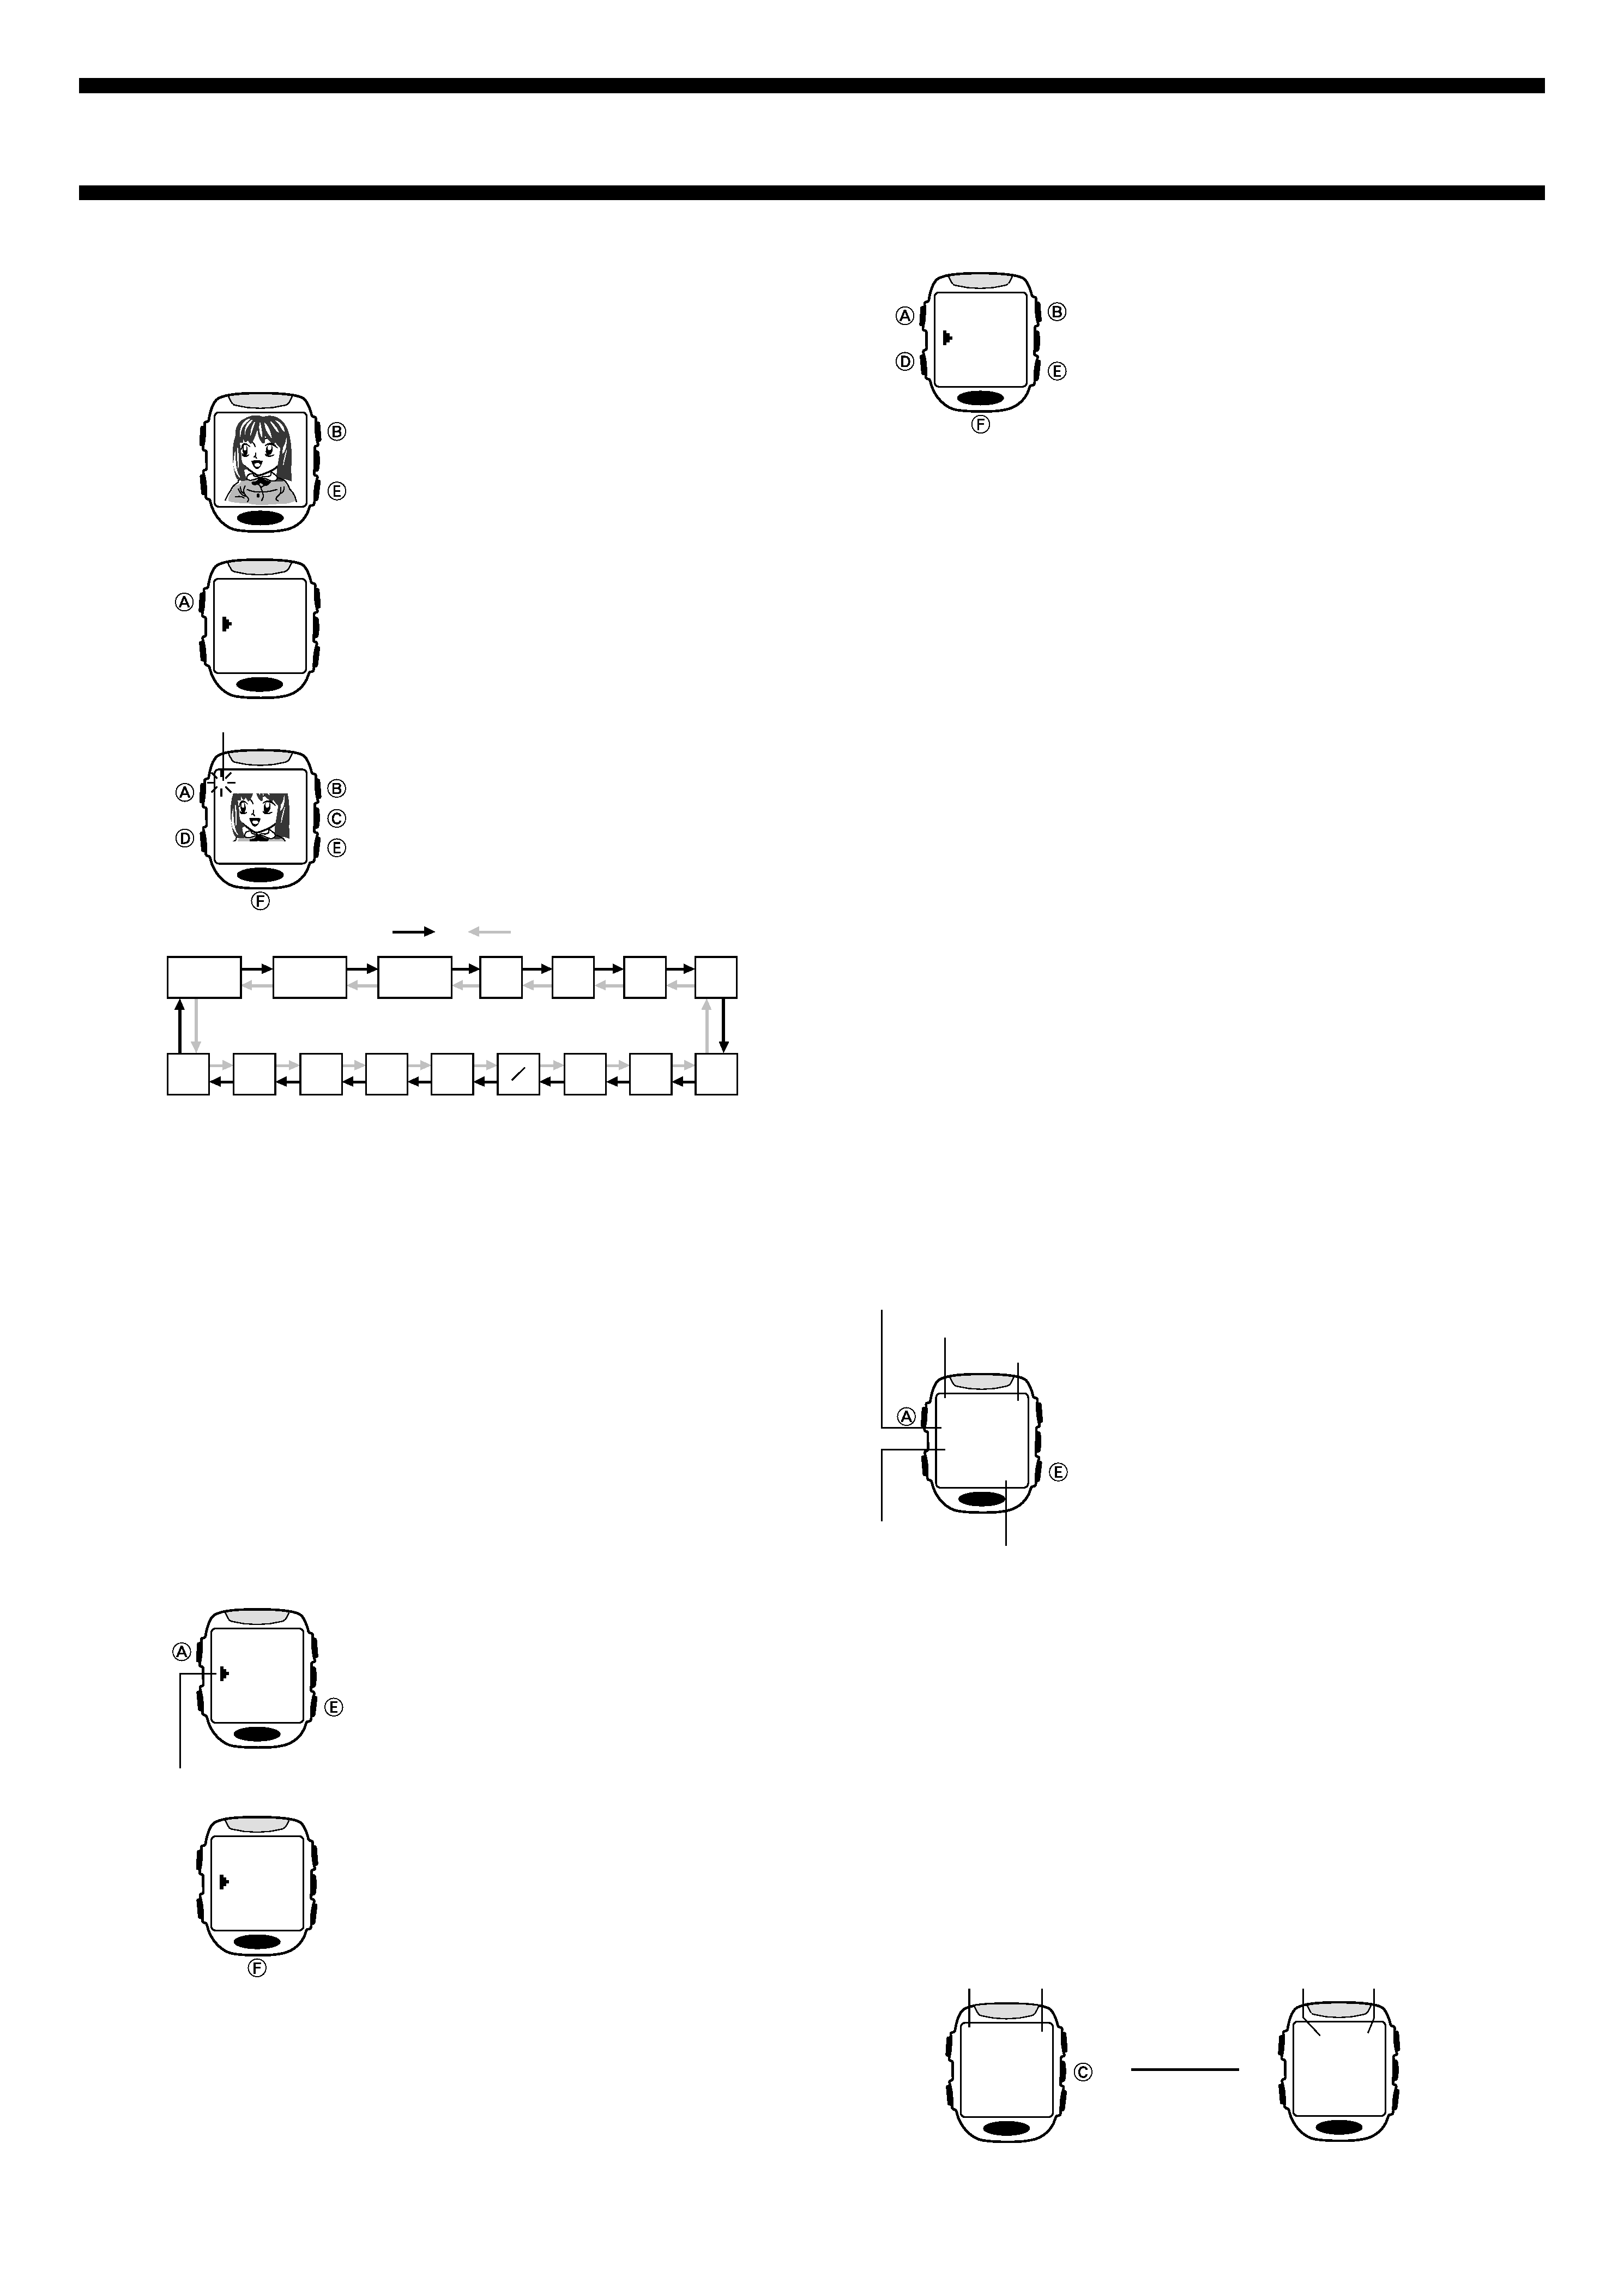
To specify the lighting type
In the Camera Mode, press A to cycle through the available lighting type
settings as shown below.
· The lighting type setting screen remains on the display for about one
second. After that, it returns to the normal Camera Mode screen.
· A lighting type setting you make remains in effect until you change it or exit
the Camera Mode. Outdoor lighting is the initial default whenever you enter
the Camera Mode.
Recording Modes
There are three recording modes that you can use to produce the type of
image you want.
Normal Mode
This mode records images using 16 grayscales. It is the normal default mode.
Merge Mode
This mode lets you merge two separately recorded images into a single
image.
Art Mode
This mode records images in two-tone monochrome.
Darker
Lighter
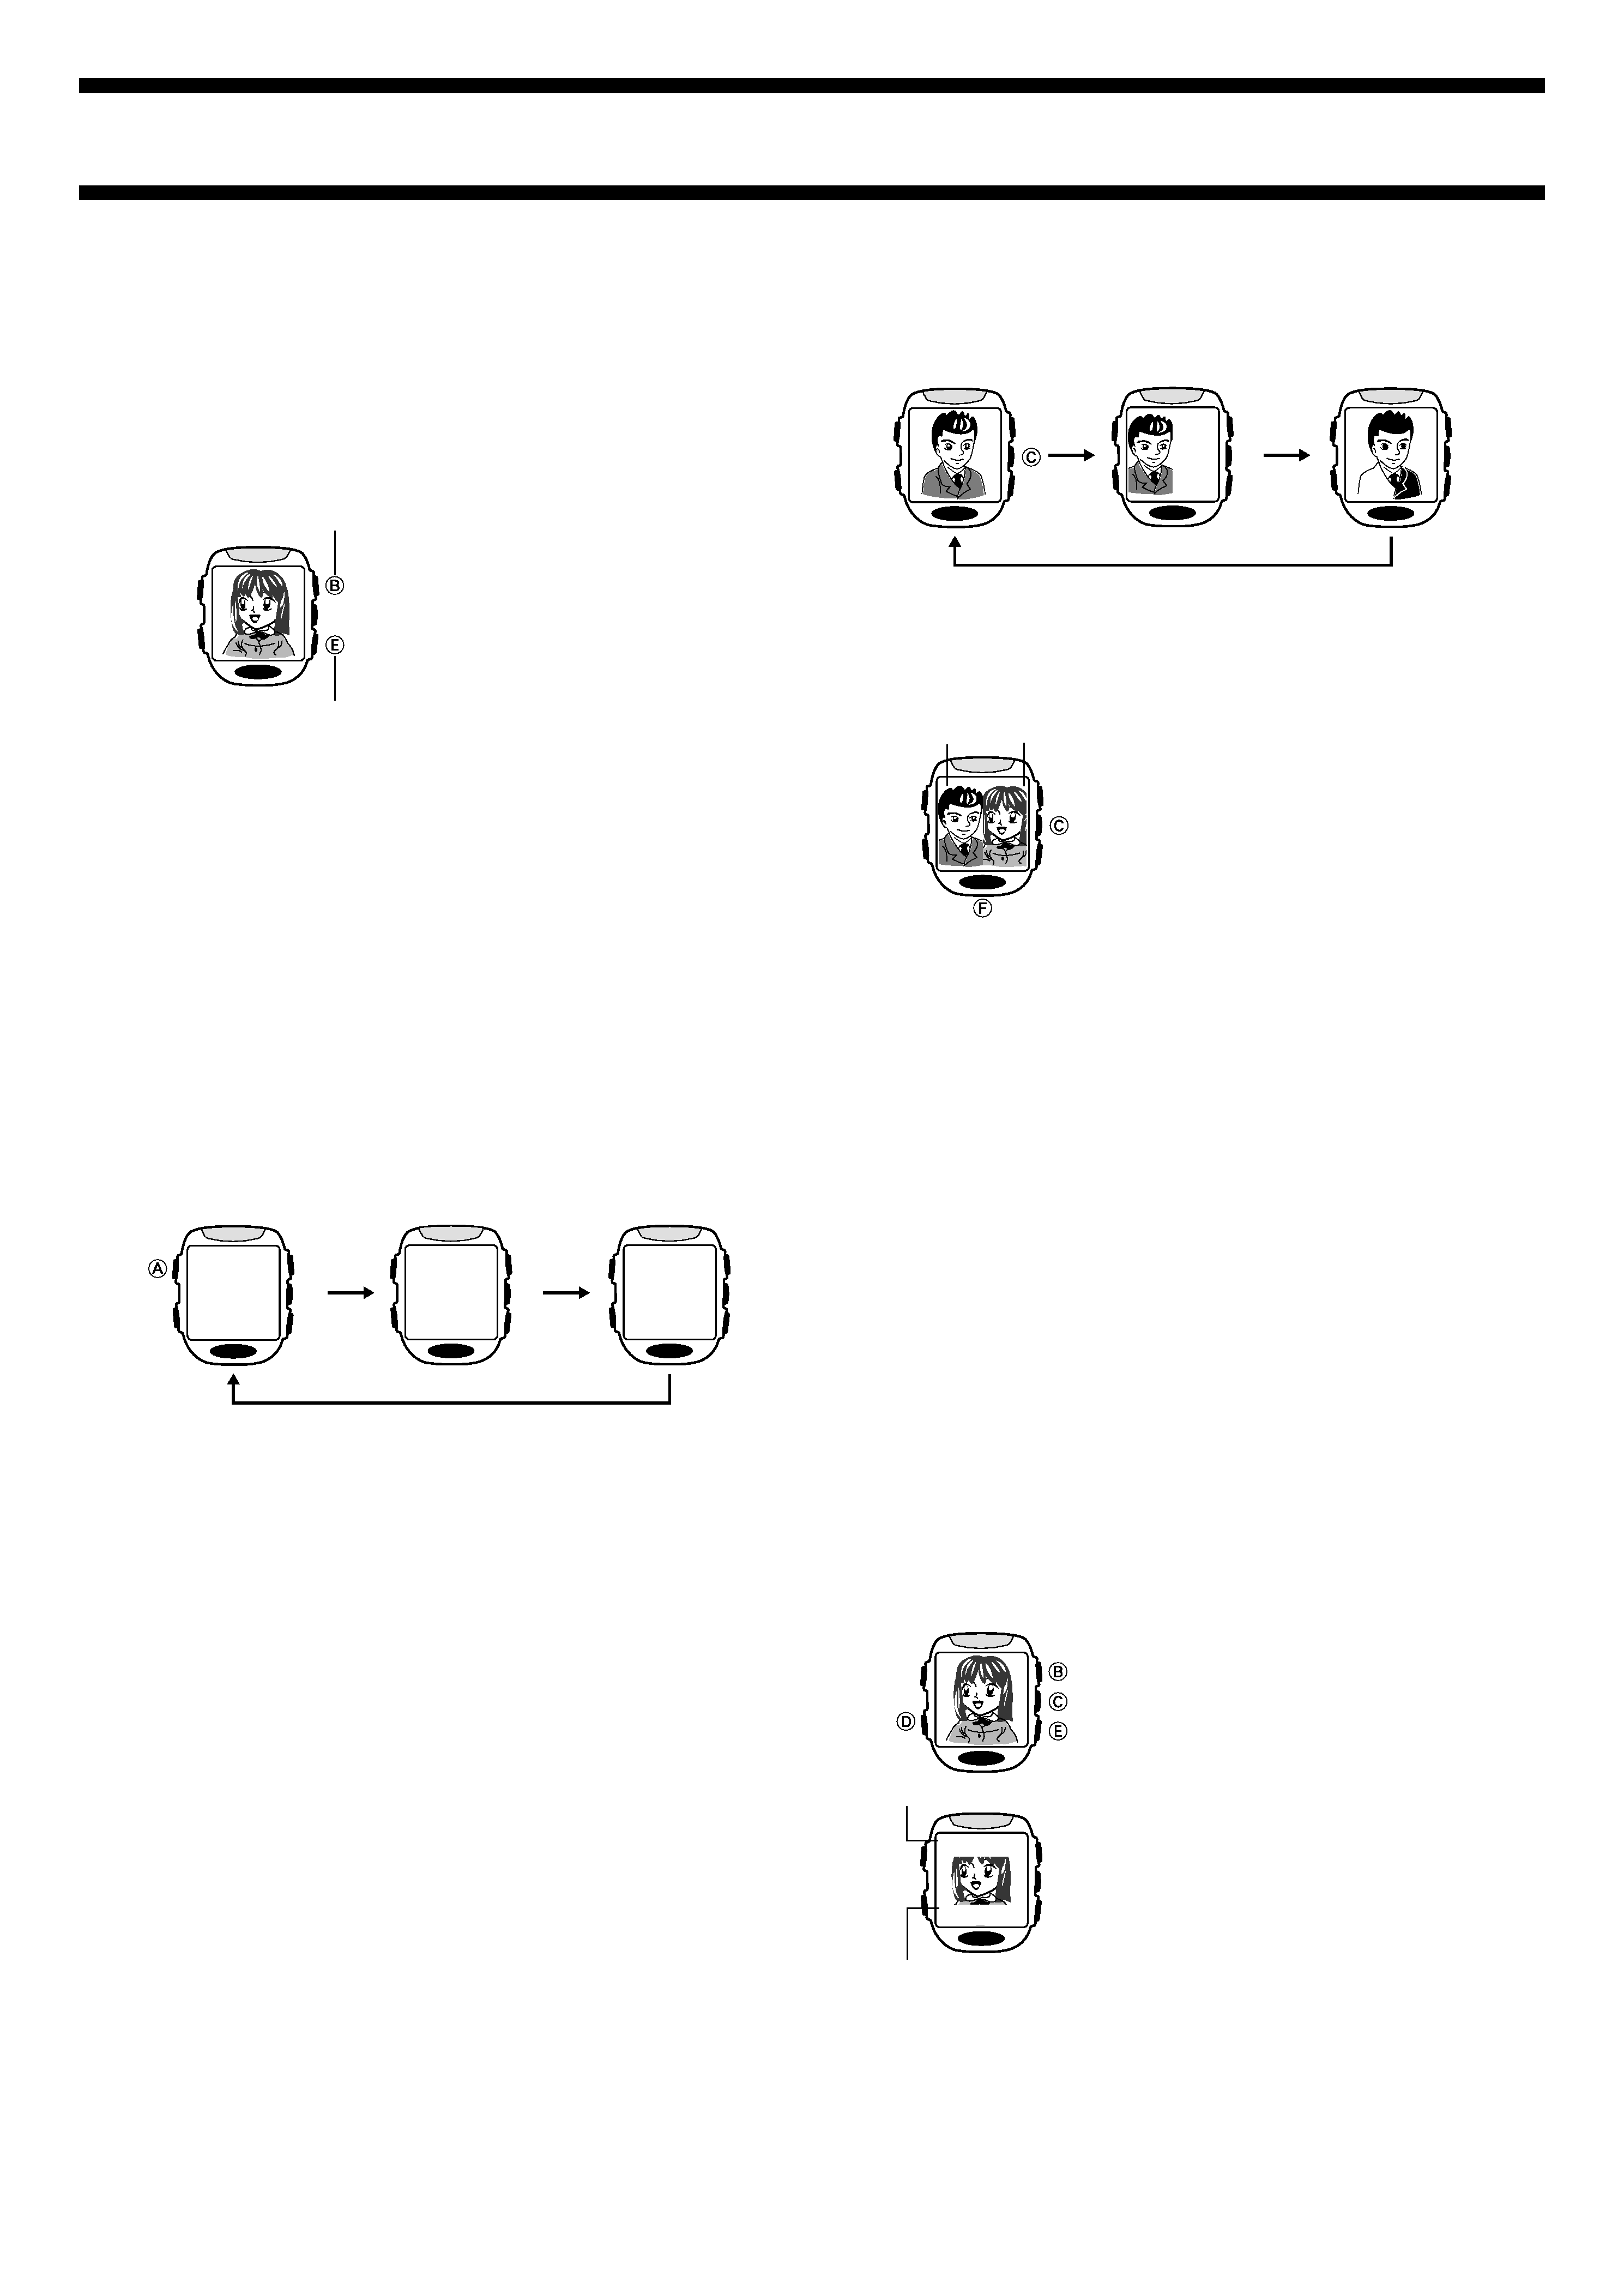
To select the recording mode
In the Camera Mode, press C to cycle through the available recording
modes as shown below.
· The recording mode you select remains in effect until you change it or exit
the Camera Mode. The Normal Mode is the initial default whenever you
enter the Camera Mode.
To record using the Merge Mode
1. In the Camera Mode, press C once to
select the Merge Mode.
2. Compose the first image, and then press
F to record it.
· This records the first image on the left half
of the display.
3. Compose the second image, and then
press F to record it.
· This records the second image on the right
half of the display, and stores both images
in memory.
Important!
· A Merge Mode image that has only a left side cannot be stored in memory.
Note
· Before pressing F in steps 2 and 3 of the above procedure, you can use
the procedure ("To adjust image brightness") to adjust the brightness of the
image.
To record using the Art Mode
1. In the Camera Mode, press C twice to select the Art Mode.
2. Compose the image, and then press F to record it.
Normal Mode
Merge Mode
Art Mode
Second
image
First
image
VISUAL DATABANKTM MODE
Besides viewing images, you can use the VISUAL DATABANK Mode to
delete images, to attach text to images, etc.
Important!
· The watch does not emit any alarm, Hourly Time Signal, or Countdown
Alarm sound while it is in the VISUAL DATABANK Mode. Instead, the
message ALM flashes in the upper left corner of the display when an alarm
time is reached, and the message TMR flashes when the countdown
reaches zero.
To view recorded images
1. In the Timekeeping Mode, press D to enter the VISUAL DATABANK
Mode.
· The first image that appears is the one you just recorded or the one that
was on the display when you last exited the Viewer Screen or the VISUAL
DATABANK Mode.
2. Use E (+) and B () to scroll through the
images currently in memory.
· Holding down either button scrolls at high
speed.
· Press C to toggle display of the recording
date and time (and attached text, if any) of
the displayed image on and off.
3. Press D five times to return to the
Timekeeping Mode.
· The watch automatically switches to the
Timekeeping Mode if you do not perform
any operation for about two minutes in the
VISUAL DATABANK Mode.
Note
· You can use the procedure under "Image Sorting" for information about
how images are sorted when they are stored in memory.
· The image may appear somewhat dark while the recording date and time
(and attached text, if any) are on the display.
ABE KEIKO
012-034-5678
2000. 6.30.
PM 10:05
Text
Recording
date and time
2220-4
SET
NAME
DEL
Pointer
DEL
ALL
PAGE
Attaching Text to an Image
You can use the following procedure to attach up to 24 characters of text for
each image.
To attach text to an image
1. In the VISUAL DATABANK Mode, use E
(+) and B () to display the image to
which you want to attach text.
2. Hold down A for about one second until
the SET menu appears.
· Make sure the pointer is next to NAME on
the menu.
3. Press F to display the text input screen.
4. Input the text you want.
· Use E (+) and B () to cycle through
available characters in the sequence shown
below at the current cursor location.
· Holding down either button scrolls at high
speed.
A to Z
Space
Press E.
Press B.
·
~_
?
:
.
--
,
0 to 9
&
'
()
E
B
· Use D (right) and C (left) to move the cursor.
5. After the text is the way you want, press A or F to save it.
Note
· The watch automatically stores any input text and exits the text input
screen if you do not perform any operation for about two minutes.
· See "To view recorded images" for information about showing and hiding
text attached to images.
Image Sorting
Images in watch memory are automatically sorted according to the first two
letters of their attached text (alpha characters
numbers symbols).
Images that do not have any attached text come last, sorted according to
their recording dates (oldest first).
· If multiple images have text that start with the same two characters, those
images are sorted according to their recording dates (oldest first).
Deleting Images
You can use the following procedures to delete a specific image or all images
currently stored in watch memory.
To delete all images in watch memory
1. In the VISUAL DATABANK Mode, hold
down A for about one second until the
SET menu appears.
2. Press E to move the pointer to DEL.
3. Press F to display the DEL (delete) menu.
SET
NAME
DEL
_
2000. 6.30.
PM 10:05
Cursor
4. Press F and a confirmation message
appears on the display.
5. If you really want to delete all images in
memory, press E to move the pointer to
YES and then press F. To clear the
confirmation message without deleting
anything, leave the pointer at NO and
press F.
· The message WAIT DEL ALL remains on
the display as the delete operation is in
progress. The message EMPTY appears
after the delete operation is complete.
6. After the EMPTY message appears, press D to enter the Alarm Mode or
F to enter the Camera Mode.
· If you do not perform any operation for about two minutes while the SET,
DEL, or ALL menu is on the display, the watch automatically exits the
menu and returns to the VISUAL DATABANK screen.
Note
· You can return to the normal VISUAL DATABANK Mode during the above
procedure by pressing the A button at any point before actually deleting
the image in step 5.
To delete a specific image
1. In the VISUAL DATABANK Mode, use E (+) and B () to display the
image you want to delete.
2. Hold down A for about one second until the SET menu appears.
3. Press E to move the pointer to DEL.
4. Press F to display the DEL (delete) menu.
5. Press E to move the pointer to PAGE.
6. Press F and a confirmation message appears on the display.
7. If you really want to delete the image, press E to move the pointer to
YES and then press F. To clear the confirmation message without
deleting anything, leave the pointer at NO and press F.
· The message WAIT DEL PAGE remains on the display as the delete
operation is in progress. The watch automatically clears the message and
returns to the normal VISUAL DATABANK Mode after the delete operation
is complete.
Note
· You can return to the normal VISUAL DATABANK Mode during the above
procedure by pressing the A button at any point before actually deleting
the image in step 7.
ALL
NO
YES
TIMEKEEPING MODE
The Timekeeping Mode is the default mode of
the watch when you are not recording images,
using the stopwatch, etc.
· You can use the Viewer Screen to view
images in watch memory.
· See "To set the time and date" for
information about setting the time and date,
and for selecting either 12-hour or 24-hour
timekeeping.
To reset the seconds count to zero
1. In the Timekeeping Mode, hold down A for about one second until the
seconds digits start to flash on the display. This indicates the setting
screen.
2. Press E to reset the seconds count to 00.
· Pressing E while the seconds count is in the range of 30 to 59 resets the
seconds to 00 and add 1 to the minutes. In the range of 00 to 29, the
minutes count is unchanged.
3. Press A to exit the setting screen and return to the Timekeeping Mode.
Note
· The watch automatically exits the setting screen if you do not perform any
operation for about two minutes.
To switch between Timekeeping Mode screen formats
In the Timekeeping Mode, each press of C toggles between the two screen
formats shown below.
FRI 3
P
1:58
35
PM indicator
Day of the week
Day
Hour : Minutes
Seconds
FRI 3
P
1:58
35
6
-
3
P
1:58
35
L
L
Day of the week
Day
Month
Day
2220-5
Using the Viewer Screen
The press of a button in the Timekeeping Mode displays the Viewer Screen,
which you can use to view images stored in memory.
Important!
· The watch does not emit any alarm, Hourly Time Signal, or Countdown Alarm
sound while the Viewer Screen is on the display. Instead, the message ALM
flashes in the upper left corner of the display when an alarm time is reached,
and the message TMR flashes when the countdown reaches zero.
To display the Viewer Screen
1. In the Timekeeping Mode, press E or B
to display the image that was on the
display the last time you exited the Viewer
Screen or the VISUAL DATABANK Mode.
2. Use E (+) and B () to scroll through the
images in memory.
· Holding down either button scrolls at high
speed.
· Hold down C to view the recording date
and time of the displayed image, and text
attached to the image, if there is any.
· The image may appear somewhat dark
while recording date and time (and attached
text, if any) are on the display.
3. To close the Viewer Screen and return to
the Timekeeping Mode display, press D.
· The watch automatically exits the Viewer
Screen if you do not perform any operation
for about 15 seconds.
To adjust image contrast
1. In the Timekeeping Mode, press E or B to display the Viewer Screen.
2. Press A to display the current image contrast setting value in the upper
left corner of the display.
3. Use B (darker) and E (lighter) to adjust the contrast to any one of the
15 available levels.
4. After the contrast setting is the way you want, press A to apply the
setting and exit the setting screen.
Note
· The above procedure affects the contrast of images only. See "Contrast
Adjustment" for information about adjusting the contrast of other screens.
ABE KEIKO
012-034-5678
2000. 6.30.
PM 10:05
Text
Recording date
and time
AL2
A
12:
OFF
Alarm time
(Hour : Minutes)
Alarm name
(Alarm 2)
AL2
A
12:
ON
ALARM MODE
You can use the Alarm Mode to set five
independent alarms. You can also turn on an
Hourly Time Signal that causes the watch to
beep every hour on the hour.
Important!
· The watch does not emit any alarm or
Hourly Time Signal sounds while it is in the
Camera Mode, VISUAL DATABANK Mode,
or IR Mode, or while the Timekeeping
Mode's Viewer Screen is on the display.
· In the case of the VISUAL DATABANK
Mode and Viewer Screen, the message
ALM flashes in the upper left corner of the
display when an alarm time is reached.
To set the alarm time
1. In the Alarm Mode, use E (+) and B () to display the screen for the
alarm whose time you want to set.
Alarm 1
(AL1)
Alarm 2
(AL2)
Alarm 5
(AL5)
Alarm 4
(AL4)
Alarm 3
(AL3)
Hourly Time Signal
(SIG)
2. After you select an alarm, hold down A
until the hour digits of the alarm time start
to flash on the display.
· The hour digits are flashing because they
are
selected.
· This operation automatically turns on the
alarm.
The on/off
status of each
alarm is
indicated here.
Hourly time
Signal on
indicator
Alarm on indicator
3. While the hour setting is flashing, use E (+) and B () to change it.
· Holding down either button changes the setting at high speed.
· When setting the alarm time using the 12-hour format, take care to set the
time correctly as am (A indicator) or pm (P indicator).
4. Press D so that the minute digits of the alarm time start to flash.
· Each press of D moves the flashing between Hour and Minutes.
5. While the minutes setting is flashing, use E (+) and B () to change it.
· Holding down either button changes the setting at high speed.
6. Press A to exit the setting screen.
Note
· The watch automatically exits the setting screen if you do not perform any
operation for about two minutes.
Daily Alarm Operation
The alarm sounds at the preset time each day for about 20 seconds, or until
you stop it by pressing any button.
To test the alarm
In the Alarm Mode, hold down C to sound the
alarm.
To turn a daily alarm and the Hourly
Time Signal on and off
1. In the Alarm Mode, use E (+) and B ()
to display an alarm screen or the Hourly
Time Signal screen.
2. When the alarm or Hourly Time Signal you
want is selected, press C to turn it on and
off.
· The alarm on indicator and the Hourly Time
Signal on indicator are shown on the display
in the Timekeeping, Alarm, Countdown
Alarm, and Stopwatch Modes.
· If any alarm is on, the alarm on indicator is
shown on the display.
COUNTDOWN ALARM MODE
The Countdown Alarm Mode lets you set a start time of up to 60 minutes. A
Countdown Alarm sounds when the countdown reaches zero.
Important!
· The watch does not emit the Countdown Alarm sound while it is in the
Camera Mode, VISUAL DATABANK Mode, or IR Mode, or while the
Timekeeping Mode's Viewer Screen is on the display.
· In the case of the VISUAL DATABANK Mode and Viewer Screen, the
message TMR flashes in the upper left corner of the display when the end
of the countdown is reached.
To set the countdown start time
1. In the Countdown Alarm Mode, hold down
A until the minutes setting of the
countdown alarm start to flash.
2. While the minutes setting is flashing, use
E (+) and B () to change it.
· Holding down either button changes the
setting at high speed.
3. Press A to exit the setting screen.
Note
· The watch automatically exits the setting screen if you do not perform any
operation for about two minutes.
Using the Countdown Alarm
· Each press of E starts and stops the
countdown.
· The time is counted down on the display in
one-second increments.
· Pressing B while a countdown is stopped
resets the countdown to the countdown start
time.
· When the countdown reaches zero, an
alarm sounds for about 10 seconds or until
you stop it by pressing any button.
TMR
6'
TMR
2'59
Seconds
Minutes
AL2
A
12:
ON