
200 Watts
50 Watts RMS
Supérieure à 50 Watts RMS par haut parleur
4 ohms
35 32.000 Hz
90 dB/W(1m)
62 Hz
0,55
5,1
0,62
13,5 litres (0,48 pied cubique)
12,3 g (0,43 oz)
1,6 kg (3livres, 8,4 onces)
®
R
OWNER'S MANUAL
Please read before using this equipment.
MODE D'EMPLOI
Veuillez lire ce mode d'emploi avant la mise en service de
l'appareil.
05-30-997-00
68P11199Y16-O
Printed in Singapore (T)
ALPINE ELECTRONICS, INC.
Tokyo Office : 1-1-8 Nishi Gotanda,
Shinagawa-ku, Tokyo 141, Japan
Tel. : (03) 3494-1101
ALPINE ELECTRONICS OF AMERICA, INC.
19145 Gramercy Place,Torrance,
California 90501, U.S.A.
Tel. : 1-800-ALPINE-1 (1-800-257-4631)
ALPINE ELECTRONICS OF CANADA, INC.
Suite 203, 7300 Warden Ave. Markham,
Ontario L3R 9Z6, Canada
Tel. : 1-800-ALPINE-1 (1-800-257-4631)
ALPINE ELECTRONICS OF AUSTRALIA PTY. LTD.
6-8 Fiveways Boulevarde Keysborough,
Victoria 3173, Australia
Tel. : (03) 9769-0000
ALPINE ELECTRONICS GmbH
Brandenburger Strasse 2-6 D-40880 Ratingen,
Germany
Tel. : 02102-45 50
ALPINE ITALIA S.p.A.
Via C. Colombo 8, 20090 Trezzano Sul
Naviglio Ml, Itary
Tel. : 02-48 40 16 24
ALPINE ELECTRONICS FRANCE S.A.R.L.
(RCS PONTOISE B 338 101 280)
98, Rue De La Belle Etoile, Z.I. Paris Nord ll
B.P. 50016 F-95945, Roissy,
Charles de Gaulle Cedex, France
Tel. : 01-48 63 89 89
ALPINE ELECTRONICS OF U.K., LTD.
13 Tanners Drive, Blakelands,
Milton Keynes MK14 5BU, U.K.
Tel. : 01908-61 15 56
ALPINE ELECTRONICS DE ESPAÑA, S.A.
Portal De Gamarra 36, Pabellón 32
01013 Vitoria (Alava) - Apdo. 133, Spain
Tel. : 34-45-283588
This Alpine component system uses woofers incorporating a newly developed Dualgap Direct Drive
(DDDrive) system in their magnetic circuit. The DDDrive system has garnered acclaim in the audio
world for succeeding in reducing distortion in the magnetic circuit to below measurable limits.
Combined with the very rigid hybrid mica diaphragm, DDDrive speakers produce crystal clear,
distortion-free, powerful sound that conventional speakers cannot match. A custom mounting kit is
included with this system. This allows Alpine's tweeters to be easily installed in a variety of locations
for surface mounting, flush mounting, etc. The crossover networks are made from carefully selected,
electrical components to optimize the performance of the tweeter-woofer combination. Gold plated
terminals add the final touch to this exceptional component system.
Ce système composé ALPINE utilise woofers avec un système à commande directe (DDDrive) de
double espace interbloc, récemment développé, dans son circuit magnétigue. Le système DDDrive a
recueilli acclamations dans le monde audio pour avoir réussi à diminuer la distorsion dans le circuit
magnétigue au-dessous des limites mesurables. De plus, en utilisant une plaqus de vibration de mica
hybride pure, les hauts-parleurs DDDrive produisent un son plus transparent, sans distorsion et plus
puissant que celui des haut-parleurs conventionnels.
Un jeu de montage ordinaire est fourni avec ce système. Celui-ci vous permet un montage aisé des
tweeters ALPINE dans divers emplacements: montage en surface, montage à ras etc.
Les circuits diviseurs de fréquence ont des composants électriques soigneusement sélectionnés pour
améliorer le rendement de la combinaison tweeter-woofer. Des bornes plaquées-or ajoutent une
touche finale à ce système composé exceptionnel.
FEATURES / CARACTÉRISTIQUES
WIRING CONNECTION/CONNEXION DU CÂBLAGE
Use high quality speaker wire for connections between the amplifier and network. For connections
between the network and speaker, use the cables supplied with the speakers.
The polarity marks (+and-) are the absolute-phase indications determined by anechoic
measurements. Depending on the mounting location/position etc., reversed polarity connection may
produce better sound. Some experimentation is required for best results.
The network can adjust the sound level of the tweeter in 3 steps. Adjust it to the desired level.
Utiliser un câble haut-parleur de haute qualité pour les connexions entre l'amplificateur et le réseau.
Pour les connexions entre réseau et haut-parleur, utiliser le câblage fourni avec les haut-parleurs.
Les marques de polarité (+et-) sont indications de phase absolus, déterminée par mesurages
anéchoiques. Selon l'emplacement, position etc. de montage, une connexion de polarité inversé peut
produire un meilleur son.
Quelqus expérimentation est requise pour obtenir de meilleurs résultats.
·
·
·
·
·
·
SPECIFICATIONS / FICHE TECHNIQUE
Power Handling (Peak)..............................................................................................................
Power Handling (Continuous).............................................................................................
Recommended Amplification.................................................................
Impedance.....................................................................................................................................
Frequency Response.........................................................................................................
Sensitivity..............................................................................................................................
Woofer Free Air Resonance (Fo)......................................................................................................
Woofer Qts..........................................................................................................................................
Woofer Qms..........................................................................................................................................
Woofer Qes.........................................................................................................................................
Woofer Vas.............................................................................................................
Total Moving Mass............................................................................................................
Net Weight (Per Pair)..................................................................................................
Design and specifications are subject to change without notice.
La fiche technique et la conception son sujet de changement sans préavis.
Charge nominale (Pointe)..........................................................................................................
Charge nominale (Continue)...............................................................................................
Amplification recommandée...............................................
Impédance.....................................................................................................................................
Réponse de fréquence.......................................................................................................
Sensibilité.............................................................................................................................
Résonance à l'air libre du woofer (Fo)..............................................................................................
Qts du woofer......................................................................................................................................
Qms du woofer......................................................................................................................................
Qes du woofer.....................................................................................................................................
Vas du woofer..............................................................................................
Total de masse mouvementée..........................................................................................
Poids net (une paire).........................................................................................
200 Watts
50 Watts RMS
Up to 50 Watts RMS per speaker
4 ohms
35 32,000 Hz
90 dB/W(1m)
62 Hz
0.55
5.1
0.62
13.5 liters (0.48 cu. ft.)
12.3 g (0.43 oz)
1.6 kg (3lbs. 8.4 oz)
DDC-F17B
Component 2 Way DDDrive Speaker System
Tech Wah Paper
108 International Road,
Singapore 62917
TWEETER LEVEL HIGH / POINT HAUT DU NIVEAU DU HAUT-PARLEUR AIGU
IN
WF
Tw
HIGH
MID
LOW
Note : Make connections properly, using the wire label.
Transparence/
Transparent
Transparence/Black stripe
Transparent/Raie noire
Transparence/Transparent
Transparence/Blue stripe
Transparent/Raie bleue
Tweeter
/Tweeter
Woofer
/Woofer
AMP
c
b
c b c b c b
b
c
FREQUENCY RESPONSE CURVE
COURBE DE RÉPONSE DE FRÉQUENCE
FREQUENCY (Hz)/FRÉQUENCE (Hz)
RESPONSE
IN
dB/W
(1m)
0
-10
-20
-30
-40
dB
20
50
100
200
500
1K
2K
5K
10K
20K
HIGH
MID
LOW
Your purchase of this fine ALPINE product, is evidence of your demand for excellence in your audio
system. We thank you supporting our efforts to this end. Before using this product, carefully read the
Owner's Manual and then store it with the Warranty card in an easy to find location.
Votre achat de ce produit de précision ALPINE est témoignage de votre demande de qualité pour
votre système audio. Nous vous remercions pour votre support à nos efforts dans ce but. Avant
d'utiliser ce produit, lire attentivement le mode d'emploi et après, rangez-le avec la carte de garantie
dans un endroit facile de retrouver.
INPUT
WOOFER
TWEETER
CROSSOVER NETWORK
INPUT
WOOFER
TWEETER
CROSSOVER NETWORK
å Network unit/Réseau..................................................................x2
ç Screw (ø4X20mm)/
Vis (ø4X20mm)...........................................................................x4
é Speed nut flat type/
Écrou de vitesse type plat...........................................................x4
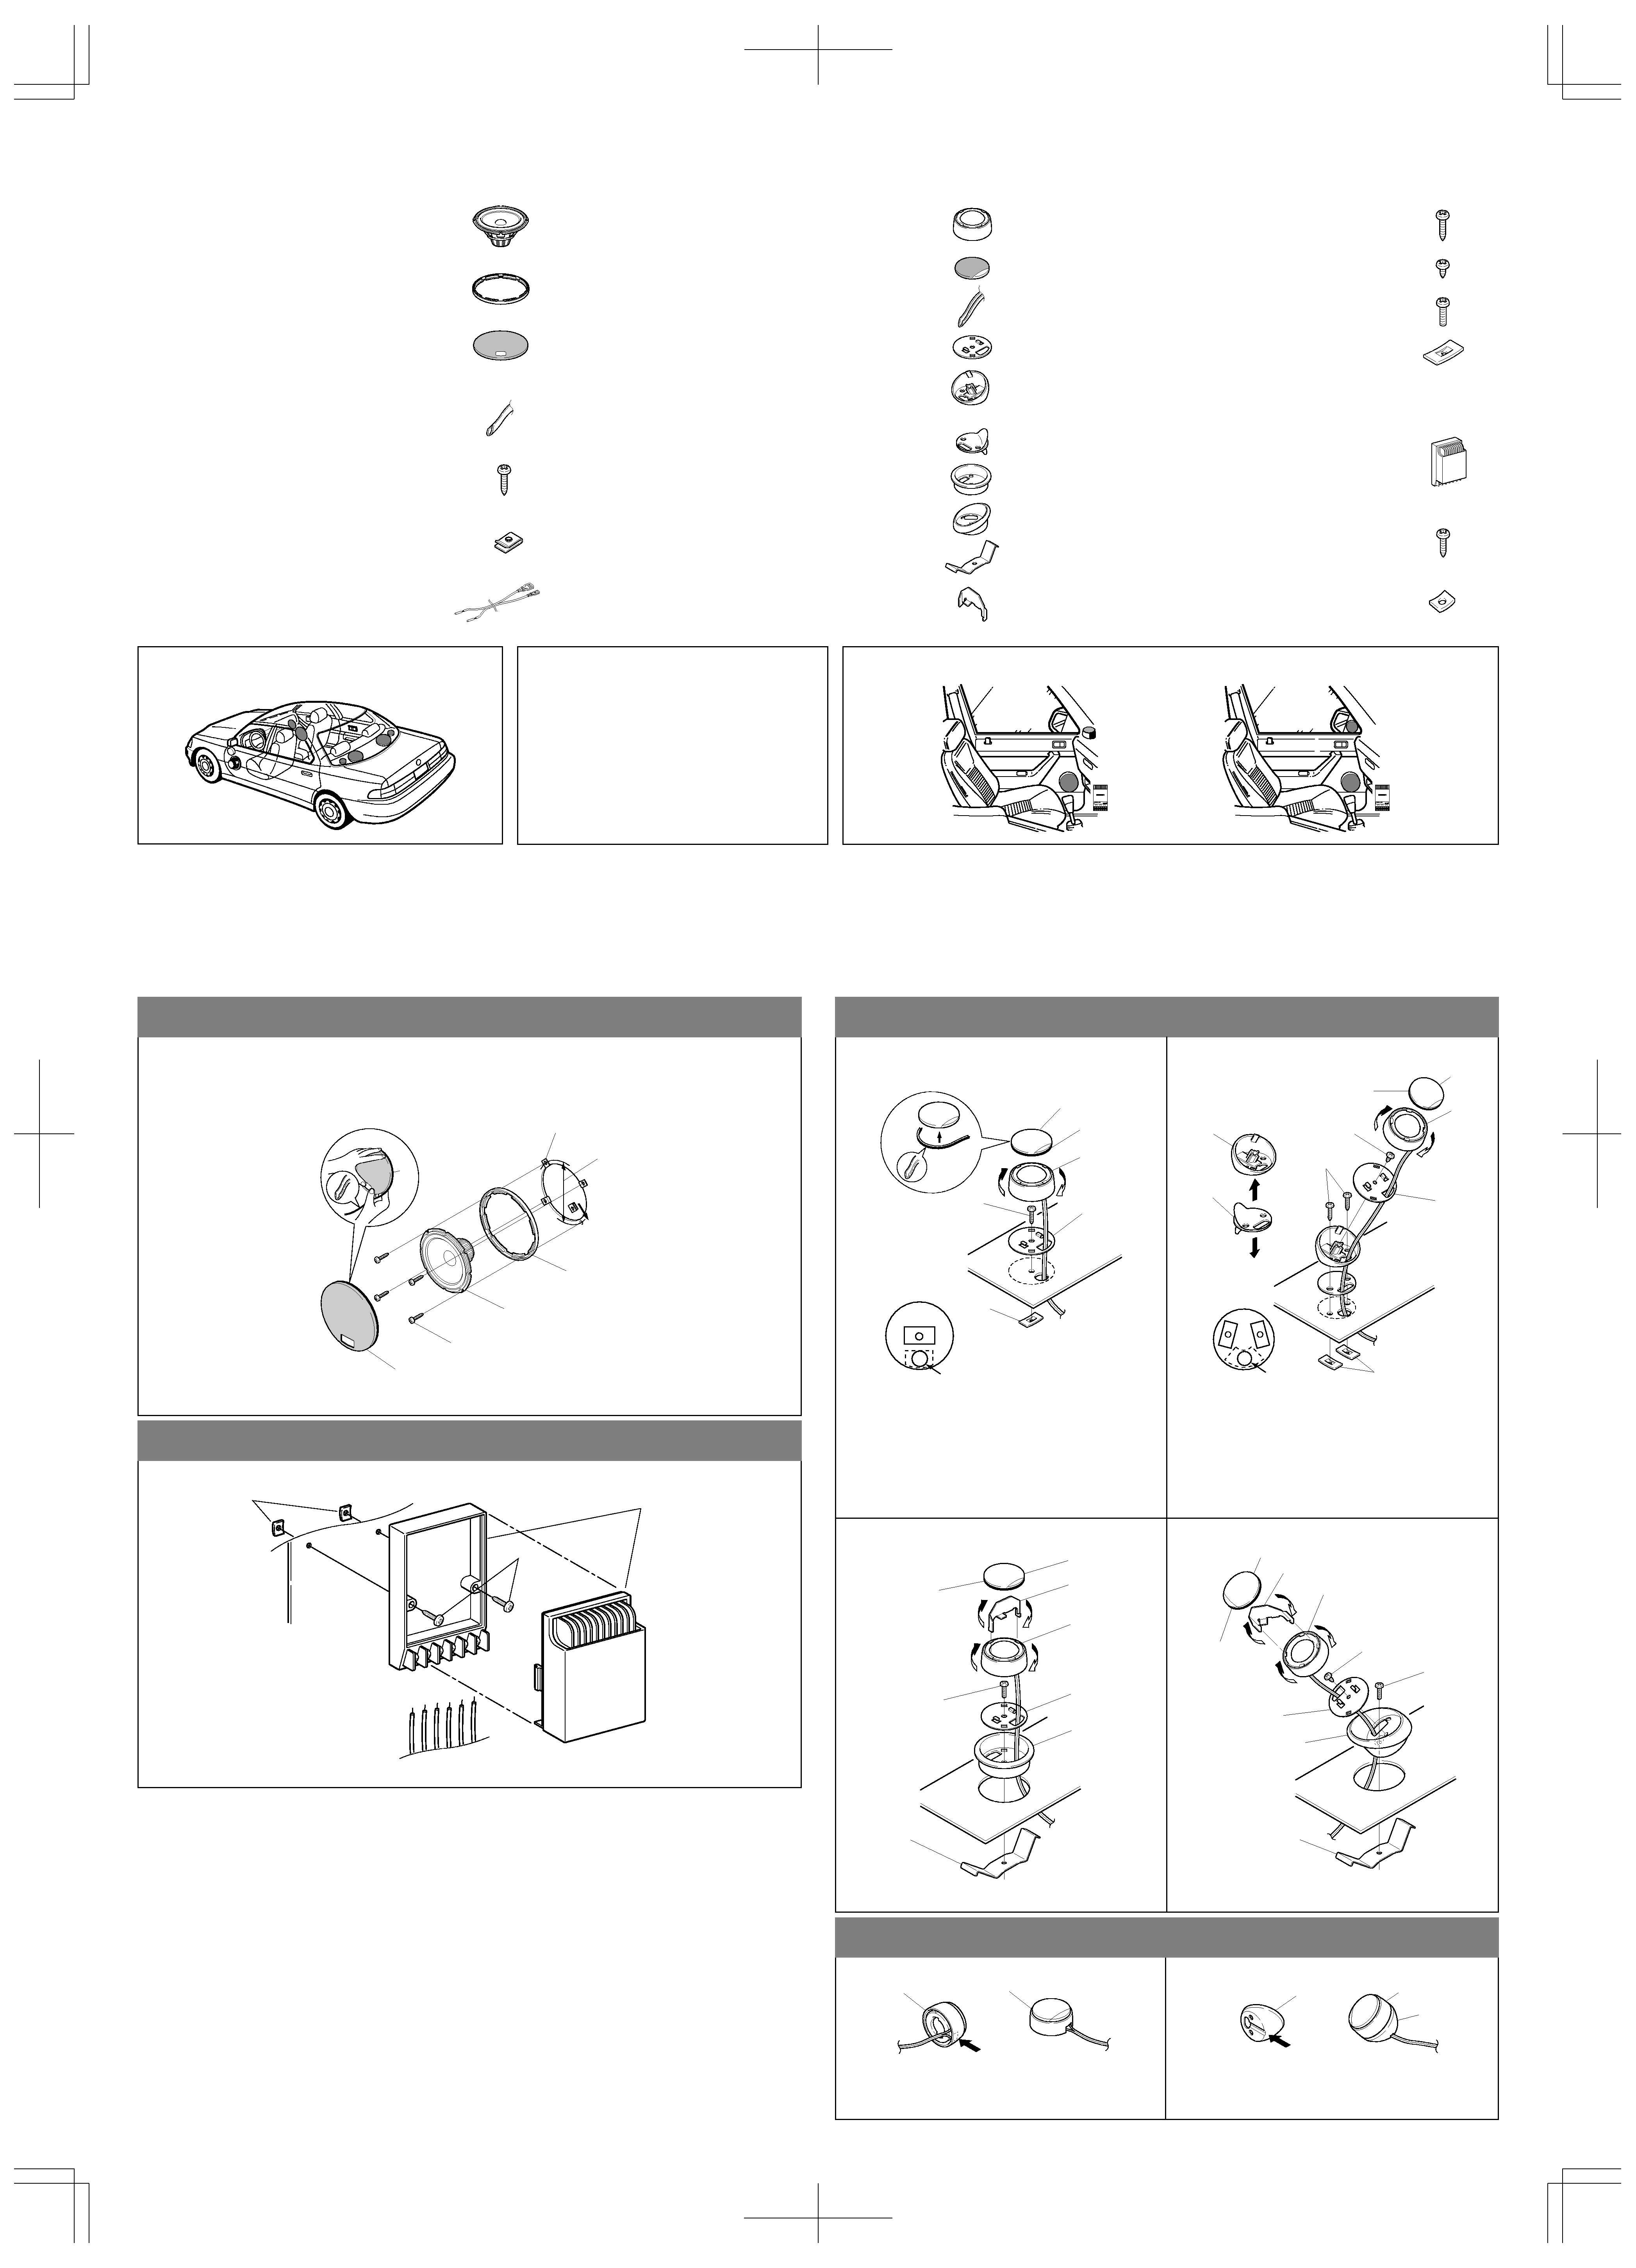
s Contents/Contenu
Use the template
A/Utiliser le gabarit A
For Woofer Mounting/Pour Montage du Woofer
1 Speaker unit (for woofer use)/
Haut parleur (pour woofer usage)...............................................x2
2 Grille/Grille..................................................................................x2
3 Metal net (for woofer use)/Réseau de mailles
métalliques (pour woofer usage)................................................x2
4 Rubber pad (for woofer use)/Coussin en
caoutchouc (pour woofer usage)................................................x2
5 Screw (ø4X25mm)/
Vis (ø4X25mm)...........................................................................x8
6 Speed clip U type/
Attache de vitesse type U...........................................................x8
7 OFC SP wire/OFC SP câble.......................................................x2
For Tweeter Mounting/Pour Montage du Tweeter
8 Speaker unit (for tweeter use)/
Haut parleur (pour tweeter usage)..............................................x2
9 Metal net (for tweeter use)/Réseau de
mailles métalliques (pour tweeter usage)...................................x2
Ä Rubber pad (for tweeter use)/Coussin en
caoutchouc (pour tweeter usage)...............................................x2
Å Bracket A/Support de montage A............................................x2
Ç Slant spacer/L'écarteur d'inclinaison..........................................x2
É Sponge cushion (Double side adhesive tape
included)/Coussin en éponge (Bande
adhésive à deux faces fournie)...................................................x2
Ñ Flush mount cup/Coup de montage encastré.............................x2
Ö Angle flush mount cup/
Coup de montage à angle encastré............................................x2
Ü Spring Bracket B/Support de rondelle B..................................x2
á Rotary tool for flush mount use/
Pièce de tournage pour montage encastré.................................x1
à Screw (ø4X25mm)/
Vis (ø4X25mm)...........................................................................x4
â Screw (ø4X10mm)/
Vis (ø4X10mm)...........................................................................x2
ä Screw (M4X25mm)/
Vis (M4X25mm) .........................................................................x2
ã Speed nut flat type/Écrou de vitesse type plat...........................x4
s Mounting location/
Emplacement de montage
s Example of installation/Exemple d'installation
Caution
A Drill and some type of sheet metal cutter will
be necessary when mounting the unit. Be
careful when using these tools.
s Installation procedures/Instructions d'installation
Woofer installation procedure/Instructions d'installation du woofer
q Mounting on a 16 cm (ø156 mm) DIN pitch opening.
Montage sur une ouverture d'écartement DIN de 16 cm (ø156 mm).
Tweeter installation procedure/Instructions d'installation du tweeter
Angle mounting/Montage en angle
Surface mounting/Montage en surface
Flush mounting/Montage en encastré
Flush angle mounting/Montage en angle encastré
q Use the template D/Utiliser le gabarit D
Adjust the direction of the speed nut
ã so that it doesn't
hinder the hole to use when routing speaker leads.
Ajuster la direction de l'écrou de vitesse
ã de manière à ne
pas gêner le trou prévu pour guider les conducteurs de
haut-parleurs.
Use the template
C/Utiliser le gabarit C
Adjust the direction of the speed nut
ã so that it doesn't
hinder the hole to use when routing speaker leads.
Ajuster la direction de l'écrou de vitesse
ã de manière à ne
pas gêner le trou prévu pour guider les conducteurs de
haut-parleurs.
q
Cut the portion indicated by the arrow using diagonal cutters or
rotary tool.
Découper la portion indiquée par la flèche à l'aide d'une
coupeuse diagonale ou d'un outil rotatif.
q
Use the template
B/Utiliser le gabarit B
q
Surface mounting/ Montage en surface
Angle mounting/Montage en angle
Route out the wire through the channel indicated by the
arrow.
Conduire dehors le câble à travers le canal indiqué par la flèche.
Précaution
Une perforatrice et un type quelconque de
coupeuse métallique seront nécessaires au
moment du montage de l'unité. Être prudent
lors de l'usage de ces outils.
Note: Be careful not to touch the tweeter diaphragm during the installation.
Note: Put the narrower side of the rubber pad
Ä outside around the metal net 9.
Note: Put the narrower side of the rubber pad
4 outside around the metal net 3.
Nota: Mettre le côté arrondi du coussin en caoutchouc
4 au côté extérieur autour du mailles métallique 3.
Mettre le côté arrondi du coussin en caoutchouc
Ä au côté extérieur autour du mailles métallique 9.
Nota:
Faire très attention pour ne pas toucher le diaphragme du tweeter pendant l'installation.
Nota:
For Network mount/Pour montage de réseau
Ç
8
Ç
8
9
Ä
Å
á
Ñ
Ü
ä
8
9
Ä
Å
á
Ü
ä
â
Ö
8
9
Ä
Å
à
É
ã
Ç
â
Hole
When dressing the wire for surface mounting/Lors du dressage des câbles pour le montage en surface.
8
8
8
9
Ä
Å
à
ã
Hole
1
2
3
5
6
4
156mm
Network installation procedure/Instruction d'installation du réseau
é
å
ç
INPUT
WOOFER
TWEETER
CROSSOVER NETWORK
INPUT
WOOFER
TWEETER
CROSSOVER NETWORK