ENGLISH
OWNER'S RECORD
For your convenience, record the model number and serial number (you will
find on the rear of your set) in the space provided below. Please refer to
them when you contact your AIWA dealer in case of difficulty.
Model No.
IC-M84
Serial No.
PRECAUTIONS
To maintain good performance
· Do not use the unit in places which are extremely hot, cold, dusty or
humid.
In particular, do not keep the unit:
· in a high humidity area such as a bathroom
· near a heater
· in an area exposed to direct sunlight (inside a parked car, where there
could be a considerable rise in temperature)
· Keep cassette tapes, magnetic cards and other magnetic recorded
materials away from the speaker as the recorded information may be
erased or noise may occur on cassette tapes.
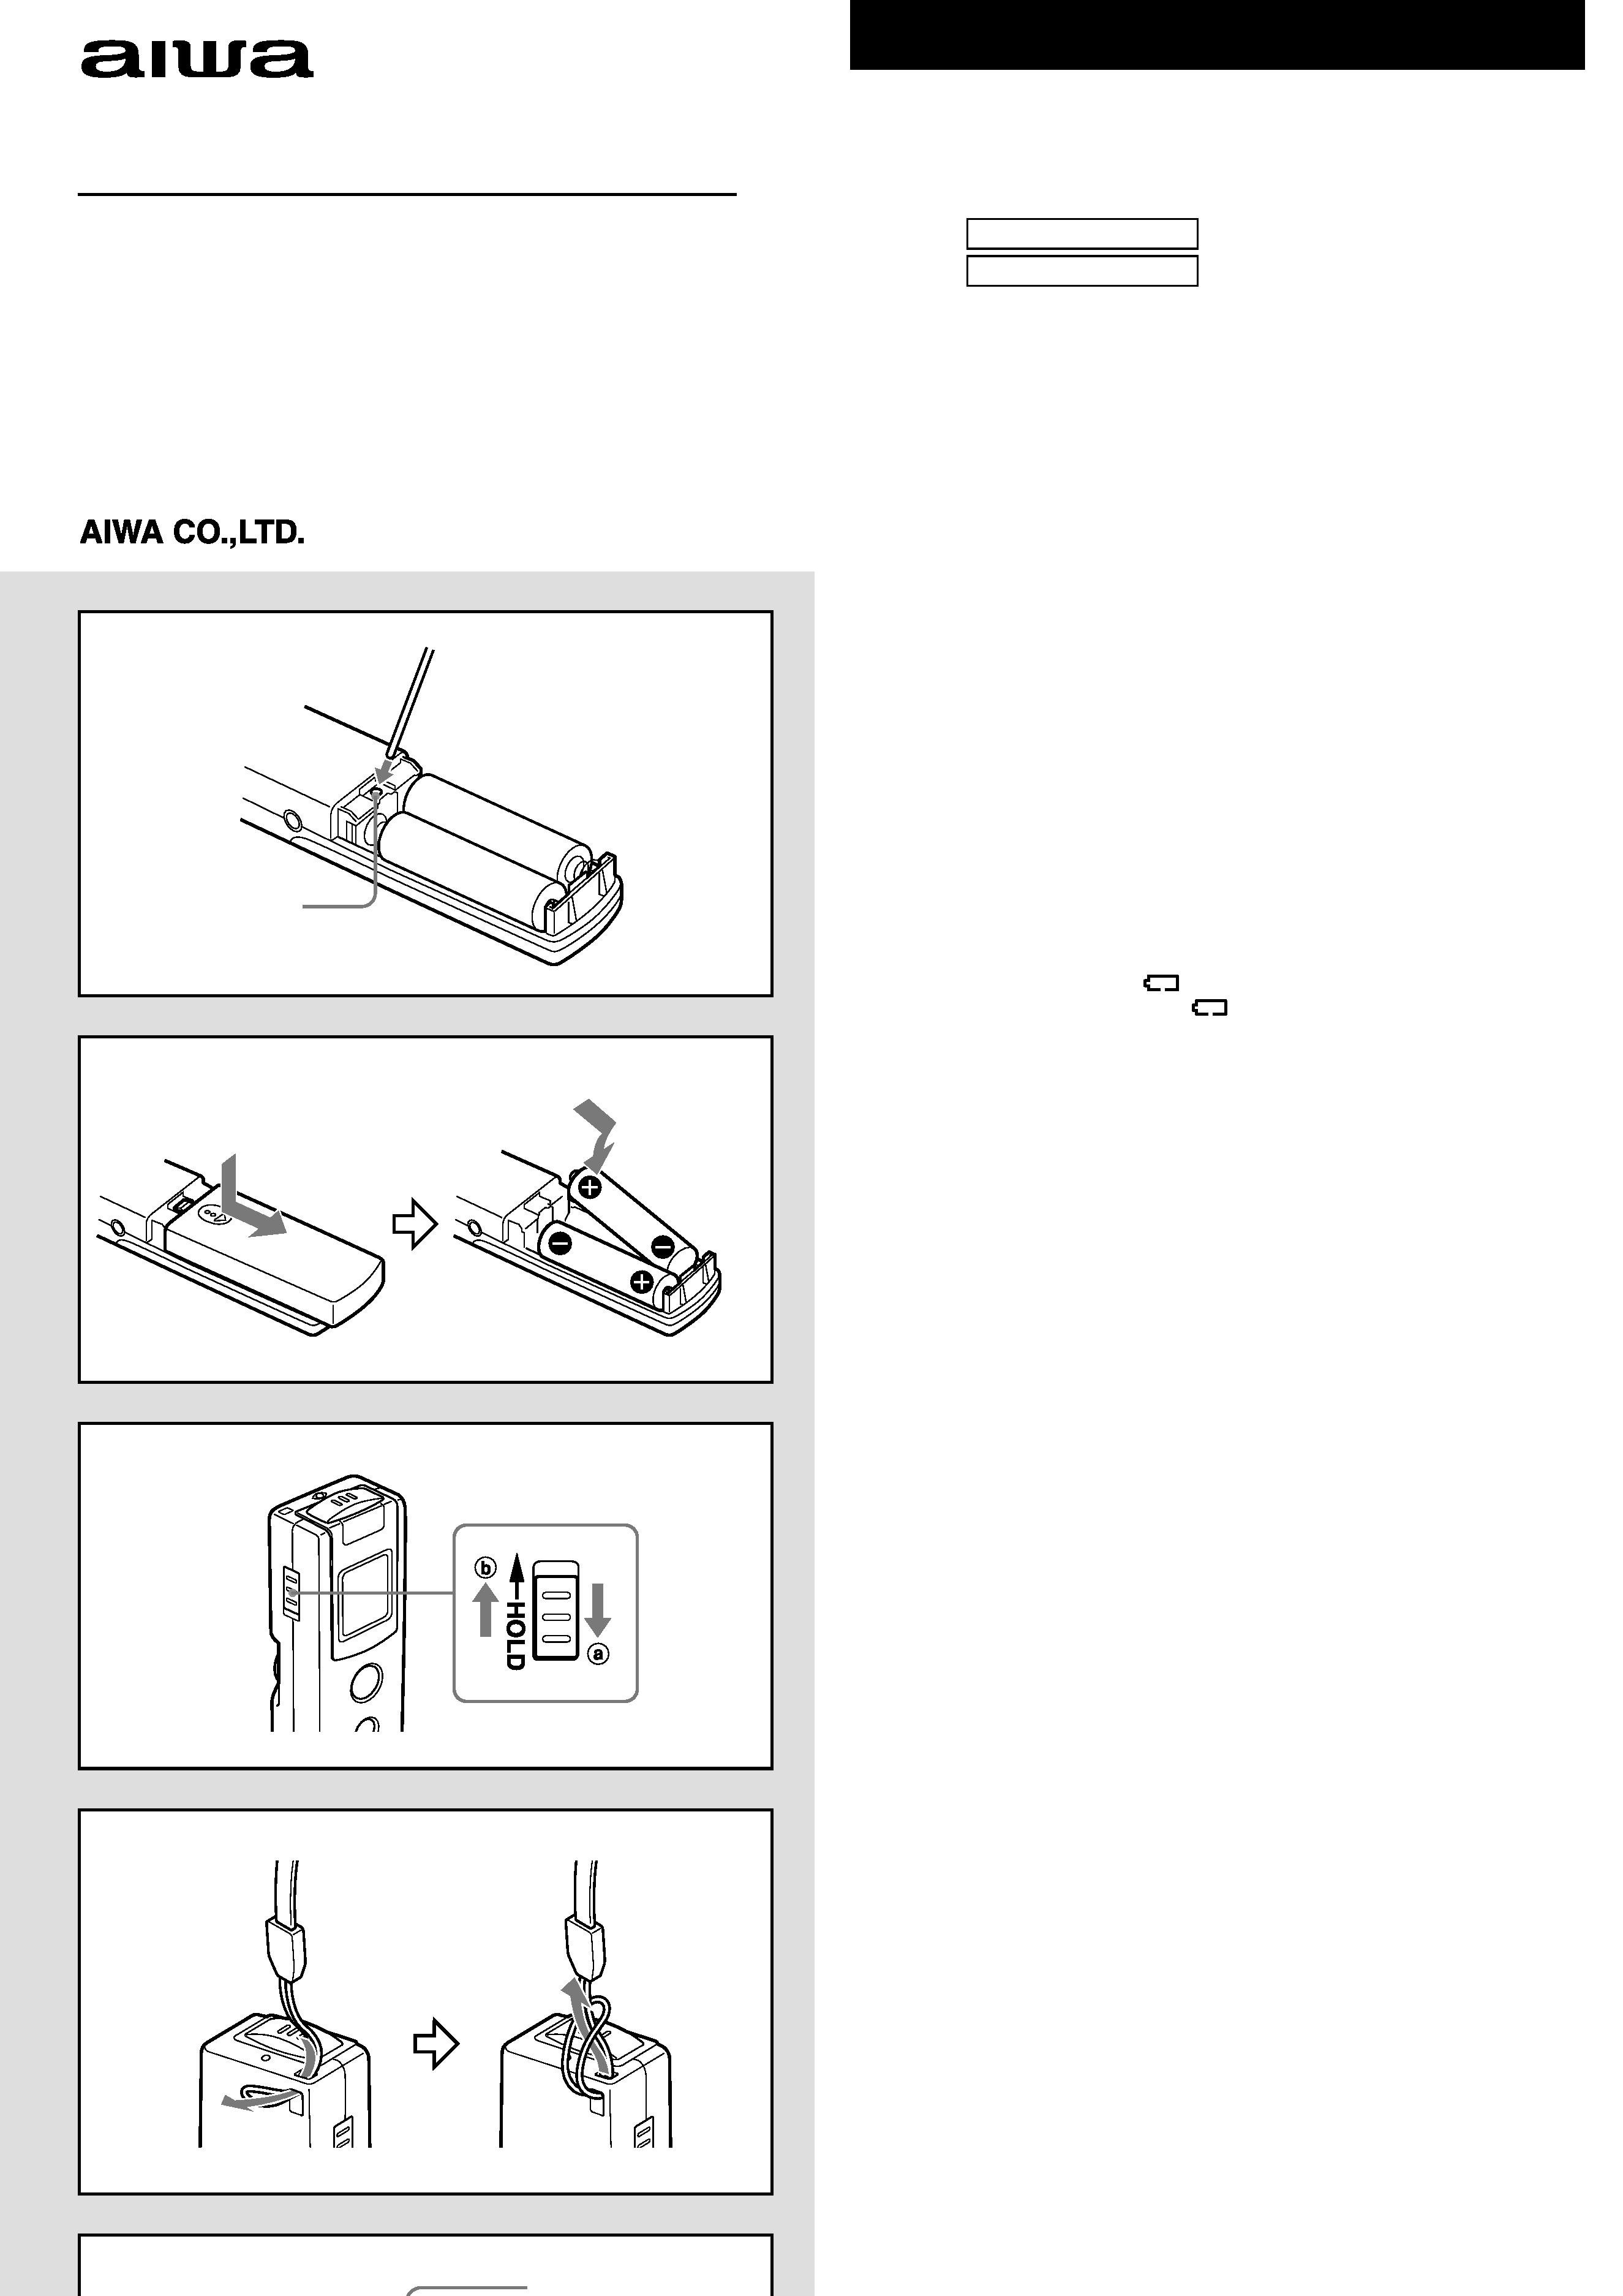
When an erroneous display or operation occurs b A
Reset the unit by pressing the RESET button inside the battery compartment
with a thin rod. Recordings are not erased when you reset the unit.
ATTENTION
Recordings may be erased when this unit is serviced.
INSERTING DRY CELL BATTERIES b B
Open the battery compartment and insert two size AAA (R03) batteries with
the
0 and 9 marks correctly aligned.
Battery replacement
Replace the batteries when
flashes in the display. Operation stops
automatically 20 seconds after the
starts flashing.
Note
After replacing the batteries, an erroneous display may occur. In this case
press the RESET button inside the battery compartment with a thin rod to
reset the unit . Recordings are not erased when you reset the unit.
b A
Note on dry cell batteries
· Make sure that the
0 and 9 marks are correctly aligned.
· Do not mix different types of batteries, or an old battery with a new one.
· To prevent the risk of electrolyte leakage or explosions, never recharge the
batteries, apply heat to them, or take them apart.
· When not using the batteries, remove them to prevent needless battery
wear.
· If liquid leaks from the batteries, wipe thoroughly to remove.
PREPARATION
HOLD switch b C
Release the HOLD switch before operation to activate the buttons.
b a
When not using the unit, set the HOLD switch to HOLD position.
b b
Accidentally pressed buttons will not function.
If a button is pressed when the HOLD switch is set to the HOLD position,
"hold" flashes in the display.
Turning on and off
Press REC/STOP,
c/sPLAY/STOP, MODE/PAUSE or FILE to turn on the
power. When
c/sPLAY/STOP is pressed, the power is turned on and
playback starts.
If no new operations are done within 1 minute from the last operation, the
power is turned off automatically (Auto Power off function).
To attach the hand strap b D
To clean the cabinet
Use a soft cloth lightly moistened with a mild detergent solution.
Do not use strong solvents such as alcohol, benzine or cleaner.
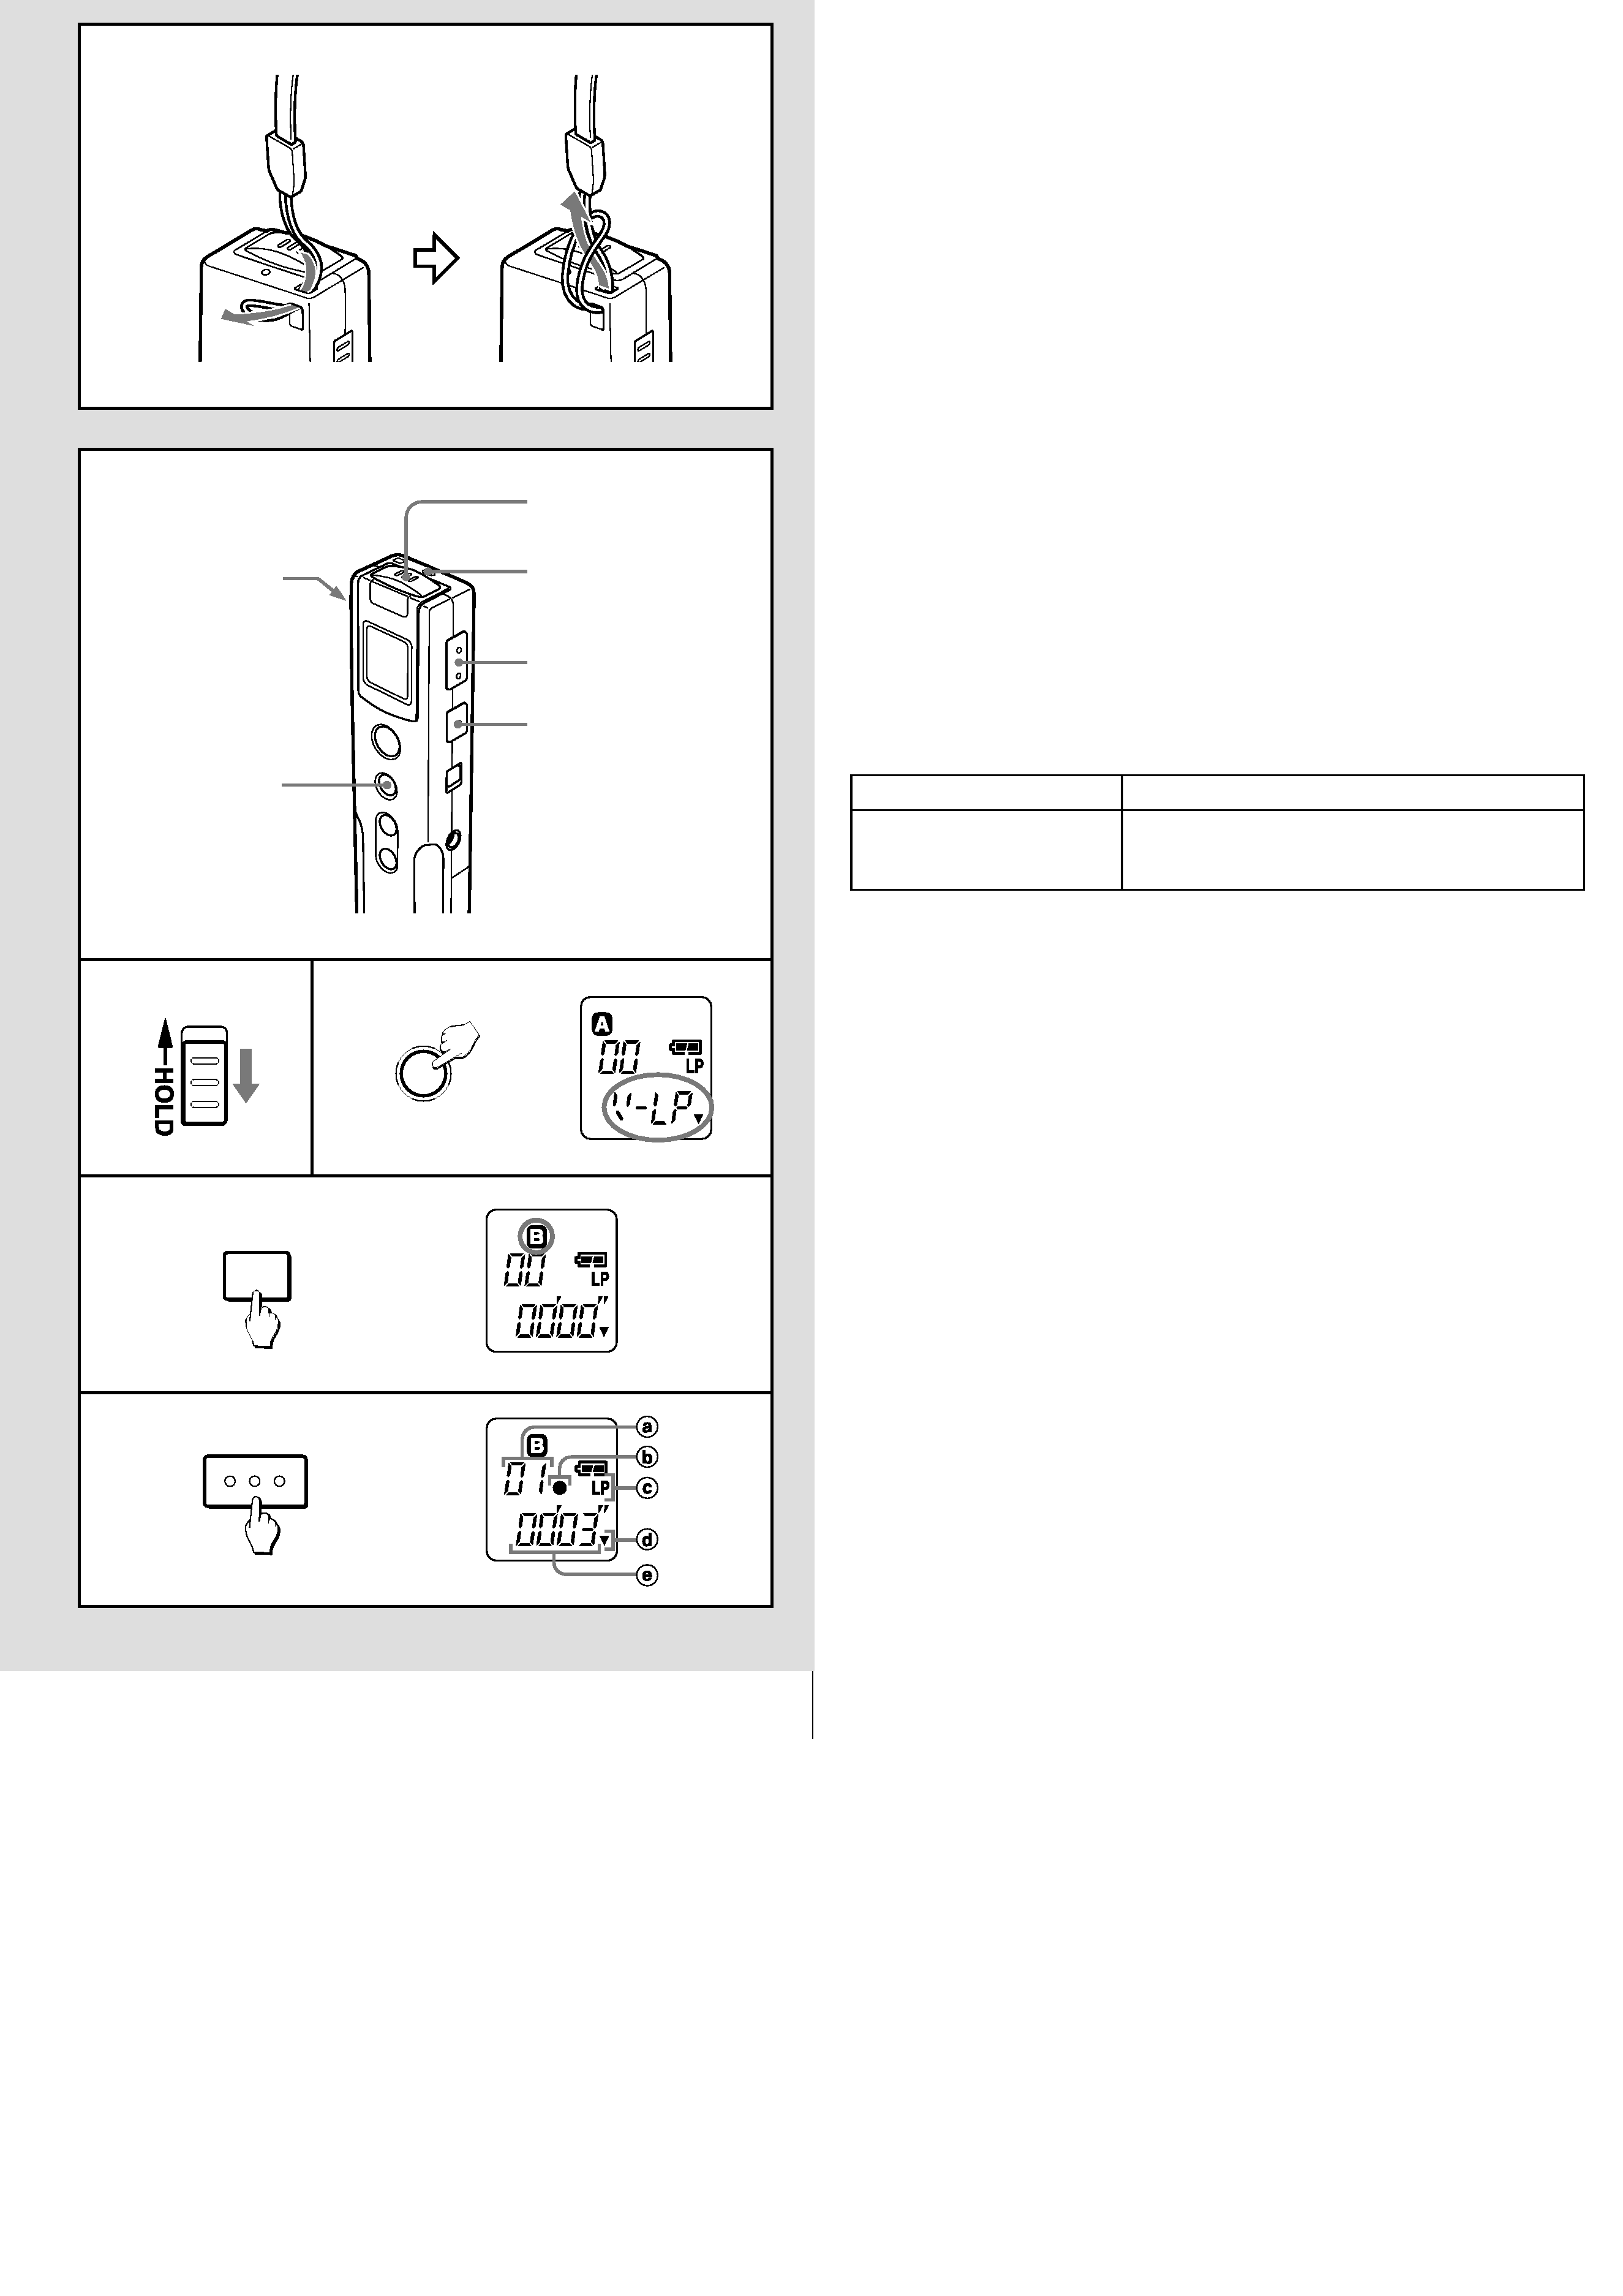
RECORDING FROM THE BUILT-IN MICROPHONE b E
This unit has 4 recording files (A, B, C and D). You can record in 100
recording tracks on each recording file.
1 Release the HOLD switch.
2 Press MODE/PAUSE repeatedly to select a recording mode.
SP:
You can record for up to about 59 minutes.
LP:
You can record for up to about 84 minutes.
V-SPk: You can record for up to about 59 minutes with the V-SENSOR
function.
V-LPk: You can record for up to about 84 minutes with the V-SENSOR
function.
Select SP to record the sound more clearly.
About the V-SENSOR function, please refer to "V-SENSOR function"
below.
3 P
FILE
t dl t
l
t
di
fil
IC-M84
IC RECORDER
GRABADOR EN CIRQUITO INTEGRADO
OPERATING INSTRUCTIONS
INSTRUCCIONES DE MANEJO
MODE D'EMPLOI
8A-HY7-901-01
000114AYO-OX
Printed in Korea
AAA (R03)
× 2
RESET
4
A
B
C
D
E
IC-M84(YU)ESF
To attach the hand strap b D
To clean the cabinet
Use a soft cloth lightly moistened with a mild detergent solution.
Do not use strong solvents such as alcohol, benzine or cleaner.
RECORDING FROM THE BUILT-IN MICROPHONE b E
This unit has 4 recording files (A, B, C and D). You can record in 100
recording tracks on each recording file.
1 Release the HOLD switch.
2 Press MODE/PAUSE repeatedly to select a recording mode.
SP:
You can record for up to about 59 minutes.
LP:
You can record for up to about 84 minutes.
V-SPk: You can record for up to about 59 minutes with the V-SENSOR
function.
V-LPk: You can record for up to about 84 minutes with the V-SENSOR
function.
Select SP to record the sound more clearly.
About the V-SENSOR function, please refer to "V-SENSOR function"
below.
3 Press FILE repeatedly to select a recording file.
4 Orient the built-in microphone to the sound source.
5 Keep REC/STOP pressed for 1 second.
The REC indicator lights up in red, then recording starts.
a Recording track number
b Recording indicator
c Recording mode
d V-SENSOR indicator
e Elapsed recording time
Basic operation
Note
You cannot change the recording file during recording.
To see the remaining recording time
Press FILE during recording or while in recording pause mode. The
remaining recording time is displayed while the button is pressed.
· The remaining recording time is approximate values.
When FULL is displayed
You cannot record any more. Erase unnecessary recordings.
V-SENSOR function
If you select V-LPk or V-SPk in step 2, the recording starts when the unit
detects sound above a preset level. If the unit does not detect the sound for
about 2 seconds, recording will pause and "SEnS" flashes.
This function prevents memory waste and empty recording.
Note
· The sensor level is factory-preset and you cannot change the level. Before
using the V-SENSOR function, please be sure to record once to confirm
the sensor level.
· When recording resumes after sound detection, the very first sounds may
not be recorded.
1
2
3
4
5
3
2
1
REC
MODE / PAUSE
5
Press REC/STOP or
c/sPLAY/STOP.
Press MODE/PAUSE.
To resume, press MODE/PAUSE, REC/STOP or
c/sPLAY/STOP.
To stop recording
To pause recording
D
REC / STOP
E
FILE

ESPAÑOL
FRANÇAIS
PRÉCAUTIONS
Pour une performance optimale
· Ne pas utiliser l'appareil dans des lieux extrêmement chauds, froids,
poussiéreux ou humides.
En particulier, ne pas laisser l'appareil dans les endroits suivants:
· extrêmement humides, comme une salle de bains
· à proximité d'un appareil de chauffage
· exposés à la lumière directe du soleil (par ex. dans une voiture garée en
plein soleil, car l'habitacle peut devenir extrêmement chaud)
· Ne
pas
poser
des
cassettes,
cartes
magnétiques
ou
autres
enregistrements magnétiques près du haut-parleur, car les informations
enregistrées risquent d'être effacées, ou les cassettes risquent d'être
parasitées.
En cas d'anomalie de fonctionnement ou d'affichage b A
Réinitialisez l'appareil en appuyant sur le bouton RESET dans le logement
des piles avec un objet pointu. Les enregistrements ne seront pas effacés à
la réinitialisation de l'appareil.
ATTENTION
En cas de réparation de l'appareil, les enregistrements risquent d'être
effacés.
INSERTION DES PILES SÈCHES b B
Ouvrez le logement des piles et insérez deux piles format AAA (R03) en
dirigeant les pôles
0 et 9 dans le bons sens.
Remplacement des piles
Remplacez les piles quand
clignote dans l'affichage. L'appareil s'arrête
automatiquement de fonctionner 20 secondes après le démarrage du
clignotement de
.
Remarque
Après le remplacement des piles, un affichage erroné peut apparaître. Dans
ce cas, appuyez sur le bouton RESET dans le logement des piles avec un
objet pointu pour réinitialiser l'appareil. Les enregistrements ne sont pas
effacés quand vous réinitialisez l'appareil.
b A
Remarques sur les piles sèches
· Vérifiez que les marques
0 et 9 sont correctement alignées.
· Ne mélangez pas différents types de pile, ou une neuve et une ancienne.
· Pour éviter tout risque de fuite d'électrolyte ou d'explosion, ne rechargez
jamais les piles, ne les chauffez pas et ne les démontez pas.
· Quand les piles ne sont pas utilisées, retirez-les pour éviter toute usure
inutile.
· Si du liquide fuit des piles, éliminez-le complètement en l'essuyant.
PRÉPARATIFS
Commutateur HOLD b C
Libérez le commutateur HOLD avant d'utiliser l'appareil pour pouvoir activer
les touches.
b a
Quand vous n'utilisez pas l'appareil, remettez le commutateur HOLD sur la
position HOLD.
b b
Les touches enclenchées par inadvertance seront inopérantes.
Si une touche est pressée alors que le commutateur HOLD est en position
HOLD, "hold" clignote sur l'afficheur.
Mise sous et hors tension
Appuyez sur REC/STOP,
c/sPLAY/STOP, MODE/PAUSE ou FILE pour
mettre l'appareil sous tension. Quand
c/sPLAY/STOP est pressé,
l'appareil est mis sous tension et la lecture démarre.
Si vous n'effectuez aucune opération dans la minute qui suit une opération,
l'appareil se mettra automatiquement hors tension (Coupure automatique).
Pour attacher la sangle b D
Pour nettoyer le coffret
Utilisez un chiffon doux légèrement imprégné d'une solution détergente
neutre.
N'utilisez pas de solvants puissants, comme l'alcool, la benzine ou un
produit de nettoyage.
ENREGISTREMENT AVEC LE MICROPHONE INTEGRE b E
Cet appareil est pourvu de 4 fichiers d'enregistrement (A, B, C et D). Vous
pouvez enregistrer sur 100 pistes d'enregistrement dans chaque fichier.
1 Libérez le commutateur HOLD.
2 Appuyez plusieurs fois sur MODE/PAUSE pour sélectionner un
mode d'enregistrement.
SP:
Vous pouvez enregistrer jusqu'à environ 59 minutes.
LP:
Vous pouvez enregistrer jusqu'à environ 84 minutes.
V-SPk: Vous pouvez enregistrer jusqu'à environ 59 minutes avec la
fonction V-SENSOR.
V-LPk: Vous pouvez enregistrer jusqu'à environ 84 minutes avec la
fonction V-SENSOR.
Sélectionnez
SP
pour
obtenir
une
meilleure
qualité
sonore
d'enregistrement.
Consultez "Fonction V SENSOR" ci dessous pour cette fonction
PRECAUCIONES
Para mantener sus buenas prestaciones
· No utilice el aparato en un lugar muy caliente, frío, con polvo o humedad.
En especial, no mantenga este aparato:
· en un lugar muy húmedo, por ejemplo en un baño
· cerca de un aparato de calefacción
· en un lugar expuesto al sol (dentro de un automóvil estacionado donde
puede subir mucho la temperatura)
· No acerque las cintas de casete, tarjetas magnéticas u otro material
grabado magnéticamente al altavoz ya que la información grabada puede
borrarse o puede aparecer ruido en las cintas de casete.
Cuando se produce una indicación de error o funciona mal b A
Reinicialice el aparato oprimiendo el botón de reposición RESET dentro del
portapilas con una varilla fina. Las grabaciones no se borran aunque
reinicialice el aparato.
ATENCION
Las grabaciones pueden borrarse cuando se hace el servicio de este
aparato.
INSTALACION DE LAS PILAS b B
Abra el portapilas y coloque dos pilas tamaño AAA (R03) con las marcas
0
y
9 correctamente alineadas.
Cambio de las pilas
Cambie las pilas cuando destella
en la pantalla. El funcionamiento se
detiene automáticamente 20 segundos después de que empieza a destellar
.
Nota
Después de cambiar las pilas, puede aparecer una indicación equivocada.
En este caso, oprima el botón de reposición RESET dentro del portapilas
con una varilla fina para reinicializar el aparato. Las grabaciones no se
borran al reinicializar el aparato.
b A
Nota sobre las pilas
· Compruebe que las marcas
0 y 9 están correctamente alineadas.
· No mezcle distintos tipos de pilas o una pila vieja con una nueva.
· Para evitar el riego de fugas de electrólito o explosiones, no recargue las
pilas, caliente o desarme.
· Cuando no utilice las pilas, sáquelas para evitar que de desgasten
inútilmente.
· Si hay fugas de líquido de las pilas, limpie a fondo para poder sacarlas.
PREPARATIVOS
Interruptor HOLD b C
Suelte el interruptor HOLD antes de la operación para activar los botones.
b a
Cuando no utilice el aparato, mueva el interruptor HOLD a la posición
HOLD.
b b
El aparato no funcionará aunque presione accidentalmente un botón.
Si se presiona un botón cuando el interruptor HOLD está en la posición
HOLD, destella "hold" en la pantalla.
Conexión y desconexión
Oprima REC/STOP,
c/sPLAY/STOP, MODE/PAUSE o FILE para
conectar el aparato. Cuando se oprime
c/sPLAY/STOP, se conecta el
aparato y empieza la reproducción.
Si no se hace ninguna operación nueva antes de 1 minuto de la última
operación, el aparato se desconecta automáticamente (Función de
desconexión automática).
Para colocar una correa de mano b D
Para limpiar el mueble
Utilice un paño suave ligeramente empapado en una solución detergente
neutra.
No utilice disolventes fuertes tales como alcohol, bencina o limpiadores
abrasivos.
GRABACION DEL MICROFONO INTEGRADO b E
Este aparato tiene 4 archivos de grabación (A, B, C y D). Se puede grabar
en 100 pistas de grabación para cada archivo de grabación.
1 Suelte el interruptor HOLD.
2 Oprima repetidamente MODE/PAUSE para seleccionar el modo de
grabación.
SP:
Se pueden grabar hasta unos 59 minutos.
LP:
Se pueden grabar hasta unos 84 minutos.
V-SPk: Se pueden grabar hasta unos 59 minutos con la función
V-SENSOR.
V-LPk: Se pueden grabar hasta unos 84 minutos con la función
V-SENSOR.
Seleccione SP para grabar un sonido más nítido.
Para la función V-SENSOR, consulte la "Función V-SENSOR" más
abajo.
3 Oprima
repetidamente
FILE
para
seleccionar
n
archivo
de

IC-M84(YU)ESF
Utilisez un chiffon doux légèrement imprégné d'une solution détergente
neutre.
N'utilisez pas de solvants puissants, comme l'alcool, la benzine ou un
produit de nettoyage.
ENREGISTREMENT AVEC LE MICROPHONE INTEGRE b E
Cet appareil est pourvu de 4 fichiers d'enregistrement (A, B, C et D). Vous
pouvez enregistrer sur 100 pistes d'enregistrement dans chaque fichier.
1 Libérez le commutateur HOLD.
2 Appuyez plusieurs fois sur MODE/PAUSE pour sélectionner un
mode d'enregistrement.
SP:
Vous pouvez enregistrer jusqu'à environ 59 minutes.
LP:
Vous pouvez enregistrer jusqu'à environ 84 minutes.
V-SPk: Vous pouvez enregistrer jusqu'à environ 59 minutes avec la
fonction V-SENSOR.
V-LPk: Vous pouvez enregistrer jusqu'à environ 84 minutes avec la
fonction V-SENSOR.
Sélectionnez
SP
pour
obtenir
une
meilleure
qualité
sonore
d'enregistrement.
Consultez "Fonction V-SENSOR" ci-dessous pour cette fonction.
3 Appuyez plusieurs fois sur FILE pour sélectionner un fichier
d'enregistrement.
4 Dirigez le microphone intégré vers la source sonore.
5 Maintenez REC/STOP pressé 1 seconde.
L'indicateur REC s'allume en rouge, puis l'enregistrement démarre.
a Enregistrement du numéro de piste
b Indicateur d'enregistrement
c Mode d'enregistrement
d Indicateur V-SENSOR
e Temps d'enregistrement écoulé
Fonctionnement de base
Remarque
Vous ne pouvez pas changer de fichier en cours d'enregistrement.
Pour contrôler le temps d'enregistrement restant
Appuyez
sur
FILE
pendant
l'enregistrement
ou
en
mode
pause
d'enregistrement. Le temps d'enregistrement restant est affiché pendant la
pression de la touche.
· L'indication de temps d'enregistrement restant est approximative.
Quand FULL est affiché
Vous ne pouvez plus enregistrer. Effacez les enregistrements inutiles.
Fonction V-SENSOR
Si vous sélectionnez V-LPk ou V-SPk à l'étape 2, l'enregistrement démarre
quand l'appareil détecte un son au-dessus du niveau préréglé. Si aucun
son n'est détecté pendant environ 2 secondes, l'appareil passe en pause
d'enregistrement et "SEnS" clignote.
Cette fonction évite de gaspiller la mémoire et d'enregistrer à vide.
Remarques
· Le niveau de détection, préréglé à l'usine, n'est pas modifiable. Avant
d'utiliser la fonction V-SENSOR, enregistrez une fois pour confirmer le
niveau de détection.
· Quand l'enregistrement reprend après la détection de sons, les tout
premiers sons peuvent ne pas être enregistrés.
Appuyez sur REC/STOP ou
c/sPLAY/STOP.
Appuyez sur MODE/PAUSE.
Pour reprendre, appuyez sur MODE/PAUSE, REC/
STOP ou
c/sPLAY/STOP.
Pour arrêter l'enregistrement
Pour interrompre
l'enregistrement
neutra.
No utilice disolventes fuertes tales como alcohol, bencina o limpiadores
abrasivos.
GRABACION DEL MICROFONO INTEGRADO b E
Este aparato tiene 4 archivos de grabación (A, B, C y D). Se puede grabar
en 100 pistas de grabación para cada archivo de grabación.
1 Suelte el interruptor HOLD.
2 Oprima repetidamente MODE/PAUSE para seleccionar el modo de
grabación.
SP:
Se pueden grabar hasta unos 59 minutos.
LP:
Se pueden grabar hasta unos 84 minutos.
V-SPk: Se pueden grabar hasta unos 59 minutos con la función
V-SENSOR.
V-LPk: Se pueden grabar hasta unos 84 minutos con la función
V-SENSOR.
Seleccione SP para grabar un sonido más nítido.
Para la función V-SENSOR, consulte la "Función V-SENSOR" más
abajo.
3 Oprima
repetidamente
FILE
para
seleccionar
un
archivo
de
grabación.
4 Apunte el micrófono integrado a la fuente del sonido.
5 Mantenga REC/STOP oprimido durante 1 segundo.
Se enciende el indicador REC en rojo y empieza la grabación.
a Número de canción que se está grabando
b Indicador de grabación
c Modo de grabación
d Indicador V-SENSOR
e Tiempo de grabación transcurrido
Funcionamiento básico
Nota
No se puede cambiar el archivo de grabación en el medio de la grabación.
Para ver el tiempo de grabación remanente
Oprima FILE durante la grabación o durante el modo de pausa de
grabación. Aparece el tiempo de grabación remanente mientras se oprima
este botón.
· El tiempo de grabación remanente es un valor aproximado.
Cuando aparece FULL
No puede seguir grabando. Borre las grabaciones que no necesite más.
Función V-SENSOR
Si selecciona V-LPk o V-SPk en el paso 2, empieza a grabar cuando la
unidad detecta un sonido por encima de un nivel prefijado. Si la unidad no
detecta el sonido durante unos 2 segundos, la grabación entra en pausa y
destella "SEnS".
Esta función evita un gasto inútil de memoria y grabaciones vacías de
contenido.
Nota
· El nivel del sensor es un ajuste prefijado de fábrica y no puede cambiar el
nivel. Antes de utilizar la función V-SENSOR, haga una grabación de
ensayo, sin falta, para confirmar el nivel del sensor.
· Cuando continúa la grabación al detectar un sonido, pueden no grabarse
los primeros sonidos.
Oprima REC/STOP o
c/sPLAY/STOP.
Oprima MODE/PAUSE.
Para continuar, oprima MODE/PAUSE, REC/STOP
o
c/sPLAY/STOP.
Para parar una grabación
Para hacer una pausa de
grabación
ENGLISH
1
2
3
4
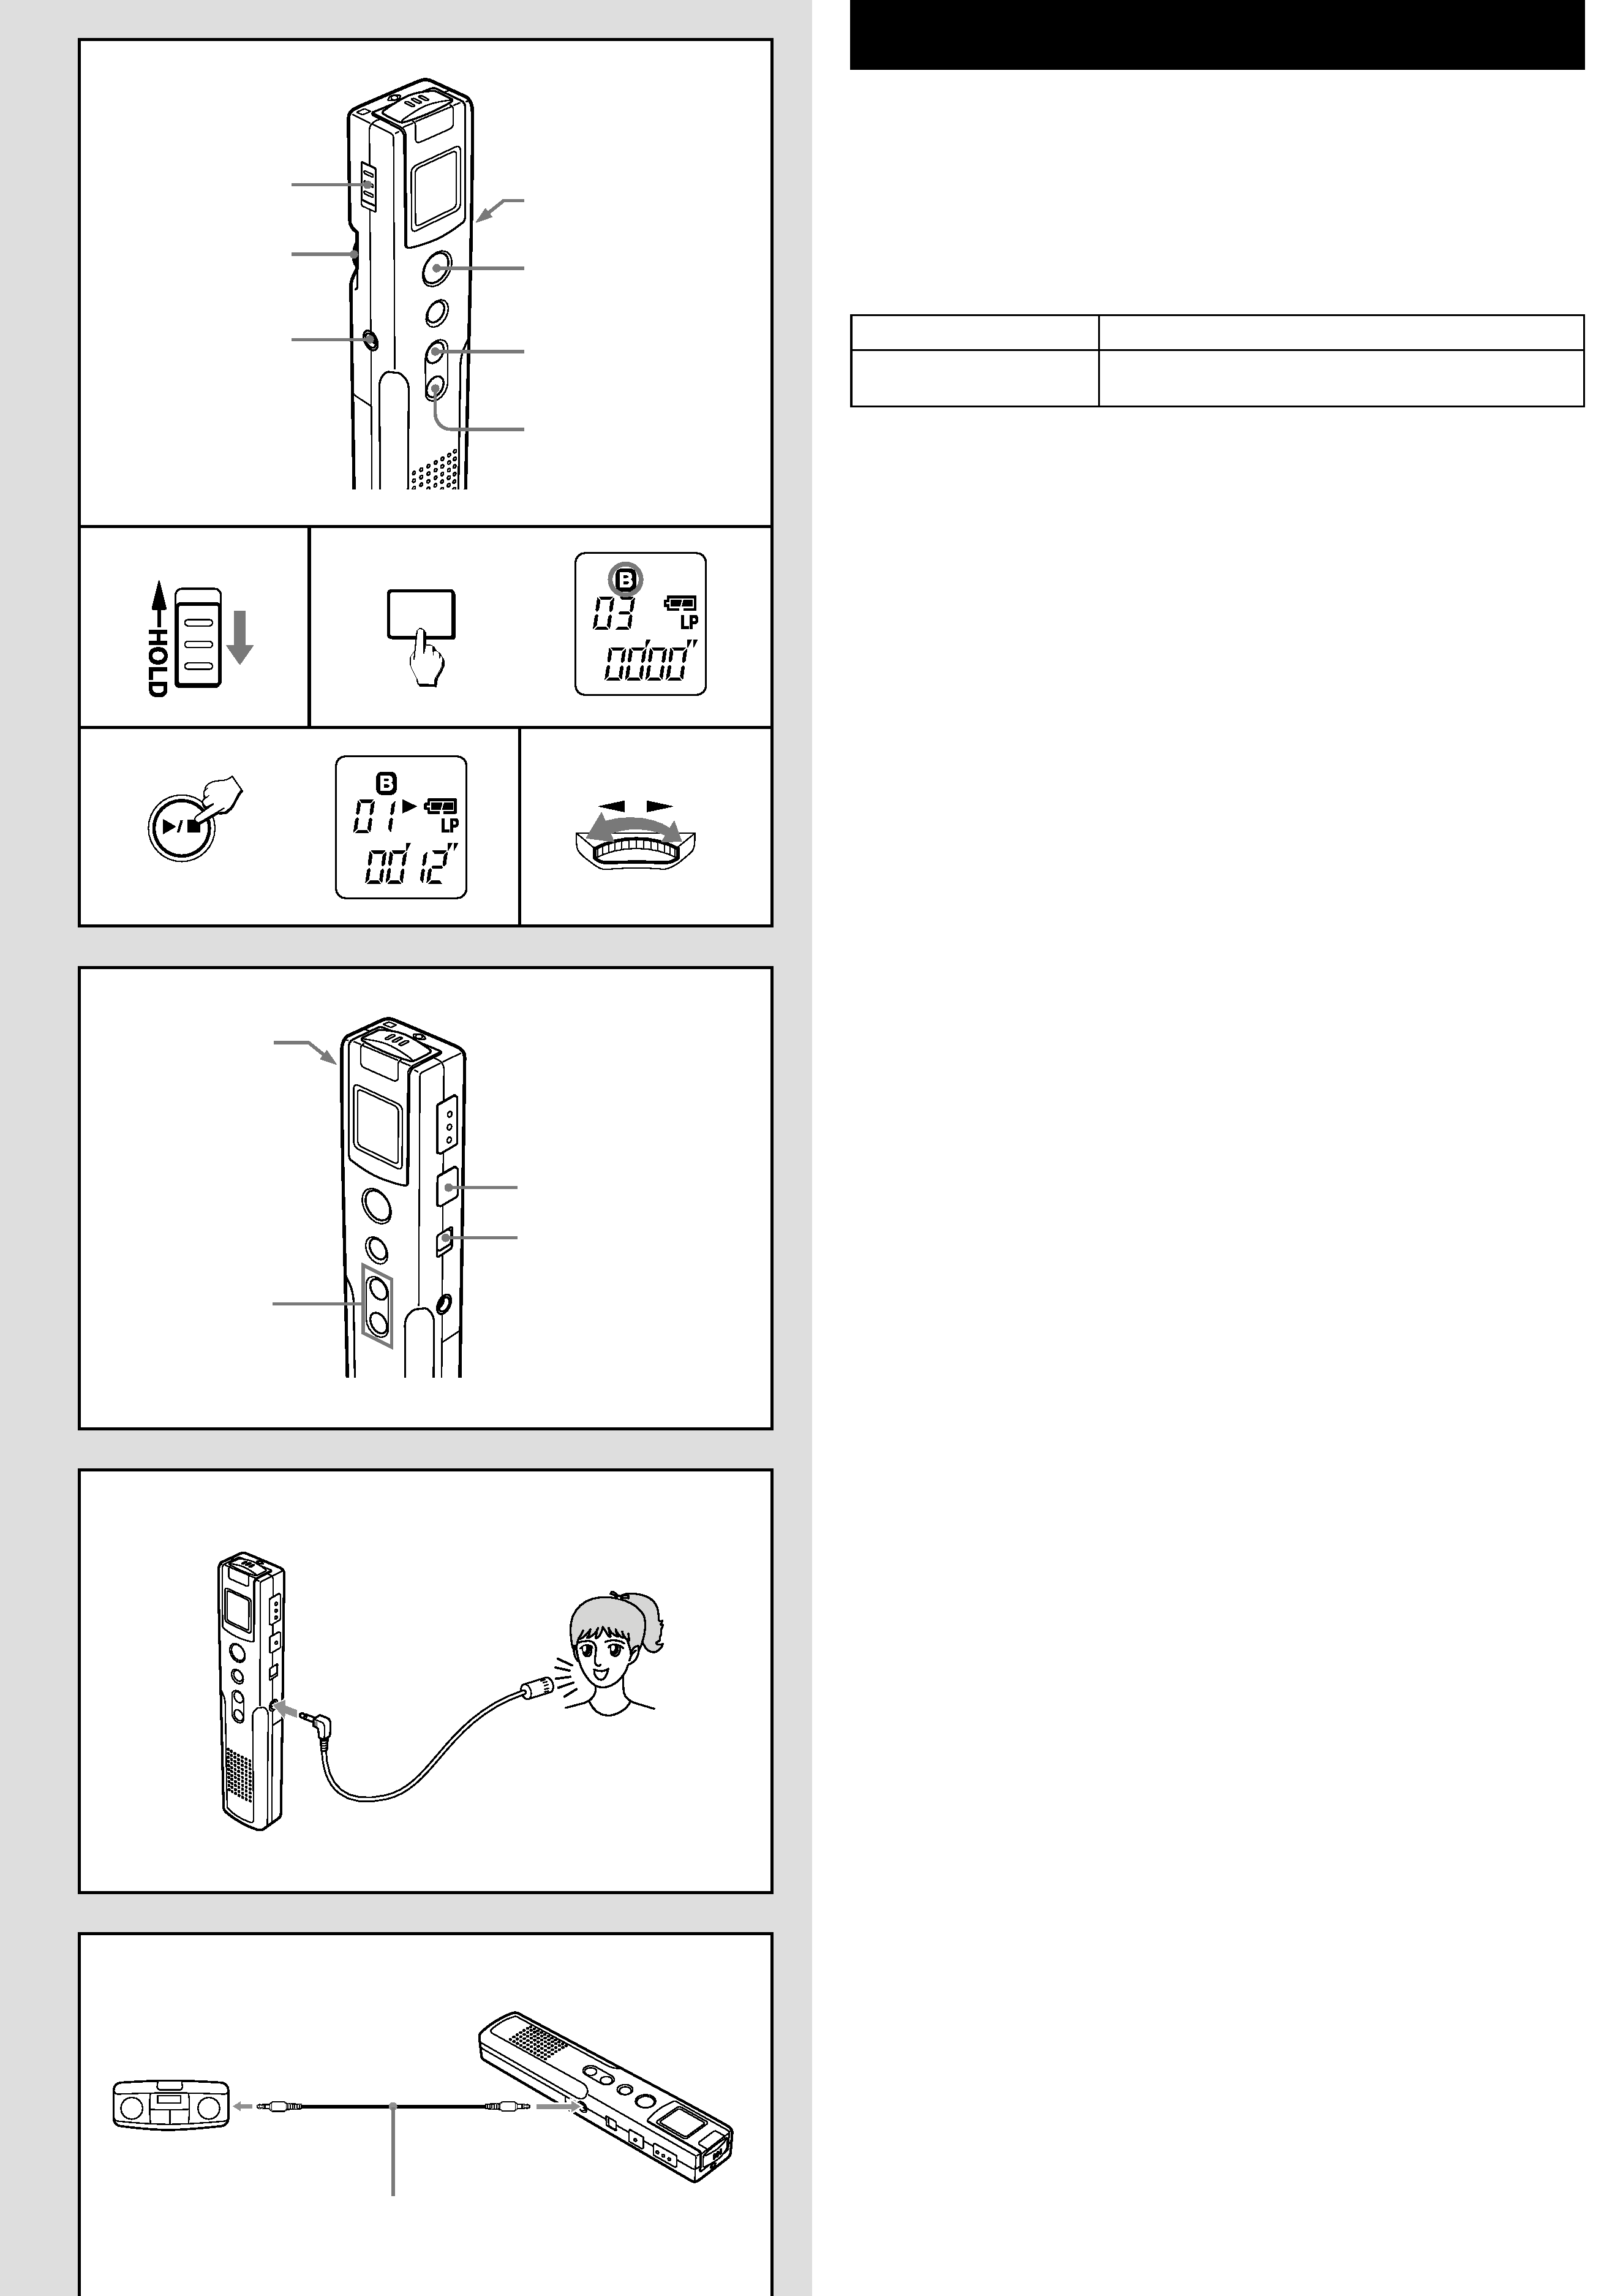
PLAYBACK b F
1 Release the HOLD switch.
2 Press FILE repeatedly to select a recording file.
3 Press
c/sPLAY/STOP.
If you select a file that has no recording tracks, "no InF" is displayed.
4 Adjust the volume.
Basic operation
To listen with an earphone
Connect a commercially available earphone with a mini-plug to the
EARPHONE jack.
When an earphone is connected, sound through the speaker is not heard.
To search for a desired point
To search for the beginning of a recording track
Press
r or t.
Keep pressed during stop mode to change the recording track number faster.
To locate a desired passage
Keep
r or t pressed during playback.
Release the button at the start of desired passage according to the time
counter in the display.
To listen to only 5 seconds at the beginning of each track
Keep
c/sPLAY/STOP pressed for 1 second. "SCAN" is displayed.
Press
c/sPLAY/STOP again to resume normal playback.
ERASING b G
You can erase recordings by recording track number.
1 Release the HOLD switch.
2 Select the recording file and press
r or t to display the
recording track number to be erased.
If you select a file that has no recording tracks, "no InF" is displayed.
3 Keep ERASE pressed for 1 second.
ErASE flashes for 10 seconds in the display.
4 Press ERASE while ErASE is flashing.
The recording track number is decreased after the track is erased.
To erase all recordings of the selected file
1 Select the recording file to be erased.
2 Keep ERASE and REC/STOP pressed for 3 seconds.
AL is displayed and ErASE flashes.
3 Press ERASE again while ErASE is flashing.
Recording from an external microphone
b H
To record sound with more clarity, use of an optional external microphone is
recommended.
Connect the microphone to the EXT. MIC jack and set the microphone near
the sound source.
Note
When recording from an external microphone, move the microphone away
from the main unit or the earphone to prevent howling.
To record from another unit
b I
Connect the other unit to the EXT. MIC jack of this unit, using the
appropriate connecting cords.
a To connect to stereo source equipment
b To connect to monaural source equipment
Note
· The connecting cords may vary according to the type of source equipment.
Before connecting a unit, read the operating instructions of the connected unit.
· If the volume setting of the source equipment is too high, the recorded
sound may be noisy or distorted. Be sure to set the volume of the source
equipment to a moderate level.
SPECIFICATIONS
Frequency response
500 3,500 Hz (EIAJ)
Microphone
Electret condenser microphone (monaural)
Maximum output
80 mW (EIAJ 8 ohms)
Speaker
Diameter 20 mm, 8 ohms
Power supply
DC 3 V using two size AAA (R03) dry cell batteries
Maximum total recording time
Approx. 84 minutes (LP mode)
Approx. 59 minutes (SP mode)
Battery life using size AAA (LR03) alkaline batteries
Approx. 12 hours (EIAJ recording)
Approx. 8 hours (EIAJ 10 mW playback)
Maximum outside dimensions
26.9 (W)
× 129.8 (H) × 16.5 (D) mm
Attenuation Cable
(Stereo mini-plug
Monaural mini-plug)
Cable de atenuación
(mini-enchufe estéreo
mini-enchufe monoaural)
Câble d'atténuation
Press
c/sPLAY/STOP.
Press MODE/PAUSE.
To resume, press MODE/PAUSE or
c/sPLAY/STOP.
To stop playback
To pause playback
F
2
3
1
4
EARPHONE
t
r
PLAY / STOP
VOL
MAX
MIN
G
2
3,4
2
1
H
I
a
PHONES
EXT.MIC
FILE
EXT.MIC