ENGLISH
WARNING
TO REDUCE THE RISK OF FIRE OR ELECTRIC SHOCK, DO NOT
EXPOSE THIS APPLIANCE TO RAIN OR MOISTURE.
OWNER'S RECORD
For your convenience, record the model number and the serial number (you
will find it in the battery compartment of your set) in the space provided
below. Please refer to them when you contact your Aiwa dealer in case of
difficulty.
Model No. FR-AP77W
Serial No.
PRECAUTIONS
To maintain good performance
· Do not use the unit in places which are extremely hot, cold, dusty or humid.
In particular, do not keep the unit:
· in a high humidity area such as a bathroom
· near a heater
· in an area exposed to direct sunlight (inside a parked car, where there
could be a considerable rise in temperature)
· Keep cassette tapes, magnetic cards and other magnetic recorded
materials away from the speaker as the recorded information may be erased
or noise may occur on cassette tapes.
MAINTENANCE
To clean the cabinet
Use a soft cloth lightly moistened with a mild detergent solution.
Do not use the strong solvents such as alcohol, benzine or cleaner.
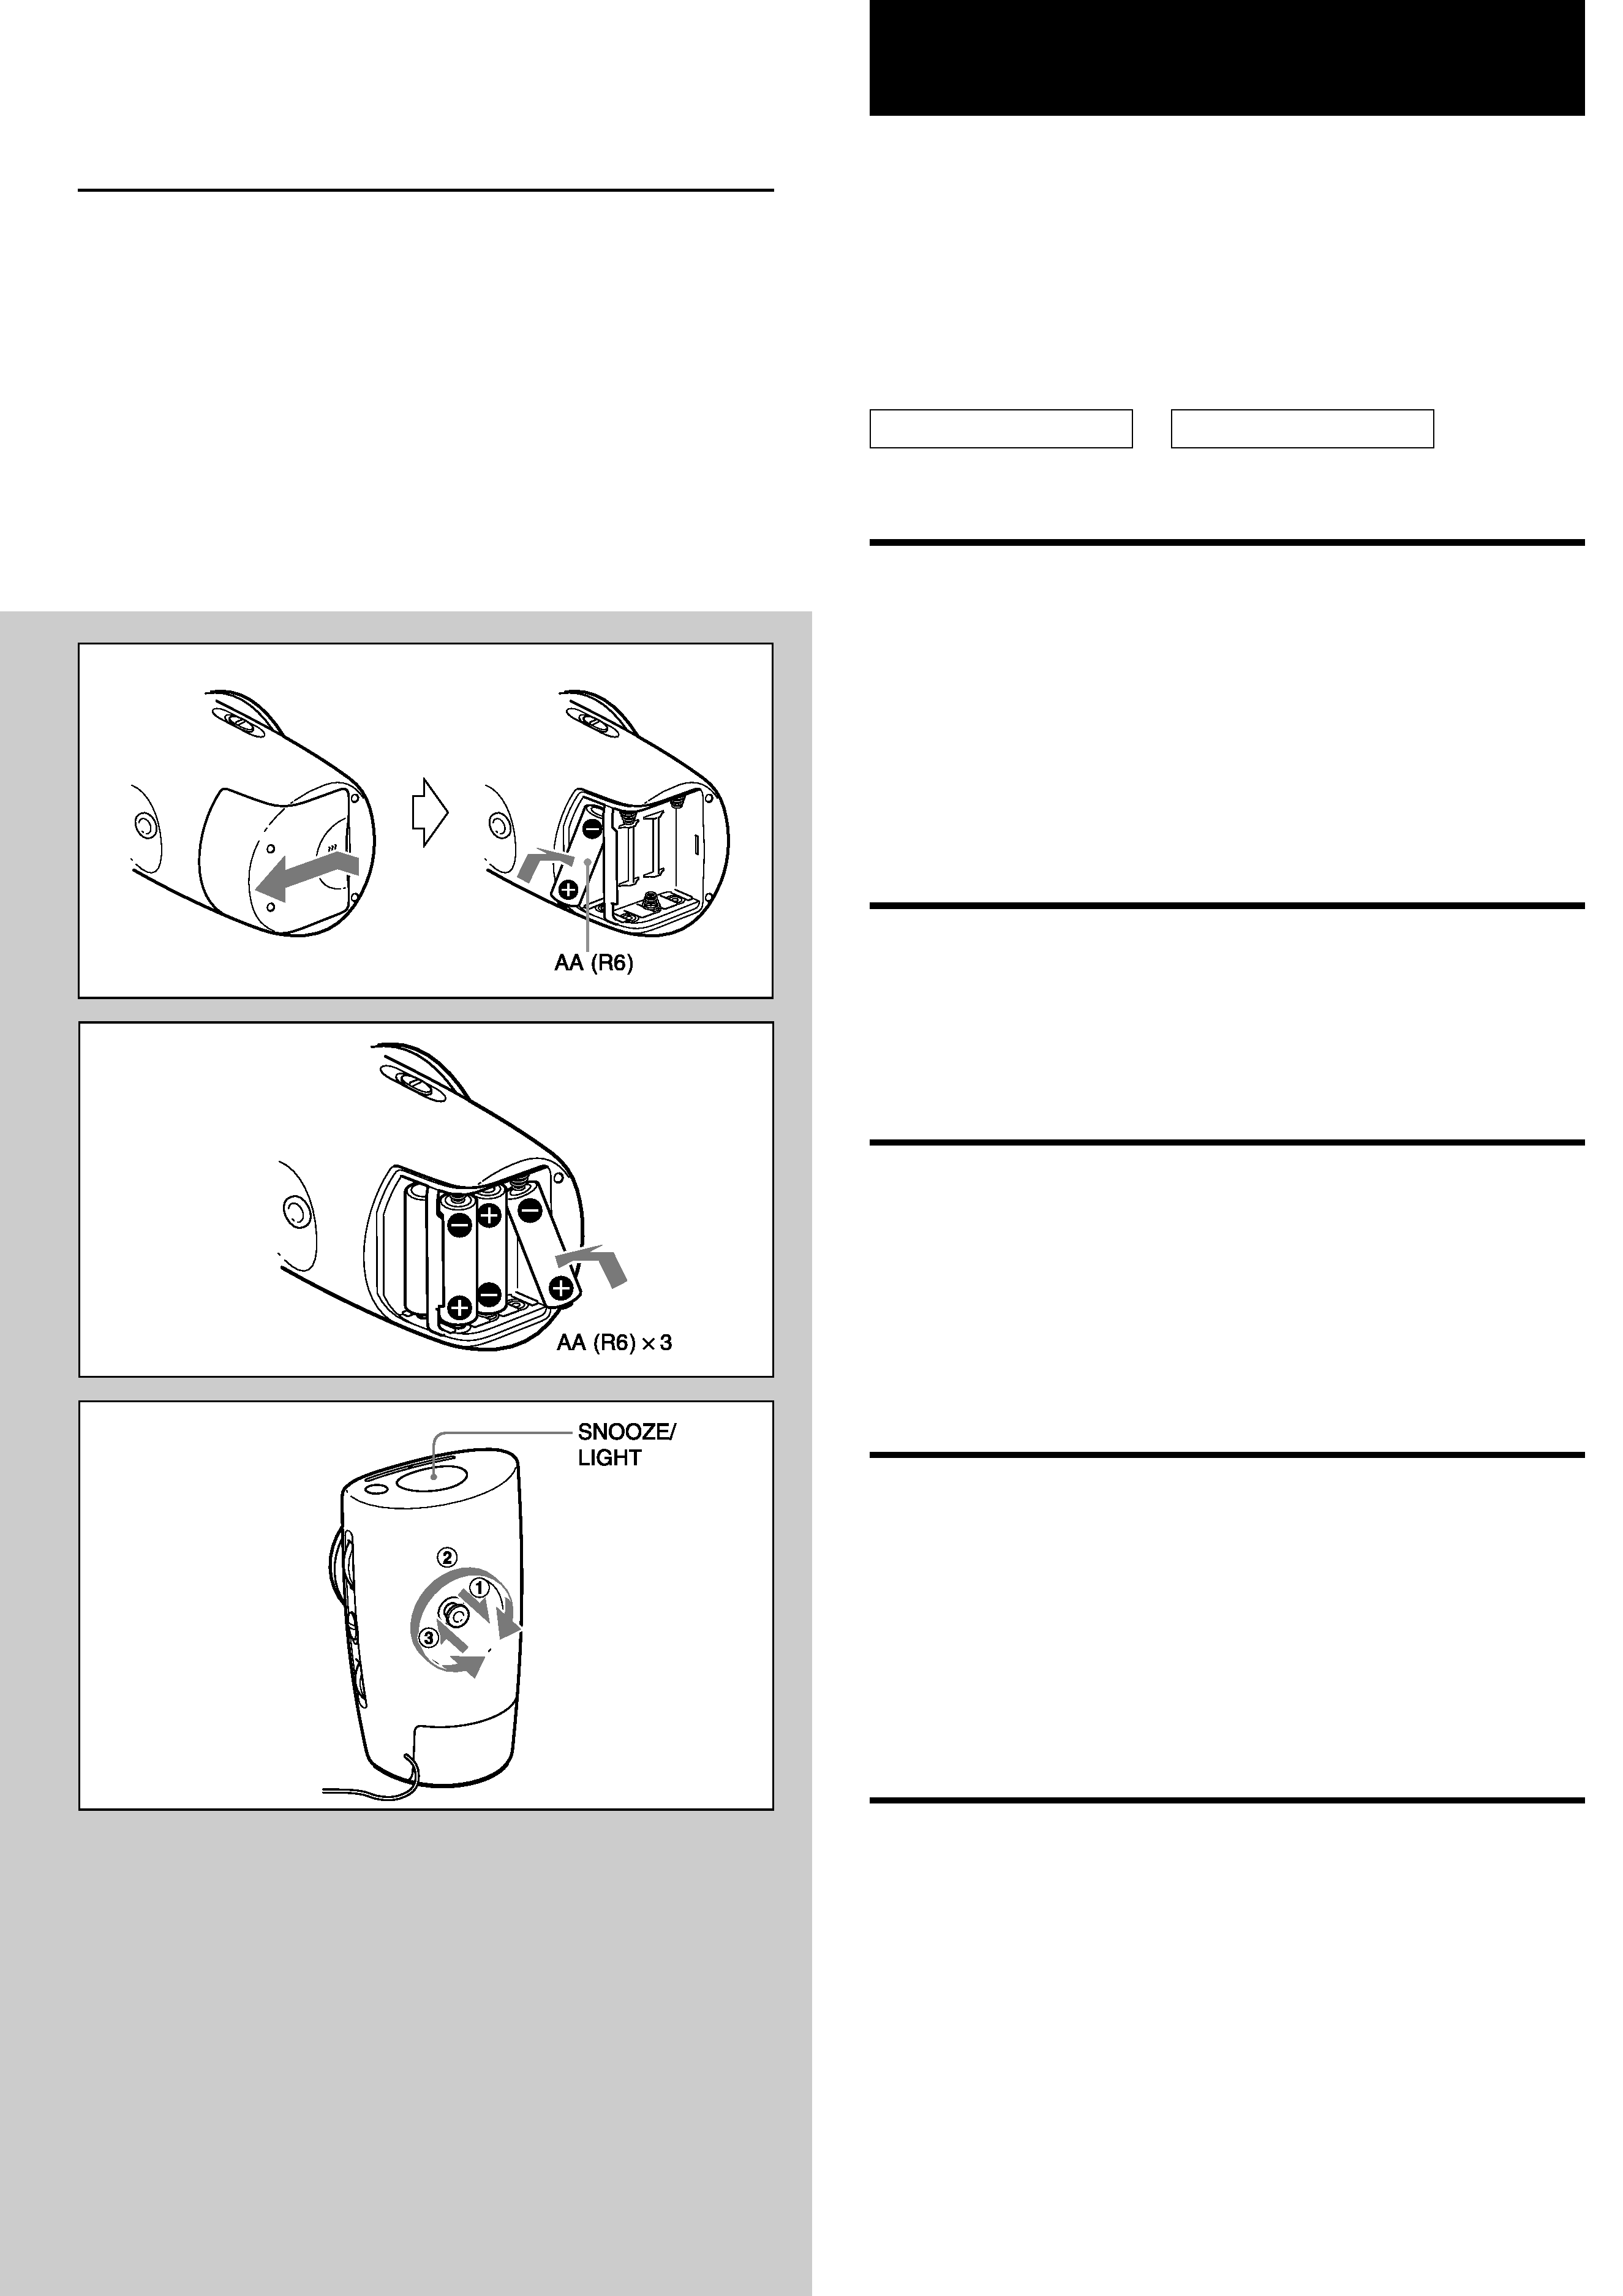
INSERTING A BATTERY FOR CLOCK AND
TIMER
A
Open the battery compartment and insert an size AA (R6) battery for
clock and timer.
The battery for the clock and timer can be used for about 1 year. Replace
the battery when the clock/timer operation does not work correctly.
Note
· You cannot set clock or timer without the battery for clock and timer.
· You cannot listen to the radio only with the battery for clock and timer.
USING ON DRY CELL BATTERIES
B
Open the battery compartment and insert three size AA (R6) batteries
with the
0 and 9 marks correctly aligned.
Replace the batteries when the sound becomes distorted.
Note on dry cell batteries
· Make sure that the
0 and 9 marks are correctly aligned.
· Do not mix different types of batteries, or an old battery with a new one.
· Never recharge the batteries, apply heat to them or take them apart.
· When not using the batteries, remove them to prevent needless wear.
· If liquid leaks from the batteries, wipe thoroughly to remove.
SETTING THE CLOCK
C
1 Insert a battery for clock and timer referring to "INSERTING A
BATTERY FOR CLOCK AND TIMER".
The clock starts running.
2 Pull the clock setting lever and turn it to set the clock.
After setting the clock, set the lever to the previous position.
About the light of the clock panel
Keep the SNOOZE/LIGHT button pressed to turn on the light of the clock
panel. The light turns off when the button is released.
A
d
FR-AP77W
RADIO RECEIVER
RECEPTOR DE RADIO
OPERATING INSTRUCTIONS
INSTRUCCIONES DE MANEJO
MODE D'EMPLOI
8A-RU8-901-01
001017AYO-OX
Printed in China
A
B
C

ESPAÑOL
FRANÇAIS
PRECAUCIONES
Para mantener sus buenas prestaciones
· No utilice el aparato en lugares muy calientes, fríos, con polvo o humedad.
Especialmente, no debe dejar el aparato:
· en lugares muy húmedos, por ejemplo en el baño.
· cerca de la calefacción
· en un lugar expuesto a los rayos del sol (dentro de un coche estacionado,
donde puede aumentar mucho la temperatura)
· Mantenga las cintas de casete, tarjetas magnéticas y demás material
grabado magnéticamente lejos del altavoz porque la información grabada
puede borrarse o pueden aparecer ruidos en las cintas de casete.
MANTENIMIENTO
Para limpiar el mueble
Utilice un paño suave ligeramente empapado en una solución detergente
neutra.
No utilice disolventes fuertes tales como alcohol, bencina o limpiador.
COLOCACION DE UNA BATERIA PARA EL
RELOJ Y TEMPORIZADOR
A
Abra el portpilas y coloque una pila de tamaño AA (R6) para el reloj y
para el temporizador.
La pila para el reloj y para el temporizador dura aproximadamente un año.
Cambie la pila cuando el reloj/temporizador deja de funcionar correctamente.
Nota
· No puede ajustar el reloj o temporizador sin haber colocado la pila para el
reloj y temporizador.
· No puede escuchar la radio sólo con la pila para el reloj y temporizador.
USO DE LAS PILAS
B
Abra el portapilas y coloque tres pilas de tamaño AA (R6) con las
marcas
0 y 9 correctamente alineadas.
Cambie las pilas cuando el sonido se escucha distorsionado o la luz de la
linterna pierde brillo.
Nota sobre las pilas
· Compruebe que las marcas
0 y 9 están bien alineadas.
· No mezcle distintos tipos de pilas o una pila vieja con una nueva.
· No recargue las pilas, caliente o desarme.
· Cuando no utilice las pilas, sáquelas para evitar que se desgasten
inútilmente.
· Si se producen fugas de líquido de las pilas, limpie para sacarlas.
AJUSTE DEL RELOJ
C
1 Coloque una pila para el reloj y temporizador consultando la
"COLOCACION DE UNA B ATERIA PARA EL RELOJ Y
TEMPORIZADOR".
El reloj empieza a funcionar.
2 Tire de la palanca de ajuste del reloj y gire para ajustar el reloj.
Después de ajustar el reloj, vuelva la palanca a su posición anterior.
Acerca de la luz en la cara del reloj
Mantenga pulsado el botón SNOOZE/LIGHT para que se encienda la luz
en la cara del reloj. La luz se apaga al soltar el botón.
PRECAUTIONS
Pour maintenir de bonnes performances
· Ne pas utiliser cet appareil à un emplacement très chaud, froid, poussiéreux
ou humide. En particulier, ne pas le conserver:
· à un endroit très humide, par exemple une salle de bains
· près d'un appareil de chauffage
· à un endroit en plein soleil (dans une voiture garée, où la température
peut considérablement augmenter)
· Conserver les cassettes, les cartes magnétiques et les autres matériaux
enregistrés magnétiquement loin du haut-parleur, car les informations
enregistrées pourraient être effacées ou des parasites pourraient apparaître
sur les cassettes.
ENTRETIEN
Nettoyage du coffret
Utiliser un chiffon doux humidifié de solution détergente douce.
Ne pas utiliser de solvant puissant tel qu'alcool, benzine ou détergent.
INSERTION D'UNE PILE POUR L'HORLOGE
ET LA MINUTERIE
A
Ouvrir le logement de la pile et insérer une pile de format AA (R6) pour
l'horloge et la minuterie.
La pile pour l'horloge et la minuterie durera environ 1 an. La remplacer
quand l'horloge/minuterie commence à mal fonctionner.
Remarques
· L'horloge ou la minuterie ne peut pas être réglée sans insertion d'une pile
pour l'horloge et la minuterie.
· L'écoute de la radio est impossible seulement sur la pile pour l'horloge et
la minuterie.
FONCTIONNEMENT SUR PILES SECHES
B
Ouvrir le logement des piles et insérer trois piles de format AA (R6) en
alignant correctement les marques
0 et 9.
Remplacer les piles en cas de déformation du son ou si la torche s'affaiblit.
Remarques sur les piles sèches
· Vérifier que les polarités
0 et 9 sont correctement alignées.
· Ne pas mélanger différents types de piles, ou une pile ancienne et une
pile neuve.
· Ne jamais recharger les piles, les chauffer ou les démonter.
· Sortir les piles de l'appareil quand elles ne sont pas utilisées pour éviter
une usure inutile.
· Si du liquide fuit des piles, l'essuyer pour l'éliminer complètement.
REGLAGE DE L'HORLOGE
C
1 Insérer une pile pour l'horloge et la minuterie en consultant
"INSERTION D'UNE PILE POUR L'HORLOGE ET LA MINUTERIE".
L'horloge commence à fonctionner.
2 Tirer sur la manette de l'horloge et la tourner pour régler l'heure.
Après le réglage de l'horloge, repousser la manette à sa position d'origine.
Eclairage du panneau de l'horloge
Maintenir la touche SNOOZE/LIGHT pressée pour allumer l'éclairage du
panneau de l'horloge. L'éclairage s'éteindra au relâchement de la touche.
ENGLISH
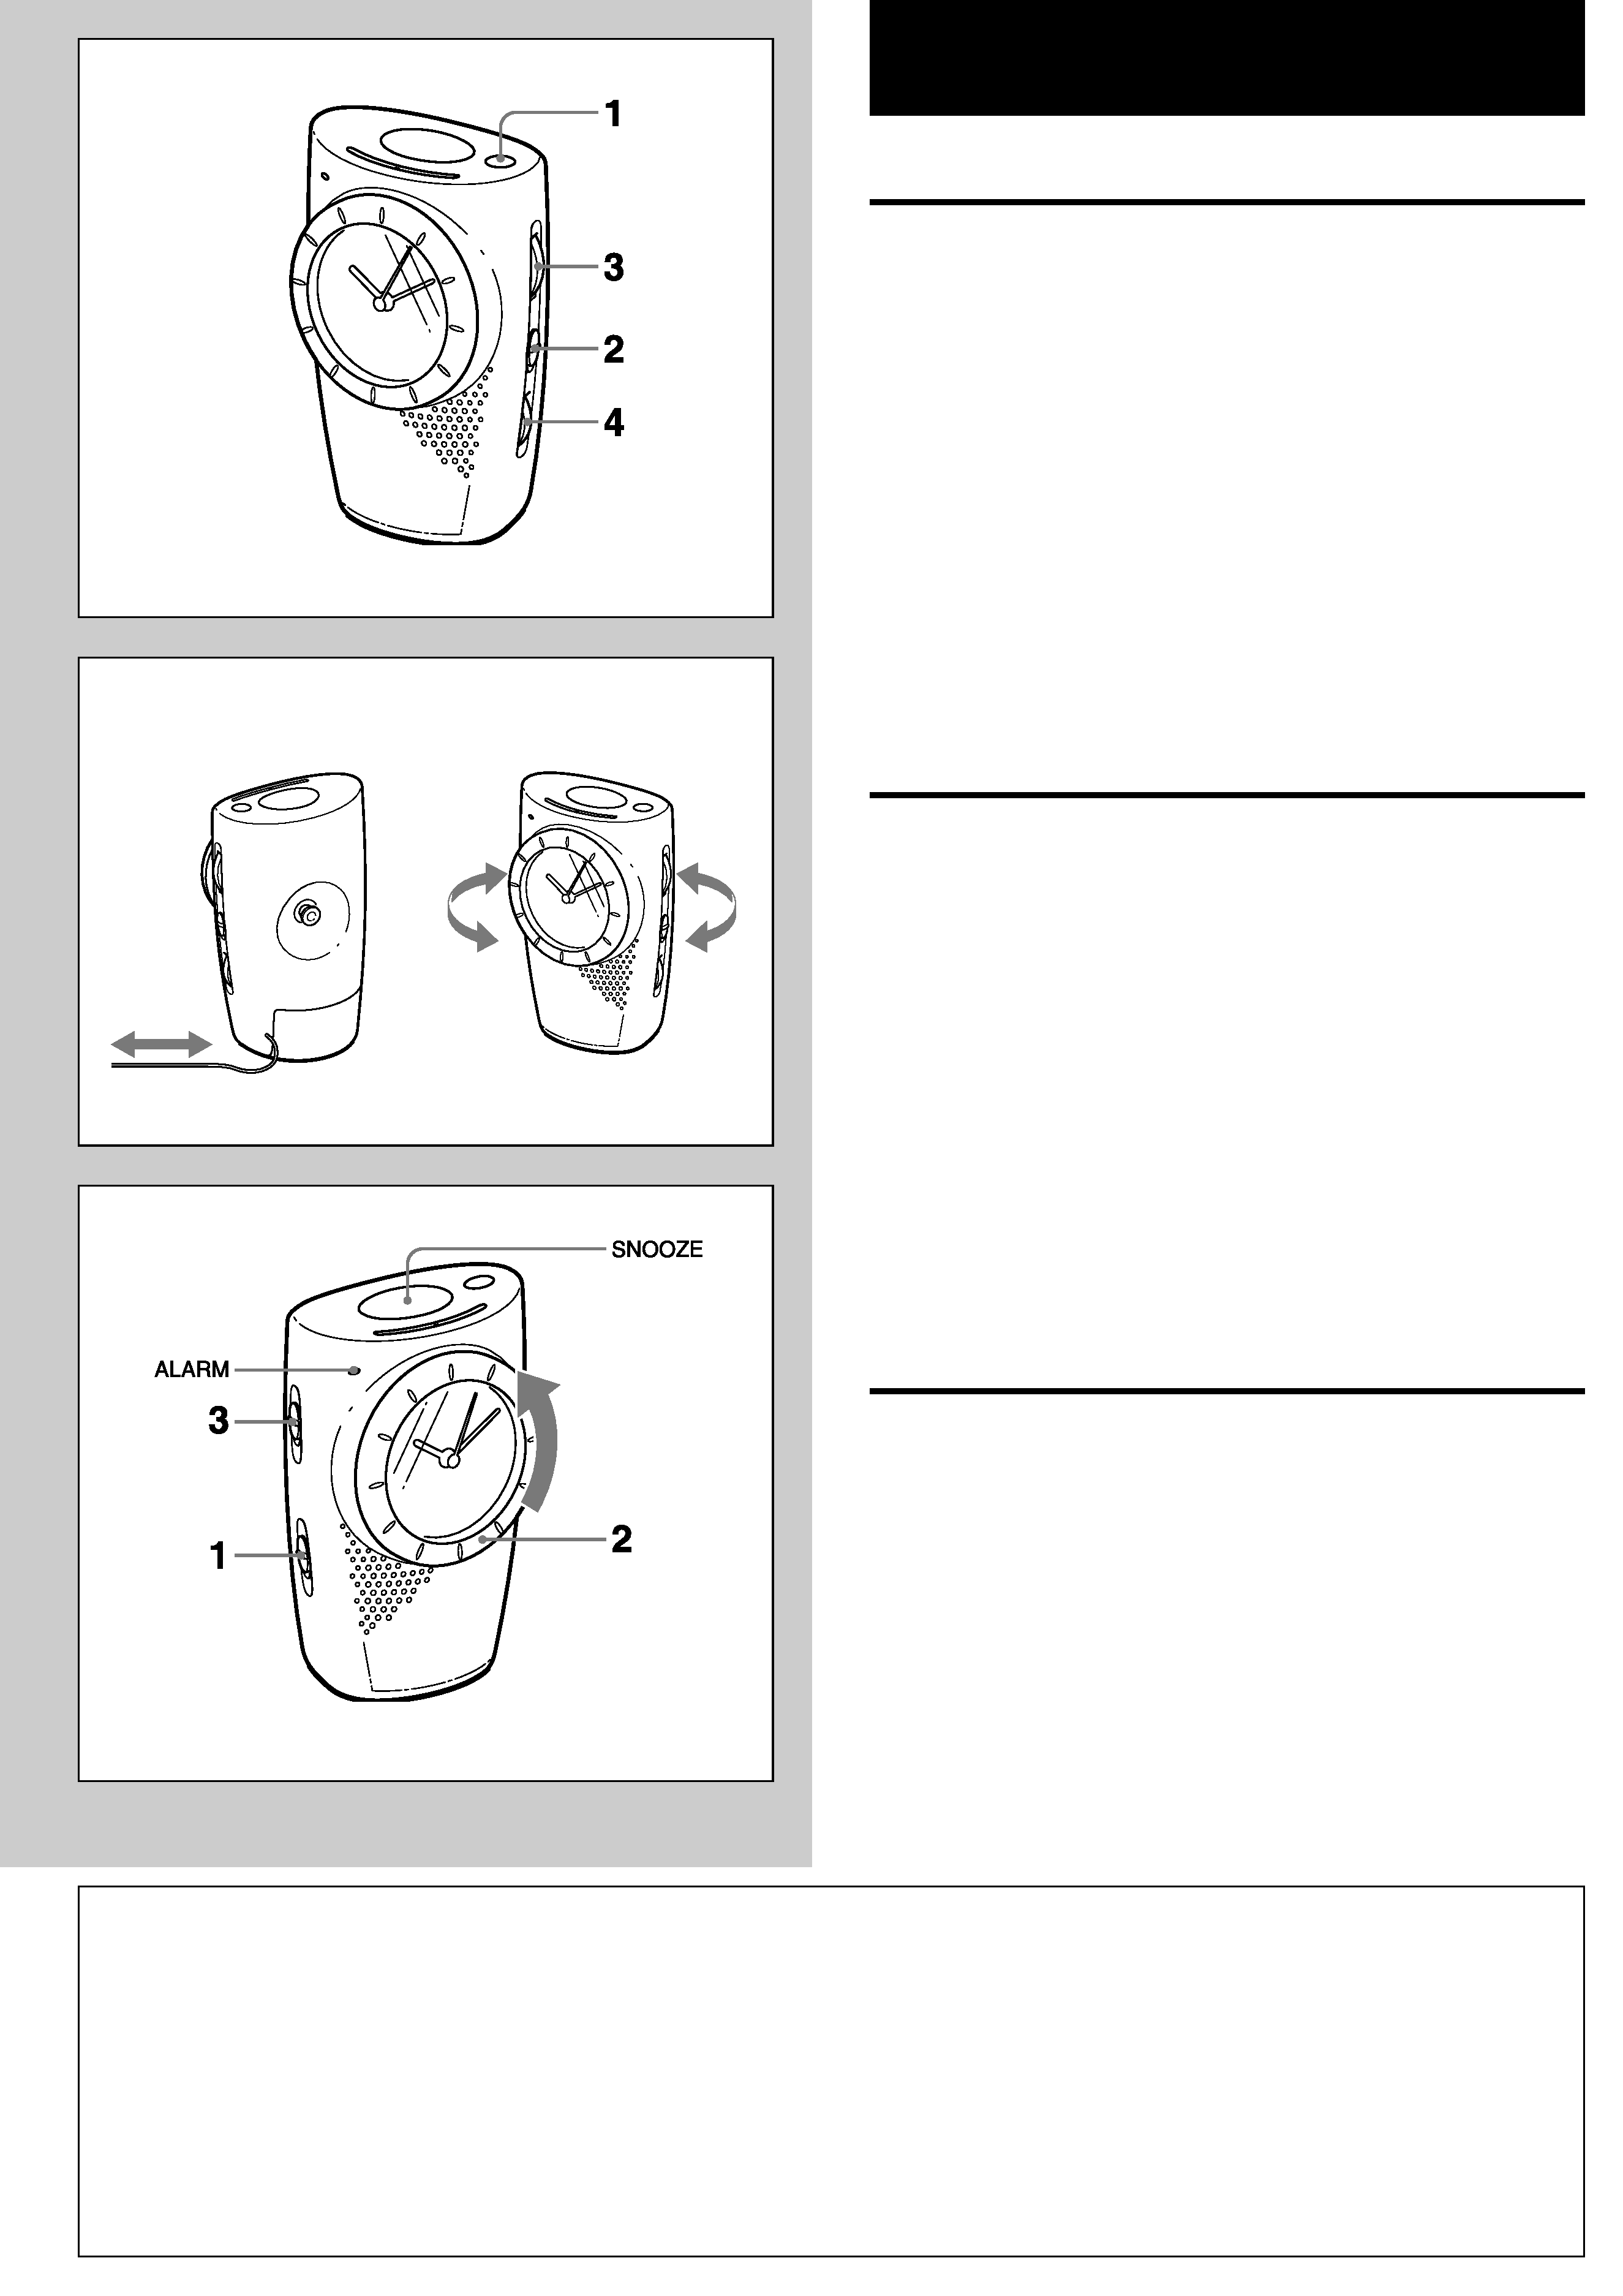
RADIO RECEPTION
D
1 Press the POWER button to turn on the radio.
2 Set BAND to select FM or AM.
3 Turn the TUNING control to tune in to a station.
4 Adjust the volume.
To turn off the radio
Press the POWER button.
Auto power off function
The radio is automatically turned off about 90 minutes after turning on the
radio.
For better reception
E
FM: Extend the FM wire antenna fully.
AM: Turn the unit to find the position which gives the best reception.
Note
Do not connect FM wire antenna to external antenna.
ALARM SETTING
F
The radio or buzzer automatically sounds at the designated time every day.
1 Set the ALARM MODE switch to RADIO or BUZZER.
2 Turn the ALARM panel to set the alarm time.
To work the alarm timer properly,
turn the ALARM panel counterclockwise.
set the alarm time at least 1 hour later from the current time.
3 Set the ALARM switch to ON.
ALARM indicator changes in yellow.
When the preset time comes, the radio or buzzer sounds. If you select
BUZZER in step 1, buzzer and radio sounds at the same time.
To turn off the alarm, set the ALARM switch to OFF or press the SNOOZE
button.
When the SNOOZE button is pressed, the buzzer or radio automatically
comes on again after about 5 minutes.
Note
· The radio or buzzer automatically turns off after about 30 minutes.
· To cancel the alarm before the preset time comes, set the ALARM switch
to OFF.
SPECIFICATIONS
Power source
DC 4.5 V using three size AA (R6) batteries
Output
160 mW (EIAJ)
Speaker
50 mm, 8 ohms
Frequency range
FM: 87.5 108 MHz
AM: 530 1,710 kHz
Antennas
FM wire antenna
Ferrite bar antenna for AM
Battery life (EIAJ 10 mW)
Using manganese batteries (R6P)
Approx. 34 hours for AM reception
Approx. 30 hours for FM reception
Using alkaline batteries (LR6)
Approx. 68 hours for AM reception
Approx. 60 hours for FM reception
Maximum outside dimensions (W
× H × D)
102
× 161 × 89 mm
Weight
Approx. 360 g (excluding batteries)
· The specifications and external appearance are subject to change without
notice.
D
E
F
FM
AM
NOTE
FOR USE IN THE U.S.A.
This equipment has been tested and found to comply with the limits for a Class B digital device, pursuant to Part 15 of the FCC Rules. These limits are designed to provide
reasonable protection against harmful interference in a residential installation.
This equipment generates, uses, and can radiate radio frequency energy and, if not installed and used in accordance with the instructions, may cause harmful interference to radio
communications. However, there is no guarantee that interference will not occur in a particular installation. If this equipment does cause harmful interference to radio or television
reception, which can be determined by turning the equipment off and on, the user is encouraged to try to correct the interference by one or more of the following measures:
Reorient or relocate the receiving antenna.
Increase the separation between the equipment and receiver.
Connect the equipment into an outlet on circuit different from that to which the receiver is connected.
Consult the dealer or an experienced radio/TV technician for help.
CAUTION
Modifications or adjustments to this product, which are not expressly approved by the manufacturer, may void the user's right or authority to operate this product.
This device complies with Part 15 of the FCC Rules. Operation is subject to the following two conditions: (1) This device may not cause harmful interference, and (2) this device
must accept any interference received, including interference that may cause undesired operation.

ESPAÑOL
FRANÇAIS
RECEPCION DE LA RADIO
D
1 Pulse el botón POWER para escuchar la radio.
2 Mueva BAND para seleccionar FM o AM.
3 Gire el control TUNING para sintonizar una emisora.
4 Ajuste el volumen.
Para desconectar la radio
Pulse el botón POWER.
Función de desconexión automática
La radio se desconecta automáticamente unos 90 minutos después de
conectar la radio.
Para escuchar mejor
E
FM: Alargue completamente la antena de cable FM.
AM: Mueva la unidad hasta encontrar la posición en la que se escuche
mejor.
Nota
No conecte la antena de cable FM a una antena externa.
AJUSTE DE LA ALARMA
F
La radio o alarma suena automáticamente a la hora especificada todos los
días.
1 Ajuste el interruptor ALARM MODE a RADIO o BUZZER.
2 Gire el panel ALARM para ajustar la hora de la alarma.
Para que el temporizador de la alarma funcione correctamente,
gire el panel ALARM hacia la izquierda.
ajuste la hora de la alarma a por lo menos 1 hora después de la hora
actual.
3 Ajuste el interruptor ALARM a ON.
El indicador ALARM cambia a amarillo.
Cuando llega la hora prefijada, suena la radio o la alarma. Si se ha
seleccionado BUZZER en el paso 1, suena al mismo tiempo la alarma y
la radio.
Para apagar la alarma, mueva el interruptor ALARM a OFF o pulse el
botón SNOOZE. Cuando se pulsa el botón SNOOZE, la alarma o la radio
vuelve a conectarse nuevamente unos 5 minutos después.
Nota
· La radio o la alarma se deconectan automáticamente después de unos
30 minutos.
· Para cancelar la alarma antes de la hora prefijada, mueva el interruptor
ALARM a OFF.
ESPECIFICACIONES
Alimentación eléctrica CC de 4,5 V con tres pilas de tamaño AA (R6)
Salida
160 mW (EIAJ)
Altavoz
50 mm, 8 ohmios
Gama de frecuencias
FM: 87,5 108 MHz
AM: 530 1,710 kHz
Antenas
Antena de cable FM
Antena de barra de ferrita para AM
Duración de la pila (EIAJ 10 mW)
Con pilas de manganeso (R6P)
Unas 34 horas para la recepción en AM
Unas 30 horas para la recepción en FM
Con pilas alcalinas (LR6)
Unas 68 horas para la recepción en AM
Unas 60 horas para la recepción en FM
Máximas dimensiones exteriores (An.
× Al. × Prof.)
102
× 161 × 89 mm
Peso
Aprox. 360 g (sin pilas)
· Las especificaciones y aspecto exterior están sujetos a cambios sin previo
aviso.
RECEPTION RADIO
D
1 Appuyer sur la touche POWER pour allumer la radio.
2Régler BAND pour sélectionner FM ou AM.
3 Tourner la commande TUNING pour accorder une station.
4 Ajuster le volume.
Pour couper la radio
Appuyer sur la touche POWER.
Fonction de coupure automatique
La radio se coupe automatiquement au bout de 90 minutes environ après
son allumage.
Pour améliorer la réception
E
FM: Etendre pleinement l'antenne filaire FM.
AM: Tourner l'appareil pour trouver la position offrant la meilleure réception.
Remarque
Ne pas connecter l'antenne filaire FM à une antenne extérieure.
REGLAGE D'ALARME
F
La radio ou une sonnerie devient automatiquement audible à l'heure fixée
tous les jours.
1Régler le commutateur ALARM MODE à RADIO ou BUZZER.
2 Tourner le panneau ALARM pour régler l'heure d'alarme.
Pour que la minuterie d'alarme fonctionne bien,
tourner le panneau ALARM dans le sens horaire.
régler l'heure d'alarme au moins 1 heure plus tard de l'heure actuelle.
3Régler le commutateur ALARM sur ON.
L'indicateur ALARM passe au jaune.
A l'heure préréglée, la radio ou la sonnerie retentit. Si BUZZER est
sélectionné à l'étape 1, la sonnerie et la radio seront audibles en même
temps.
Pour couper l'alarme, régler le commutateur ALARM à OFF ou appuyer
sur la touche SNOOZE. A la pression de la touche SNOOZE, la sonnerie ou
la radio redevient automatiquement audible après 5 minutes.
Remarques
· La radio ou la sonnerie se coupe automatiquement au bout d'environ 30
minutes.
· Pour annuler l'alarme avant l'heure préréglée, régler le commutateur
ALARM à OFF.
SPECIFICATIONS
Alimentation
DC 4,5 V avec trois piles AA (R6)
Puissance
160 mW (EIAJ)
Haut-parleur
50 mm, 8 ohms
Plage de fréquences
FM: 87,5 - 108 MHz
AM: 530 1,710 kHz
Antennes
Antenne filaire FM
Antenne barre en ferrite pour AM
Autonomie des piles (EIAJ 10 mW)
Avec des piles au manganèse (R6P)
Env. 34 h pour la réception AM
Env. 30 h pour la réception FM
Avec des piles alcalines (LR6)
Env. 68 h pour la réception AM
Env. 60 h pour la réception FM
Dimensions extérieures max. (L
× H × P)
102 x 161 x 89 mm
Poids
Env. 360 g (piles exclues)
· Les spécifications et l'aspect extérieur sont sujets à modification sans
préavis.